LCD SCREEN
28
■
General Settings
1
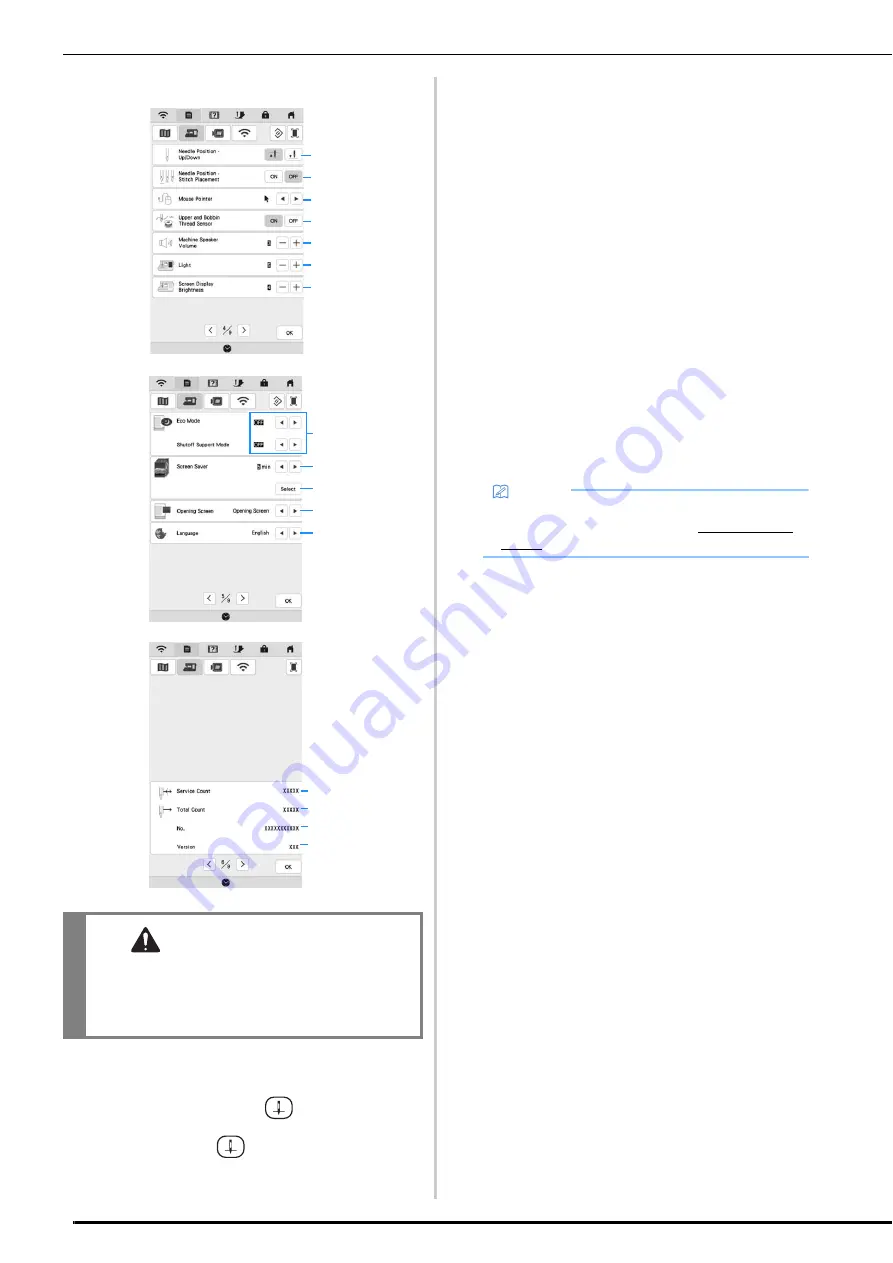
Select the needle stop position (the needle position
when the machine is not operating) to be up or down.
Select the down position when using the pivot key.
2
Select the operation of the
(Needle position
button) from the following two sequences (page 67).
Each press of the
(Needle position button):
[ON] : Switches the needle position between being
raised, stopped immediately before entering the fabric,
or lowered.
[OFF] : Switches the needle position between being
raised or lowered.
3
Select the shape of the pointer when a USB mouse is
used.
4
Turn both the upper and bobbin thread sensors [ON] or
[OFF]. If it is turned [OFF], the machine can be used
without thread.
5
Select the speaker volume. Increase the number for
louder volume, decrease for softer volume.
6
Select the brightness of the work area lights.
7
Select the screen display brightness.
8
Set the [Eco Mode] and the [Shutoff Support Mode] to
save the machine power (page 29).
9
Select the length of time until the screen saver appears.
0
Select the image of the screen saver (page 30).
A
Select the initial screen that is displayed when the
machine is turned on.
B
Select the display language.
C
Shows the service count which is a reminder to take your
machine in for regular servicing. (Contact your
authorized Brother dealer for details.)
D
Shows the total number of stitches sewn on this
machine.
E
Shows the internal machine number for this machine.
F
Shows the program version.
CAUTION
• When [Upper and Bobbin Thread Sensor] is set
to [OFF], the machine cannot detect tangled
upper thread. Continuing to use the machine
with tangled thread may cause damage.
1
4
6
7
2
3
5
9
8
0
A
B
F
E
C
D
Memo
• Install the latest software. Check with your local
authorized Brother dealer or at “ http://s.brother/
cpeaa/ ” for available updates (page 194).
Summary of Contents for 882-W70
Page 2: ......
Page 12: ...CONTENTS 10 ...
Page 56: ...CHANGING THE PRESSER FOOT 54 ...
Page 57: ...Chapter 2 Sewing Basics ...
Page 73: ...Chapter 3 Various Stitches ...
Page 106: ...MY CUSTOM STITCH 104 ...
Page 107: ...Chapter 4 Basic Embroidery ...
Page 141: ...Chapter 5 Advanced Embroidery ...
Page 156: ...EMBROIDERY APPLICATIONS 154 ...
Page 157: ...Chapter 6 My Design Center ...
Page 176: ...STIPPLING 174 ...
Page 177: ...Chapter 7 Appendix ...
Page 193: ...ERROR MESSAGES 191 Appendix 7 ...
Page 205: ......
Page 206: ......
Page 207: ......
Page 208: ......
Page 209: ......
Page 210: ......
Page 211: ......


