


2-8
¡
Adding lines, labels and areas to freeform labels
Correcting multiple line problems
As you type, the system calculates how many lines will fit on the installed supply and within the
specified length (if you previously entered a label length). If you have entered too many lines, the
system displays one of several messages describing the error:
•
If you start a new line, and that line will not fit on the tape you have installed, the following
message displays. This message also displays if you enter more lines than will fit on one label
(the maximum is 42).
•
If the text you enter won’t fit in the specified length, this message displays:
To fix the above problems, you can:
•
Select a smaller type size. See
Changing type size
on page 3-4.
•
Change the line spacing to Tight as described in
Changing the look of the label
on page 3-13.
•
Press the New Area key to create a new area on the current label.
•
Use fewer lines on the label.
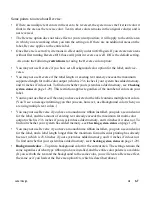
If you have a continuous color monochrome ribbon installed and you then add a second
color to the label, if your existing text already exceeds the maximum for multi-color
output, you’ll see the “Text too long message.” shown below:
The maximum multi-color output is:
•
23.6 inches if your system has been upgraded with additional memory
•
14 inches if it has the standard memory allotment
You can find out whether your system has additional memory by checking the Hardware
version on the Status window. See
Checking system status
on page 1-29 for instructions.
When you press any key to continue, the message disappears. To fix this problem, you can
either reduce the length of the text, or install a paneled ribbon. For information about paneled
ribbons, see
Selecting ribbon type
on page 4-5.
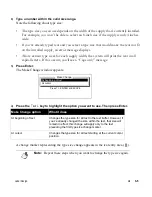
Type too large or too many lines
Text too long
Text too long for more than one color.
Press any key to continue.
Summary of Contents for POWERMark
Page 1: ...User s Guide Manuel d utilisation Manual de usauario...
Page 10: ...x Specifications...
Page 56: ...2 16 Using specialty applications...
Page 90: ...3 34 Working with bar codes...
Page 124: ...7 4 Maintaining the system...
Page 125: ...1 Signs Application 0...
Page 126: ...2 Signs Application Differences from standard operating system 1 2 2 2 2 3 4 5 6 1 7 8...
Page 148: ...1 Hazardous Waste Labels Application 0 1 2...
Page 168: ...1 Pipe Markers Application 0...
Page 169: ...2 Pipe Markers Application Differences from standard operating system 1 2 3 40 5 6 7 8 9...
Page 192: ......


