background image

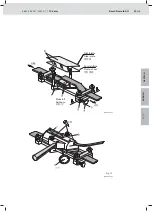
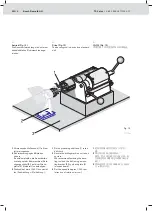
Fig. 10

515211-14.eps

515211-15.eps

10

3 842 546 257/2012-07

  |  TS 2

plus


Bosch Rexroth AG 

21/

28

Stahlplatte
Steel plate

薄钢板

Kunststoffolie
Plastic sheet

塑料薄膜

Klebstoff
Adhesive

粘贴剂

DEUT

SCH

EN

GLISH

中 文

Summary of Contents for 3 842 546 257

Page 1: ...中 文 DEUTSCH ENGLISH 3 842 546 257 2012 07 Replaces 2006 01 DE EN ZH Montageanleitung Assembly instructions 安装说明 Gurtmontage auf Förderstrecken Belt mounting on conveyor sections 输送段上的皮带安装 ...

Page 2: ...ol Initial operation Maintenance Setting Sicherheitshinweise 1 Erläuterungen zum Montagevorgang 2 Werkzeuge und Hilfsmittel 2 1 Werkzeugsatz 2 2 Verbrauchsmaterial 3 Vorbereitung 3 1 Berechnung der Gurtlänge 3 2 Ausschärfeinrichtung Sicherheits hinweise 3 3 Prüfen der Ausschärfeinrichtung 3 4 Ausschärfen der Gurtenden 4 Gurtmontage 4 1 Auflegen des Gurtes 4 2 Spannen des Gurtes 5 Kleben 5 1 Vorbere...

Page 3: ... 初次运行 保养和维修工作只允 许在遵守安全说明和安全规定的前提 下 由经过培训的专业人员来完成 电气连接按照相应的国家规定来完成 对于德国 VDE 0100 规定 VDE 德 国电气工程师协会 在进行所有的维修和保养工作之前 必 须切断所有的能源供给 主开关 减压 阀等等 另外 还必须采取相应的措施防止意外 重新接通 例如 在主开关旁加上 正 在进行保养工作 正在进行维修工 作 等警告牌 责任 对于由于不正确使用或用户没有遵守使 用说明对产品进行改动而造成的损坏 制造商不承担任何保修和赔偿责任 保修 如果不使用原装备件 制造商不承担任 何保修责任 适用的备件订货号请在我们的 CD ROM MTpart 3 842 529 770 上查找 环保 在使用溶剂工作时 请注意制造商关于 安全和环保方面的相关规定 在更换损坏件时 必须对换下的零部件 按规定进行环保处理 Die Installati...

Page 4: ...The length that is to be beveled is approximately 60 mm This is determined by the strength of the belt material and the beveling tool design The beveling tool matches the belts used thus no additional settings are required normally Bonding with pretensioning Both ends of the belt are pretensioned before being bonded so that the belt has the correct amount of pretensioning in the drive system after...

Page 5: ... with lS 2000 mm conveyor sections It includes beveling tool A for sharpening off the belt ends where they are joined heat press B for bonding the belt ends thermally belt pretensioning device C and accessories abrasive belt brush If a second heat press is used two adjacent belts can be bonded at the same time 皮带安装工具套件 皮带安装工具套件用于连接 lS 2000 mm 的输送段的皮带 GT 2 它由下列工 具组成 用于在连接位置给皮带制作斜面的皮 带打磨工具 A 用于进行皮带热...

Page 6: ...ür den gewerblichen Gebrauch Sicherheitshinweise beachten Adhesive Adhesive for bonding the belts using the belt mounting tool kit Only for industrial use observe safety instructions 粘贴剂 相配于皮带安装工具套件的皮带粘贴 剂 只适用于工业应用 遵守安全说明 2 2 Werkzeuge und Hilfsmittel Verbrauchsmaterial Tools and aids Expendable materials 工具和辅具 使用材料 Bei der Bestellung bitte Bestelllänge auf ganze Meter aufrunden Please round the o...

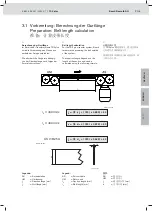
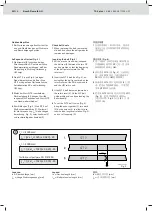
Page 7: ...der Formel zu errechnen Belt length calculation For the TS 2plus transfer system Bosch recommends preparing the belt outside of the system The required length depends on the length of the section and can be calculated using the following formula 3 1 Vorbereitung Berechnung der Gurtlänge Preparation Belt length calculation 准备 计算皮带长度 计算皮带长度 在 TS 2plus 输送系统中 建议在设备 之外进行皮带的准备工作 要求的皮带长度取决于输送段长度 按 下列公式计算...

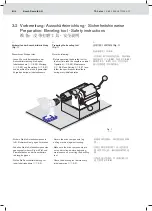
Page 8: ... 在您开始在皮带打磨工具上进行检查 和设置工作之前 断开驱动部件的电 源 在每次投入使用前 对皮带打磨工具 进行检查 3 9 Vorbereiten der Ausschärfeinrichtung Fig 1 Dies müssen Sie beachten Lesen Sie vor Inbetriebnahme der Ausschärfeinrichtung die Kapitel Inbetriebnahme 3 22 Wartung 3 25 und Einstellung 3 27 und beachten Sie die dort gemachten Vorgaben bei jeder Inbetriebnahme Preparing the beveling tool Fig 1 Note the following Before operating the bevel...

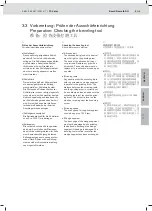
Page 9: ...beveling tool Check before every startup a Abrasive belt The abrasive belt glued on in a spiral must lie tight on the grinding drum The ends of the abrasive belt must not protrude Remove any grit with a wire brush The sand paper must be replaced if it is defective or used up on one side b Grinding table Pay attention that the swiveling table with the screwed on wedge segment is parallel to the gri...

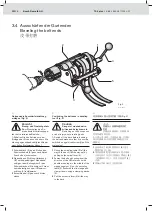
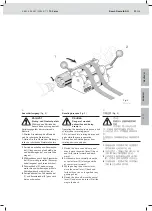
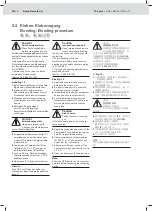
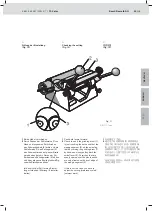
Page 10: ...dge and clamp it down using a clamping device 5 3 Pull the eccentric lever 4 all the way to the back 把皮带端头放入皮带打磨工具 Fig 2 小心 有被拉入机器和被挤伤的 危险 在驱动器接通时 有被旋转 的零件碰伤的危险 在放入皮带前 关闭驱动器 并采取 相应的措施防止意外重新接通 拉下电 源插头 1 拉动摆动手柄 3 将摆动台 2 完全 摆到后面 上面 2 用双面胶带把来自回转单元的皮带端 头前边沿对齐且对中粘贴在摆动台 2 上的楔形件 1 上 并用夹持装置 5 夹紧 3 将偏心手柄 4 完全拉到后面 Gurtenden in Ausschärfeinrichtung einlegen Fig 2 Vorsicht Einzug und Quetschgefahr Beim Einscha...

Page 11: ...veling process Fig 3 Caution Danger of crushed extremities and being drawn in Operating the beveling tools poses a risk of injury due to rotating parts Do not reach into rotating devices and parts while they are in operation Keep hair and clothing away from rotating devices and parts 1 Switch the drive on and slowly and evenly move the swivel lever 1 back and forth move forward and back ward 2 At ...

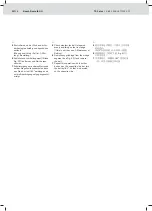
Page 12: ...ederholen dazu den Gurt dort um 180 umklappen da mit die Abschrägung entgegengesetzt erfolgt 5 Check whether the belt is tapered evenly and thinly on the front edge If this is not the case Maintenance Setting 6 Remove any grindings from the wedge segment see Fig 2 1 and remove the belt 7 Repeat this operation with the other belt end on the opposite side but turn the belt by 180 so that it is bevel...

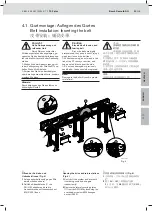
Page 13: ...n and keep a safe distance from the side Do not use damaged or previously used belts these should be replaced Note Damage to the belt will result in prema ture failure 小心 皮带高度张紧且有皮带断裂 的可能 皮带粘帖后高度张紧 若粘 结点不牢固 则有可能皮带断裂并致人 员受伤 在张紧过程中 您不要站在输送段 ST 的延长线上 并且要与其保持侧面 的距离 不许使用已经损坏的或者已经用过的 皮带 更换这些皮带 说明 受损的皮带将导致提前失效 Opening the drive and return stations Fig 4 1 Switch off the system and prevent it from being s...

Page 14: ... für die Vorspannung lGV siehe Längen berechnung Fig 5 zurücknehmen 2 und rechtwinklig abschneiden 3 Inserting the belt Fig 4 1 With a piece of round bar suspend the belt reel 2 between the two SP section profiles so that the beginning of the belt points toward the UM return unit 2 Insert the GT 2 belt see Fig 4 en suring that the belt is centered on the return rollers of the AS drive module and th...

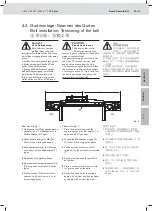
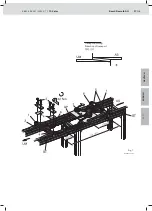
Page 15: ...on the return rollers on AS and UM 4 2 Gurtmontage Spannen des Gurtes Belt installation Tensioning of the belt 皮带安装 张紧皮带 Beachten Sie Fig 7 1 Gurtspanner mit Ösen gegeneinander gerichtet in ca 1 m Abstand auf die beiden Strecken ST legen 2 Sechskantschrauben 2 M8 2x4 Stück lösen Platten abnehmen 3 Schmirgelleinenstücke 4 Körnung nach oben auf Alu Strebenprofil 1 legen 4 Gurtenden 3 parallel auflegen...

Page 16: ...引起受伤的危险 必须确保夹持装置 5 正确拧紧 6 把压板的倒圆角面朝向皮带放置到皮 带 GT 2 上 并且分别用两个 M8 外 六角螺栓 2 平行且均匀拧紧 最大拧 紧力矩约 42 Nm 说明 为了避免损坏皮带导向 GP 我们推荐 把一块压板用作拉伸器的支撑 7 把拉伸钩 6 挂在带较长皮带伸出段 的皮带张紧器的吊环上 把链钩 6 挂在另一个皮带张紧器的吊环上 8 通过转动拉伸器上的手柄 7 使皮带 张紧到如此的程度 直到使制出斜面 的皮带端 8 互相重叠在一起 并能 够放进热压机中为止 9 必须把两个斜面准确重叠在一起 以 使皮带的厚度在粘贴位置仍然与其它 部分保持一致 Vorsicht Hohe Gurtspannung Sind die Gurte nicht richtig befestigt besteht Verlet zungsgefahr durch losreissen...

Page 17: ...Fig 7 515211 11 eps ST ST 5 3 842 546 257 2012 07 TS 2plus Bosch Rexroth AG 17 28 Transportrichtung Direction of transport 输送方向 DEUTSCH ENGLISH 中 文 ...

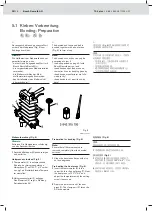
Page 18: ...的皮带 带博世力 士乐订货号 使用指定的粘贴剂 遵守粘贴剂制造商给出的粘贴规定 不许使用过期的粘贴剂 5 1 Kleben Vorbereitung Bonding Preparation 粘贴 准备 Klebevorbereitung Fig 8 Hinweis Entfernen Sie Gewebereste vollständig von den Ausschärfflächen 1 Ausschärfflächen mit Spiritus reinigen und entfetten Heizpresse vorheizen Fig 9 1 Thermometer 5 in entsprechende Bohrung der Heizpresse stecken Heizpresse 7 auf 120 C 5 vorhei zen ggf an Einstellschraube ...

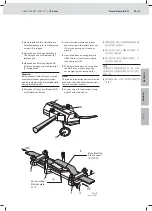
Page 19: ...bleibt 6 Schraube 4 lösen und Klemmteil 2 mit Gurtende entfernen 3 Insert the rubber plate and plastic sheet from the intermediate layer set 6 into the lower part of the heat press 1 4 Insert the belt end coming from the UM 2 return unit and secure tightly with clamp part 3 5 Then insert the belt end coming from the AS 2 drive module align and secure tightly with clamp part 2 Note The two beveled ...

Page 20: ...eiden Sechskant muttern 10 parallel und gleichmäßig festschrauben 6 Temperatur an Thermometer 5 kon trollieren 120 C 5 und ggf an der Einstellschraube 8 justieren 7 nach ca 25 min Gerät ausschalten Netzstecker ziehen und auf 50 C abkühlen lassen 8 Heizpresse 7 öffnen und entfernen Hinweis Gurt GT 2 vor Öffnen der Spannvor richtung auf Raumtemperatur abkühlen lassen Caution Incorrectly bonded belt ...

Page 21: ...Fig 10 515211 14 eps 515211 15 eps 10 3 842 546 257 2012 07 TS 2plus Bosch Rexroth AG 21 28 Stahlplatte Steel plate 薄钢板 Kunststoffolie Plastic sheet 塑料薄膜 Klebstoff Adhesive 粘贴剂 DEUTSCH ENGLISH 中 文 ...

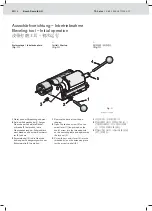
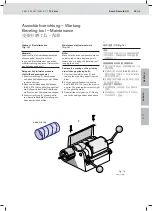
Page 22: ...g am Schwenktisch einschrauben und mit der Kontermut ter 3 sichern 3 Exzenterhebel 4 in die Gewinde bohrung am Verlängerungsstück der Exzenterwelle 5 eindrehen 1 Remove the device from the pa ckaging 2 Open the knurled screw 2 on the swivel lever 1 long thread on the shaft screw into the threaded hole on the swiveling table and tighten with the lock nut 3 3 Screw the eccentric lever 4 into the thr...

Page 23: ...bilden Ist das nicht der Fall ist eine Einstel lung erforderlich Wartung Einstellar beiten 1 Push both levers forward 2 Check to see if the grinding drum 1 is just touching the entire width of the wedge segment 3 on the swiveling table by turning the grinding drum 1 by hand and slowly pulling back the swivel lever 2 Scratches that are evenly spaced over the whole width are only allowed on the fron...

Page 24: ...sschärfein richtung mit der Bohrmaschine Befe stigungswinkel 2 auf einer Grund platte 3 Holzbrett zu befestigen 3 Drehzahl auf etwa 1000 1 min einstel len Drehrichtung Pfeilrichtung 1 Fix the protruding shaft end 1 in the drill chuck 2 Secure the drilling machine so it does not turn We recommend fastening the beve ling tool and the drill using a moun ting bracket 2 to a base plate 3 wooden board 3...

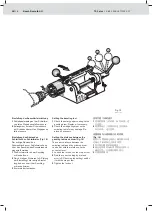
Page 25: ... oben beschrieben prüfen Maintenance adjustment work Fig 14 Note Make sure the drive components are not under voltage before beginning main tenance on or setting the beveling tool unplug the drive Replace the coating on the grinding drum change grinding belt 1 Unscrew the safety device 1 and remove the old emery paper from the drum 2 Pull the new self adhesive grinding belt 3 842 315 104 onto the ...

Page 26: ...lung finden und mit der Anschlag schraube fixieren 3 Kontermutter festziehen Setting the beveling tool 1 Check the emery paper coating on the grinding drum Replace if necessary 2 Check the wedge segment on the swiveling table for any damage Re place if necessary Setting the distance between the grinding table and drum Fig 15 The correct distance between the swiveling table and the grinding drum can ...

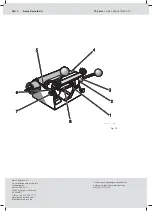
Page 27: ...sm Fig 16 1 With a screwdriver carefully unhinge the long leg 1 from the return spring on the eccentric shaft 8 2 Remove the shaft extension with the eccentric lever 3 by loosening the hex socket screw 2 3 Loosen both locking screws 6 on the upper side of the eccentric bus hing bearing arrangement 4 Using a suitable wrench set both eccentric bushings 7 so that the surface of the swiveling table is...

Page 28: ...h 30 02 07 70442 Stuttgart Germany DC IA MKT Telefax 49 711 811 7777 www boschrexroth com info boschrexroth de 5152 11 20 eps Fig 16 28 28 Bosch Rexroth AG TS 2plus 3 842 546 257 2012 07 Technische Änderungen vorbehalten Subject to technical modifications 保留技术更改的权利 ...

Reviews: