background image


8.8“ Touchscreen Colour Display AHD 880 TC 


Safety 


10 


V5 


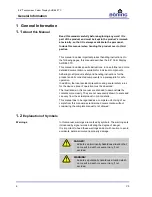
This manual lists the following qualifications for various areas of 
activity. 


Trained Person


has been trained by the operator through an orientation for the 
assigned tasks and has been informed about possible hazards 
from improper execution. 


Specialist


is able to execute the assigned tasks and recognize and avoid 
potential hazards independently due to formal training, knowl-
edge and experience, as well as knowledge of the situational 
norms and regulations. 


Electrician


is able to work on electrical systems and recognize and avoid 
potential hazards independently due to formal training, knowl-
edge and experience, as well as knowledge of the situational 
norms and regulations. 


The electrician is trained for the specific work site in which he is 
active and knows the relevant norms and regulations. 


Only those persons  who can be expected to do their work reliably 
are permitted as personnel. Persons, whose responsiveness is di-
minished by e.g. drugs, alcohol, or medication, are not permitted. 

  Observe the local age and profession specific regulations when 

selecting the personnel. 


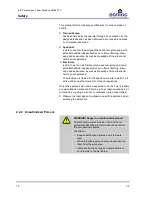
2.2.2  Unauthorized Persons 


WARNING! Danger to unauthorized persons! 

Unauthorized persons who do not meet the re-
quirements described in this manual do not know 
the occupational hazards. 

Therefore: 
–  Keep unauthorized persons out of the work 

area. 

–  When in doubt, approach persons and remove 

them from the work area. 

–  Interrupt all work as long as unauthorized per-

sons remain in the work area. 


Summary of Contents for AHD 880 TC

Page 1: ...2012 08 27 8 8 Touchscreen Colour Display AHD 880 TC Operation Manual Read this manual before beginning any work Dok ID PaB 1144 V5 ...

Page 2: ...2 V5 Böning Automationstechnologie GmbH Co KG Am Steenöver 4 D 27777 Ganderkesee Tel 49 0 4221 9475 0 Fax 49 0 4221 9475 21 22 E Mail info boening com Internet www boening com ...

Page 3: ...ata Color Display AHD 880 TC 17 4 2 Technical Data Remote Control AHD 650R 19 4 3 Name Plate AHD 880 TC 19 4 4 Dimensions 20 4 4 1 Device Dimensions Color Display AHD 880 TC 20 4 4 2 Panel Cutout and Drill Holes AHD 880 TC 21 4 4 3 Device Dimensions Remote Control AHD 650R 22 4 4 4 Panel Cutout and Drill Holes AHD 650R 23 4 5 Connections 24 4 5 1 Device Connections 24 4 5 2 Terminal Assignment 25 ...

Page 4: ...42 7 3 3 Measuring Points Page in Tabular Format 43 7 4 Alarms 44 7 4 1 Colors and Status LED Display 44 7 4 2 Alarm Page 44 7 4 3 Alarm Acknowledgement 46 7 5 Configuration Menu 46 7 5 1 Configuration Page Standard Settings 47 7 5 2 Making Changes 48 7 5 3 Configuration Page Advanced Settings 51 7 6 Measuring Points List Service Page 53 7 7 Information Page 55 7 8 Brightness Control 56 7 9 Power ...

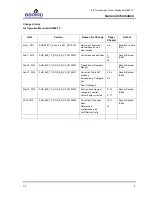
Page 5: ...additions 5 27 28 Pasuki Bahram PaB Feb 20 2012 AHD_880_TC_DOK_EN_V2_20120207 Translation of Operation Manual Pasuki Bahram PaB Feb 27 2012 AHD_880_TC_DOK_EN_V3_20120227 Correction Table DIP switches Amendments Configura tion Dok ID changed 4 5 4 4 6 Pasuki Bahram PaB Mar 14 2012 AHD_880_TC_DOK_EN_V4_20120314 Configuration diagram changed to neutral Colour depth corrected P 14 P 17 Pasuki Bahram P...

Page 6: ...ion In addition the local accident prevention and general safety rules for the device s area of operation must be observed The illustrations in this manual are intended to demonstrate the contents more clearly They are not necessarily drawn to scale and can vary from the actual product in minor details This manual has to be regarded as a complete unit Using of ex cerpts from this manual as stand a...

Page 7: ... knowledge and experience of many years The manufacturer is not responsible for damages due to Noncompliance with the instructions in this manual Unintended use Employment of untrained personnel Unauthorized modifications Technical modifications Use of unauthorized spare parts The actual scope of delivery can vary from the explanations and il lustrations in this manual in case of customized models...

Page 8: ...other rights 1 5 Spare Parts WARNING Risk of injury from incorrect spare parts Incorrect or defective spare parts can cause dam ages malfunctions or complete failure and jeopard ize the vessel s safety Therefore Only use the manufacturer s original spare parts Order spare parts from a contracted reseller or directly from the manufacturer Refer to page 2 for the address 1 6 Warranty Terms The warra...

Page 9: ...hazards resulting from the special working conditions of the product s place of use He must implement these in the form of operating instructions for the product s use During the product s entire period of operation the operator must verify that his operating instructions are in compliance with current regulations and revise them if necessary The operator must clearly regulate and define areas of ...

Page 10: ...nd experience as well as knowledge of the situational norms and regulations The electrician is trained for the specific work site in which he is active and knows the relevant norms and regulations Only those persons who can be expected to do their work reliably are permitted as personnel Persons whose responsiveness is di minished by e g drugs alcohol or medication are not permitted Observe the lo...

Page 11: ...he product beyond and or other than its intended use can cause hazardous situations Therefore Only use the product as intended Strictly adhere to all instructions in this manual In particular avoid the following unintended use Using a supply voltage other than the one indicated in this manual Any claims for damages resulting from unintended use are void The operator is solely responsible for any d...

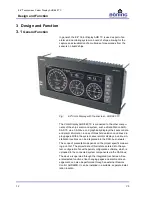
Page 12: ... their sensor data and alarm information in case of threshold violation on various dis play pages Within the system several color displays in various in stallation locations can be integrated into the CAN bus network The scope of presentation depends on the project specific measur ing point list The project data of this list are entered into the sys tem configuration file with special configuratio...

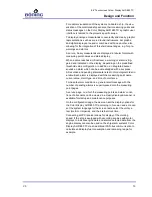
Page 13: ... a key press All recorded and pending alarms are listed in chronological order in a table Each alarm is displayed with the measuring point name current value alarm type and time of occurrence To indicate alarm conditions a general alert message with the number of pending alarms is superimposed onto the measuring point pages A service page on which the measuring points and alarm condi tions of all ...

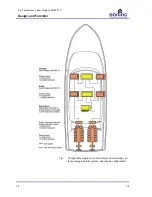
Page 14: ...8 8 Touchscreen Colour Display AHD 880 TC Design and Function 14 V5 Fig Configuration diagram of a ship alarm and monitoring sys tem and engine alarm system dual engine configuration ...

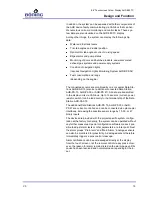
Page 15: ...S 30 or AHD PS 47 All data are transmitted to the display units via CAN bus Up to 15 sensors current power resistor switch can be led directly to the terminal strip of the Data Station AHD SAS 15 The additional Data Stations AHD PS 15 AHD PS 30 or AHD PS 47 are current controlled and can be connected via optocoupler interfaces increasing the possible sensor range by 15 30 or 47 binary inputs The d...

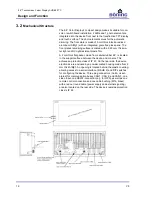
Page 16: ... plastic film A 2 mm thick flat gasket made from cellular rubber EP is located in the support surface between the device and console This achieves a protection class of IP 67 On the rear side the device electronics are enclosed by a powder coated housing made from 2 mm thick AlMg1 An opening is located behind the plastic covering allowing access to a serial interface D SUB 9 and DIP switches for c...

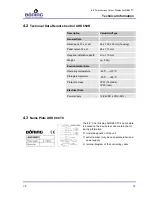
Page 17: ...mm Required installation depth min 150 mm Weight ca 2 0 kg Environmental Data Operating temperature 25 C 70 C Storage temperature 30 C 85 C Protection class IP 66 frontside IP 22 rear Electrical Data Power supply 12 24VDC 30 25 Power current consumption max 700mA 24VDC Display Data Display resolution 640 H x 240 V Pixels Visible screen diagonal 8 8 209 28 mm x 78 48 mm Color depth 15 bit Luminosit...

Page 18: ...terfaces Interfaces 3 x CAN Bus 1 x RS232 e g for GPS 1 x plug 8 pin for Remote Con trol AHD 650R 1 x Video In composite video PAL 50 Hz Outputs 2 x potential free relay contact 40 V DC 1A Inputs 1 x binary optocouplers Approvals Classification societies Germanischer Lloyd Lloyd s Register of Shipping ...

Page 19: ...designation of the unit serial number may be on separate label and power supply terminal diagram of the connecting cable Description Value Unit Type General Data Dimensions W x H x D 40 x 130 x 35 mm housing Panel cutout W x H 26 x 111 mm Required installation depth min 110 mm Weight ca 0 2kg Environmental Data Operating temperature 25 C 70 C Storage temperature 30 C 85 C Protection class IP 67 fr...

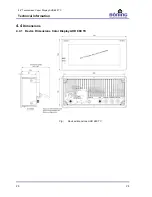
Page 20: ...8 8 Touchscreen Colour Display AHD 880 TC Technical Information 20 V5 4 4 Dimensions 4 4 1 Device Dimensions Color Display AHD 880 TC Fig Device dimensions AHD 880 TC ...

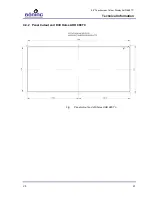
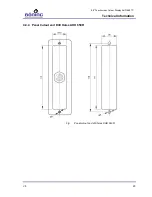
Page 21: ...8 8 Touchscreen Colour Display AHD 880 TC Technical Information V5 21 4 4 2 Panel Cutout and Drill Holes AHD 880 TC Fig Panel cutout and drill holes AHD 880 TC ...

Page 22: ...8 8 Touchscreen Colour Display AHD 880 TC Technical Information 22 V5 4 4 3 Device Dimensions Remote Control AHD 650R Fig Device dimensions Remote Control AHD 650R ...

Page 23: ...8 8 Touchscreen Colour Display AHD 880 TC Technical Information V5 23 4 4 4 Panel Cutout and Drill Holes AHD 650R Fig Panel cutout and drill holes AHD 650R ...

Page 24: ...tems CAN 1 CAN 2 and CAN 3 can be connected with a corresponding 5 pin plug connector plug according to DeviceNet Standard The CAN bus handles the data transfer and communication with all other devices con nected to the system The system configuration is also uploaded via the CAN bus Prior to upload it is created with a separate con figuration software If present Remote Control AHD 650R is connect...

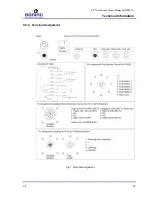
Page 25: ...8 8 Touchscreen Colour Display AHD 880 TC Technical Information V5 25 4 5 2 Terminal Assignment Fig Terminal assignment ...

Page 26: ...otor data to the AHD TC 880 CAN connection 2 CAN 2 To integrate the AHD 880 TC into the ship alarm system No other CAN networks may be connected to this terminal 4 5 4 DIP Switch Functions Under the protective cap on the device rear a group of DIP switches SW 1 1 12 is located Certain settings that deviate from the standard configuration can be made with these DIP switches CAUTION Since incorrect ...

Page 27: ...h must be set to the ON position TIP The following table uses the term Switched Off Display A complete shut down of the device with the button Power is not possible With this button the device is switched to stand by The device itself remains powered on The device is switched on again by touching the screen See also Chapter 7 9 TIP If a DIP switch is moved into another position this change is effe...

Page 28: ...ccurs SW1 6 If an alarm occurs when the display is switched off the display is activated immediately dis playing the alarm page If the switch is set to ON the display does not power on autonomously SW1 7 Free SW1 8 Free SW1 9 When this switch is set to the ON position and the display is restarted the device configuration of the display is deleted the graphical configuration however is not deleted ...

Page 29: ...guration of the device the DIP switch SW 1 12 must be set back to the OFF position TIP If a new configuration is loaded into an already configured display AHD 880 TC it may under certain circumstances lead to a non operational status of the display the Fault LED flashes and the display flickers slightly The following procedure represents a solution for solving this prob lem Separate the display fr...

Page 30: ... a special cable is required The cable is connected to the GPS connector on the rear side of the device For best data transmission the length of the cable should not ex ceed 3 meters Prior to configuration the DIP switch SW 1 12 must be set to posi tion ON After the configuration has successfully transmitted to the device the DIP switch SW 1 12 must be set back to position OFF ...

Page 31: ... is required With this cable the graphics configuration can also be transmitted to the device The Sub Min D connector is located on the rear side of the device beneath the protection plate refer to page 20 Prior to configuration the DIP switch SW 1 12 must be set to posi tion ON After the configuration has successfully transmitted to the device the DIP switch SW 1 12 must be set back to position O...

Page 32: ...r Binary state Alarm Inteface The extension of the configuration to be performed with the AHD DevcieConfig is currently under development and will be available in the near future TIP The upload of new firmware as well as the upload of new graphic configuration is described in section 4 6 of this document TIP A detailed description of the configuration with the software tool AHD DeviceConfig is ava...

Page 33: ...immediately upon receipt Proceed as follows when recognizing external transport damages Do not accept delivery or accept it only with reservation Note the scope of the damage on the transport documents or the deliverer s bill of lading File a claim TIP Claim any fault as soon as it is noticed Damage claims can only be filed within their respective rec lamation periods 5 3 Packaging About the Packa...

Page 34: ...bserve the local disposal regulations When necessary contract a specialist company Storage Store the packages under the following conditions Do not store them outdoors Store them in a dry dust free environment Do not expose them to aggressive media Protect them from sunlight Observe the storage temperature refer to technical data Avoid mechanical shock When storing longer than 3 months regularly i...

Page 35: ...Only electricians may work on the electrical system Basic Information Caution Risk of injury from improper installation and initial startup Improper installation and initial startup can cause personal injury and property damage Therefore Ensure sufficient installation space before be ginning any work Handle parts with exposed sharp edges care fully Observe orderliness and cleanliness in the work a...

Page 36: ...ducts in extreme high or low temperature areas Never install the products on ceilings that can not support their weight Never bump or shake the products vigorously Installation Requirements All required connecting cables are of the required version equipped with plug connectors according to technical specifica tions or project drawings led to the intended installation loca tion and are properly in...

Page 37: ...ng wires in the terminals To avoid short circuits verify that all wires are connected in the terminal To not over tighten the terminal clamps When using pluggable terminal strips or plug connectors it is imperative to ensure insertion in the correct socket and secure seating 3 Test the system for earth ground fault CAUTION System failure or malfunction During earth ground fault incorrect data can ...

Page 38: ...tion manuals of the devices used and verify their correct supply voltage and polarity before connecting them 4 Switch on the power supply of the Color Display AHD 880 TC and all connected external devices from the corresponding circuit breakers in the power distribution and the device inter nal starting devices according to the corresponding operation manuals 5 Verify the correct startup sequence ...

Page 39: ...asuring Points Pages Display of analogue and binary sensor data in graphics sup ported and table format Alarm Pages Tabular representation of recorded alarm conditions with differ entiation of acknowledged and unacknowledged alarms Dis play of status messages for engine stop or load reduction con ditions Configuration Page Set time language and measuring unit system Service Pages Displays channel ...

Page 40: ...y to the device established red LED failure flashes when the CAN bus communication is disturbed 7 2 Key Functions The Color Display AHD 880 TC is equipped with a touchscreen surface All operating elements are represented as virtual operating keys and must be touched to execute the corresponding function The touch is visually simulated as a key press so that the user receives feedback every time Th...

Page 41: ...guration page for changing the basic settings Key Next Page Key press switches the display to the next standard page If no further page is available the system display switches to the first page TIP Additional keys and their functions are described within the context of their appearance in the corre sponding chapters of this documentation ...

Page 42: ...play field designation of page Right display field a logo during normal operating conditions in case of alarm an alarm message and display of the number of current system alarms The data field representing the corresponding analogue and binary measuring points is located below the header line For analogue measuring points graphic representation e g instruments or bar graphs or as is usually the ca...

Page 43: ...5 oil temperature engine digital display TIP Measurement units and instrument scales according to user specific settings on the configuration page 7 3 3 Measuring Points Page in Tabular Format Measuring points pages in tabular format can be used for analogue or binary measuring points Each measuring point displayed in tabular format covers a com plete display line consisting of Status LED display ...

Page 44: ... in the project specific configuration By default the above listed color designation is used We urgently recommend a uniform color designa tion for the corresponding status messages in the overall project 7 4 2 Alarm Page If the data stations in the system record an event the correspond ing information reaches the display AHD 880 TC via the communi cations bus The message is evaluated according to...

Page 45: ...lor coding the mes sage category Red alarm Yellow warning pre alarm Orange sensor error wire break Each alarm line s columns is supplemented with the following in formation Measuring point text Measured value Measured value unit Type of event Date and time of alarm event Alarm Counter A red indicator at the top right of the screen displays the number of currently active alarms acknowledged and una...

Page 46: ...Every error message alarm or warning must be noted and fully acknowledged before the system returns to its normal operating condition Please observe the following sequence when acknowledging an alarm 1 Acoustic alarm acknowledgement 2 Optical alarm acknowledgement 3 Verify and correct the alarm cause if possible TIP Full alarm acknowledgement can only be performed via the acknowledge keys on the a...

Page 47: ...olors White no pending alarms Red at least 1 pending alarm Key for acknowledging the acoustic signal Quit Horn Key press deactivates the internal horn and any connected signal devices Key colors White no pending unacknowledged acoustic alarms Red at least one pending unacknowledged acoustic alarm Key Exit Page Key press switches the display to the previous measuring points page Key Display Off to ...

Page 48: ...s released Key Previous Step Decrease Value After selecting and marking a parameter that is to be changed acti vating this key selects the previous step or decreases a numeric value by 1 A quick key press decreases a numeric value by one step During a longer key press the device counts down incrementally until the key is released 7 5 2 Making Changes Parameter Selection The parameter to be set is ...

Page 49: ...until another parameter has been selected or the configuration page is exited After the change has been completed the configuration page is displayed as follows Accept New Settings The new setting is automatically accepted as soon as another pa rameter has been selected of the configuration page is exited TIP Accepting a parameter change does not require a special confirmation In case of erroneous...

Page 50: ...mation page is always English Units metric C bar l h Imperial F psi gal h Brightness minimum 0 100 This value determines the display s minimum brightness and is mostly relevant for nighttime use The default setting at the time of delivery is 0 maximum 0 100 This value determines the display s maximum brightness and is mostly relevant for daytime use The default setting at the time of delivery is 7...

Page 51: ...ges It is pulled from a library Upon request individual wishes can be honored Power Up Modes Two power up modes are available Power Up Mode Automatic In automatic mode the display is always activated immediately after power up Power Up Mode Manual In manual mode internal activation also follows immediately However the display remains switched off To activate it the user must touch the touch surfac...

Page 52: ...ic Key press switches to the configuration page with the basic settings Key Next Step Increase Value After selecting and marking a parameter that is to be changed acti vating this key selects the next possible step or increases a numeric value by 1 A quick key press increases a numeric value by one step During a longer key press the device counts up incrementally until the key is released Key Prev...

Page 53: ...es to the display area of the measuring points list displaying the first available service page Service Page The number of available service pages depends on the number of existing measuring points Each page displays 26 measuring points The measuring points are displayed in two columns of 13 items each Measuring Points Line Every measuring point contains a virtual LED colour coded accord ing to it...

Page 54: ...the display to the alarm page Key for acknowledging the acoustic signal Quit Horn Key press deactivates internal horn and any connected signal devices Key Exit Page Key press switches the display back to the configuration page ad vance settings Key Next Page Key press changes to the next available service page If already on the last page the first service page is displayed ...

Page 55: ...d displays the information page Available Information The following general information is displayed Header line Display type Date Time Current date and time Firmware Current version number Configuration Current version number Temperature Internal settings for temperature monitoring Brightness Current setting display lighting Default Data Default setting display lighting Alarm Data Internal alarm ...

Page 56: ...erior temperature of the housing is exceeded the TFT screen s background light ing s power is reduced or completely switched off The brightness is primarily dependent on the ambient brightness If the device operates in high environmental temperatures it auto matically dims to avoid overheating the unit and to protect the hardware The brightness is reduced by up to 20 If this is not sufficient to r...

Page 57: ...ing and inspection Only use solvent free and nonabrasive detergents for cleaning CAUTION Risk of injury from dangerous voltages and other hazards Opening covers can expose you to dangerous volt ages or other hazards Therefore Never perform device repairs yourself Do not remove the covers for maintenance or inspection In case of product malfunctions contact the manufacturer or an authorized represe...

Page 58: ...from dangerous voltages or other hazards Opening the covers can expose you to dangerous voltages or other hazards Therefore Never perform device repairs yourself Do not remove the covers for maintenance WARNING Risk of injury from improper error correction Improper error correction can cause severe per sonal injury or property damage Therefore Only the manufacturer may repair the device Ensure suf...

Page 59: ...soon as the device is con nected to the supply power When it extinguishes the supply volt age is either too low or it is interrupted The Fault LED can indicate the conditions OFF ON or BLINK ING If no error condition is determined the Fault LED is not lit If the fault LED is blinking the CAN data communication is inter rupted and the device receives no data from the other ship alarm system compone...

Page 60: ...tion of CAN data communication Fault LED is blinking wire break plug connection not correctly inserted into the device check connections Display powered off Power LED lit Display in standby mode not a device defect activate the display by touching the touch screen Display too dark brightness offset not set correctly not a device de fect increase brightness offset see menu No function Device defect...

Page 61: ...nt installation space before be ginning any work Use caution when handling parts with exposed sharp edges Observe orderliness and cleanliness in the work area Parts and tools that are loosely stacked or lying about are accident sources Uninstall parts properly When in doubt consult the manufacturer 10 2 Disassembly Before beginning disassembly disconnect the device from the power supply and secure...

Page 62: ...er components according to their material properties CAUTION Environmental damages from improper dis posal Electrical scraps electronic components lubri cants and other auxiliary materials are subject to hazardous waste regulations and may only be dis posed by licensed specialist companies Your local authorities or specialized disposal companies can pro vide you with information about environmenta...

Page 63: ...Switch Functions 26 Disassembly 61 Disposal 62 E Error Correction 60 Errors 58 Explanation of Symbols 6 F Fault LED 59 Firmware 55 I Information page 55 Initial Startup 38 Installation 36 Intended Use 11 K Key Functions 40 L LED 59 LED Display 44 Limitation of Liability 7 M Maintenance 57 Measuring Point Pages 42 Measuring Points List 53 Measuring Points Page in Tabular Format 43 N Name Plate AHD ...

Page 64: ... Service pages 53 Spare Parts 8 Start Page 40 Startup 40 Status LED Display 44 Storage 33 34 T Technical Data Color Display AHD 880 TC 17 Technical Data Remote Control AHD 650R 19 Technical Information 17 Terminal Assignment 25 Transport 33 Transport inspection 33 U Unauthorized Persons 10 W Warranty Terms 8 ...

Page 65: ...echnology Ship Automation Böning Automationstechnologie GmbH Co KG Am Steenöver 4 D 27777 Ganderkesee E Mail info boening com Internet www boening com Texts and illustrations not binding We reserve the right to make changes due to technical improvements ...

Reviews: