User Manual(Ver 1.1)
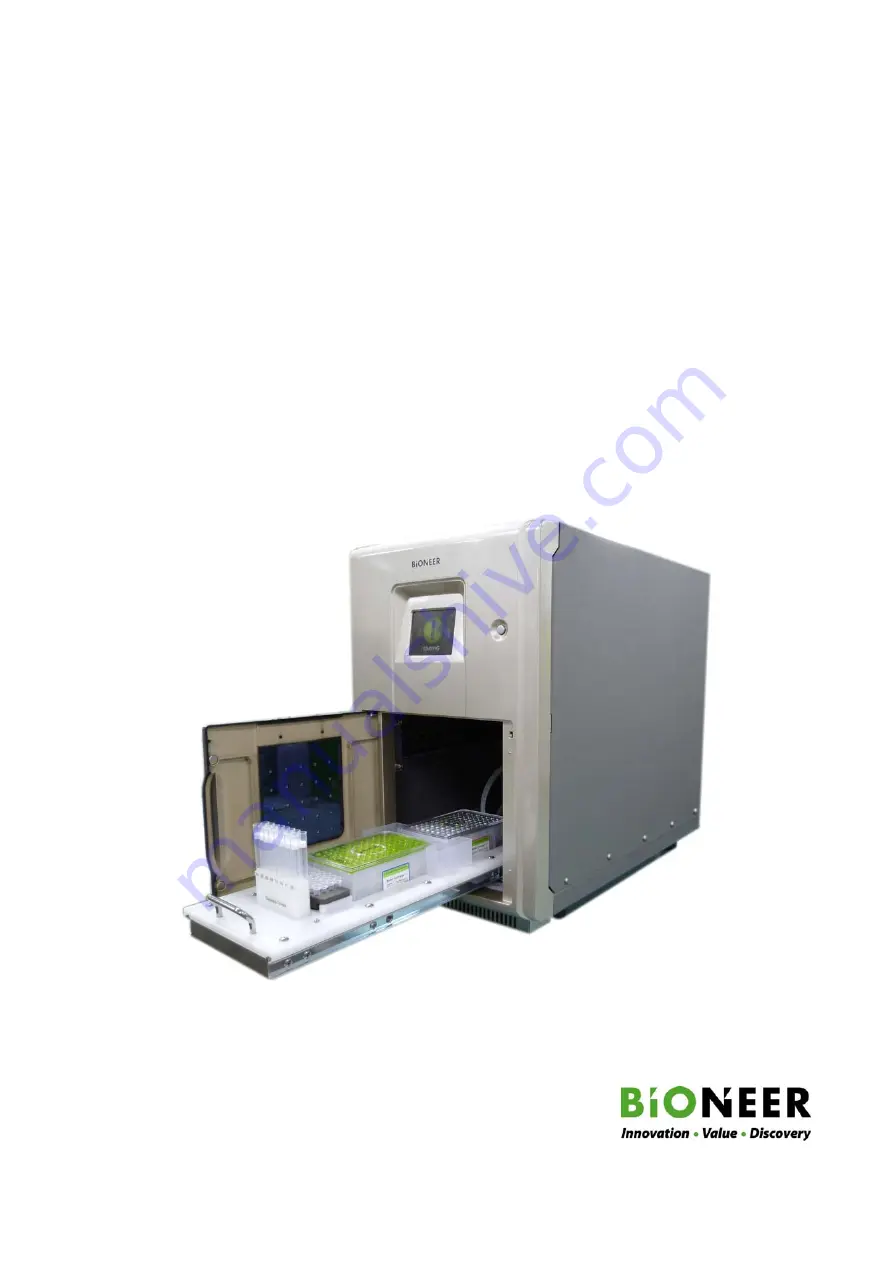
ExiPrep™16 Pro
Fully Automated Nucleic Acid Extraction System
Page 1: ...User Manual Ver 1 1 ExiPrep 16 Pro Fully Automated Nucleic Acid Extraction System...
Page 2: ...ponents and Specifications 6 1 System Components 6 2 Specifications 7 3 System Views 7 IV Installing the ExiPrep 16 Pro 8 V DNA RNA Extraction 11 1 Contamination Protection Accessory Installation 11 2...
Page 3: ...ttp www bioneer com to obtain more information about ExiPrepTM 16 Pro General information ExiPrep 16 Pro is a trademark of Bioneer Corporation The information contained in this manual is under copyrig...
Page 4: ...instrument with wet hands as this may result in shock or instrument malfunction Please touch the power adapter cord with dry hands 7 If the instrument is stopped either from operator error including...
Page 5: ...g fan mesh located on the front bottom while installing 5 When connecting the PC network hub and ExiPrepTM 16 Pro do so with all involved components powered off Connecting components while the power i...
Page 6: ...ration If such chemicals are spilled on the instrument immediately clean with a soft cloth 6 Do not keep the instrument in an environment with high humidity Damage from storage in these conditions is...
Page 7: ...aution to push in or pull out the base plate so the liquid does NOT overflow to the instrument inside If the liquid overflows inside the instrument it may damage the instrument or cause the electrocut...
Page 8: ...iStationTM system instead of Setup tray Part Name Cat No Qty Check ExiPrep 16 Pro A 5040 1 ea User s Manual 1 ea Waste Tray 1 ea Elution Tube Rack 1 ea Disposable Tip Rack 1 ea Protection Cab 1 ea Con...
Page 9: ...ns mm 320 W x 500 H x 535 D Weight 27 kg Operating temperature 15 30 C Operating humidity 20 80 no condensation Operating system Standalone or PC Electrical Voltage Frequency 100 240 VAC 50 60 Hz Netw...
Page 10: ...rument door and remove the belt tie and rail bolt Make sure that all components are included Refer to the list of components on page 6 1 Open the door and remove the Screw bolt A from the rail 2 Remov...
Page 11: ...ay on the LCD touch screen to indicate normal power on 7 Press the power button on the LCD screen to initialize the instrument A progress bar on the lower portion of the LCD touchscreen will indicate...
Page 12: ...X297 10 IV Installing the ExiPrep 16 Pro continued 10 Connect the instrument to the network hub using a LAN cable 11 Connect a LAN cable between the network hub and the PC which has the ExiStation Man...
Page 13: ...ontamination Shield CAUTION In order to use contamination shield this must be installed on the Base plate accessory 2 Place the contamination shield on the lower right side of the Syringe block Contam...
Page 14: ...action Kit 3 Check DNA RNA extraction Kit for the samples and the nucleic types to be extracted 4 Place the number of sample tube from the diagnostic kit and the elution tube to be extracted on the El...
Page 15: ...tridge corresponding to the relative location and number of tubes and tips using the 6 Hole punch tool 8 Punch holes in sealing the film of Buffer Cartridge using the 6 Hole punch tool in the same pat...
Page 16: ...lock maintains the Elution Tube Rack at a low temperature to keep the eluted nucleic acids and nucleic acid diagnostic kit mix refrigerated 3 Press the START button to access the PREP SETUP screen 4 R...
Page 17: ...CK LIST 17 page on the LCD touchscreen 11 Verify the name of the target nucleic acid type and sample source type on the Running Mode screen and press the RUN button Progress of the extraction run can...
Page 18: ...rotocol Do other work Perform an extraction run using a different protocol for another nucleic acid and sample source type Finish Finish and exit 15 If the automatic UV sterilization option is enabled...
Page 19: ...te Make sure the Buffer Cartridge fits snugly and exactly into its place Misplacement of the Buffer Cartridge may result in instrument break down and malfunction 10c Place the Elution tube rack on the...
Page 20: ...ton located on the upper right side to turn the instrument on Initialize the instrument by pressing the power icon initially displayed on the LCD touchscreen 2 Execute the ExiStation Manager Software...
Page 21: ...desired kit by catalog number The Nucleic Acid Type will automatically selected once a Diagnosis Kit selection is made Select a Sample Source Type appropriate for your experiment For details on operat...
Page 22: ...the Re Prep orders you wish to incorporate into the workflow at this point 7 The locations of the non template control NTC and positive control PC will be automatically allocated The default settings...
Page 23: ...up window You may rename or delete the sample information and move the well to a different location For example to move the sample to a different well select Move from the first drop down menu and sel...
Page 24: ...utton to initiate nucleic acid extraction 13 After the extraction is complete remove the samples Elution tubes and Diagnostic Kit tubes containing eluted material and immediately run real time PCR or...
Page 25: ...resent it means that the instrument is connected to the PC via network and is possible to use the ExiStation Manager Software to control the instrument Cooling Fan Operation The Cooling Fan icon allow...
Page 26: ...cting Start from the Main Menu will bring up the PREP SETUP screen where you can enter the three digit code for the extraction and sample source type Refer to the code list within this Manual to selec...
Page 27: ...al cavity of the instrument Press the UV lamp icon to initiate the UV sterilization process The icon will turn yellow as UV sterilization proceeds The sterilization runs for 5 minutes The progress can...
Page 28: ...ccessing features such as UV sterilization and system preferences Details on system configuration can be found in page 31 History Enabled by selecting the user login option Allows you to audit up to 9...
Page 29: ...1 Press the Setup button to access the SETUP menu 2 Press the User button to access the User Registration menu 3 Enter a 6 digit user ID using the keypad on the LCD touch screen and press Enter to sa...
Page 30: ...n memory 1 Press the Setup button to access the SETUP menu 2 Press the History button to view the instrument run history 3 The run history contains the following parameters No Recent runs have a lower...
Page 31: ...etup button to access the SETUP menu 2 Press the Config button to access the System Setup menu 3 Press the User button to enable login mode If the login mode is enabled a popup prompt User Mode ON app...
Page 32: ...nt after every DNA RNA extraction run 1 Press the Setup button to access the SETUP menu 2 Press the Config button to access the System Setup menu 3 Press the UV lamp button to enable automatic UV ster...
Page 33: ...rs Screen Calibrates the screen position Calibrate the screen position relative to touching Press and hold the circle at the upper left corner with a blunt tool for 2 seconds Press and hold the circle...
Page 34: ...n the LCD touchscreen 3 Press the Enter button 4 The Admin Menu screen includes an option to delete user IDs or change the administrator ID Select User list delete 1 to delete unused IDs Select Admini...
Page 35: ...r ID change menu Enter a new 6 digit administrator ID using the keypad in the middle of LCD touchscreen and press Enter button to save Press the ok button to save new administrator ID after verifying...
Page 36: ...ress and network hub LAN port settings may change depending on the installation site and PC 1 Execute the program 2 Click the IP Select button on the lower left corner 3 A new window IP Machine Select...
Page 37: ...on the right side Wait until the progress bar is full If the connection stops progressing restart the update process from step 1 9 Once the connection process is done Memory Check starts window will p...
Page 38: ...ight click the connection and select Properties 3 Select Internet Protocol TCP IP 4 Select Use the following IP address 5 Enter the IP address subnet mask Default gateway and DNS server address inform...
Page 39: ...Serum 1 14 Genomic DNA Buffy coat 2 14 Total RNA Buffy coat 1 15 Genomic DNA Sputum 2 15 Total RNA Sputum 1 16 Genomic DNA BAL 2 16 Total RNA BAL 1 17 Genomic DNA Saliva 2 17 Total RNA Saliva 1 18 Gen...
Page 40: ...DNA Serum 3 14 mRNA Buffy coat 4 14 viral DNA Buffy coat 3 15 mRNA Sputum 4 15 viral DNA Sputum 3 16 mRNA BAL 4 16 viral DNA BAL 3 17 mRNA Saliva 4 17 viral DNA Saliva 3 18 mRNA Swab 4 18 viral DNA Sw...
Page 41: ...oat 6 14 viral DNA RNA Buffy coat 5 15 viral RNA Sputum 6 15 viral DNA RNA Sputum 5 16 viral RNA BAL 6 16 viral DNA RNA BAL 5 17 viral RNA Saliva 6 17 viral DNA RNA Saliva 5 18 viral RNA Swab 6 18 vir...
Page 42: ...m A4 210X297 40 No Target Sample source No Target Sample source 7 01 Plasmid DNA endA strain 9 01 Protein His Tag 7 02 Plasmid DNA endA strain No Target Sample source 8 21 Fragment DNA Gel slice 8 22...
Page 43: ...r problem of the system call for the After Service The system does not operate even RUN button is pressed 1 Check if the bracket lock is removed 2 Check if the system is initiating normally when the p...
Page 44: ...e are any residues in each accessories and the rack 3 Check if any accessories and the rack s lock pins are bent or damaged 4 Request for After Service During the operation the syringe block does not...
Page 45: ...bottom of the system 1 Check if the rack and the waste rack and other accessories are inserted in the right position 2 Check if there is a leakage in the syringe block 3 Request for After Service The...
Page 46: ...work hub 3 Verify that the network hub power is ON 4 Verify the PC network settings 5 Make sure the instrument control software is installed in the correct folder 6 Request service from your dealer Ac...
Page 47: ...ited to scratches dents and broken plastic on ports b to damage caused by accident abuse misuse flood fire earthquake or other external causes c to a product or part that has been modified in any way...