83
IPv6 Autoconfig
The IPv6 address composes of two parts, the prefix and the interface ID.
There are two ways to dynamically configure IPv6 address on hosts. One is “stateful” configuration,
for example using DHCPv6 (which resembles its counterpart DHCP in IPv4.) In the stateful auto-
configuration model, hosts obtain interface addresses and/or configuration information and
parameters from a DHCPv6 server. The Server maintains a database that keeps track of which
addresses have been assigned to which hosts.
The second way is “stateless” configuration. Stateless auto-configuration requires no manual
configuration of hosts, minimal (if any) configuration of routers, and no additional servers. The
stateless mechanism allows a host to generate its own addresses using a combination of locally
available information (MAC address) and information (prefix) advertised by routers. Routers
advertise prefixes that identify the subnet(s) associated with a link, while hosts generate an
"interface identifier" that uniquely identifies an interface on a subnet. An address is formed by
combining the two. When using stateless configuration, you needn’t configure anything on the client.
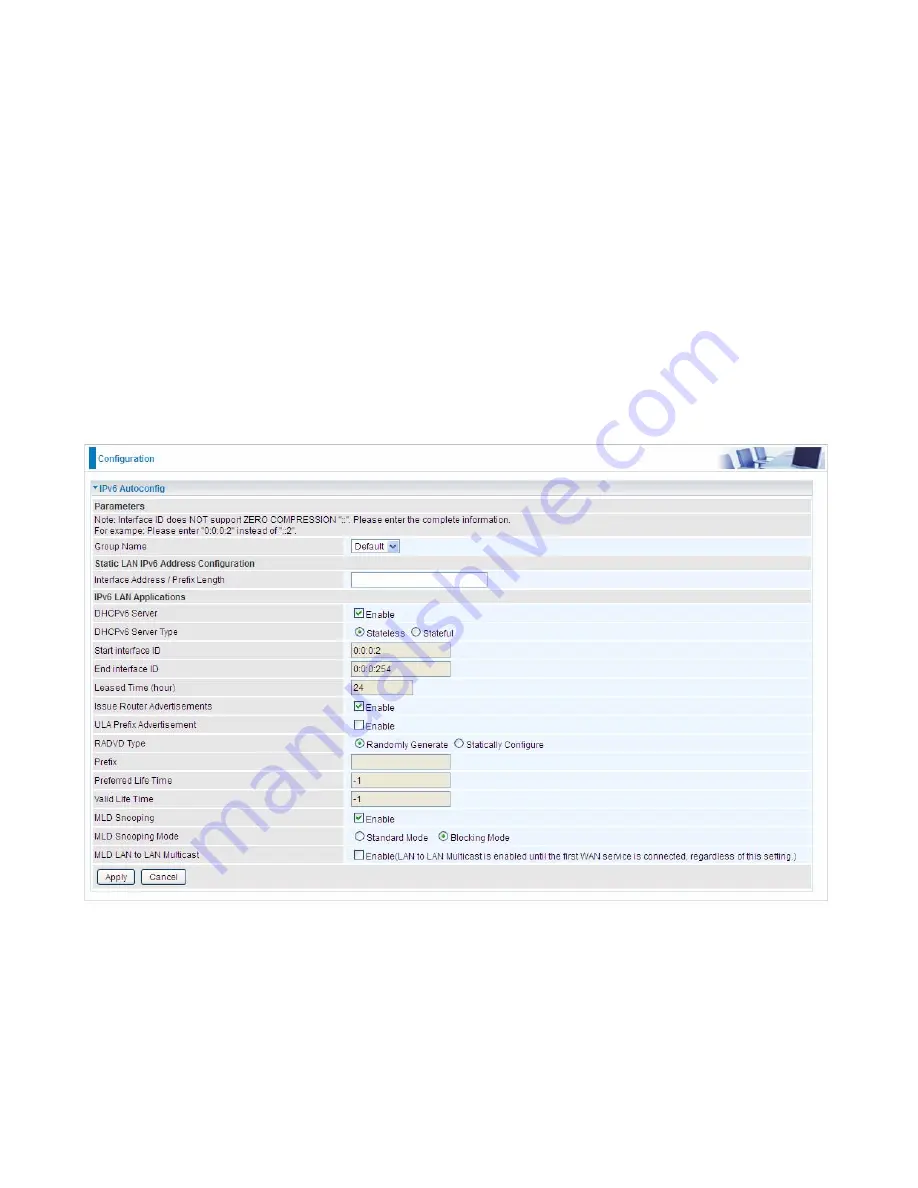
Group Name:
Here group refers to the group you set in
Interface Grouping
section, you can set
the parameters for the specific group. Select the group by the drop-down box. For more
information please refer to
Interface Grouping
of this manual.
Static LAN IPv6 Address Configuration
Interface Address / Prefix Length:
Enter the static LAN IPv6 address.
IPv6 LAN application
DHCPv6 Server:
Check whether to enable DHCPv6 server.
Summary of Contents for BiPAC 8700VAX(L)-1600
Page 17: ...12 The Rear Ports 5 1 2 3 4 7 9 8 10 6 ...
Page 22: ...17 3G 4G LTE mode Failover fallback mode ...
Page 37: ...32 8 In the above page click finish to complete the EZSO settings ...
Page 40: ...35 8 In the above page click finish to complete the EZSO settings ...
Page 43: ...38 8 In the above page click finish to complete the EZSO settings ...
Page 106: ...101 Configure AP as Enrollee Add Registrar with PIN Method 1 Set AP to Unconfigured Mode ...
Page 126: ...121 Router C setup Refer to Router B setup ...
Page 169: ...164 Accessing mechanism of Storage In your computer Click Start Run enter 192 168 1 254 ...
Page 171: ...166 Access the folder public ...
Page 174: ...169 Step 2 Click Add a Printer Step 3 Click Add a network wireless or Bluetooth printer ...
Page 185: ...180 How to disable set rule Rule inactive ...
Page 233: ...228 ...
Page 236: ...231 ...
Page 246: ...241 4 Input Internet address and Destination name for this connection and press Next ...
Page 247: ...242 5 Input the account user name and password and press Create ...
Page 248: ...243 6 Connect to the server ...
Page 250: ...245 ...
Page 262: ...257 4 Input Internet address and Destination name for this connection and press Next ...
Page 263: ...258 5 Input the account user name and password and press Create ...
Page 267: ...262 ...
Page 291: ...286 2 ipoe_eth4 with DDNS www hometest1 com using username password test test ...
Page 303: ...298 Click Apply to confirm your settings ...
Page 312: ...307 Mobile Network User can press Scan to discover available 3G 4G LTE mobile network ...
Page 318: ...313 Example Ping www google com ...
Page 319: ...314 Example trace www google com ...