81
IGMP LAN to LAN Multicast:
Check to determine whether to support LAN to LAN (Intra LAN)
Multicast. If user want to have a multicast data source on LAN side and he wants to get IGMP
snooping enabled, then this LAN-to-LAN multicast feature should be enabled.
LAN side firewall:
Enable to drop all traffic from the specified LAN group interface. After activating it,
all incoming packets by default will be dropped, and the user on the specified LAN group interface
can't access CPE anymore. But, you can still access the internet service. If user wants to manage
the CPE, please turn to
IP Filtering Incoming
to add the allowing rules.
Note
that all incoming
packets by default will be dropped if the LAN side firewall is enabled and user cannot manage this
CPE from the specified LAN group.
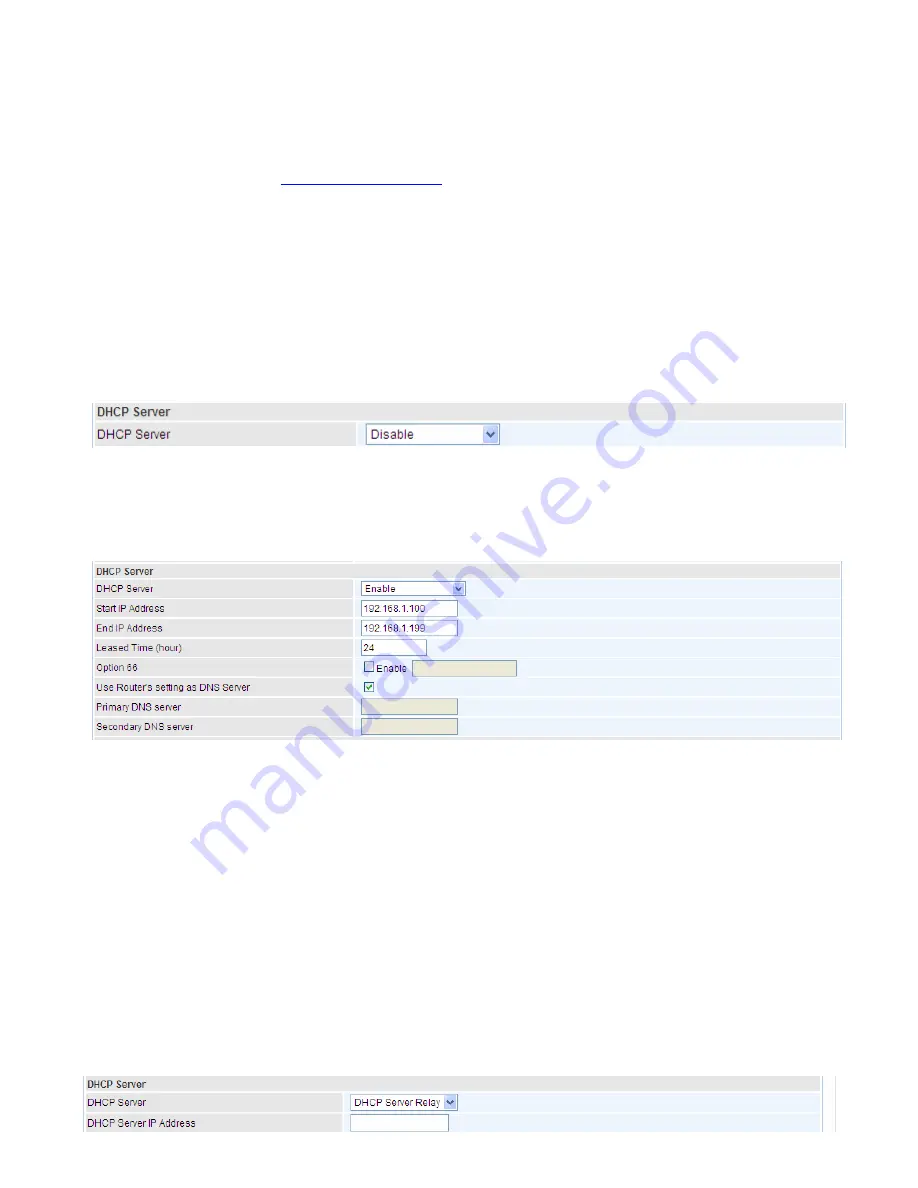
DHCP Server
You can disable or enable the DHCP (Dynamic Host Configuration Protocol) server or enable the
router’s DHCP relay functions. The DHCP protocol allows your router to dynamically assign IP
addresses to PCs on your network if they are configured to obtain IP addresses automatically.
L
Disable
Disable the DHCP Server function.
L
Enable
Enable the DHCP function, enter the information wanted. Here as default.
Start IP Address:
The start IP address of the range the DHCP Server used to assign to the Clients.
End IP Address:
The end IP address f the range the DHCP Server used to assign to the Clients.
Leased Time (hour):
The leased time for each DHCP Client.
Option 66:
Click Enable to activate DHCP option 66 for some special devices, like IPTV Set Box.
The devices can get firmware or some special service from the TFTP server. User needs to set the
IP or hostname of the TFTP server.
User Router’s setting as DNS server:
Select whether to enable use router’s setting as DNS server,
if enabled, the PCs on the LAN side obtain the router’s setting as DNS server. If disabled, please
specify exactly the primary/secondary DNS server.
Primary/Secondary DNS server:
Specify your primary/secondary DNS server for your LAN devices.
L
DHCP Server Relay
Summary of Contents for BiPAC 8700VAX(L)-1600
Page 17: ...12 The Rear Ports 5 1 2 3 4 7 9 8 10 6 ...
Page 22: ...17 3G 4G LTE mode Failover fallback mode ...
Page 37: ...32 8 In the above page click finish to complete the EZSO settings ...
Page 40: ...35 8 In the above page click finish to complete the EZSO settings ...
Page 43: ...38 8 In the above page click finish to complete the EZSO settings ...
Page 106: ...101 Configure AP as Enrollee Add Registrar with PIN Method 1 Set AP to Unconfigured Mode ...
Page 126: ...121 Router C setup Refer to Router B setup ...
Page 169: ...164 Accessing mechanism of Storage In your computer Click Start Run enter 192 168 1 254 ...
Page 171: ...166 Access the folder public ...
Page 174: ...169 Step 2 Click Add a Printer Step 3 Click Add a network wireless or Bluetooth printer ...
Page 185: ...180 How to disable set rule Rule inactive ...
Page 233: ...228 ...
Page 236: ...231 ...
Page 246: ...241 4 Input Internet address and Destination name for this connection and press Next ...
Page 247: ...242 5 Input the account user name and password and press Create ...
Page 248: ...243 6 Connect to the server ...
Page 250: ...245 ...
Page 262: ...257 4 Input Internet address and Destination name for this connection and press Next ...
Page 263: ...258 5 Input the account user name and password and press Create ...
Page 267: ...262 ...
Page 291: ...286 2 ipoe_eth4 with DDNS www hometest1 com using username password test test ...
Page 303: ...298 Click Apply to confirm your settings ...
Page 312: ...307 Mobile Network User can press Scan to discover available 3G 4G LTE mobile network ...
Page 318: ...313 Example Ping www google com ...
Page 319: ...314 Example trace www google com ...


