Page 52
Pyramid 2 Keyboard
Installation and Operating Instructions
SETTING ELECTRONIC LIMIT STOPS
Limit Stops are used to restrict the mobility of a PTZ camera. A pan and tilt zone can be set up with a Limit Stop at each
corner, and the PTZ camera is unable to move beyond the boundaries of this zone.
There are a number of situations where Limit Stops might be used:
For privacy issues.
Where cameras are wall-mounted, and measures need to be taken to prevent the camera from hitting the wall. In this
instance, the limit stops should only be used as a temporary measure. Physical limits should be installed to ensure that
there is no damage to the camera.
To restrict the use of pan and tilt components and so reducing wear and tear on PTZ units.
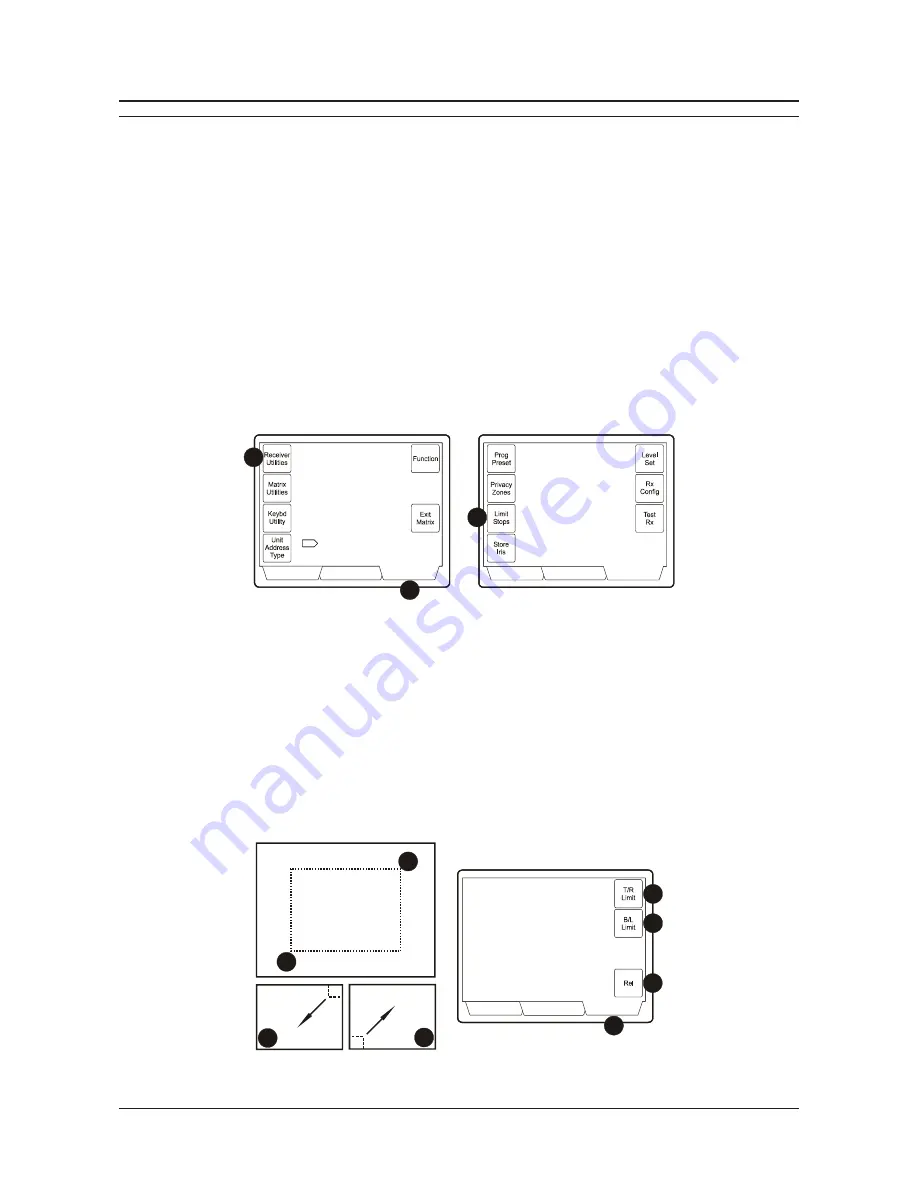
The Pyramid 2 Keyboard can be used to specify Electronic Limit Stops for PTZ cameras. To do this, follow the steps below:
1. Select the PTZ camera to which the Limit Stops are to be programmed - see
Selecting a Camera
on page 14.
2. Press the
Utility Menu
screen key.
3. Press the
Receiver Utilities
soft-key.
4. Press the
Limit Stops
soft-key. The
Limit Stops Programming
screen is displayed (Figure 73).
VCR / MUX
Utility Menu
Operator
VCR / MUX
Operator
Utility Menu
12...
12...
12...
12...
2
3
4
Figure 72 - Accessing the Limit Stops Programming Screen
5. Use the joystick so that the bottom-left corner of the usable pan and tilt zone is at the top-right of the monitor.
6. Press the
BL Limit
soft-key.
7. Use the joystick so that the top-right corner of the usable pan and tilt zone is at the bottom-left of the monitor.
8. Press the
TR Limit
soft-key.
9. To cancel the Limit Stops at any point, press the
Rel
soft-key.
10. Press the
Utility Menu
screen key to leave the
Limit Stops Programming
screen.
11. It is now necessary to save the Limit Stops to the receiver. To do this, press the
Receiver Utilities
soft-key and then
press the
Prog Preset
soft-key. To complete the save procedure, press the
Store Presets
soft-key.
7
Pan and
Tilt Zone
No-PT Zone
VCR / MUX
Operator
Utility Menu
Move Pan & Tilt to top & right
limit stop position and press
T/R Limit button. Repeat for
bottom & left position. Press
Rel to release limit stops.
Limit Stops Programming Screen
Figure 73 - Programming Limit Stops
10
9
6
8
7
5
5
7
Summary of Contents for Pyramid 2
Page 1: ...Please read this manual first Pyramid 2 Keyboard Installation and Operating Instructions ...
Page 6: ...Page 6 Pyramid 2 Keyboard Installation and Operating Instructions ...
Page 32: ...Page 32 Pyramid 2 Keyboard Installation and Operating Instructions ...
Page 38: ...Page 38 Pyramid 2 Keyboard Installation and Operating Instructions ...
Page 66: ...Page 66 Pyramid 2 Keyboard Installation and Operating Instructions ...


