background image

R5906788-03

Thor series

83

7

USB 3.0

The ICMP can be connected to a USB 3.0 Media to load content. The USB port can be used to load
content (DCP), or keys (KDM), or software update.

NOTE

: These ports are recommended for fast ingest when connected to an appropriate USB 3.0 source.

USB

Universal Serial Bus (USB) is an industry standard developed in the mid-1990s that defines the
cables, connectors and communications protocols used in a bus for connection, communication,
and power supply between computers and electronic devices.

USB 2.0

(also called "Hi-Speed"),

adding higher maximum signaling rate of 480 Mbit/s (effective throughput up to 35 MB/s or 280
Mbit/s), in addition to the "USB 1.x Full Speed" signaling rate of 12 Mbit/s.[16] USB 2.0 connectors
are usually colored black.

USB 3.0

defines a new SuperSpeed mode with a signaling speed of 5

Gbit/s and a usable data rate of up to 4 Gbit/s (500 MB/s). A USB 3.0 port is usually colored blue,
and is backwards compatible with USB 2.0.

9.4 ICMP source input ports

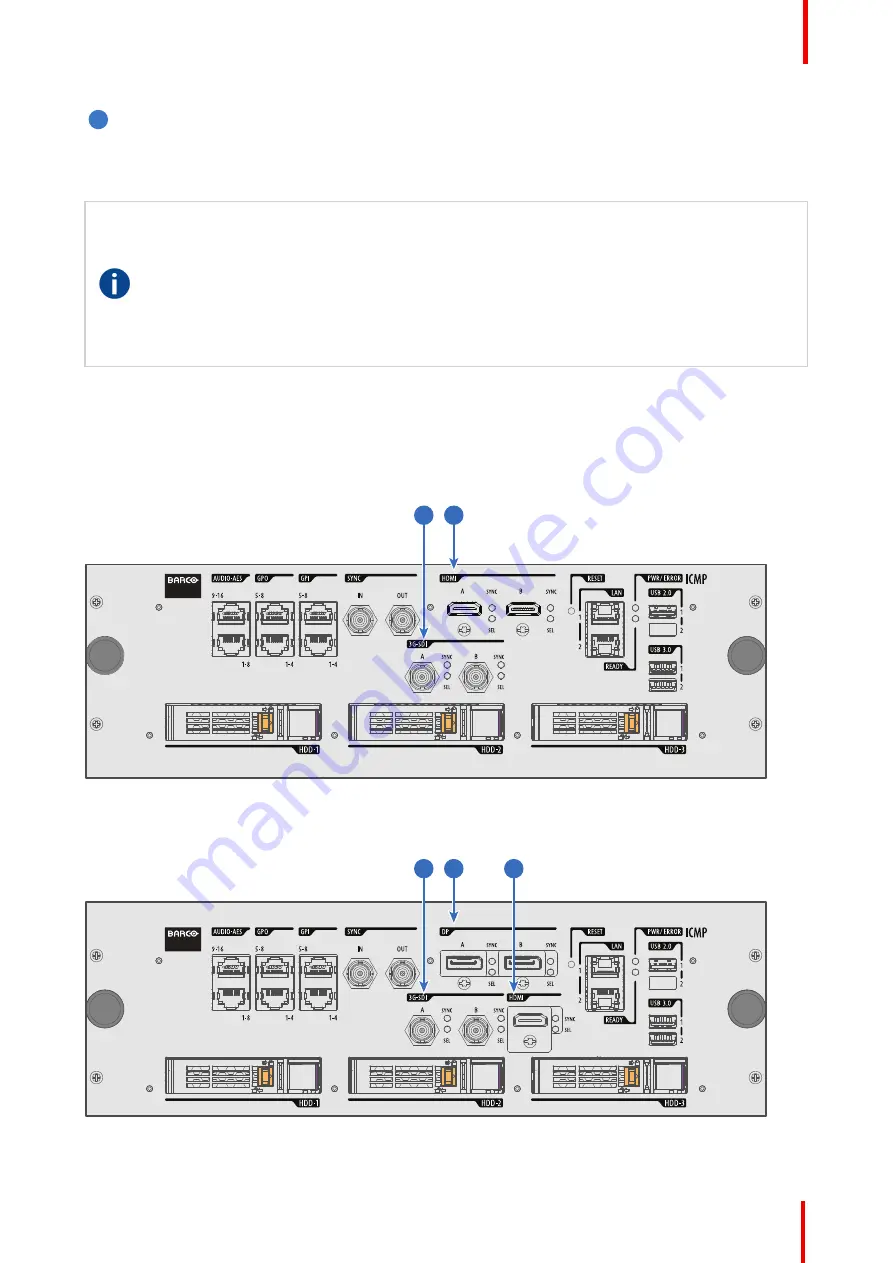
Location of the source input ports

The last produced model is equipped with two HDMI 2.0 (Reference 8, Image 9-8) as video source.

8

9

Image 9-8: ICMP (with HDMI 2.0).

Some models with DisplayPorts (Reference 11, Image 9-9) and HDMI 1.4 (Reference 10, Image 9-9) are still
present on the field.

11

9

10

Image 9-9: ICMP (with DisplayPort and HDMI 1.4).

ICMP

Summary of Contents for Thor Series

Page 1: ...ENABLING BRIGHT OUTCOMES Installation manual Thor series...

Page 2: ...Barco NV President Kennedypark 35 8500 Kortrijk Belgium www barco com en support www barco com...

Page 3: ...but not the class B ITE limits Such equipment should not be restricted in its sale but the following warning shall be included in the instructions for use Warning This is a class A product In a domes...

Page 4: ...ftware License Agreement You should carefully read the following terms and conditions before using this software Your use of this software indicates your acceptance of this license agreement and warra...

Page 5: ...npacking the projector 38 4 3 Initial inspection 40 5 Installation process 41 5 1 Installation process overview 42 6 Physical installation 45 6 1 Removing the transport protection bars 46 6 2 Position...

Page 6: ...14 Obtaining the Barco ICMP certificate 101 9 15 Removing a HDD from the ICMP 102 9 16 Installing a HDD into the ICMP 103 10 Starting up 105 10 1 Switching the Thor series projector ON 106 10 2 Switch...

Page 7: ...top cover 150 16 3 Removal of the side covers 151 A Specifications 153 A 1 Specifications of the Thor 154 A 2 Specifications of the Thor 155 A 3 Specifications of the ICMP 156 A 4 Dimensions of the T...

Page 8: ...R5906788 03 Thor series 8...

Page 9: ...very expectation and that you thereby take a little time to page through this important manual Familiarizing yourself with it s features important safety instructions and necessary maintenance actions...

Page 10: ...ith two chillers instead of one For Thor series only one chiller has to be taken into account What s expected from you For your safety and in the interest of reliable trouble free high quality perform...

Page 11: ...the term Thor series used in this document When referring in this document to the term Thor series means that the content is applicable for following Barco products THOR THOR Model certification name...

Page 12: ...radiance lasers this laser light is processed through the projectors optical path Native laser light is not accessible by the end user in any use case The light exiting the projection lens has been d...

Page 13: ...rojected beam within the zone between the projection lens and the related Hazard Distance HD This shall be physically impossible by creating sufficient separation height or by placing optional barrier...

Page 14: ...o rest on the power cord Do not locate this projector where persons will walk on the cord Do not operate the projector with a damaged cord or if the projector has been dropped or damaged until it has...

Page 15: ...ure that the lens cooling system and all cover plates are correctly installed See installation procedures Warning high intensity light beam NEVER look into the lens High luminance could result in dama...

Page 16: ...t has been dropped or the cabinet has been damaged If the product exhibits a distinct change in performance indicating a need for service Replacement parts When replacement parts are required be sure...

Page 17: ...or lens cleaning follow the instructions precisely as stipulated in the projector manual Rated maximum ambient temperature ta 30 C 86 F Rated humidity 0 RH to 80 RH Non condensed An external frame mus...

Page 18: ...25 1 2014 DANGER NE PAS REGARDER LE FAISCEAU EVITER TOUTE EXPOSITION DIRECTE DES YEUX AU FAISCEAU RG3 IEC EN 62471 5 2015 CLASS 1 IEC EN 60825 1 2014 DISTANCE DE SECURITE CONSULTER LE MANUEL DE SECURI...

Page 19: ...d cover UPS INLET 200 240V 6A max 50 60Hz UPS OUTLET ONLY FOR CONNECTION TO UPS INLET WARNING Disconnect the power to the mains terminals and unplug power cord at UPS inlet for removal of all power fr...

Page 20: ...rea unless the beam is at least 2 0 meter above the floor level In environments where unrestrained behavior is reasonably foreseeable the minimum separation height should be greater than or equal to 3...

Page 21: ...Ib and IV laser light shows and or for incorporation of the RG3 LIPs into their shows Dealers and distributors are also required to obtain a valid laser light show variance This product shall be locat...

Page 22: ...eam exposure HDreflection the distance that has to be kept restrictive related to the reflected light from the rear projection screen HDdiffuse the relevant distance to be considered while observing t...

Page 23: ...of modifying optics Hazard Distance 2 0 1 2 3 4 5 6 1 1 1 1 2 1 3 1 4 1 5 1 6 1 7 1 8 1 9 2 2 1 2 2 2 3 2 4 2 5 2 6 2 7 2 8 2 9 3 3 1 3 2 3 3 3 4 3 5 3 6 3 7 3 8 3 9 4 Hazard Distance HD m Throw Ratio...

Page 24: ...R5906788 03 Thor series 24 Safety Information...

Page 25: ...ated documentation sets are available on the Barco website Different components of the projection system 1 2 3 5 4 6 7 8 9 Image 3 1 1 Chiller unit without expansion for DMD cooling not used for Thor...

Page 26: ...R5906788 03 Thor series 26 Commander Web Commander System overview...

Page 27: ...a liquid cooling system is provided consisting of liquid circuits inside the projector which are connected via hoses to external chillers Only chiller models and hoses exclusively developed for this...

Page 28: ...9 Communication port with chillers 10 Lens 11 Air outlet 12 Projector status light 13 Laser status light 14 Projector ID label Air flow The Thor series projector has two air flow channels reference A...

Page 29: ...as the standard installed coupling on the chiller However the hoses of the DMD cooling which have to be connect with the coupling of this expansion unit has a smaller diameter than the hoses for the...

Page 30: ...ed off and on to reset the safety controller Otherwise the lasers can not be activated External beam enable key The beam enable key is built in but there is also a connection available for an addition...

Page 31: ...key B1 External safety interlock B contact No 1 B2 External safety interlock B contact No 2 CAUTION The need for installing external safety interlocks is the responsibility of the Safety Officer and d...

Page 32: ...also be connected via a Local Area Network LAN in the same way as the Thor series In this configuration both devices can communicate with each other as well The Touch Panel interface requires a volta...

Page 33: ...jector A comprehensive array of easy to access menu pages provide the projectors digital input output and screen display via a combination of simple buttons and displays Image 3 13 Quick and Easy conf...

Page 34: ...greatly increase the level of operational efficiency Projectionists can now enjoy a streamlined and intuitive user interface that seamless blends projector control with a full fledged screen managemen...

Page 35: ...careful consideration of things such as image size ambient light level projector placement and type of screen to use are critical to the optimum use of the projection system Barco provides a guarante...

Page 36: ...cuits inside the projector which are connected via hoses to external chillers Only chiller models and hoses exclusively developed for this application and approved by Barco are allowed to be used Barc...

Page 37: ...s is removed from the projector through small drain tubes at the bottom of the projector It s most efficient and recommended to guide the small drain tubes directly to a water drain A vertical air gap...

Page 38: ...Supply UPS also known as a Continuous Power Supply CPS must have an output voltage of 200 240V at 50 60Hz and must be capable of delivering an output current of 5 5 amperes This UPS provides only pow...

Page 39: ...4 1 Image 4 1 5 Lift up the outer carton box reference 5 Image 4 2 as a whole and remove it away from the projector package 6 Lift up the inner carton box reference 6 Image 4 2 as a whole and remove...

Page 40: ...soon as possible The packaging of the Thor series projector is provided with a shock watch label If this shock watch label was triggered red colored at arrival during transport may indicate rough hand...

Page 41: ...ch stage is briefly described and refers to more detailed step by step procedures in this manual Use this overview as a checklist to ensure that all stages have been followed in the setup process of t...

Page 42: ...oved hoses may be used See chapter Connecting the hoses with projector and chillers page 49 and chapter Connecting the data cable with projector and chillers page 51 6 Installing the isolation shells...

Page 43: ...eve that 1 Press the LIGHT button on the Local Keypad to activate the lasers 2 Press the DOWSER button on the Local Keypad to open the mechanical dowser of the projector The dowser is open if the colo...

Page 44: ...R5906788 03 Thor series 44 Installation process...

Page 45: ...th projector and chillers Connecting the data cable with projector and chillers Accessing the mains compartment Connecting the external safety interlocks Three phase power input configuration of the p...

Page 46: ...move the two fixation screws reference 1 Image 6 1 in the center of the transport protection bar Use a 10 mm Allen wrench 1 Image 6 1 2 Pull the transport protection bar out of its slot 1 Image 6 2 3...

Page 47: ...theatre screen see reference A Image 6 4 2 If another film projector is already present projector will be off center try to optimize aim see reference B Image 6 4 Note Unlike analog film projectors i...

Page 48: ...e long nuts reference 1 Image 6 5 of each projector foot against the projector chassis 1 1 2 Image 6 5 4 Later when the projector is up and running adjust precise image geometry and placement Projecto...

Page 49: ...the maximum feet height is 18 cm This correspond with a forward tilt of 6 7 if the front feet are completely turned in and the back feet turned out Barco offers a pedestal for the Thor series project...

Page 50: ...OUTare omitted How to connect the hoses 1 Ensure that all connectors of the hoses chillers and projector are clean Wipe away any dust before attaching 2 Connect the hoses one by one with the chiller a...

Page 51: ...BD Male Female 15 pins plugs One short 5 meter communication cable with SUBD Male Female 15 pins plugs only if two chillers are required How to connect the communication ports of the chillers with the...

Page 52: ...over door door which contains the dust filters 4 Loosen the retaining screw reference 2 Image 6 11 of the inner door Use a PH1 Phillips screwdriver 5 Pivot the inner door to access the mains compartme...

Page 53: ...unt wire s from the 10 pole terminal block and connect the cable s according the schematic in Image 6 13 Note Only remove the shunt wires from these pins which have to be connected with an external sa...

Page 54: ...position depending on the local power supply For a 3W N PE system 346 415V is measured between the lines 200 240V is measured between the lines and the neutral For a 3W PE system 200 240V is measured...

Page 55: ...1 2 3 A C B 4 5 6 A B C Image 6 16 2 Take off the mounted links A B and C 3 Connect the left pins together Place 2 links between the upper pin and the middle pin A B and 1 link between the middle pin...

Page 56: ...e ground wire PE with the connector indicated with PE on the terminal barrier strip If a neutral conductor is available connect always to the connector indicated with N on the terminal barrier strip W...

Page 57: ...e the fixation spring on the fixation pins reference 3 Image 6 18 while squeezing together and push it against the power plug Release the fixation spring 3 1 2 Image 6 18 6 10 Connecting a UPS to the...

Page 58: ...y cord minimum 0 75 mm or 18 AWG and minimum 300V CAUTION Do not use the power OUTLETsocket of the projector to provide power to other equipment 6 11 Installing the Communicator Touch Panel Required t...

Page 59: ...e depends on the operator preferences In the illustration below the swivel arm is installed into the mounting hole nearest by the Local Keypad of the projector 3 4 1 2 Image 6 22 3 Place the Touch Pan...

Page 60: ...to tighten the locking nut on the connector 6 Image 6 25 6 Attach the multi cable to the swivel arm using the two Velcro strips 7 Position the Touch Panel interface in the desired location Hold the To...

Page 61: ...ver transport the projector with a Lens mounted in the Lens Holder Always remove the Lens before transporting the projector Neglecting this can damage the Lens Holder and Prism CAUTION Caution when re...

Page 62: ...35 X R9855947 HB 2 8 5 5 2 53 4 98 X R98565042 HC 1 13 1 72 X X R98562942 HC 1 35 1 86 X X R98562972 HC 1 46 2 10 X X R98563002 HC 1 65 2 60 X X R98563032 HC 2 00 3 35 X X R98565043 VHC 1 13 1 72 X R...

Page 63: ...the real distances can differ by 2 from the calculated values For critical situations fixed installs that use the lens at one of its extreme zoom positions this should be taken into account 7 3 Lens i...

Page 64: ...ens Holder front plate An audible click should be noticed Once seated there may be no airgap between lens flange and Lens Holder front plate Caution Ensure that the lock handle remains in the locked p...

Page 65: ...t the projector with a Lens mounted in the Lens Holder Always remove the Lens before transporting the projector Neglecting this can damage the Lens Holder and Prism 7 4 Lens removal How to remove a le...

Page 66: ...ge is limited as well All DC4K lenses have a shift range of 50 up 50 down 17 left and 17 right This range is valid for all throw ratios Within these shift ranges the projector and lens perform excelle...

Page 67: ...rojectors The operation temperature of the lens is reached after approximately 30 minutes projection of average video Button backlight colors WHITE The default backlight color of the Shift Zoom and Fo...

Page 68: ...R5906788 03 Thor series 68 Lenses Lens selection...

Page 69: ...tail light and the different input and communication ports of your Thor series projector Note that all information about the ICMP is gathered into one separated chapter ICMP page 77 Overview Introduct...

Page 70: ...rt with Chillers 4 Local keypad 5 ICMP 6 Barco Cinema Controller 7 Switch Mode Power Supply SMPS for projector electronics not lasers CAUTION A unit may only be removed from the card cage by qualified...

Page 71: ...pt for Cinema Controller board and Local Keypad Only the following functionalities of the projector remains active Local Keypad Router LAN and WAN port fully functional USB IN port type B Virtual comp...

Page 72: ...linking green Indicates the start of the CONDITIONING process After six s will light up continuously On Blinking green Ongoing CONDITIONING process Lasers are tested Continuous green Sealed compartmen...

Page 73: ...ed or that the ambient temperature inside the Light Processor compartment is exceeded or that the DMD FRONTor DMD BACK temperature is exceeded 4 Star button Star button reference 4 Image 8 4 Pressing...

Page 74: ...t of the Key button is red 11 Zoom button The Zoom button reference 11 Image 8 4 allows you to zoom in or out the projected image on the screen The backlight of the Zoom button is red in case the end...

Page 75: ...oftware locates the projector on the network if there is a DHCP server or the user can insert the correct IP address to access the projector Once accessed it is possible to check and manipulate all th...

Page 76: ...tment of the projector via PC or MAC wide range of control possibilities copying data from the projector backup RS232 An Electronic Industries Association EIA serial digital interface standard specify...

Page 77: ...ed Image 9 1 Overview ICMP introduction ICMP HDD ICMP communication ports ICMP source input ports ICMP DisplayPort specifications ICMP SDI specifications ICMP HDMI 2 0 specifications ICMP HDMI 1 4 spe...

Page 78: ...R5906788 03 Thor series 78 Installing a HDD into the ICMP ICMP...

Page 79: ...he standard Integrated Cinema Processor functionality from Texas Instruments is fully integrated into the ICMP So the ICMP replaces the ICP board as well 2 1 Image 9 2 1 ICMP 2 HDDs for ICMP As an int...

Page 80: ...ge of a L series projector 1 2 Image 9 5 9 2 ICMP HDD About ICMP HDD The three HDDs local storage in the ICMP are set up in a RAID 5 configuration This storage technique that combines multiple HDD com...

Page 81: ...MP or to reuse a complete set of disks coming from another projector with ICMP It is sufficient to insert the three HDDs from a valid RAID array and let the system explore the new RAID The mounting or...

Page 82: ...e for further information 3 GPI 1 4 5 8 These RJ45 connectors can be used to receive trigger signals from other devices The mapping of the General Purpose Input GPI on each input Cues is configured vi...

Page 83: ...um signaling rate of 480 Mbit s effective throughput up to 35 MB s or 280 Mbit s in addition to the USB 1 x Full Speed signaling rate of 12 Mbit s 16 USB 2 0 connectors are usually colored black USB 3...

Page 84: ...play devices HDCP High bandwidth Digital Content Protection is a form of digital copy protection developed by Intel Corporation to prevent copying of digital audio and video content as it travels acro...

Page 85: ...D Audio formats 2 channels LPCM 16 bits 32 kHz 44 1 kHz 48 kHz 88 2 kHz 96 kHz 5 1 format LPCM 24 bits 48 kHz 7 1 format LPCM 20 bits 48 kHz Notes DisplayMode Single is applicable to both DisplayPort...

Page 86: ...rates to 2 97 Gbps using the same 75 ohm coaxial cable This new standard also called 3 Gbps 3G SDI enables higher resolution of picture quality required for 1080p and digital cinema SDI terminology St...

Page 87: ...er SMPTE 292M STANDARD 1 485 Gb s HD SDI SIGNALS Standard HD SDI SMPTE 292M formats SMPTE Standard Source Resolution Frame Rate Display Rate Scan Type SMPTE 296M 1280 x 720 23 976 24 25 29 970 30 50 5...

Page 88: ...4 4 4 10 or 12 Bit Standard HD SDI 2 SMPTE 292M formats2 SMPTE Standard Source Resolution Frame Rate Display Rate Scan Type SMPTE 292M SMPTE 428 8 1920 x 1080 2048 x 1080 23 976 24 25 29 97 30 47 952...

Page 89: ...4 4 4 12 Bit Dual Stream 3G HD SDI SMPTE 425 formats SMPTE Standard Source Resolution Frame Rate Display Rate Scan Type SMPTE 292M SMPTE 428 9 1920 x 1080 2048 x 1080 23 976 24 25 29 970 30 47 952 48...

Page 90: ...there are quality differences The high speed cables would be preferred over the standard speed cables They usually work at higher cable lengths than the standard speed ones The Premium Certified HDMI...

Page 91: ...upported 3D Frame Packing Formats Format Frame Rate Color coding Bit depth 1920x1080 2048x1080 23 976 24 25 29 97 30 RGB YCbCr 4 4 4 YCbCr 4 2 2 8 10 12 1920x1080 2048x1080 50 59 94 60 RGB YCbCr 4 4 4...

Page 92: ...ant bits of port B HDMI 2 0 Supported Passive 3D Formats 3D formats only Format Frame Rate Color coding Bit depth 1920x1080 2048x1080 24 30 RGB YCbCr 4 4 4 YCbCr 4 2 2 8 10 12 1920x1080 2048x1080 60 R...

Page 93: ...10 12 720x576 50 RGB YCbCr 4 4 4 YCbCr 4 2 2 8 10 12 1280x720 23 976 24 25 29 97 30 50 59 94 60 100 119 88 120 RGB YCbCr 4 4 4 YCbCr 4 2 2 8 10 12 1680x720 23 976 24 25 29 97 30 50 59 94 60 100 119 8...

Page 94: ...YCbCr 4 2 2 8 10 12 HDMI 1 4 Supported 2D Interlaced Formats Format Frame Rate Color coding Bit depth 720x576 25 50 100 1920x1080 25 29 97 30 50 59 94 60 HDMI 1 4 Supported 3D Frame Packing Formats Fo...

Page 95: ...t panel give information on the status of the device 1 2 Image 9 10 Status overview PWR ERROR and READY LEDs 1 2 PWR ERROR READY ICMP Status Off Off Turned off Red Off Board reset or FIPS error Blinki...

Page 96: ...Green Blinking Orange Update ongoing Orange Orange Update done 9 10 ICMP HDD status LEDs ICMP HDD status LEDs 5 4 Image 9 11 Status overview PWR ERROR and READY LEDs 4 5 HDD I O RAID ICMP HDD Status...

Page 97: ...k status RAID broken can be retrieved via the Web Commander See user guide of the Web Commander 1 Switch off the power 2 Replace all defect HDDs with approved models of the same storage capacity See p...

Page 98: ...ers can obtain information needed to issue KDMs The TDL has several data sources Device manufacturers Exhibitors Deployment Entities Integrators Service Providers interacting with Exhibitors regional...

Page 99: ...cifications for an open architecture for digital cinema that ensures a uniform and high level of technical performance reliability and quality control Note that the DCI specification is not a standard...

Page 100: ...n the front panel of the ICMP Not recommended use only when all other reset possibilities are exhausted How to reset the ICMP 1 Click on the ICMP reset button in the GUI of the Web Commander or Click...

Page 101: ...of the ICMP with a smartphone It s recommended to use a smartphone with auto focus The QR reader will automatically redirect to the ICMP certificate download page on the web server Note Instead of dow...

Page 102: ...m the ICMP In case the ICMP has to be returned to factory e g for repair the non defective HDDs should be removed and kept How to remove a HDD 1 Switch off the projector 2 Moving the latch towards the...

Page 103: ...HDD set have the same storage capacity See label on top of the HDD to know the storage capacity How to install a HDD 1 Ensure that the projector is switched off 2 Prepare the HDD for insertion by mov...

Page 104: ...covery process The red LED of the HDD which has to be rebuilt is blinking This process takes about 200 GB per hour Once the RAID is completed the red LED turns off CAUTION It s strongly recommended to...

Page 105: ...tor These procedures highlight all important points to be checked prior to switching the projector ON This is to ensure a safe startup of the projector Overview Switching the Thor series projector ON...

Page 106: ...s is installed for the application and the lens cap is removed from the lens See chapter Lens installation page 63 10 Check if the small drain tubes at the bottom of the projector leads to a water dra...

Page 107: ...witching the Thor series projector OFF About the switch off process To switch off the Thor series projector in a safe manner to protect the internal electronics avoid moisture due to warming up the te...

Page 108: ...en the projector is in Standby mode reference B Image 10 1 The initialization of all electronic boards takes approximately two minutes and during this process the backlight of the Standby button is bl...

Page 109: ...y in the projector Stage 6 4 Cooling started Stage 6 5 Reaching liquid temperature target During CONDITIONING the backlight of the Light button is blinking green The projector status light is continuo...

Page 110: ...R5906788 03 Thor series 110 Starting up...

Page 111: ...cus When the DMD plane and lens plane are parallel the plane of sharp focus will also be parallel to these two planes If however the lens plane is tilted with respect to the DMD plane the plane of sha...

Page 112: ...be achieved by turning the lens holder to remove the tilt or swing between lens plane and DMD plane Lp3 Lp4 Image 11 1 Scheimpflug principle Scheimpflug principle The plane of sharp focus can be chang...

Page 113: ...image is not equally sharp can be caused if the projector is NOT in parallel with the screen or a previous misaligned Scheimpflug Take into account that the consequence of applying Scheimpflug correc...

Page 114: ...um image on the screen WIDE 6 Is it possible to focus the center of the projected image If yes the Back Focal Length is OK Proceed with the next step If no the Back Focal Length needs realignment Proc...

Page 115: ...completely from the threaded rod Otherwise the lens holder front plate with lens will fall off F F 1 Image 11 6 2 Sharpen the image at the top right corner of the screen by turning the lower right Sc...

Page 116: ...r 13 mm How to fix the Lens Holder front plate Start the fixation as follows steps must be followed strictly 1 Project the Outline Aspect test pattern depending on projector type 2 Zoom the projected...

Page 117: ...10 mm nut driver 11 4 Back Focal Length adjustment When to adjust the Back Focal Length If a lens is used with a throw ratio suited for the application lens selection depends on projection distance a...

Page 118: ...e Communicator chapter Installation Advanced Lens parameters Caution Not using the correct lens parameters could result in lens damage 3 Perform a lens HOME RETURN operation See user guide of the Comm...

Page 119: ...17 is equally aligned with the front of the threaded rod reference 6 Image 11 17 Use a 13mm nut driver Note This is the nominal position of the Lens Holder Caution Do not remove any of the Scheimpflu...

Page 120: ...Scheimpflug adjustment nuts for further adjustment instructions in this procedure F 1 2 3 Image 11 19 6 Zoom the lens for minimum image on the screen TELE and focus the center of the projected image...

Page 121: ...rojected image in the corners as sharp as in the middle If yes proceed with the procedure Fixation of the Lens Holder front plate page 116 If no Scheimpflug adjustment is required See procedure Scheim...

Page 122: ...R5906788 03 Thor series 122 Scheimpflug...

Page 123: ...tor for convergence adjustment and how to adjust the convergence Overview Convergence controls Preparing for convergence adjustment Converging the red pattern onto the blue pattern Converging the gree...

Page 124: ...with three extended control knobs for convergence adjustment The control knobs are numbered from 1 to 6 and have the same color as the channel which they affect To access the control knobs the left si...

Page 125: ...l BLUE position Rotation is limited to approximately 10 pixels on the left screen flank and 10 pixels on the right screen flank One turn of a control knob relates to an approximately 10 pixels displac...

Page 126: ...ojector for convergence adjustment 1 Remove the left side cover of the projector 2 Release the six screws reference 1 Image 12 3 of the control knobs cover plate Use a 3 mm Allen wrench 3 Remove the c...

Page 127: ...ed with the horizontal direction control knob 3 1 To translate the RED pattern vertically slightly turn the red control knobs number 1 and 2 Turn both control knobs in equal increments Note Note that...

Page 128: ...nd wrench Converging the GREEN pattern onto the BLUE pattern Start with aligning the GREEN pattern in the vertical direction control knob 4 and 5 and then proceed with the horizontal direction control...

Page 129: ...center left and right of the projected image 5 To adjust the red pattern See procedure Converging the red pattern onto the blue pattern page 127 6 When the red and green pattern are overall aligned wi...

Page 130: ...R5906788 03 Thor series 130 Convergence...

Page 131: ...le references are made to the user guide of the Communicator for detailed menu navigation instructions The first chapter describes the complete calibration process in chronological order Overview Cali...

Page 132: ...e point calibration See user guide of the Communicator for detailed menu navigation instructions 6 Color gamut calibration electronic P7 correction Measured values are saved in the Measured Color Gamu...

Page 133: ...e ICMP media player the color correction Dual separate eyes is selected in the INPUT file b then activate the PCF file PCF already contains plane 1 information c then activate the MCGD and TCGD files...

Page 134: ...ector in the desired projection mode 2D Laser3D or External 3D For detailed instructions see user guide of the Communicator 3 Configure the desired aspect ratio e g FLATor SCOPE use most common aspect...

Page 135: ...4 0 3 0 2 0 1 0 0 0 0 0 1 0 2 0 3 0 4 0 5 0 6 0 7 0 8 1 Image 13 2 Sample Chromaticity Diagram with Color Gamut of target device 1 Why apply color correction During the post production process of a f...

Page 136: ...lass CAUTION Prior to start with color gamut calibration ensure that the white point calibration for the same projection mode 2D Laser3D or External 3D is finalized successfully See chapter White poin...

Page 137: ...luminance is equal to one lumen per square foot Why calibrating the Light Sensor The purpose of luminance calibration is to make a reference between the light measured by the projector built in light...

Page 138: ...he projector and environment to play a movie 6 Repeat this measurement process for other aspect ratios if applicable e g SCOPE The US unit of luminance is the Foot lambert or ft L whereas the SI unit...

Page 139: ...and 4 yearly maintenance actions not included in this manual which must be done by certified service personnel who are familiar with potential hazards of the product and all product safety checks Con...

Page 140: ...eed up drying allow the filter s to dry at 50 C max in a well ventilated room 2 Check the surface of the lens output side for dust it is not needed to remove the lens from the projector Only clean if...

Page 141: ...n this manual 2 Clean the housing of the chillers Removal overall dust accumulation on chiller covers See documentation set of the chillers 3 Verify the internal clock of the ICMP with real time clock...

Page 142: ...R5906788 03 Thor series 142 Preventative maintenance actions...

Page 143: ...ay only be performed by TRAINED PROJECTIONISTS or qualified SERVICE PERSONNEL Overview Check the dust filters Vacuum cleaning of the dust filters Washing and drying the dust filters Cleaning the lens...

Page 144: ...e of the dust filter for dust and or grease In case the filter is contaminated with grease wash and dry the dust filter See cleaning procedure Washing and drying the dust filters page 145 In case the...

Page 145: ...are removed from the projector Required tools Vacuum cleaner with soft brush suction nozzle How to vacuum clean the dust filter 1 Carefully vacuum the air inlet side of the dust filter Use a vacuum c...

Page 146: ...the dust filter is still clogged repeat this procedure from step 1 4 Rinse the dust filters with clean water to flush all grease residue away 5 Shake out all excess liquid by repeatedly swinging the f...

Page 147: ...with lens cleaner together with a clean lens cleaning cloth Polish again with a dry one If smears occur when cleaning lenses replace the cloth Smears are the first indication of a dirty cloth 15 5 Cle...

Page 148: ...keys 1 to 6 changes back to its original color Authorization procedure is aborted When code is entered then the backlight of the Key button lit up white in case of a service door tamper check if all...

Page 149: ...or removing the projector covers unless otherwise specified in the procedure Overview Opening the front and rear cover doors Removal of the top cover Removal of the side covers R5906788 03 Thor serie...

Page 150: ...doors 1 Unlatch reference 1 Image 16 1 and pivot the plastic cover door 1 1 Image 16 1 16 2 Removal of the top cover The illustrations in this procedure are based on the top left cover Nevertheless th...

Page 151: ...Unlatch and pivot the front and rear plastic cover doors a few centimeters This to gain access to the two thumbscrews of the top cover and the side cover See procedure Opening the front and rear cove...

Page 152: ...rence 3 Image 16 4 4 Remove the two screws located at the middle bottom of the side cover reference 4Image 16 4 Use a 3 mm Allen wrench 5 Lift up the side cover about two centimeters and then remove i...

Page 153: ...of your Thor series projector as well as the dimensions and the center of gravity Overview Specifications of the Thor Specifications of the Thor Specifications of the ICMP Dimensions of the Thor serie...

Page 154: ...3D up to 120fps 60fps per eye 2x 3G SDI inputs 16x AES EBU audio channels 2x RJ45 3D Color3D Barco Laser3D Native 6 primary color 3D system Only requires color filter glasses Dolby3D glasses cannot be...

Page 155: ...2 10 1 4K VHC LNS or DC4K HC 1 65 2 60 1 4K VHC LNS or DC4K HC 2 00 3 35 1 4K VHC LNS or DC4K HC Lens Shift adjustable vertical and horizontal depending on lenses Inputs Barco Alchemy ICMP included i...

Page 156: ...ecifications of the ICMP Specifications Integrated Cinema Media Processor DCI 4K 2D up to 60fps DCI 4K 3D 24 or 30 fps per eye DCI High Frame Rates 2K 3D up to 120fps 60fps per eye JPEG 2000 bit rates...

Page 157: ...neMate App iOS Android free Integrated storage 2TB effective storage RAID 5 3x 1TB Hot swappable 2 5 hard drives 4TB effective storage RAID 5 3x 2TB Hot swappable 2 5 hard drives Options ICMP License...

Page 158: ...nsions of the Thor series projector Dimensions 293 5 1446 859 1135 415 293 5 298 741 6 675 1211 33 3 117 5 33 3 117 5 EXIT DRAIN EXIT DRAIN PONT OF GRAVITY 707 5 246 5 325 675 112 Image A 1 Dimensions...

Page 159: ...R5906788 03 Thor series 159 A 5 Technical Regulations Certificates Image A 2 EAC mark Image A 3 CE mark Image A 4 ETL mark Image A 5 FCC label Image A 6 RCM mark Specifications...

Page 160: ...R5906788 03 Thor series 160 Specifications...

Page 161: ...rview About General Purpose Inputs Outputs GPIO Pin configurations of the Cinema Controller communication ports Pin configurations of the ICMP communication ports R5906788 03 Thor series Pin configura...

Page 162: ...PIn N 4 7V Input to projector Internal projector 1k1 5V to 18V Image B 1 Cables When long cable connections are required the use of shielded cables with twisted pairs is recommended One twisted pair i...

Page 163: ...ernal system connected with the GPO port pull up or pull down circuitry GPIO and projector Standby mode Enter or leave the Standby mode can be done with GPIO of the Cinema Controller via two predefine...

Page 164: ...N 17 reserved 36 reserved 18 reserved 37 reserved 19 reserved Ethernet port 10 100 Base T RJ45 port 1000 Base T RJ45 port Pin Pair Color Description Description 1 3 white green TXD TX0 2 3 green TXD...

Page 165: ...ls AUDIO AES 1 8 Audio channel AES pair RJ 45 pin 1 2 1 1 1 2 3 4 2 3 2 6 5 6 3 4 3 5 7 8 4 7 4 8 AUDIO AES 9 16 Audio channel AES pair RJ 45 pin 9 10 5 1 5 2 11 12 6 3 6 6 13 14 7 4 7 5 15 16 8 7 8 8...

Page 166: ..._P 3 EXT_GPOUT_6_N 4 EXT_GPOUT_7_P 5 EXT_GPOUT_7_N 6 EXT_GPOUT_8_P 7 EXT_GPOUT_8_N 8 General Purpose Input GPI 1 4 Definition RJ 45 pin EXT_GPIN_1_P 1 EXT_GPIN_1_N 2 EXT_GPIN_2_P 3 EXT_GPIN_2_N 4 EXT_...

Page 167: ...wn contacts facing you The contacts are numbered 1 8 from left to right Here s what you will see RJ 45 Pin Number Left Right copper side 568A 568B AES 1 8 1 White Green White Orange AES 1 2 plus 2 Gre...

Page 168: ...R5906788 03 Thor series 168 Pin configurations...

Page 169: ...169 Overview Disposal information Turkey RoHS compliance Hazards Contact information Production address Download Product Manual R5906788 03 Thor series Environmental information C...

Page 170: ...m Cd these chemical symbols will appear below the crossed out wheeled bin symbol By participating in separate collection of batteries you will help to ensure proper disposal and to prevent potential n...

Page 171: ...arco Factory No 16 Changsheng Road Changping District 102200 Beijing P R C 16 3 102200 Barco Visual Beijing Electronics Co Ltd No 16 Changsheng Road Changping District 102200 Beijing P R C 16 102200 M...

Page 172: ...R5906788 03 Thor series 172 Environmental information...

Page 173: ...5 pins connectors This standard is used for relatively short range communications and does not specify balanced control lines RS 232 is a serial control standard with a set number of conductors data r...

Page 174: ...media Interface is a compact audio video interface for transferring uncompressed video data and compressed uncompressed digital audio data from a HDMI compliant device the source device to a compatibl...

Page 175: ...cation Products that have been tested per the DCI Compliance Test Plan CTP are posted at the DCI compliance web site Notably DCI compliance does not require compliance to the full set of SMPTE DCP sta...

Page 176: ...Glossary R5906788 03 Thor series 176...

Page 177: ...ior 147 Filters 145 Filters wet 145 Lens 146 Color Backlight 67 Calibration 135 Commander 34 Communication 69 AUDIO AES 82 GPI 82 GPO 82 Introduction 70 LAN 82 SYNC 82 USB 2 0 82 USB 3 0 83 USB port 7...

Page 178: ...Chemicals 17 Hazards 170 HDD 80 About 80 Degrade mode 81 RAID broken 81 RAID recovery 81 Remove 102 103 Storage 81 Storage capacity 81 Validated list 81 HDMI 84 HDMI 1 4 Specifications 92 HDMI 2 0 84...

Page 179: ...1 ICMP 165 Power input setup 54 Power loop through Installation 56 Product safety labels 17 Production 171 Projection screen 38 Projector Air flow 28 Communication port 51 Projector ON OFF explained 1...

Page 180: ...Status light lasers 71 Switching OFF 107 Switching on 106 SYNC 82 System overview 25 Chillers and hoses 28 Commander 34 Communicator software 33 Thor 27 T Tail light 70 TDL 97 Technical Regulations 15...

Page 181: ...R5906788 03 Thor series 181...

Page 182: ...Barco NV President Kennedypark 35 8500 Kortrijk Belgium www barco com R5906788 03 07 09 2018...

Reviews: