P/N 130426 Rev.
D
25
Banner Engineering Corp.
•
Minneapolis, U.S.A.
www.bannerengineering.com • Tel: 763.544.3164
A-GAGE EZ-ARRAY
Instruction Manual
PC Interface
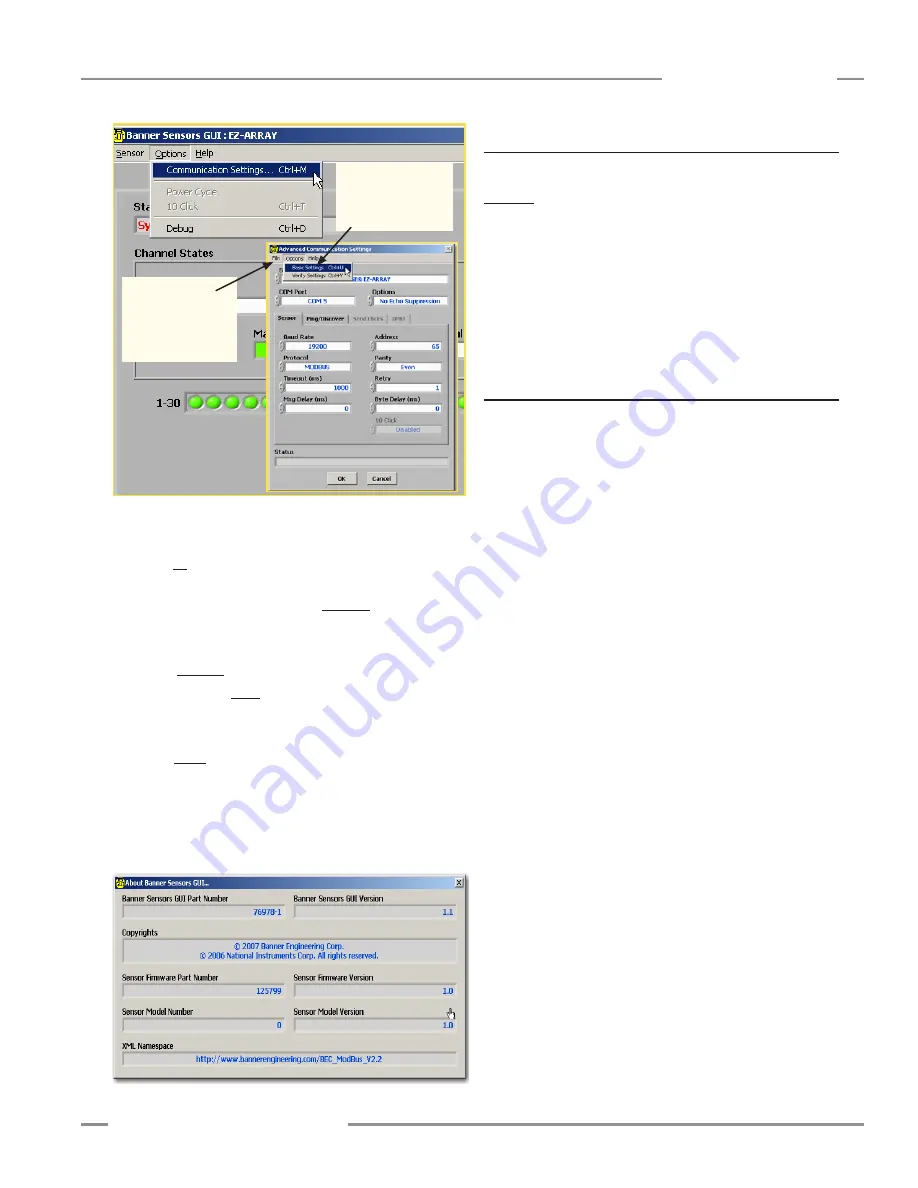
Figure 5-6. Options menu, Alignment/Status screen and resulting
Communication Settings screen
Figure 5-7. Help menu results in About Banner Sensors GUI screen
• Address
determines the sensor address (from
1
to
247
; factory
default is
65
) on the Modbus network.
• Timeout
determines how long (in ms) the PC will wait for a
response from the sensor. Default is
1000 ms
.
• Msg Delay
— Injects a delay (pause) between messages
between the GUI and a sensor (in ms).
• Protocol
(
Modbus
). Do not select Bannerbus.
• Parity:
Select
Odd
,
Even
, or
None
.
• Retry
— Number of times the GUI will attempt communication
with the sensor.
• Options
(
DPB1
,
No Echo Suppression
, or
Echo
Suppression
). EZ-ARRAY requires either
DPB1
or
No Echo
Suppression
for communication.
Help Menu
Help
(Ctrl + A) provides system version information for reference
in the event of a Factory applications help call; see Figure 5-7.
5.4 Factory Defaults
Factory default selections in this section are designated with an
underline. To reconfigure a sensor to the factory default optons,
access the .xml default file from the folder
Banner Engineering
> Banner Sensors GUI > Configs > Defaults
(see Section 5.1).
This changes all the setup fields in the GUI to the default values,
which can then be reviewed and/or written to the sensor.
NOTE: If reverting a configuration to the default values, first
record the sensor’s factory-calibrated Null and Span
values, so they can later be written to the sensor.
5.5 Alignment and Blanking
When the Alignment/Status screen is first displayed (see Section
5.3 and Figure 5-2), two functions can be performed: Start
Sampling and Align Sensor.
The System Alignment screen Channel States display can be
used to see an ongoing, realtime display of sensing status. Click
on
Start Sampling
; the Status window will read
Sampling in
Progress
until
Stop Sampling
is selected. When sampling is
not active, the Channel States displays are not updated.
The Channel States status fields
in the screen provide a
color-coded, visual status of the number of blocked (red), made
(green), and blanked (gray) channels. The selected sensor scan
type is displayed in the Scan Type text field. The “blanked”
value is a count of the beam channels that are ignored when the
sensor applies the current blanking configuration to the selected
measurement mode (see Section 1.10). The “blocked” value is
a count of blocked beams, excluding any blanked beams. The
“made” value is a count of unblocked and unblanked beams. The
total number of beams blocked, made, and blanked will always
equal the total number of sensor beam channels. Below this
row of text boxes is a graphic display that depicts the status of
each individual beam, color-coded to the totals boxes above it.
This graphic display may be used both to view which beams are
blocked or blanked and also to blank individual beams.
The Active Measurements status fields
depict the active
(selected) measurement modes (up to two), with the present
value for each, plus a history of the minimum and maximum
values recorded during the sampling of a target, held until a new
target is presented.
This
sampling tool
is useful for setting the
sensor discrete output levels, for verifying sensor operation, and
for proving out an application.
Perform electronic alignment when the sensor is first installed,
and repeat whenever the emitter or receiver (or both) is moved.
Electronic alignment also can be initiated using the remote
TEACH line or the Alignment switch on the receiver’s front panel
(see Sections 1.5 and 4.2).
Select Basic for an
abbreviated list; select
Advanced to access all
communications fields
File menu includes
Open and Save
commands to save
a communication
settings file on your PC


