Atomos Shogun Studio 2 User Manual Download Page 116

Zebra tab

To access the Zebra settings, tap the Settings icon and select the Zebra Tab.
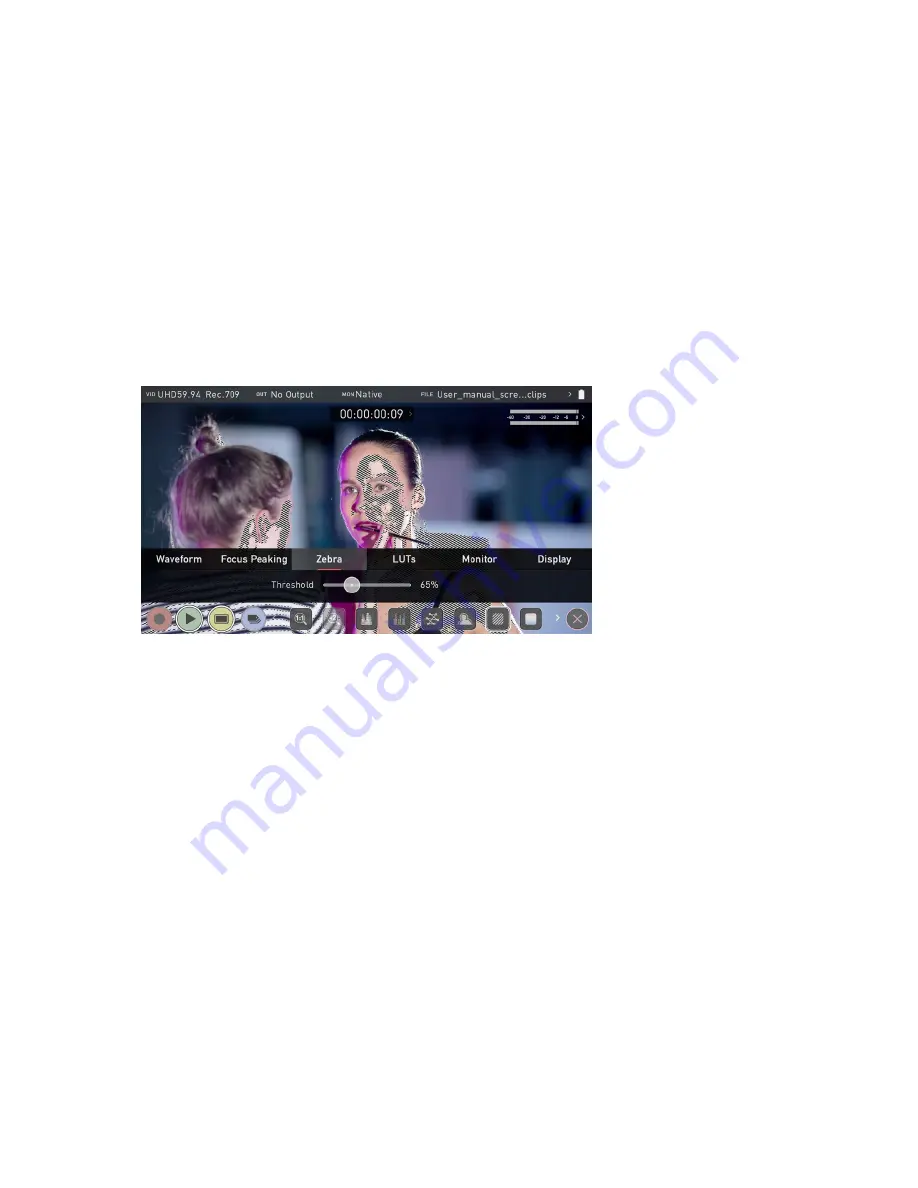
 

Zebra Threshold

These settings allow you to select an  exposure level in your image where you want the 
Zebra indicators to appear. A setting of 95-100% is commonly used to indicate areas of 
the image that are close to overexposure or that are overexposed. The Zebra threshold 
value can be adjusted by moving the slider left or right.

Summary of Contents for Shogun Studio 2

Page 1: ...U S E RMA N U A L S H O G U NS T U D I O2...

Page 2: ...s production galleries post production facility MCR ProAV Signage on set DIT sports officiating and many more Atomos defined the ability to migrate away from MPEG based GOP codecs with high levels of...

Page 3: ...not place on uneven or unstable surfaces l Do not insert anything but a Master Caddy II or AtomX SSDmini in the drive slot on your SHOGUN STUDIO 2 l Do not touch the SHOGUN STUDIO 2 screen with sharp...

Page 4: ...member that SDI cables use locking connectors and will not simply pull out if they are jerked or tripped over They are therefore a significant trip hazard to your equip ment which may be damaged if th...

Page 5: ...oftware provided with this EULA You agree you will not copy the Software except as necessary to use it with the ATOMOS SHOGUN STUDIO 2 You agree that you may not copy the written materials accompanyin...

Page 6: ...o ATOMOS includes its related entities subsidiaries and parent company Image credit on SHOGUN STUDIO 2 display and all other instances https un splash com freestocks Trademarks SHOGUN STUDIO 2 2 and A...

Page 7: ...ng your product Register your SHOGUN STUDIO 2 at my atomos com within twelve months of purchase to upgrade to a 3 year warranty Registering your product ensures you receive com munication on all futur...

Page 8: ...ivalent ones b Repair the goods c Pay the cost of replacing the goods or of acquiring equivalent ones and d Paying the cost of having the goods repaired The customer must notify ATOMOS of any defect i...

Page 9: ...fitness for a particular purpose The remedies outlined in this warranty are the exclusive remedy a customer from defective goods which are subject to the warranty ATOMOS does not warrant that the goo...

Page 10: ...nual Conventions To keep things simple but clear we ve only adopted two conventions in this manual A helpful tip suggestion or something to note because it s not obvious at first An important note or...

Page 11: ...Caddy II 4 4x short rubber feet with screws for desktop use 5 2x large rubber feet for elevating the front of the unit 6 2x IEC power cable or external PSU for Japan 7 1 x USB C Dock 8 2 x HDMI Cable...

Page 12: ...rack ears and screws from the protective packaging Line up the holes and screw in the supplied screws with the appropriate Philips head screwdriver Take care to screw each screw in 3 4 of the way in...

Page 13: ...n be attached and used during rack mount operation The 2 x larger feet are designed to raise the front of the unit to an angle to allow for easier desktop viewing It is advised to remove these larger...

Page 14: ...your actual unit 1 Power Button The power button as described earlier controls the simultaneous turning on or off both recorder channels With both power supplies connected press the Power button and...

Page 15: ...oth channels have an independent 3 5mm headphone jacks for monitoring audi o The volume control is located in the Meters menu accessed by touching the Audio Meters on the main screen or via the Settin...

Page 16: ...Out HDMI input connection used to record to the SHOGUN STUDIO 2 supports up to 4Kp60 HDMI output connection provides a live loop out or play out when in Playback mode Loop out between Channel 1 and C...

Page 17: ...422 9pin D Sub Each recorder has its own dedicated 9pin D Sub for RS422 machine control Simply connect your RS422 cable from a qualified device or controller to the relevant port on the SHOGUN STUDIO...

Page 18: ...13 RJ45 connection For SERVICE ONLY and should only be used if instructed to do so as part of firmware updates...

Page 19: ...ers We work closely with leading drive manufacturers to qualify as many options as possible Before using these drives they need to be mounted in the Master Caddy II For more information refer to To pu...

Page 20: ...ATOMOS website To purchase an SSDmini handle adapter visit atomos com accessories ssdmini handle Secure Erase For drives that carry the ATOMOS Logo such as the G Technology 4K SSD Angelbird 4KRAW Atom...

Page 21: ...or more details refer to Best Practice on page 31 File Recovery Your SHOGUN STUDIO 2 is able to detect when the drive is under stress and it will recover from any break in a recording by waiting until...

Page 22: ...allows you to efficiently offload the drive contents direct to your computer ATOMOS USB C 3 1 Powered Docking Station The integrated USB cable features one USB C 3 1 connector for use with computers w...

Page 23: ...the most up to date information on compatible drives please visit www atom os com drives Master Caddy 1 drives can connect to a Master Caddy Docking Station but are NOT compatible with the SHOGUN STUD...

Page 24: ...les will claim to be high speed but will lack the required shielding on both cable and connector to main tain a high quality signal If the signal contains errors that affect your recording your SHOGUN...

Page 25: ...remember that SDI cables use locking connectors and will not simply pull out if they are jerked or tripped over Therefore they can be a significant trip hazard and also a hazard to your equipment whi...

Page 26: ...rovided power cables to the sockets and then connect to mains power The dual power supplies internally balance the power draw across both units and additionally allows for backup power if one of the p...

Page 27: ...n on the device The SHOGUN STUDIO 2 does not feature a software off function in the menu and can only be powered down from the physical switch on the front of the unit Once powered pressing the power...

Page 28: ...will notice that Master Caddy III has a slim mer lighter weight design to ensure compatibility with the CONNECT range of hardware products For information on drives that are compatible with SHOGUN STU...

Page 29: ...ty Please observe all the usual precautions when handling them and NEVER touch the exposed SATA connector as static electricity may be harmful to your disk With the drive inside the Master Caddy III u...

Page 30: ...omething isn t set up or aligned properly If you experience difficulty when inserting the Master Caddy III to your device the drive may not be sitting correctly in the Master Caddy or the screw heads...

Page 31: ...SHOGUN STUDIO 2 and also reduces handling and potential damage to the disk casing Master Caddy II New 2 keyway system The Master Caddy II is hot swappable so you can do this at any time even while th...

Page 32: ...time the device name and file naming con ventions Date Time It is vital you set the correct date and time on your SHOGUN STUDIO 2 to ensure that the metadata for your files is correct To access the Da...

Page 33: ...each setting to set the time zone time and date used on the SHOGUN STUDIO 2 For more information refer to the Date Menu on page 90 Format Media Make sure your drive is correctly inserted and all data...

Page 34: ...The Media menu provides information on the drive currently inserted To format the drive tap the Format Drive button below...

Page 35: ...the connection or drive Try removing the drive and reattaching the drive Ensure correct alignment of your media The SHOGUN STUDIO 2 uses the exFAT file system for broadest com patibility Secure Erase...

Page 36: ...e you valuable time in post production The unit name serves two main purposes l Drive Naming Giving the unit a unique name aids with identification Once you have given it a name all drives subsequentl...

Page 37: ...will form part of the recorded clip filename SHGCNCT_S001_S001_T001 MOV How to modify the File Name l Use the icons at Scene and Shot to increase or decrease the numerical values l Once you have finis...

Page 38: ...installed 2 Visit atomos com product support and select SHOGUN as the product family then SHOGUN STUDIO 2 from the left side of the screen check the current AtomOS ver sion for SHOGUN STUDIO 2 which w...

Page 39: ...the ATOMST2 FW file to the root of the drive in the docking station Ensure that the firmware update file is on the root of the drive and not in a folder on the drive Make sure that the firmware file...

Page 40: ...the update has completed your SHOGUN STUDIO 2 will delete the FW file and power down 8 If your SHOGUN STUDIO 2 is already powered on you will be prompted to perform the AtomOS update when a drive con...

Page 41: ...ur SHOGUN STUDIO 2 becoming unresponsive there is a built in recov ery mechanism All you have to do is press and hold the on off button for 10 seconds If you do this your SHOGUN STUDIO 2 will revert t...

Page 42: ...erating system that has a clean intuitive and elegant design It s simple and straightforward but at the same time it provides access to the complete range of features No complicated sequences of butto...

Page 43: ...ter view of your subject while adjusting monitor assist functions such as focus peaking and false color Record Playback Monitoring and Edit features are easier than ever to use Monitor Mode Home REC R...

Page 44: ...Touch to access Power Menu Battery Indicator shows power level and flashes red when power is running low SETTINGS red Touch to access all Recording settings including input out put file media gamma ga...

Page 45: ...u are in for example Recording and Monitoring will display the Video Input type but if you are in Play mode Video Input will show the resolution and frame rate of the video clip currently cued or play...

Page 46: ...ng capacity of the drive POWER Touch to access Power Menu A Battery icon will be displayed when a battery is attached with the current power level of the battery displayed visually The icon flashes re...

Page 47: ...swipe monitoring icons to the left The icons will behave in a carousel like manner and you can swipe left and right to access any of the features At the bottom right is the Settings button Press the...

Page 48: ...n to home Any Monitoring functions you have activated will remain active until they are turned off SETTINGS yellow Touch to access Monitoring Feature Settings Set scope sizes adjust transparency LUTs...

Page 49: ...input No media The Rec icon is dimmed and disabled if there is no valid video input It also appears in where there is no media the disk is not formatted or the disk is full The button is dimmed becaus...

Page 50: ...ist SHOGUN STUDIO 2 2 uses a unit name scene shot and take convention to name the clips Select the clip you want to play by touching the file name and this will start to play back To exit the playlist...

Page 51: ......

Page 52: ...le Playlist options For more information on using playlists refer to Playlists on page 137 No disk disk not secure The Play button will be dimmed and disabled if there is no disk where there is a poor...

Page 53: ...itoring Features on page 46 section These features are explained in detail in the Monitoring Features section EDIT You can use the edit tools during recording and playback Pressing EDIT takes you into...

Page 54: ...ontain information as well as settings that can be adjusted Across the top of the menu page that opens are menu tabs that link to the other menu pages Swipe the menu tabs to the left or right to see a...

Page 55: ...pen the source selection screen By default SDI sources will use a single input signal however you can configure the device for dual or quad link as well as four separate inputs for switching The input...

Page 56: ...on the Switching 4x3G SDI option displays four different colored cables con nected to the SDI inputs to indicate four separate input sources Tap to select an input source on the left then tap on Confi...

Page 57: ...for Timecode and Trig ger in both Quad and Dual link modes Mode Tap Mode under SDI MULTILINK to set the mode for Multilink You will be taken to the Input Source screen to select your configuration The...

Page 58: ...1 or 12G SDI 2 Select channel Source 1 or 2 Dual Dual Link mode To monitor or a record a dual link SDI signal connect the SDI inputs to the 12G inputs IN1 and IN2 3G IN3 and IN4 are unused in Dual Li...

Page 59: ...uad Link mode a 4x 3G or 4 x HD SDI signal can be received SDI input signals must be connected in the correct order to input IN1 IN2 IN3 and IN4 to use Quad Link When a Quad Link signal is detected th...

Page 60: ...een multiple cameras or sources All inputs MUST have an identical frame rate and resolution For example 59 94p 29 97p and 23 98p cannot be mixed with 60p and 24p SDI input 1 is the master input and ne...

Page 61: ...maximum resolution and frame rate of each connected source for switching is 1080p60 which is 4 x 1080p 60fps feeds l All inputs MUST have an identical frame rate and resolution For example 59 94p 29 9...

Page 62: ...g automatically on the SHOGUN STUDIO 2 when it detects rolling timecode on the camera l Camera Manufacturer When you have an SDI signal connected to your SHOGUN STUDIO 2 and have selected SDI at Input...

Page 63: ...correctly attached via a compatible HDMI cable Log HDR Turn on to enable HDR image processing inside the SHOGUN STUDIO 2 Bring the control of post into your shoot record preview and review using HDR...

Page 64: ...ould not be used for regular Log About Log HDR A better understanding of Log and HDR will enhance your workflow and ultimately allow you to capture maximum amount of detail during recording and save y...

Page 65: ...g in HDR a signal will be output with the HDR flag to activate the correct settings on a compatible HDR display This can be useful if you wish to monitor log footage in the studio VIDEO OUT This secti...

Page 66: ...D 1080p DCI Crop When enabled this setting trims the 17 9 DCI input to 16 9 converting the signal to UHD When 4K to 2K Output is On the output will down scale to HD HDMI timecode Allows for the embedd...

Page 67: ...priate metadata flags Ensure that Dobly Vision is supported on the recieving TV Monitor select DOLBY at HDR Type and enable HDR Out in the Output menu Dolby Vision external playout of recorded files i...

Page 68: ...same time ISO Recordings The recordings section allows you to select which of your inputs to record as ISO record ings These are isolated recordings of each individual camera or source that you can u...

Page 69: ...annels of analog audio When armed the icons will be red and black and white when not armed for recording Once activated in the audio menu your channel settings will be displayed under AUDIO on the swi...

Page 70: ...e for audio will come from the input you switched to Choose 1 2 3 4 Allows you to select which channel s audio to use as an embedded digital audio source when switching between the sources Tap on the...

Page 71: ...rate and codec selected will determine the number of seconds being cached for Pre Roll Using a lower bit rate codec setting and shooting at a lower frame rate will increase the length of Pre Roll Whe...

Page 72: ...LUT record codec disk options etc CODEC Recording Format Codec Format To select a codec tap on the currently displayed codec to toggle between the options l Apple ProRes l Apple ProRes RAW l Avid DNx...

Page 73: ...four levels of compression HQX HQ SQ and LB DNxHD 220x DNxHR HQX are 10 bit whilst all oth ers variants are 8 bit and DNxHD36 is a proxy codec Apple ProRes RAW Apple ProRes RAW also requires free acti...

Page 74: ...d 1080i59 94 in NTSC regions e g USA Japan and 1080i50 in PAL regions e g Europe In order to convert the signal from the internal recording format to 1080i5994 or 1080i50 they use a process called 3 2...

Page 75: ...rrow underneath Record repeatedly until you see 1080p23 98 or 1080p24 displayed You may not get a green tick in this column immediately 2 Your SHOGUN STUDIO 2 needs to analyze the video for about 1 se...

Page 76: ...ure in the Panasonic camera settings that pulldown is not set to Advanced 1080p25 1080p29 97 or 1080p30 For these modes access the Record Menu tab and simply press the Record Format options repeatedly...

Page 77: ...multiple devices or with multicam shoots The unit name serves two main purposes l Drive Naming Giving the unit a unique name aids with identification Once you have given it a name all drives subseque...

Page 78: ...hot Allows you to adjust the Shot number that will form part of the recorded clip filename _ S001_S001_T001 MOV Use these icons to increase or decrease the numerical value for the Shot number Take Tak...

Page 79: ...Red Arri file naming is only supported when the signal is connected via SDI...

Page 80: ...ut and 8 digital channels via HDMI input as well as 2 analogue audio channels via the XLR Mic Line in Audio Meters The audio meters the display the audio levels for all active audio channels This allo...

Page 81: ...record Tap the record button for each channel that you want to record and it will turn red to indicate the fact that it is being recorded You can record multiple channels of audio by tapping multiple...

Page 82: ...usual 8 channels of audio when using HDMI If analog audio is recorded it will be placed as track 1 2 with embedded audio moving to 3 4 Note if analog channels are turned on but no audio is present in...

Page 83: ...the 3 5 mm headphone output on your SHOGUN STUDIO 2 For more information on meters and monitoring refer to Audio Menu on page 79 Left Gain Right Gain Use these icons to adjust the gain applied to the...

Page 84: ...ue input channel to Line Level via the XLR breakout cable l Pro Level 24 dBu Sets the analogue input channel to Pro Level Audio to via the XLR breakout cable Analogue gain can then be tuned by increme...

Page 85: ...Phantom Power You can choose to deliver phantom power over the XLR MIC input Tap Off to toggle Phantom Power On...

Page 86: ...or drive Try removing the drive and reattaching the drive Ensure correct alignment of your media Capacity Displays the total capacity of inserted media Format Tap to format the media inserted in your...

Page 87: ...ves that carry the ATOMOS Logo such as the G Technology 4K SSD Angelbird 4KRAW AtomX SSDmini by Angelbird and Sony an option for Secure Erase is presented This allows for the entire drive including th...

Page 88: ...appears in the cen ter top below the info bar In home screen mode the timecode display sits on the bottom near the REC PLAY MON EDIT icons Touching the Timecode display on the home screen just below...

Page 89: ...in REC RUN mode the user has the choice to start and stop recording remotely from the source camera timecode To enable rolling Timecode Start Stop functions simply set the HDMI Timecode switch to on W...

Page 90: ...adjust ing the start point of the SHOGUN STUDIO 2 s Timecode are not available as the Timecode is set by the SHOGUN STUDIO 2 s internal clock Auto Restart With this setting the Timecode will reset to...

Page 91: ...mat Menu Simply keep tapping until the desired format is shown The Time Month Day and Year are selectable and can be modified by clicking the blue plus and minus icons next to the desired fields TIME...

Page 92: ...When a battery is attached to your SHOGUN STUDIO 2 the Battery icon on the Power menu screen indicates the remaining power in the attached battery The numerical figure above the battery icon will indi...

Page 93: ...O 2 Tap Power Priority Mode to toggle between the following options l DC When DC Power plug icon is selected the plug icon will be white l Battery When Battery is selected shading inside the battery i...

Page 94: ...ional codecs and features For more information refer to Activation Menu You can also check on the ATOMOS website to ensure you are running the latest firmware www atomos com support Factory Reset Allo...

Page 95: ...t and have inser ted a formatted drive the following will happen l The REC icon will be illuminated red l The input source format will be shown in the top left corner of the information bar in monitor...

Page 96: ...Ready to Record monitor mode features No Input No Disk No Disk Formatted...

Page 97: ...UDIO 2 2 Start and Stop record control can be triggered by the following methods 1 Home Page Touch Screen 2 HDMI Rolling Timecode trigger 3 HDMI Camera trigger 4 SDI Camera Trigger 5 Via LANC serial p...

Page 98: ...g trigger in REC RUN will need to be used to trigger recording automatically at the same time as the camera starts recording HDMI Camera Trigger Record The HDMI Camera trigger is available for support...

Page 99: ...pressed on the camera in turn this will trigger the SHOGUN STUDIO 2 to start stop recording at the same time as the camera...

Page 100: ...E ICONS TO THE LEFT The icons will behave in a carousel like manner and you can swipe left and right to access any of the features At the bottom right is the settings button Press Settings to adjust b...

Page 101: ...Monitoring Features Activation Icons The Monitor Features will only be illuminated and available if there is an input signal detected...

Page 102: ...he loc ation of the screen you are viewing 4K 1 1 shows 1 4 of the 4K UHD image 2 1 Toggle to magnify the screen The indicator box shows the location of the screen you are viewing and you can move the...

Page 103: ...with a low contrast LOG curve and works in perfect part nership with HDR to illustrate and highlight the clipping point to allow you to correctly expose you image The WFM monitor tool is not currentl...

Page 104: ...d the WFM will move in to the bottom icon line up Vectorscope The Vectorscope display shows color information of hue shown as a phase vector and saturation measured by outward distance from the center...

Page 105: ...g feature provides you with visual guides that enhance the areas in your shot that are in focus The parts of the image that are in focus are highlighted by the selec ted color You can customize the se...

Page 106: ...False Color Scale The False Color Scale on the left hand side of the screen is a legend that correlates bright ness values in the image with specific colors The numbers in this scale represent the IRE...

Page 107: ...Only Exposure Blue only displays a greyscale image based on the blue channel of the input signal This is useful to observe the noise content of a video image as sensor noise is most visible in this ch...

Page 108: ...nd safe areas You can select from common cine social or TV frame guides The aspect ratio markers are very useful with the Ana morphic De Squeeze tool to preview crops that could be made in post Cine a...

Page 109: ...for the title safe area The Safe Area Grid Lines will still be visible when tapping the center of the screen to hide the overlays Anamorphic De Squeeze Allows you to de squeeze images when monitoring...

Page 110: ...l 2x l 1 8x l 1 5 l 1 33x l 1 25x Scopes are not available when anamorphic de squeeze is activated...

Page 111: ...en each monitoring tool is enabled It also provides settings for LUTs the dis play and monitor modes To access these settings tap on MON in the Information Bar across the top of the screen Alternative...

Page 112: ...Screen To toggle between Waveform Monitor sizes of 1 4 1 3 and Full Screen dur ing monitoring recording and playback tap on the bottom left corner of the screen You can also adjust the brightness and...

Page 113: ...displayed There are multiple display modes and you can select the color and width of peaking indicators Mode Tap on these icons to switch between the focus peaking modes Focus Peaking Color This optio...

Page 114: ...ion overlays the focus peaking indicators on top of an outline of the image Outline Color Adjusts the color used for peaking It can be helpful to adjust this color so that areas in focus stand out fro...

Page 115: ...Outline Width Adjusts the width used focus peaking indicators on screen Tap to select the desired width...

Page 116: ...settings allow you to select an exposure level in your image where you want the Zebra indicators to appear A setting of 95 100 is commonly used to indicate areas of the image that are close to overex...

Page 117: ...d for delivery of content designed to be viewed in REC 709 or SDR If you are working with 3D LUTs you can use color correction applications as well as applications like Davinci Resolve Photoshop or de...

Page 118: ...irm the fact that you want to overwrite the loaded LUT when you tap on the folder 5 Navigate through the disk file system to the LUT file to be uploaded and tap on the name of a LUT to select it A sec...

Page 119: ...rwrite the loaded LUT How to apply a LUT to your image 1 Tap on MON in the Information Bar across the top of the screen to access the Monitor Mode menu and select the LUTs tab 2 Tap on one of the eigh...

Page 120: ...ted LUT file name will display at MON in the Information bar when applied to the image LUT Processing In the LUTs tab the settings allow you to choose how the LUT will be applied l During recording l...

Page 121: ...ut of the SHOGUN STUDIO 2 This will allow for instant preview on a larger monitor or to be used with a wireless sender This function can also be combined with the down convert option that can be found...

Page 122: ...Remember that you can remove all overlays by simply tapping in the center of the screen Tap again to reveal the overlays...

Page 123: ...terms and differences between the existing Rec 709 standard dynamic range SDR and the way we view images in High Dynamic Range HDR Using Standards Native Rec 709 HLG PQ ATOMOS 10 uses predefined setti...

Page 124: ...d Rec 709 image or a Log image etc A standard Rec 709 image will look correct and a Log image will look flat Rec 709 With this mode selected the SHOGUN STUDIO 2 will map from the camera gamma gamut so...

Page 125: ...e will determine how much more detail is vis ible between HLG and PQ modes Monitor Options On the right side of the screen the monitor tab provides options for the SHOGUN STUDIO 2 Display Off The Disp...

Page 126: ...and the idle green status will be displayed on the front screen LED Flip Screen The Flip screen option allows you to invert the screen to meet your needs of operation Whilst the screen is inverted tak...

Page 127: ...tive mode At 100 brightness the image will be using the full 3000nit peak brightness of the display As with any electronic screen device increasing the brightness will increase the power draw and batt...

Page 128: ...a Gamma control allows you to create darker and richer shadows This may be useful when monitoring in bright daylight conditions Gain Gain will boost the image brightness and affect the highlights Rese...

Page 129: ...formation For more information refer to the Camera Output sec tion Now you are ready to capture Log and simultaneously use ATOMOS 10 image processing to preview the final HDR result in the field rathe...

Page 130: ...hat allows control of all aspects of the monitor through image processing to deliver the unclipped beauty of specular highlights through natural vibrant colors with a result that allows you to simply...

Page 131: ......

Page 132: ...op of the file list will playback Once within Play mode the complete Monitoring and Edit tool sets are available by tapping the buttons Switch from Monitor to Edit tools by toggling the MON and EDIT b...

Page 133: ...Main Controls REC Record Jump to Record Home Screen PLAY Play and pause the current clip MON Monitor Reveal hide monitoring tools Toggle on off EDIT Reveal hide edit tools Toggle on off...

Page 134: ...ols become available during playback Scrub bar Scrub forward and back through the clip Speed direction control The percentage slider allows for you to set the playback direction and speed This is per...

Page 135: ...ity to step the clip by 1 frame either for ward or reverse to give you chance to analyze the clip in more detail this is especially use ful when combined with the 2 1 zoom function Loop Tapping this i...

Page 136: ...or folder button will bring up a list of clips available on the drive This will show clip name with Scene shot Take numbers as well as resolution codec and duration Tap to highlight a clip this will s...

Page 137: ......

Page 138: ...ed Files folder then press the Playlist button which will turn green and reveal the options available To return to normal playback of all recorded materials press the Playlist icon again to deactivate...

Page 139: ...is based on their file names with the last clip recorded at the top of the list Tap Order to toggle the order that clips will be played back in Tags Tap this icon to cycle through the following option...

Page 140: ...and codec are supported The resolution and frame rate is indicated in the bottom right corner of the screen Favorite Playlist The cut tag edit points can be combined with the favorites Playlist allowi...

Page 141: ...More information about using the In and Out points tagging and XML Export is available in the Using Edit tools during recording playback and monitoring on page 158 section...

Page 142: ...f the screen whilst in Playback mode It contains information about the settings used in record ing the clip VIDEO OUT Format Displays the resolution and frame rate used in recording the selected clip...

Page 143: ...de the SHOGUN STUDIO 2 Camera Tap to scroll through to the manufacturer of the camera providing the input Options include Sony Fujifilm Canon Panasonic ARRI RED JVC Leica Nikon ZCAM Olympus OMSYSTEM a...

Page 144: ...this switch if you are feeding HDR images to the SHOGUN STUDIO 2 from a cam era or games console that supports HLG or PQ HDR output directly using the appropriate metadata flags If you are feeding Log...

Page 145: ...re When an output device is detec ted your device will automatically deliver an output signal over either HDMI or SDI For more information on these settings refer to Output Menu on page 64 HDMI Output...

Page 146: ...nd UHD will be scaled to HD 1080p DCI Crop When enabled this setting trims the 17 9 DCI input to 16 9 converting the signal to UHD When 4K to 2K Output is On the output will down scale to HD HDMI time...

Page 147: ...e device from a camera or games console that supports HLG or PQ HDR output using the appropriate metadata flags Ensure that Dobly Vision is supported on the recieving TV Monitor select DOLBY at HDR Ty...

Page 148: ...e one that appears whilst in the Recording and Monitoring modes For more information on these set tings refer to Audio Menu on page 79 section Some of the settings that are present in the Audio menu w...

Page 149: ...The Date menu that appears whilst in Playback mode is identical to the one that appears whilst in the Recording and Monitoring modes For more information on these settings refer to the Date Menu on pa...

Page 150: ...e Battery menu that appears whilst in Playback mode is identical to the one that appears whilst in the Recording and Monitoring modes For more information on these set tings refer to the Battery Menu...

Page 151: ...e that appears whilst in the Recording and Monitoring modes For more information on these set tings refer to the Info Menu on page 93 section Some of the settings that are present in the Info menu whi...

Page 152: ...u can easily see which parts of your recording you have marked to keep or reject Favorite clips can easily be built into a Playlist in playback mode and these tagged sub clips can then be played out b...

Page 153: ...Main Controls REC Record Press record to start recording PLAY Play and pause the current clip MON Monitor Reveal hide monitoring tools Toggle on off EDIT Reveal hide edit tools Toggle on off...

Page 154: ...Settings There are no user accessible settings available for Edit functions in the current ATOMOS firmware This may change with future firmware updates...

Page 155: ...ctor or work through your takes without having to dump the recorded files to another work station NLE In Point Set the in point by touching the button at desired point Simply touch on to indicate in p...

Page 156: ...ect Mark the take section as a reject Talent 1 Tag talent or assign another meaning Talent 2 Tag talent number 2 or assign another meaning event etc Over Exposed Tag clip as over exposed or out of foc...

Page 157: ...lor Use tag to indicate a problematic image or even use for another pur pose Noise Tag clip as containing background noise or interference Cut Away Tag clip as a cut away scene Close Up Tag clip as cl...

Page 158: ...nd post production time SmartLog is compatible with FCP XML fcpxml RESET Pressing the reset button will remove all tags and XML data from a clip This is useful when dealing with multiple takes or if a...

Page 159: ...ecording monitoring or playback In and Out points Set in and out points easily during playback Use the scrub control to accurately find the correct moment while the footage is paused Once markers are...

Page 160: ...ress Favorite or Reject and then press again to stop marking that section Multiple tags can be applied to your clips to provide Timecode accurate meta tags that can be exported to Apple FCP XML A gree...

Page 161: ...all tags and XML data from a clip This is useful when dealing with multiple takes or if a clip is tagged incorrectly Reset will not remove or affect in point and out point settings To remove markers y...

Page 162: ...uction Tags are useful during playback and allow you to create playlists featuring only selected recordings from your disk More information about playlists can be found in the Playback Playout section...

Page 163: ...length of time required to create the FCP XML file will vary depending on your recording time and the amount of flags applied 3 Once the XML file has been saved to your media you will be returned to t...

Page 164: ...dy II so that the SATA III connector lines up with the SATA II connector on the Docking Station Media can t be inserted the wrong way round 3 Gently slide your media all the way into the Docking Stati...

Page 165: ...her storage location Windows Open the disk in My Computer Select all the files or just the ones you wish to transfer copy and paste them to your desired location ctrl c copy ctrl v paste Mac OS Your S...

Page 166: ...roRes and Avid DNxHD DNxHR Applications need to support these codecs inside a MOV wrapper l Final Cut Pro version 7 l Final Cut Pro l Davinci Resolve 8 0 l Adobe CS5 with 5 51 update or later l EDIUS...

Page 167: ...Docking Station refer to the Connecting media on page 163 section 2 Insert the media with your footage into the Docking Station and you will see the drive appear in your Finder window 3 Start Final C...

Page 168: ...You ll see the folders in the SHOGUN STUDIO 2 drive Select the folder containing the foot age you want to import Click on Import All or Import Selected Individual clips can also be selected...

Page 169: ...Choose the Event you wish to import the footage into or create a new event Click on Import...

Page 170: ...Your Scene Shot and Take files now appear in the project window ready for use in your FCP project...

Page 171: ......

Page 172: ...to import the XML file l Directly from the docked hard drive l Manually into Final Cut Pro Automatic Import 1 Open the Finder 2 Select the drive in this example it is EXCVIDEO 3 Double click the unitn...

Page 173: ...e it is called XML Import 3 Select File Import XML 4 Select the SHOGUN STUDIO 2 drive under Devices 5 Choose the unitname FCPXML select Import 6 The XML will import Viewing tags in Final Cut Pro Once...

Page 174: ...You can also filter the view to only see specific tags e g favorite etc...

Page 175: ...information on the cameras that record ProRes RAW and the settings that can be adjusted refer to the ProRes RAW video cameras and devices section in the Apple Support Article How to adjust ProRes RAW...

Page 176: ...ctor to show the Info Inspector 5 Click on the word Basic at the bottom of the Info Inspector tab to open the Metadata View pop up menu and select Settings 6 The Info Inspector will now display the ca...

Page 177: ...setting selected in camera during the recording of the selected ProRes RAW clip s This is for information purposes only and is not adjustable ISO This drop down menu allows you to adjust the ISO sett...

Page 178: ...is for information purposes only and is not adjustable Temperature Adjusts the color temperature setting for the selected clip s This slider only appears where the camera used to record the ProRes RAW...

Page 179: ...nt operating temperature Up to 40 Degrees Celsius Construction and Control Body Aluminium alloy chassis Cooling Actively controlled fans and heat sink Tally light Rear and front Red border on the disp...

Page 180: ...Red LogFilm Log3G10 Log3G12 FujiFilm Flog PQ HDR10 HLG Nikon N Log Gamut Bt2020 DCI P3 PDCI p3 65 Sony SGamut SGamut3 SGamut3 cine Canon Cinema DCI P3 DCI P3 BT2020 Panasonic V Gamut Arri Alexa Wide...

Page 181: ...ite balance Exposure index Shutter speed angle Iris F stop ISO Gamma gamut Video Output Playout HDMI 1 x HDMI 2 0 4Kp60 per channel SDI Loop Out 2 x 12G SDI Backwards compatible Auto detec tion SDI Pl...

Page 182: ...RAW only up to 6K via SDI only 4K DCI 23 98 24 25 29 9 30 50 59 94 60p 4K UHD 23 98 24 25 29 9 30 50 59 94 60p 2K DCI 2046 x 1080 2k DCI 23 98 24 25 29 9 30 50 59 94 60p Sony FX9 RAW up to 180p FHD 19...

Page 183: ...4 Per recorder channel Switched Program Record Yes Up to 1080p 60 Multi Input Switching SDI A B toggle Yes up to 12G SDI per input Dual Input display Via Multi ISO input mode Multiple SDI input Up to...

Page 184: ...Yes adjustable Isolate color channel Blue Only Cine Frame Guides 16 9 2 4 1 2 35 1 1 91 1 1 85 1 4 3 Social Frame guides 9 16 1 1 1 91 1 4 5 Safe areas Action and Graphic Grid markers 9 grid Anamorphi...

Page 185: ...MOV wrapper What s in the box Accessories included SHOGUN STUDIO 2 2 unit 2 x rack ears with screws 4 x rubber feet with screws 2 x IEC power cable 2 x HDMI cable 5 x Master caddy II Optional extras...

Reviews: