page 36
speeds ranging from .06 to .19 sec. for 60° travel. Your choice
will be determined by your driving skills as well as your
budget because some of the high speed or high torque
servos can be very expensive. Below you will find a chart
which lists the servos that will bolt in or fit with only minor
modifications.
WARNING! We have determined that two of
the high torque Futaba servos will not work unless you modify
the servo mounting location in the truck. These are the S-
9302 and the S-9303 servos. If you choose to use these
servos, then making the servo fit will be your responsibility.
Guide to Recommended Servos
Airtronics
Futaba
JRpropo
94102
S148
5072
94322
S9403
5172
94737
S9304
47212
94738
S9402
47352
94151(Discontinued)
94152(Discontinued)
94155
94156
94157
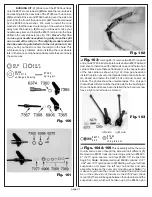
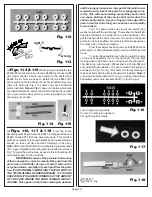
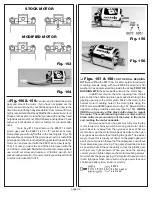
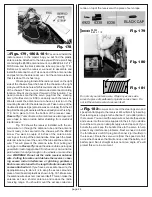
Note: Futaba servos require that you file the servo
mounting tab holes so they are closer to the servo case to
allow the #7527 servo mounts to fit closer to the servo case.
See fig. 138. JRpropo servos may require that you trim the
servo mounting tabs' outer edge to clear the steering servo
saver and battery hold down strap. See fig. 139.
TRIM
SHADED
AREA
Futaba servos
Fig. 138
TRIM
SHADED
AREA
JRpropo servos
Fig. 139
The photos that follow show the installation of a
Airtronics 94737 high torque, high speed ball bearing me-
dium sized servo for the steering servo.
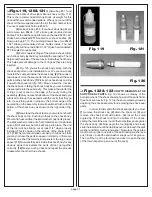
❏
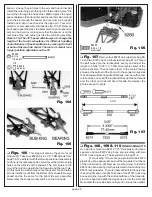
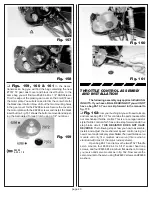
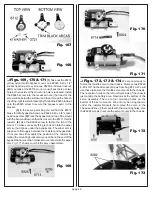
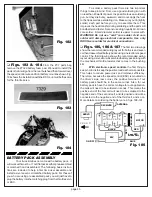
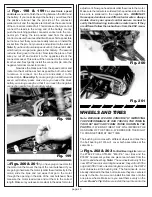
Figs. 140, 141 & 142
In bag #7-6 you will find
the #9180 servo horn tree (see fig. 140). On the parts tree are
servo horns that fit Airtronics, Futaba, & JRpropo servos.
Each servo horn is marked with the first letter of the brand of
radio the horn will fit.
Remove the correct servo horn from the parts tree.
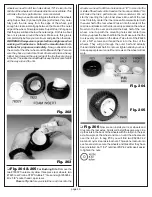
Now go to bag #6-14 and remove one #6270 short ball end.
Thread the #6270 ball end into the #9180 servo horn from the
back side as shown in fig. 141. This will place the ball end over
the servo when mounted.
Note: KOpropo servos should be
able to use the Airtronics servo horn. If you are using a
different brand of servo and none of our servo horns will fit
you must then use one of the stock servo horns that came
with your servo.
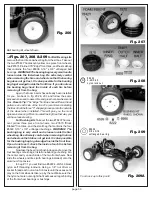
Before you can install our servo horn you must
remove the stock servo horn that comes installed on most
servos. Now place the servo in front of you. With the output
shaft facing you make sure the shaft is on the right side of the
servo. Now install the servo horn so that it points straight up
as shown in fig. 142. Before you secure the servo horn, rotate
the servo horn to the right and left. We want to make sure the
servo horn has almost the same travel in both directions. If
not then you will need to remove the servo horn, rotate its
mounting position by one or more splines and recheck until
everything is correct. Your finshed servo should look like fig.
142.
Fig. 140
Fig. 141
Fig. 142
#627 0
4-40
❏
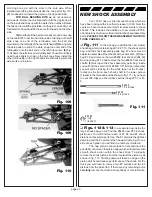
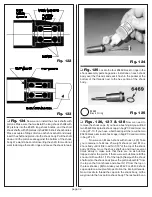
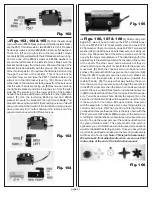
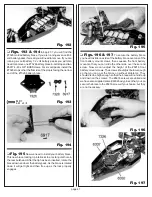
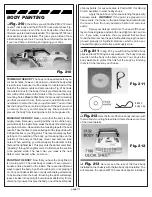
Figs. 143, 144, 145 & 146
In order to
properly install the steering servo, we will need to make any
servo modifications now. Refer back to figs. 138 & 139 for any
modifications to be made to Futaba or JRpropo servos.
In bag #7-6 you will find the #7336 plastic servo
mount parts (two mounts and two mount spacers) as shown
in fig. 143. From the same bag remove four #6917 4-40 x 3/
8" BHSScrews, and four #7337 servo shim washers (gold
colored).
The drawing in fig. 144 shows the maximum stan-
dard servo length. If your servo is longer you will need to add
the #7336 servo mount spacers. If your servo is smaller or

