62
PREPARING THE CATTLEMAXX FOR OPERATION
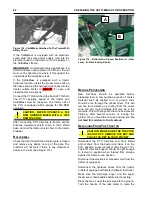
Figure 114 - CattleMaxx Attached To The Tractor With
Safety Chain.
If the CattleMaxx is equipped with an electronic
scale, plug the scale power supply cord into the
electrical outlet on the tractor or to the battery on
the CattleMaxx frame.
IMPORTANT:
On electronic scale applications, if a
bolt and nut are used in place of a hitch pin, the nut
must not be tightened to where it hits against the
underside of the weigh bar clevis.
If the CattleMaxx is equipped with a tractor
hydraulic function, install the proper male ends on
the hoses and plug the hydraulic line hoses into the
tractor outlets. Refer to page 81 for open and
closed center instructions.
Connect the PTO driveline to the tractor PTO shaft.
The PTO operating speed of the tractor and
CattleMaxx must be the same. The tractor half of
the PTO is equipped with 6 splines for 540 RPM
operation.
CAUTION: NEVER OPERATE A 540
RPM GRINDER MIXER WITH A 1000
RPM TRACTOR.
After connecting PTO driveline to tractor, anchor
driveline implement shield chain in main shield
base slot and the tractor shield chain to the tractor
drawbar.
R
OLLERMILL
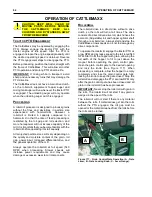
Check that the rollermill feed control gate is closed
and remove any debris on top of the gate. The
rollermill will not start if there is any material or
debris in the rolls (See Figure 115).
Figure 115 - Rollermill in Closed Position (A - Gate
Lever; B - Gate locking Knob).
B
EFORE
P
ROCESSING
New machines should be operated before
preparing feed. A few hundred pounds of coarse
material such as shelled corn or ground cobs
should be ran through the grinder mixer. This will
remove the protective oil coating from the mixer
cone and any metal particles that may be in the
machine. This will help polish the cone and prevent
bridging. After several minutes of running the
grinder mixer, unload the mixture and discard.
Do
not feed this mixture to the livestock.
D
ETACHING
F
ROM
T
HE
T
RACTOR
CAUTION: MAKE SURE THE TRACTOR
IS SHUT OFF, REMOVE THE KEY AND
PLACE THE KEY IN YOUR POCKET.
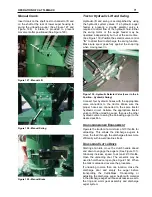
Disconnect the PTO driveline and front shield
anchor chain from the tractor and place it on the
PTO driveline support bracket (See Figure 116).
The PTO driveline support should be tight enough
to remain in position when rotated from storage
against the frame to use position.
Disconnect the electronic scale power cord from the
tractor (if equipped).
Disconnect the hydraulic hoses from the tractor
outlets (if equipped with tractor hydraulic functions).
Make sure the discharge auger and the auger
feeder are in their saddles before disconnecting.
Block the tires. Lower the jack stand to the ground.
Turn the handle of the jack stand to raise the
B
A
Summary of Contents for CATTLEMAXX 6105
Page 7: ...TABLE OF CONTENTS 5 ...
Page 14: ...12 INTRODUCTION Figure 5a Safety Decals ...
Page 22: ...20 PREPAIRING THE GINDER MIXER FOR OPERATION Figure 15 PTO Support ...
Page 27: ...OPERATION OF GRINDER MIXER 25 cleaned out Keep all bystanders away from the machine ...
Page 42: ...40 LUBRICATION Figure 70 Hammermill engaging pin shields removed for clarity ...
Page 49: ...SERVICE 47 Figure 96 Belt Removal Shields Removed For Clarity B C ...
Page 78: ...76 OPERATION OF CATTLEMAXX Figure 143 Hopper Inspection Window ...


