


GRINDER MIXER ADJUSTMENTS
33
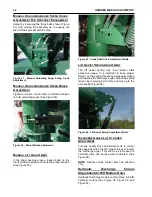
Figure 46 - Belt Tension Adjustment
•
Loosen idler bolt "G"
•
Adjust bolt "H" (See Figure 46) until
Hammermill Jack Shaft "D" (See Figure 47) is
parallel to Hammermill Housing. Measure both
sides.
Figure 47 - Belt Tension Adjustment
•
Tighten bolts "B","C", "E", and "F". Lock
adjusting bolts "A" in place with nut.
•
Adjust tension in Main Drive Chain (See page
24).
•
Reattach all shields removed or opened in
previous steps.
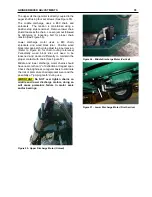
Figure 48 - Checking Belt Tension.
IMPORTANT:
Proper alignment of the pulleys must
be maintained when adjusting belt tension.
Belts should be checked periodically for proper
tension and alignment, especially when the
machine is new or when a new set of belts are
installed. (See Figure 49) During operation, if the
drive belts are very hot or are smoking due to being
loose, do not shut off the machine, but stop grinding
and allow the mill to continue to run for several
minutes until the belts have cooled. After the belts
have cooled, stop the machine to re-tension the
belts.
Figure 49 - Belt Pulley Alignment.
H
AMMERMILL
D
OOR
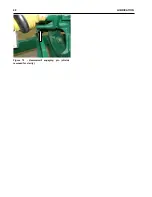
To increase the hammermill door pressure on the
screen, adjust the length of the T-handle threaded
end. Check the adjustment and tighten the locking
nuts in place against the pivot block. (See Figure
50)
Figure 50 - Hammermill Door Pressure.
E
F
H
G
D
Summary of Contents for CATTLEMAXX 6105
Page 7: ...TABLE OF CONTENTS 5 ...
Page 14: ...12 INTRODUCTION Figure 5a Safety Decals ...
Page 22: ...20 PREPAIRING THE GINDER MIXER FOR OPERATION Figure 15 PTO Support ...
Page 27: ...OPERATION OF GRINDER MIXER 25 cleaned out Keep all bystanders away from the machine ...
Page 42: ...40 LUBRICATION Figure 70 Hammermill engaging pin shields removed for clarity ...
Page 49: ...SERVICE 47 Figure 96 Belt Removal Shields Removed For Clarity B C ...
Page 78: ...76 OPERATION OF CATTLEMAXX Figure 143 Hopper Inspection Window ...


