19
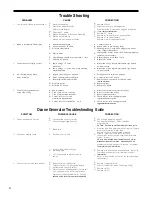
Trouble Shooting
Problem
Cause
Correction
After resolving the cause of any error code or any service valve, press NEXT & REGEN simultaneously for 5 seconds or disconnect power supply for
5 seconds at PC board and reconnect to resynchronize software with piston position.
valve eRROR COdes
Error Code 101
‑
Unable to recognize
A1. Control not reading piston position
A1. Resynchronize software with piston position by
start of regeneration
pressing start of regeneration NEXT and REGEN
buttons simultaneously for 5 seconds, until screen
changes. Initiate regeneration to verify function by
pressing and holding REGEN button until regeneration
initiates, step through regeneration modes by pushing
REGEN button each time motor stops.
A2.
Verify motor connection to PC board; motor wires
intact
and motor fully inserted to engage pinion.
A3. Verify correct assembly; PC board snapped onto
drive
bracket and wires are in backplate guides and drive
bracket snapped onto backplate. Verify three drive
gears are in place on drive bracket.
Error Code 102
‑
Unexpected stall
B1. Mechanical Binding
B1a
. Check for any foreign material in stack assembly
impeding piston movement and remove; verify seals
intact and
in place, if not, replace stack assembly and piston. B1b
. Check
for incorrect assembly, drive bracket not snapped
into place, motor pushed inside of barrel of drive bracket
(black gear on motor end should be flush with end of shaft).
B1c. Drive gears unable to rotate freely
‑
replace gear(s) if not
rotating freely.
B2. Buildup on piston
B2.
Clean with soft cloth and vinegar, or replace piston
B3. Improper voltage being delivered
B3. Motor unable to move piston, check voltage is present
to board
on 12V DC motor at start of regeneration modes.
Transformer should provide 12 volts when plugged
into outlet and not attached to board - if not replace
transformer
Error Code 103
‑
Motor ran too long,
C1. High drive forces on piston
C1. Loosen drive cap gear 1/4 turn
timed out trying to reach next position
C2. Address high drive forces
C3. Motor failure during regeneration
‑
replace motor
Error Code 104
‑
Motor ran too long,
D1. Piston unable to reach home position
D1. Incorrect assembly; check drive bracket is
correctly timed out trying to reach home position
seated and snapped into place on backplate,
wires
outside of guides on backplate can impede drive
bracket from correct position.
D2. Check PC board is seated on posts and snapped
into place on drive bracket
D3. Drive gear labels dirty or missing, missing or broken
gear, replace as needed
Mav eRROR COdes
After resolving any MAV error or servicing MAV, resynchronize software with piston positioning by pressing NEXT and REGEN buttons simultaneously for 5
seconds
or disconnecting power from PC board for 5 seconds and reconnecting.
AlTERNATING MAV DRIVE - ERROR CODES 106 & 107
Error Code 106
‑
Alternating MAV ran too long
A1. Control valve is programmed for alternating or as
NHWB without having MAV connected to board.
Reprogram valve to proper setting or connect MAV
to alternating MAV drive on PC board
A2. MAV motor not fully engaged with
gears
Error Code 107
‑
Alternating MAV stalled B. Mechanical Binding
B1. Open MAV and check for foreign material on stack
assembly, remove if present, verify seals intact and in
place. If not, replace stack assembly
B2. Drive gear should spin freely
‑
replace if necessary
aUXIlIarY MaV drIVe - errOr cOdeS 116 & 117
error code 116
‑
Auxiliary MAV ran to long
A1. Control valve is programmed for auxiliary MAV without
having MAV connected to board. Reprogram valve to
proper setting or connect MAV to two
‑
pin connection
labeled auxiliary drive on PC board
A2. MAV motor not fully engaged with
gears
error code 117
‑
Auxiliary MAV stalled
B1. Open MAV and check for foreign material on stack
assembly, remove if present, verify seals intact and in
Summary of Contents for PurAzone A03
Page 1: ...PurAzone A03 Filtration PurAzone A03 Filtration Filter Manual Owner s Filter Manual 2013 2014...
Page 5: ...5 Figure 2 Figure 4...
Page 14: ...13 NEXT to go to Step 15S...
Page 18: ...17 RETURN TO NORMAL MODE...
Page 20: ...16 NEXT to go to Step 10CS...
Page 34: ...28...

