background image

Novara Ethernet Keypads

4

 Instruction Manual - Novara Ethernet Keypads

Button Layout

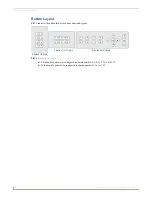
FIG. 3 indicates the button layout for 8 and 16 button Keypads: 



8-Button Keypads can be configured for button numbers 1-8, 9-16, 17-24, or 25-32.



16-Button Keypads can be configured for button numbers 1-16 or 17-32.

FIG. 3  

Keypads Button Layout

1

2

3

4

5

6

7

8

1

3

5

7

2

4

6

8

1

2

3

4

5

6

7

8

15

13

14

12

16

9

10

11

8-button US style

8-button UK/EU style

16-button US/UK style

Summary of Contents for Novara SP-08-E-US

Page 1: ...PDF provided by Conference Room AV AMX HPX U400 SP 08 E Novara 8 Button Keypad Module for HydraPort Table Boxes...

Page 2: ...Instruction Manual Keypads Novara Ethernet Keypads SP 08 E US Latest Release 05 18 2015...

Page 3: ...ked on the outside of each box The RMA is valid for a 30 day period After the 30 day period the RMA will be cancelled Any shipments received not consistent with the RMA or after the RMA is cancelled w...

Page 4: ...t Keypads 9 Overview 9 Locating the IP Address of the Keypad 9 Simulating the ID Pushbutton 9 Toggling Between IP Addressing Modes DHCP and Static IP 10 Assigning a Device ID to a Keypad 10 Resetting...

Page 5: ...21 REBOOT 21 SET_NDX_DESC 21 Telnet User Name and Password 22 Additional Notes 22 Setting a Telnet User Name and Password 22 Telnet Commands 23 or Help 23 DEVICE STATUS 23 EXIT 23 FACTORYFWIMAGE 23 GE...

Page 6: ...uction Manual Novara Ethernet Keypads SHOW CONNECTION LOG 27 Notes on Specific Telnet Clients 28 Windows Client Programs 28 Linux Telnet Client 28 Enabling Disabling Telnet on the Keypad 28 SHOW CONNE...

Page 7: ...iv Instruction Manual Novara Ethernet Keypads Table of Contents...

Page 8: ...net Keypad FIG 1 interfaces over Ethernet and receive power via any Power over Ethernet PoE injector or switch which conforms to the 802 3af standard Novara Ethernet Keypads include FIG 1 Novara 8 But...

Page 9: ...Connector 10 100 Button Layout 8 buttons blue backlit buttons with controllable feedback Rear Panel Connector Ethernet RJ 45 Ethernet Connector 10 100 Dimensions SP 08 E US 4 11 16 x 2 15 16 x 1 1 16...

Page 10: ...inimum Internal Clearance for 1 Gang US Conduit Boxes To ensure a proper fit with sufficient clearance US style Novara Keypads require the following minimum internal dimensions within the conduit box...

Page 11: ...16 button Keypads 8 Button Keypads can be configured for button numbers 1 8 9 16 17 24 or 25 32 16 Button Keypads can be configured for button numbers 1 16 or 17 32 FIG 3 Keypads Button Layout 1 2 3...

Page 12: ...you to use either straight through or crossover Ethernet cables The port LEDs show communication activity connection status speeds and mode information The LAN port also receives its power via the LAN...

Page 13: ...standard The network must be connected through the PoE injector to send power to the Keypad 1 Connect the PoE injector to an AC outlet 100 240V using a standard power cord 2 Connect the switch categor...

Page 14: ...learance US style Novara Keypads require the following minimum internal dimensions within the conduit box US 1 Gang HWD 2 9 x 2 1 x 2 5 74 mm x 53 mm x 64 mm These minimum interior dimensions will mai...

Page 15: ...Installation 8 Instruction Manual Novara Ethernet Keypads...

Page 16: ...es 3 Right click the Novara Ethernet Keypad and select Network Bind Unbind Device from the menu that appears The Bind Unbind Device dialog opens 4 By default the selected keypad appears in the Device...

Page 17: ...s buttons 1 and 2 on the keypad to assign a device address to the keypad See the NetLinx Studio Instruction Manual or consult the online help tool in NetLinx Studio for more information Resetting the...

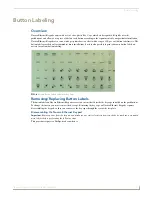
Page 18: ...your own button labels on acetate for custom button labeling Removing Replacing Button Labels The button labels on Novara Ethernet Keypads are acetate inserts that fit inside the key caps installed on...

Page 19: ...on label to fit inside the Key Caps Custom button labels must be cut to a 0 472 12 mm square to fit securely inside the Key Caps The thickness of the acetate used must not exceed 004 0 10 mm 2 Place t...

Page 20: ...ow these procedures closely the bottom of the Key Cap must be installed on the pushbutton before the Key Cap clips engage or there is a risk of the button being misaligned Also note that removing the...

Page 21: ...Cap is installed 3 Gently replace the Key Cap on the pushbutton Verify that the vertical orientation of the Button Label is correct relative to the Novara keypad Align the Key Cap with the target pus...

Page 22: ...for details 1 In NetLinx Studio click on the OnLine Tree tab in the Workspace Bar to view the devices on the System 2 Click Display and select Refresh System from the context menu This establishes a n...

Page 23: ...ated devices including the Device Controller are listed in the OnLine Tree 4 In NetLinx Studio select Tools Firmware Transfers Send to NetLinx Device FIG 13 The Send to NetLinx Device dialog opens 5 l...

Page 24: ...new information 3 Click Done to close the Device Addressing dialog 4 Click Reboot from the Tools Reboot the Master Controller dialog and wait for the System Master to reboot Note The STATUS and OUTPU...

Page 25: ...Upgrading Firmware 18 Instruction Manual Novara Ethernet Keypads...

Page 26: ...thernet Keypads including NetLinx and Telnet commands Button Layouts The following illustrations indicate the button numbers for the Novara Ethernet Keypads SP 08 E US Channels Channels on Novara Ethe...

Page 27: ...llumination in the Off state 0 EXPANSION Allows NetLinx code to query the keypad to determine whether any expansion keypads are attached to it Syntax EXPANSION Example SEND_COMMAND DEVICE_1 EXPANSION...

Page 28: ...0 44 Copyright AMX LLC If a Telnet password is set then user credentials are required Enter username Enter protected password Welcome to SP 08 E US v1 0 44 Copyright AMX LLC SEND_COMMANDs Cont Command...

Page 29: ...ich will then present the password prompt Here the defined password must be entered in order to successfully open the Telnet session Additional Notes Both the Telnet user name and password are case se...

Page 30: ...vel 1 0 Supported data types UByte UInt EXIT Exit the telnet session FACTORYFWIMAGE Reset unit to factory firmware image and reboots the Module GET CONFIG Display the current connection settings Examp...

Page 31: ...192 168 21 101 Subnet Mask 255 255 255 0 Gateway IP 192 168 21 2 MAC Address 00 60 9f 90 0d 39 GET LOCATION Displays the location parameter for NDP set by the SET LOCATION command on page 27 GET SN Re...

Page 32: ...nection settings interactively allowing the user to specify the mode If mode is TCP or UDP the master URL and port number can be specified as well If AUTO is selected the System number can be specifie...

Page 33: ...ve entered Domain Name amx com DNS Entry 1 192 168 20 5 DNS Entry 2 12 18 110 8 DNS Entry 3 12 18 110 7 Is this correct Type Y or N and Enter Y Settings written Device must be rebooted to enable new s...

Page 34: ...IP Addressing Modes DHCP and Static IP section on page 10 for details SET LOCATION Sets the location parameter for NDP Syntax SET LOCATION location Maximum length 25 characters If the name entered exc...

Page 35: ...a carriage return If an ALT 255 is entered two 255 characters are sent per the Telnet RAFT If the code to go back to command mode is entered ALT 29 which is the character is not sent but Telnet comman...

Page 36: ...Programming Ethernet Keypads 29 Instruction Manual Novara Ethernet Keypads...
Page 37: ...egistered trademarks of AMX AMX reserves the right to alter specifications without notice at any time It s Your World Take Control 3000 RESEARCH DRIVE RICHARDSON TX 75082 USA 800 222 0193 469 624 8000...

Reviews: