background image

   This PDF was provided by 

AV Ace

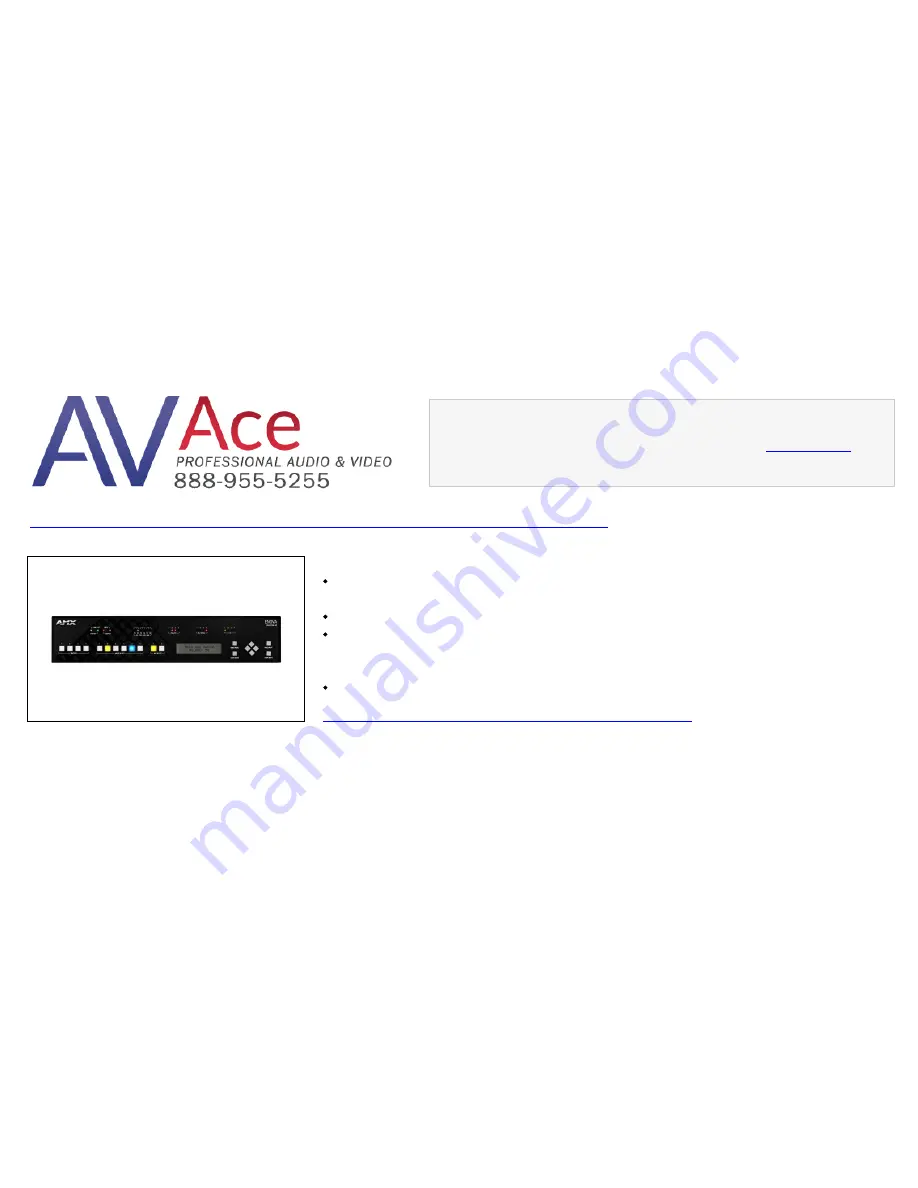
AMX DVX-2100HD-T 75W, 70V/100V 6x2 Multi-Format Presentation Switcher

Supported Video: HD resolutions up to 1080p and RGB resolutions up to 1920 x 1200
@ 60Hz
Amplifier: 75W, 70V/100V mono amplifier
Includes: 2 CC-NIRC, IR Emitter w/3.5mm Phoenix (FG10-000-11), 2 CC-DVIM-VGAF,
DVI to VGA Adapter (FG10-2170-13) 2 Front Rack Mounting Brackets (62-1905-04),
installation guide
DIMENSIONS (HWD): 3 1/2" x 17" x 14 1/4"

View more DVX-2100HD-T product information

Your selected PDF begins on the next page

Summary of Contents for Enova DVX-2100HD

Page 1: ...olutions up to 1920 x 1200 60Hz Amplifier 75W 70V 100V mono amplifier Includes 2 CC NIRC IR Emitter w 3 5mm Phoenix FG10 000 11 2 CC DVIM VGAF DVI to VGA Adapter FG10 2170 13 2 Front Rack Mounting Bra...

Page 2: ...de All In One Presentation Switchers Enova DVX 2100HD 6x2 All in One Presentation Switcher DVX 2100HD SP DVX 2100HD T Latest Release 05 30 2011 Enova DVX 2100HD 6x2 All in One Presentation Switcher Op...

Page 3: ...ked on the outside of each box The RMA is valid for a 30 day period After the 30 day period the RMA will be cancelled Any shipments received not consistent with the RMA or after the RMA is cancelled w...

Page 4: ...n for replacement of the obsolete outlet 10 Protect the power cord from being walked on or pinched particularly at plugs convenience receptacles and the point where they exit from the apparatus 11 Onl...

Page 5: ...Important Safety Instructions ii Enova DVX 2100HD 6x2 All In One Presentation Switcher Operation Reference Guide...

Page 6: ...0 INPUT SELECT Pushbuttons 11 MIC SELECT Pushbuttons 12 LCD Display 12 VIDEO MENU Pushbutton 12 AUDIO MENU Pushbutton 13 TOOLS Menu Activation 13 Navigation Pushbuttons 13 VIDEO AUDIO MUTE Pushbuttons...

Page 7: ...36 DVI to Triple RCA Cable Pinout Information 36 DVI A Male to S Video Male Cable 38 DVI to S Video Cable Pinout Information 38 DVI A Male to HD15 VGA Male Adapter 39 DVI to VGA Cable Pinout Informati...

Page 8: ...Product Summary 66 Web Assistant 66 Training 66 Programming 67 NetLinx Commands 67 NetLinx Channels 67 NetLinx Levels 68 NetLinx Protocol 68 SEND_COMMANDS 69 AUDIO SEND_COMMANDs 70 AI input O output...

Page 9: ...VIDEO_MUTE 78 VIDEO_TESTPATTERN 78 VIDEO_TESTPATTERN 78 VIDIN_BRIGHTNESS 78 VIDIN_BRIGHTNESS 78 VIDIN_COLOR 78 VIDIN_COLOR 79 VIDIN_CONTRAST 79 VIDIN_CONTRAST 79 VIDIN_FORMAT 79 VIDIN_FORMAT 79 VIDIN...

Page 10: ...PE 84 INTENSITY_LCD 84 System SEND_COMMANDs 85 DSP_FWVERSION 85 FGPA_FWVERSION 85 INTENSITY_LCD 85 INTENSITY_LEDS 85 INTENSITY_LEDS 85 UTP Input SEND_COMMANDs 86 SB 86 SB 86 SS 86 SS 86 WPVIDEO 86 UDM...

Page 11: ...MANDs 93 CHARD 93 CHARDM 93 GET BAUD 93 RXCLR 93 RXOFF 93 RXON 94 SET BAUD 94 TXCLR 94 Appendix A 95 Available Pixel Display and Refresh Rates 95 DVI and VGA Supported Input Resolutions 95 Composite a...

Page 12: ...ces and functional requirements in every room There is also a stereo line level output with its own mixing and equalization settings The DVX 2100HD T can deliver 70V and 100V amplified variable mono a...

Page 13: ...acro functions are programmed via NetLinx code See the MACROS Pushbuttons section on page 10 for details INPUT SELECT pushbuttons 6 back lit multi color source selection pushbuttons select an Input so...

Page 14: ...balanced or unbalanced audio and switchable Phantom Power AUDIO OUTPUTS LINE 1 3 5mm 5 pin captive wire connector provides for fixed or variable balanced or unbalanced mono or stereo line level audio...

Page 15: ...ed Yellow LED lights On when the connection speed is 100 Mbps and turns Off when the speed is 10 Mbps L A link activity Green LED lights On when the Ethernet cables are connected and terminated correc...

Page 16: ...mposite Universal Transmitter Wallplate UK FG1402 50 KW KB KA UPX CS A EU Composite Universal Transmitter Wallplate EU FG1402 50 EW EB EA UPX RGB A US RGB Universal Transmitter Wallplate US FG1402 51...

Page 17: ...g the supplied mounting screws 3 Install the DVX 2100HD in the mounting rack by using the mounting screws to affix the unit to the rack 4 Connect any applicable wires to the DVX 2100HD Refer to the Wi...

Page 18: ...entilation requirements of all the items of equipment installed within the rack The maximum operating ambient temperature is 40 C 104 F When installing equipment into a rack distribute the units evenl...

Page 19: ...Overview 8 Enova DVX 2100HD 6x2 All in One Presentation Switcher Operation Reference Guide...

Page 20: ...le on FG1905 01 and 02 models FIG 3 DVX 2100HD SP front panel FIG 4 DVX 2100HD SP rear panel FG1905 04 FIG 5 DVX 2100SP rear panel FG1905 01 MACROS INPUT SELECT MIC SELECT LCD Display AUDIO MENU I O L...

Page 21: ...de for information on programming macros FIG 6 Front Panel LEDs Front Panel LEDs Label Color Description LINK ACT green Blinks when receiving LAN data packets STATUS green Blinks to indicate that the...

Page 22: ...input After making your selection the selected input type Audio Video or both is switched to the selected output see the Video Settings section on page 41 for details on selecting a video output and...

Page 23: ...lections see below and indicates current status of any adjustments made to settings within these menus VIDEO MENU Pushbutton Press the VIDEO MENU pushbutton FIG 11 to access the video options displaye...

Page 24: ...splayed on the LCD display The Tools Menu enables you to see status information such as IP address and installed firmware versions as well as adjust LCD and LED backlight intensity Use the UP and DOWN...

Page 25: ...protocols for data transmission FIG 16 provides wiring specifications for the RS 232 422 485 connectors FIG 14 Audio Video Mute buttons FIG 15 RS 232 422 485 Device Port connectors FIG 16 RS 232 422 4...

Page 26: ...is I O port uses 5V logic but can handle up to 12V without harm When used for outputs the I O port acts as a switch to GND and is rated for 200mA 12 VDC The PWR pin provides 12 VDC 200 mA and is desig...

Page 27: ...ogram is causing inadvertent communication and or control problems If necessary place the on board Master in PRD mode and use the NetLinx Studio v 2 x program to resolve the communication and or contr...

Page 28: ...re you have previously saved the driver This will create a new virtual COM port on your PC 3 Edit the Serial Communication settings in NetLinx Studio to use the virtual COM port created in step 2 and...

Page 29: ...whether to use half duplex or full duplex mode This communication is reflected via the front ICSP LED FIG 24 provides the pinouts and signals for the LAN connector and cable FIG 25 describes the blink...

Page 30: ...m current draw is less than 2 Amps To isolate the DVX 2100HD from high inrush current AxLink devices or potential power faults on the AxLink bus it is strongly recommended that you power external AxLi...

Page 31: ...he GND wire on the AxLink PWR connector when using a separate 12 VDC power supply Do not connect the PWR wire to the AxLink connector s PWR opening FIG 28 4 pin mini Phoenix connector wiring diagram u...

Page 32: ...INPUT connectors 1 4 however the DVX 2100HD allows independent switching of video and audio so video and audio inputs of the same number do not have to be connected to the same source equipment Source...

Page 33: ...to the source or destination connector You also can use a CC 3 5ST5 RCA2F 2 RCA Female to 5 Pin Phoenix Cable FG10 003 20 for this type of connection MIC INPUTS 1 2 Two 3 5mm 3 pin captive wire MIC I...

Page 34: ...output provides fixed or variable balanced or unbalanced mono or stereo output Destination devices require either balanced differential or unbalanced single ended connections FIG 35 illustrates optio...

Page 35: ...VX 2100HD SP connect speakers to the AMP output as displayed in FIG 37 On the DVX 2100HD T connect a speaker to either the 70V or 100V terminals as displayed in FIG 38 FIG 36 Amplified Audio Output FI...

Page 36: ...ingle Link Cable section on page 33 DVI A Male to 5 BNC Male Cable section on page 35 DVI A Male to Triple RCA Male Cable section on page 36 DVI A Male to S Video Male Cable section on page 38 DVI A M...

Page 37: ...e connected to the UDM Hub or UPX wallplate via CAT5 or CAT5e cabling FIG 41 The DVX 2100HD and the adapter cables listed above utilize industry standard pinouts The only adapter cable that is unique...

Page 38: ...Signals 568B Termination Color Pair RGB YPbPr CVBS S Video Color Pair 1 3 Red Y CVBS S1 Y 2 2 3 Red Y CVBS S1 Y 2 3 2 Blue Pr CVBS S3 C 3 4 1 Green Pb CVBS S2 1 5 1 Green Pb CVBS S2 1 6 2 Blue Pr CVB...

Page 39: ...using a DVI I to DVD D HD15 splitter See the VIDEO INPUTS 1 4 section on page 25 for DVI I connector pinout details DVI I VIDEO OUTPUT 2 is available on FG1905 04 and FG1905 05 units FG1905 01 and FG...

Page 40: ...ing table lists the HD 15 VIDEO OUTPUT connector pinouts FIG 43 VGA Output Connector HD 15 VIDEO OUTPUT Connector Pinouts Pin Signal Function 1 Red Red signals 2 Green Green signals 3 Blue Blue signal...

Page 41: ...t have been tested to deliver video at the specified resolutions without significant signal degradation In particular lower resolutions 640 x 480 720 x 480 and 800 x 600 can often be delivered signifi...

Page 42: ...ce and capacitance losses which can negatively impact the quality of the image When using a UPX HDMI A wallplate with the UDM OUTPUT port note that the UPX HDMI A wallplates do not send video over the...

Page 43: ...n cables Again audio from these sources is connected to the corresponding audio inputs Connections for audio and video from two Laptop PCs are routed to a UDM 0102 or a pair of UPX wallplates and the...

Page 44: ...rain wire aluminum foil mylar shield for TMDS signals and shields Five UL1589 28AWG for DDC_CLK DDC_DATA Hot_Plug_Detect 5VDC and GROUND The above bundles jacketed together in aluminum foil shield and...

Page 45: ...12 Pin not populated in DVI D connector 13 TMDS DATA 3 P TMDS DATA 3 P 13 Pin not populated in DVI D connector 14 5VDC 5VDC 14 28AWG 15 GROUND GROUND 15 28AWG 16 HOT PLUG DETECT HOT PLUG DETECT 16 28A...

Page 46: ...DC DATA Pin populated in DVI A connector but not connected for this cable 8 ANALOG VERTICAL SYNC VSync Signal Black BNC center pin 9 TMDS DATA 1 N Pin not populated in DVI A connector 10 TMDS DATA 1 P...

Page 47: ...corresponds to the CC DVI RCA3M DVI to Component Composite cable FG10 2170 09 available from AMX DVI to Triple RCA Cable Pinout Information DVI A Connector Pin Signal Name Signal Name RCA connector pi...

Page 48: ...D 0 5 Pin not populated in DVI A connector 20 TMDS DATA 5 N Pin not populated in DVI A connector 21 TMDS DATA 5 P Pin not populated in DVI A connector 22 TMDS CLOCK SHIELD Pin not populated in DVI A c...

Page 49: ...r this cable 8 ANALOG VERTICAL SYNC Pin populated in DVI A connector but not connected for this cable 9 TMDS DATA 1 N Pin not populated in DVI A connector 10 TMDS DATA 1 P Pin not populated in DVI A c...

Page 50: ...Y C Returns shields 1 2 BACKSHELL SHIELD Pin populated in DVI A connector but not connected for this cable This cable type corresponds to the CC DVIM VGAF DVI to VGA adapter FG10 2170 13 available fro...

Page 51: ...21 TMDS DATA 5 P Pin not populated in DVI A connector 22 TMDS CLOCK SHIELD Pin not populated in DVI A connector 23 TMDS CLOCK P Pin populated in DVI A connector but not connected for this cable 24 TMD...

Page 52: ...le lists the options available by pressing the VIDEO MENU button FIG 48 LCD display FIG 49 Navigation buttons Video Menu Options Output Select ALL 1 or 2 Use the left and right navigational buttons to...

Page 53: ...e whether you want the video from the selected input to display in black and white You can set the Black White option to On or Off The default setting is Off Brightness Use the left and right navigati...

Page 54: ...ght navigational buttons to select the appropriate output test pattern Audio Settings The following table lists the audio options available on the LCD display by pressing the AUDIO MENU button on the...

Page 55: ...lizer from 20 to 20dB in 12dB increments The default value is 0 EQ 5KHz Use the left and right navigational buttons to adjust the 5KHz level on the equalizer of the selected audio input You can set th...

Page 56: ...not by the Gain setting Increasing Preamp Vol will cause the limiter to activate at a lower input threshold Decreasing Preamp Vol will cause the limiter to activate at a higher input threshold After...

Page 57: ...network Gateway Displays the gateway address of the network IP DNS Addr Displays the IP or DNS address of the device Master FW Version Displays the version number of the firmware the Master is using...

Page 58: ...DVX 2100HD resides on 1 Open a web browser and type the IP Address of the target DVX 2100HD in the Address Bar 2 Press Enter to access WebConsole for that DVX 2100HD The initial view is the WebContro...

Page 59: ...three control buttons across the top of the main page FIG 51 WebControl This is the option that is pre selected when the WebConsole is accessed Use the options in the Manage WebControl Connections pag...

Page 60: ...nter the IP address of the presentation switcher in the location bar of the web browser If you do not know your switcher s IP address see the Locating the IP Address of the Presentation Switcher secti...

Page 61: ...LCD display on the front panel of the presentation switcher Perform these steps to locate the IP address of the unit 1 Simultaneously press the Video Menu and Audio Menu buttons The Tools menu appear...

Page 62: ...e input s current settings The option button changes color depending on whether video is detected on the selected input Green indicates a signal is detected yellow indicates a signal is detected but c...

Page 63: ...ceived from the connected display device Click Manual to manually select the video resolution for display output 1 After clicking the option button select a resolution from the corresponding drop down...

Page 64: ...es you make reflect instantaneously on your source input and output devices FIG 56 displays the Audio page for the DVX 2100HD SP This page differs from the page for the DVX 2100HD T in that it contain...

Page 65: ...ck Dual Mono when using independent microphones Each mono microphone input is mixed onto both the right and left channels Click Single Stereo when connecting a single stereo source Microphone input 1...

Page 66: ...dB in 1 dB steps Bass Use the slider to set the bass level for the mic You can set the bass between 20 and 20 dB in 1 dB steps Treble Use the slider to set the treble level for the mic You can set th...

Page 67: ...ant any video 3 Audio Select an option button to select the corresponding audio input You can only select one audio out put at a time Select None if you do not want any audio 4 Microphone 1 Click the...

Page 68: ...ut O output on page 70 CL on page 76 or CI input O output on page 76 for more information 1 B Source Input Gain Adjust the input audio level gain attenuation for each input GAIN value Level 5 or Rampi...

Page 69: ...mic limiter for Mic 2 This protects the speakers from loud transients like those seen when a microphone is dropped This also provides significant feedback protection AUDMIC_LIMITER ENABLE DISABLE See...

Page 70: ...1 or Ramping Channels 24 and 25 For mute use AUDIO_MUTE ENABLE DISABLE or Channel 26 momentary or Channel 199 Toggling See VOLUME on page 75 or AUDIO_MUTE on page 71 for more information 1 T UDM Audi...

Page 71: ...Audio Video Configuration 60 Enova DVX 2100HD 6x2 All in One Presentation Switcher Operation Reference Guide...

Page 72: ...2100HD is 0 zero The Master device number is always 0 and cannot be changed The Device Number can be viewed on the DVX 2100HD Configuration Manager Device Configuration page 6 Launch NetLinx Studio a...

Page 73: ...et directory in the Browse For Folder dialog FIG 60 The selected directory path is displayed in the Send To NetLinx Device dialog Location text box Assuming that the specified target directory contain...

Page 74: ...o reboot After it reboots the DVX 2100HD actually goes through the upgrade process During the upgrade process the Status LED blinks and the DVX 2100HD stays offline Once the upgrade is complete the LE...

Page 75: ...100HD 6x2 All in One Presentation Switcher Operation Reference Guide Additional Documentation For additional information on using NetLinx Studio refer to the NetLinx Studio online help and Operation R...

Page 76: ...vel for the audio output Adjust the volume bass mid range and treble Select which audio input is routed to the audio output AMXmeetingroom is delivered in a NetLinx token file TKN and a password prote...

Page 77: ...select Demo Mode Demo Mode allows for full use of the system for 14 days with the Demo Mode watermark on the user pages Product Summary The AMXmeetingroom product summary is available at http www amx...

Page 78: ...nnel is active 25 Ramping Channel Volume is ramped down while channel is active 26 Momentary Function Channel Cycle volume mute when channel is activated 50 UTP Wallplate Channel Buttonpress indicatio...

Page 79: ...ge is 0 255 13 Reserved 14 Video Input Hue range is 0 255 20 Audio Mic PreAmp range is 0 255 21 Audio Mic Band1 Bass range is 0 255 22 Audio Mic Band2 Treble range is 0 255 23 Reserved 24 Reserved 25...

Page 80: ...ain Amp Output and most audio commands are addressed to this port Audio Output Port 2 is the Line Output and normally tracks the Main Amp Output port with small exceptions For example the AUDOUT_VARIA...

Page 81: ...OMMAND string of the form AUDIN_NAME name AUDIN_NAME Sets the input name of the audio port Sets the input name of the audio port addressed by the D P S to name Syntax SEND_COMMAND DEV AUDIN_NAME name...

Page 82: ...mple SEND_COMMAND MIC_1 AUDMIC_GAIN Returns a COMMAND string of the form AUDMIC_GAIN value AUDMIC_GAIN Sets the input gain on the microphone Sets the input gain of the microphone addressed by the D P...

Page 83: ...AMP_GAIN Sets the pre amplifier gain on the microphone Sets the pre amplifier gain of the microphone addressed by the D P S to value Syntax SEND_COMMAND DEV AUDMIC_PREAMP_GAIN value Variables value 0...

Page 84: ...port addressed by the D P S has the variable setting enabled or disabled Syntax SEND_COMMAND DEV AUDOUT_VARIABLE Example SEND_COMMAND AUDIO_OUTPUT_2 AUDOUT_VARIABLE Returns a command in the form AUDOU...

Page 85: ...Q Requests the equalizer setting of the band on the audio input port Queries the equalizer setting of band band on the input audio port addressed by the D P S Currently only supported for the MIC1 and...

Page 86: ...XPOINT Requests the mix level of the input port Queries the mix level contribution of the audio input port addressed by input to the audio output mixer addressed by output Syntax SEND_COMMAND DEV XPOI...

Page 87: ...nd 2 Switches audio input port 3 to audio output port 1 Since audio has only one output port the multiple output port specification is ignored CL Switches the audio or video or both inputs to the outp...

Page 88: ...O_OUTPUT_1 OSD Returns a COMMAND string of the form OSD ENABLED DISABLED OSD Sets the status of the OSD setting Enables or Disables the On Screen Display OSD setting on the video port addressed by the...

Page 89: ...tch These are case sensitive Example SEND_COMMAND VIDEO_OUTPUT_1 VIDEO_TESTPATTERN Cross Hatch Sets the test pattern to display to Cross Hatch VIDIN_BRIGHTNESS Requests the input brightness of the vid...

Page 90: ...the D P S to value Syntax SEND_COMMAND DEV VIDIN_CONTRAST value Variables value 0 100 Example SEND_COMMAND VIDEO_INPUT_1 VIDIN_CONTRAST 50 Sets the contrast of video input port 1 based on D P S to 50...

Page 91: ...ple SEND_COMMAND VIDEO_INPUT_1 VIDIN_NAME Returns a COMMAND string of the form VIDIN_NAME name VIDIN_NAME Sets the input name of the video port Sets the input name of the video port addressed by the D...

Page 92: ...string of the form VIDIN_RES_REF h x v rate VIDIN_RES_REF Sets the resolution and refresh rate of the video input port Sets the resolution and refresh rate of the video input port addressed by D P S I...

Page 93: ...by the D P S Syntax SEND_COMMAND DEV VIDOUT_ASPECT_RATIO ratio Variables ratio Full Stretch Zoom Anamorphic Example SEND_COMMAND VIDEO_OUTPUT_1 VIDOUT_ASPECT_RATIO Full VIDOUT_RES Requests the resolut...

Page 94: ...ax SEND_COMMAND DEV VIDOUT_RES_REF horizontal x vertical refresh rate Variables horizontal An integer value representing the horizontal vertical An integer value representing the vertical May have an...

Page 95: ..._LOCKOUT ENABLED DISABLED FP_LOCKOUT Sets the front panel lockout Enables or Disables whether the Front Panel is supposed to be locked out Syntax SEND_COMMAND DEV FP_LOCKOUT ENABLE DISABLE Example SEN...

Page 96: ...the front panel light intensity Sets the intensity of the lighting brightness of the LED buttons that are part of the Front Panel Syntax SEND_COMMAND DEV INTENSITY_LEDS intensity value Variables inten...

Page 97: ...e SEND_COMMAND dvRX1 SB46 Sets the brightness to 46 about half way SS Requests the cable compensation for video arriving over RJ45 cable Queries the cable compensation for video arriving over RJ45 to...

Page 98: ...ed to compensate for cable losses a value of 0 provides no additional boost whereas a value of 70 compensates for around 300m cable 15 Red skew controls the delay added to a video signal to compensate...

Page 99: ...ess and skew of the signals delivered to a connected display based on distance and cable type Syntax SEND_COMMAND DEV SD D CC Variables D distance 0 255 cable length in meters C cable type CAT5 CAT5e...

Page 100: ...the device might respond with SKR 7 SKR Sets the skew on the red video channel Syntax SEND_COMMAND DEV SKR R Variables R skew value delay in 2nS intervals 0 31 skew value Example SEND_COMMAND dvRX1 S...

Page 101: ...ichever exists is generated for the one hundred digit Uses CTON and CTOF times for pulse times Syntax SEND_COMMAND DEV CH channel number Variables channel number 0 199 channels Example SEND_COMMAND dv...

Page 102: ...ated by the CH or XCH send commands in tenths of seconds Syntax SEND_COMMAND DEV CTON time Variables time 0 255 Given in 1 10ths of a second Default is 5 0 5 seconds Example SEND_COMMAND dvRXIR CTON 2...

Page 103: ...the IR code as 3 4 3 enter Mode 1 Example x x x enter SEND_COMMAND dvRXIR XCH 3 Transmits the IR code as 0 0 3 enter SEND_COMMAND dvRXIR XCH 34 Transmits the IR code as 0 3 4 enter SEND_COMMAND dvRXIR...

Page 104: ...ntax SEND_COMMAND DEV CHARDM time Variables time 0 255 Measured in 1 millisecond increments Example SEND_COMMAND dvRXRS232 CHARDM 10 Sets a 10 millisecond delay between all transmitted characters GET...

Page 105: ...ster SET BAUD Set the serial communication parameters Syntax SEND_COMMAND DEV SET BAUD baud parity data stop Variables baud baud rates are 115200 57600 38400 19200 9600 4800 2400 1200 parity N none O...

Page 106: ...720x480p 240 720 480 240 480p CEA 861 720x576p 50 720 576 50 576p CEA 861 720x576p 100 720 576 100 576p CEA 861 720x576p 200 720 576 200 576p CEA 861 800x500 60 800 500 60 VESA CVT 800x600 56 800 600...

Page 107: ...024 75 VESA DMT 1280x1024 85 1280 1024 85 VESA DMT 1360x764 60 1360 764 60 VESA CVT 1360x768 60 1360 768 60 VESA DMT 1440x900 60 1440 900 60 VESA DMT 1440x900 75 1440 900 75 VESA DMT 1440x900 85 1440...

Page 108: ...2 720x480p 60 720 480 59 9 480p SMPTE 293M CEA 770 2 ITU R BT 1358 720x576i 50 720 288 50 576i 720x576p 50 720 576 50 576p ITU R BT 1358 1280x720p 50 1280 720 50 720p50 SMPTE 296M 1280x720p 60 1280 7...

Page 109: ...A DMT 1024x768 75 1024 768 75 VESA DMT 1280x720p 60 1280 720 60 720p CEA 861 1280x800 60 1280 800 60 VESA CVT 1280x1024 60 1280 1024 60 VESA DMT 1360x768 60 1360 768 60 VESA DMT 1440x900 60 1440 900 6...

Page 110: ...Appendix A 99 Enova DVX 2100HD 6x2 All In One Presentation Switcher Operation Reference Guide...

Page 111: ...you have the opportunity to gather the information and experience you need to deliver strong AMX solutions Plus AMX courses also help you earn CEDIA NSCA InfoComm and AMX continuing education units C...

Reviews: