Installation and Setup
44
Hardware Reference Manual – DXLink Twisted Pair™ Transmitters/Receiver
DX-TX or HDMI TX – Attaching Signal, Transport, and Control Cables
IMPORTANT:
Before attaching cables, be sure to set the DIP switch’s toggles if necessary (see page 36).
IMPORTANT:
Do not use the RJ-45 connector labeled “DXLink” for connecting to a standard Ethernet Network.
NOTE:
Power, IR, and RS-232 ports are covered in their own sections.
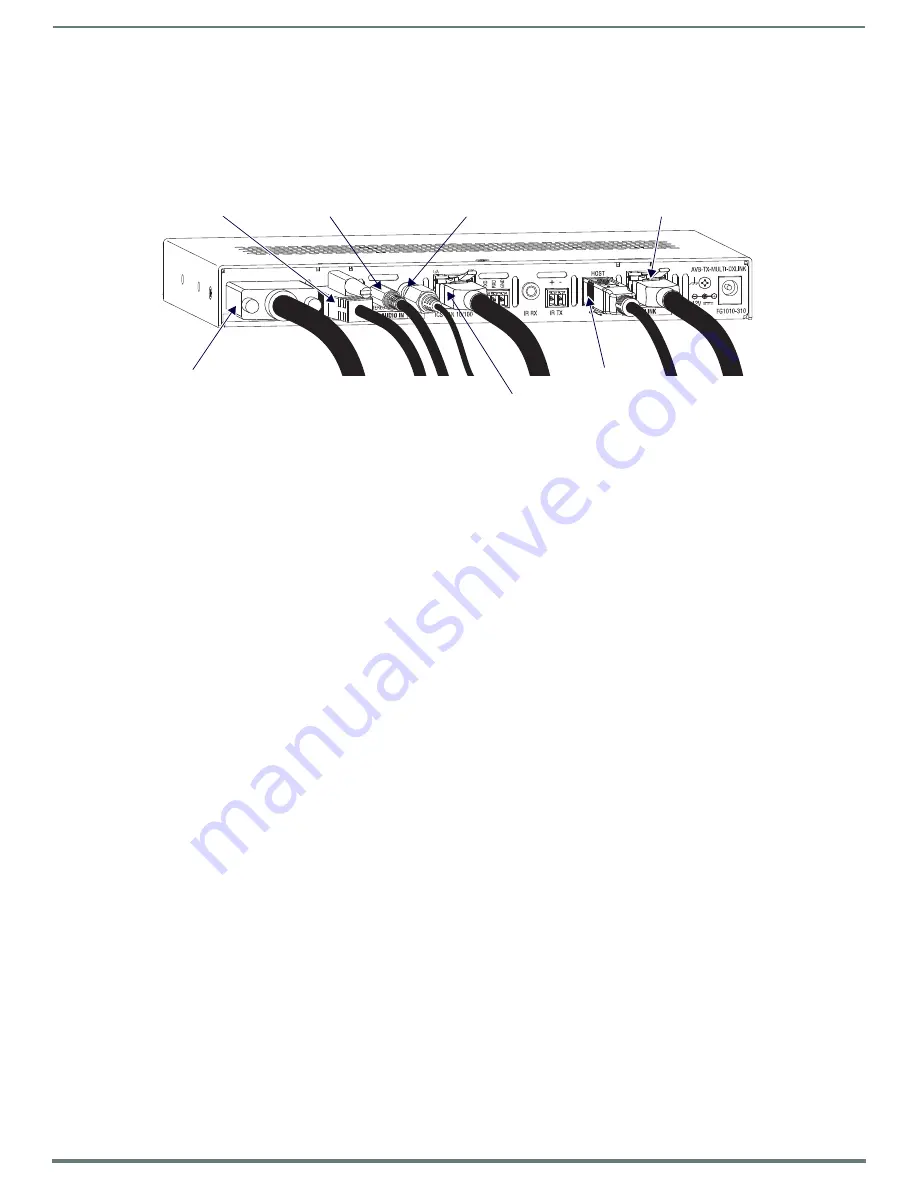
To attach signal, transport, and control cables to DX-TX or HDMI TX:
1.
DX-TX only
– Attach the HD-15 cable from the source device to the Video In connector (for pinouts for VGA, component, S-
Video, and composite, see page 105).
2.
HDMI In connector – Attach the HDMI cable from the source device to the HDMI In connector.*
3.
DXLink connector – Attach a twisted pair cable to the DXLink connector for UTP transport to the switcher (or DX-RX).
4.
Stereo Audio In jack (optional) – Plug in the analog audio cable from the stereo audio source into the Stereo Audio In jack.
For audio precedence information, see page 41.
5.
Digital Audio In jack (optional) – Insert the S/PDIF (RCA) plug on the digital audio cable from the digital audio source into the
Digital Audio In jack. For audio precedence information, see page 41.
6.
ICS LAN 10/100 connector (optional) – Attach a twisted pair cable from this connector to a LAN.
7.
If necessary, set the video and audio formats using commands (for NetLinx programming information, see page 64).
8.
USB Host port (optional) – Attach USB cable from PC. The port’s default is “enabled.” For USB port information, see page 18.
For USB SEND_COMMAND information, see page 77.
* DVI cable can be used instead (via a DVI-to-HDMI cable adapter); however, the advanced audio support from HDMI will not be
available.
NOTE:
The ID Pushbutton places the module in ID Mode for setting the NetLinx ID (device only) and provides additional functionality,
such as placing the device in Static IP Mode or DHCP Mode. For complete information, see page 56.
DX-TX or HDMI TX – Applying Power
IMPORTANT:
If desktop power is used to power the Transmitter, only the provided desktop power supply should be used and it must
not be altered in any way. Remote power can only be provided via a switcher or a DXLink power injector. AMX does not support the use
of any other power supplies or power injectors as these may potentially damage the DXLink equipment.
Important Power Considerations for Enova DGX Systems
Local power – Local power (desktop power supply) always takes precedence over power via the DXLink line from the
switcher. However, if a locally powered module is connected to a switcher and the local power is lost (i.e., unplugged or
turned off), the module will power down and then automatically power back up using power from the switcher via the
DXLink connection (increasing the overall power draw on the switcher). When local power is restored, it automatically
replaces the power over the DXLink line.
DXLink power – When modules are being powered by an Enova DGX DXLink board or DXLink power injector (using power via
the DXLink line), to maintain the switcher’s power redundancy, we recommend that you:
Determine the power budget based on the Input/Output boards used and the quantity of powered endpoints (modules);
see page 31.
Do not use local DC power jack on module (even if local power adapter is turned off).
NOTE:
When using DXLink Power from an Enova DGX Switcher, we recommend wiring a technical ground for the ungrounded sources/
destinations with respect to the DXLink Transmitters/Receivers and switcher (see page 37).
FIG. 31
Attach signal and control cables (DX-TX shown)
HDMI In connector
Stereo Audio In jack
USB port
ICS LAN 10/100
Digital Audio In jack
Video In connector
DXLink output connector


