American DJ
®
- www.americandj.com - Accu Color 250™ Instruction Manual Page 36
American DJ
®
- www.americandj.com - Accu Color 250™ Instruction Manual Page 35
Accu Color 250™
Optional Gobo
This unit comes with an optional gobo. There is also a 30°
beam angle lens
(Optional But Not Included)
. Follow the
instructions below to install the gobo and/or lens when desired.
Caution!
Never open the unit when in use. Always disconnect
the main power before attempting to change the gobos.
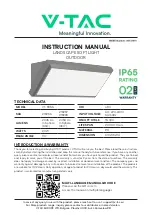
1. To change the gobo, you must remove the top half of the
unit. The top half of the unit has the LED menu on it.
2. Unscrew the four phillips screws in the top half of the unit.
Remove the top half of the unit.
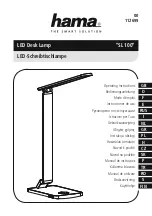
3. When you remove the top half you will be able to see four
thumb screws. See the picture below for reference.
Optional Gobo holder screws in here
Optional 30° beam angle lens scr
ews in her
e
Accu Color 250™
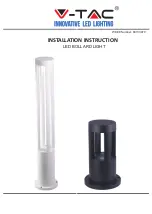
DMX Traits cont.
Channel Value
Function
3 88 - 90 COLOR MOTOR RESET
91 - 93 NO FUNCTION
94 - 96 SHUTTER & DIMMER MOTOR
RESET
97 - 99 NO FUNCTION
100 - 119 INTERNAL PROGRAM 1
120 - 139 INTERNAL PROGRAM 2
140 - 159 INTERNAL PROGRAM 3
160 - 179 INTERNAL PROGRAM 4
180 - 199 INTERNAL PROGRAM 5
200 - 219 INTERNAL PROGRAM 6
220 - 239 INTERNAL PROGRAM 7
240 - 255 SOUND ACTIVE