9
-EN
01GB05IVA106E.fm
ALPINE IVA-D106E 68-12118Z27-A (EN)
Accessory List
•
Head unit .............................................................................1
•
Power Cable ........................................................................1
•
Pre OUT/AUX cable.............................................................1
•
Mounting Sleeve ..................................................................1
•
Mounting Bracket ................................................................2
•
Flush Head screw (M4 x 3)..................................................8
•
Hexagon washer-head screw (M4 x 6)................................4
•
Rubber Cap .........................................................................1
•
Hex Bolt ...............................................................................1
•
Front Frame .........................................................................1
•
Carrying bag .......................................................................1
•
Owner's Manual.............................................................1 set
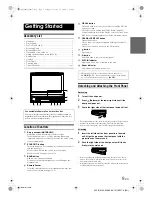
Location of Controls
Rotary encoder/MUTE/AUDIO
Adjust the volume by turning to the left or right.
Turns the Mute mode on or off by pressing repeatedly.
If pressed and held for at least 2 seconds, the audio setup
screen is displayed.
SOURCE/
button
Turns the power on. Press and hold for at least 2 seconds to
turn the power off.
Monitor open: Recalls the source selection screen.
Monitor closed: Changes the source.
BAND button
Radio mode: Changes the band.
Visual source (except navigation screen): Changes the
display mode.
Remote Sensor
Point the optional remote control transmitter towards the
remote sensor within a range of 2 m.
VISUAL button
Press and hold for at least 2 seconds to recall the VISUAL
selection screen.
If VISUAL is set in “Setting the VISUAL Button” (page 34),
momentarily press to recall the VISUAL selection screen, and if
NAV. is set, momentarily press to recall the navigation screen.
OPEN/CLOSE/FLAT button
Opens the monitor.
Closes the monitor by pressing and holding for at least 2
seconds.
Press to set the open monitor to the flat position.
button
Ejects a disc.
button
Use this button to remove the front panel.
DISC IN Indicator
Lights up when a disc is inserted in the unit.
Power Indicator
This indicator is lit when power is on.
Detaching and Attaching the Front Panel
Detaching
1
Turn off the unit power.
2
Press
(Release) at the lower right side until the
front panel pops out.
3
Grasp the right side of the front panel and pull it out.
•
The front panel may become hot in normal usage (especially the connector
terminals on the back of the front panel). This is not a malfunction.
•
To protect the front panel, place it in the supplied carrying bag.
Attaching
1
Insert the left side of the front panel into the main
unit. Align the groove on the front panel with the
projections on the main unit.
2
Push the right side of the front panel until it locks
firmly into the main unit.
•
Before attaching the front panel, make sure that there is no dirt or
dust on the connector terminals and no foreign object between the
front panel and the main unit.
•
Attach the front panel carefully, holding the sides of the front panel to
avoid pushing buttons by mistake.
Getting Started
Connectable to Remote Control Interface Box
You can operate this unit from the vehicle’s control unit when an
Alpine Remote Control Interface Box (optional) is connected. For
details, contact your Alpine dealer.
•
The buttons on the face of this unit are shown in bold (e.g.
SOURCE/
). The onscreen buttons that appear in the display
are shown in bold enclosed by [ ] (e.g.
[BAND]
).
01GB00IVAD106E.book Page 9 Tuesday, January 15, 2008 2:48 PM


