


AM-64x DAT High Capacity Tape Drives
Page 3
PDI-00649-00, A01
System Type
Mounting Kit
VME Rack Mount
PDB-00625-60
VME Pedestal
PDB-00625-61
AM-2000M/AM-3000M *
PDB-00625-61
AM-1400/AM-1600 Desktop **
PDB-00647-50
AM-990 VME and SBC
Not required
Eagle Deskside
Not required
AM-1600 Deskside
Not required
* With Roadrunner or AM-540 upgrade (AM-649-01 not compatible with AM-540)
** For AM-647 DAT drives only—other models not compatible
Make sure you have the correct mounting kit before you begin. The DAT drive has the same
environmental specifications as your computer.
TOOLS REQUIRED
For most installations, the only tools you need to install the DAT drive are a #2 Phillips-head
screwdriver and a pair of needle-nose pliers.
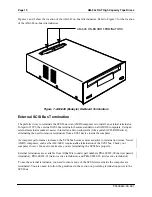
PREPARING THE DAT DRIVE FOR INSTALLATION
First, you need to select the SCSI ID of the DAT drive by setting the proper switches on the back of the
drive. If your computer uses a SCSI bus, you have seven SCSI IDs to choose from (0 through 6). The
SASI bus supports only SCSI IDs 0 through 3. Don't worry if you have a gap in your device addressing;
AMOS doesn't require that each device be defined in sequence.
Except for systems with a CMOS configuration menu, such as the Eagle 550 and Roadrunner
060, if you want to be able to warm boot from your DAT drive, you must set it to a higher SCSI
ID than any other tape device on the bus.
While the Wide SCSI-2 bus supports IDs up to 15, all Alpha Micro DAT drives are narrow SCSI
devices. You cannot set one to an ID higher than 6, even if it is attached to the Wide SCSI-2 bus
with an adapter.
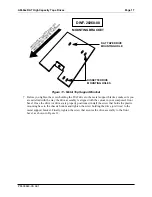
Jumpers and Switch Settings
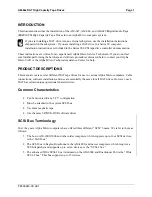
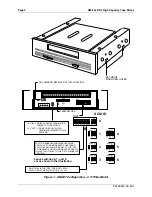
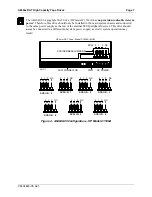
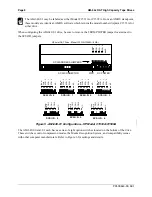
Refer to the following illustrations for configuration and jumper locations for your DAT drive.
There are two physically different types of AM-647 DAT drives: a 3.5” wide, half-height drive in
a 5.25” mounting bracket, and a full 5.25” wide, half-height drive. Although their physical sizes
and the locations of jumpers and switches are different, the same configuration rules apply to
both.


