AT-SBx908 GEN2 Installation Guide for Virtual Chassis Stacking
181
Replacing AT-SBxPWRSYS1-80 DC Power Supplies
To replace an AT-SBxPWRSYS1-80 DC Power Supply, perform the
following procedure:
1. Turn off the circuit breaker to the AT-SBxPWRSYS1-80 DC Power
Supply.
2. Turn off the On/Off switch on the front panel of the power supply. Refer
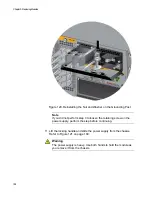
3. Use a #2 screwdriver to loosen the screw on the locking handle. Refer
Note
Do not lift the locking handle yet.
Figure 113. Loosening the Screw on the Locking Handle
Summary of Contents for AT-FAN08
Page 10: ...Figures 10...
Page 12: ...Tables 12...
Page 16: ...Preface 16...
Page 38: ...Chapter 1 Overview 38...
Page 60: ...Chapter 2 Virtual Chassis Stacking 60...
Page 82: ...Chapter 4 Installing the Chassis 82 Figure 34 Example of Adjusting the Equipment Rack Brackets...
Page 104: ...Chapter 4 Installing the Chassis 104...
Page 140: ...Chapter 5 Powering On the Chassis 140...
Page 166: ...Chapter 7 Cabling the AT XEM2 Line Card Ports 166...


