background image

23

Alibi™ NVR Firmware V3.6.22 User Manual

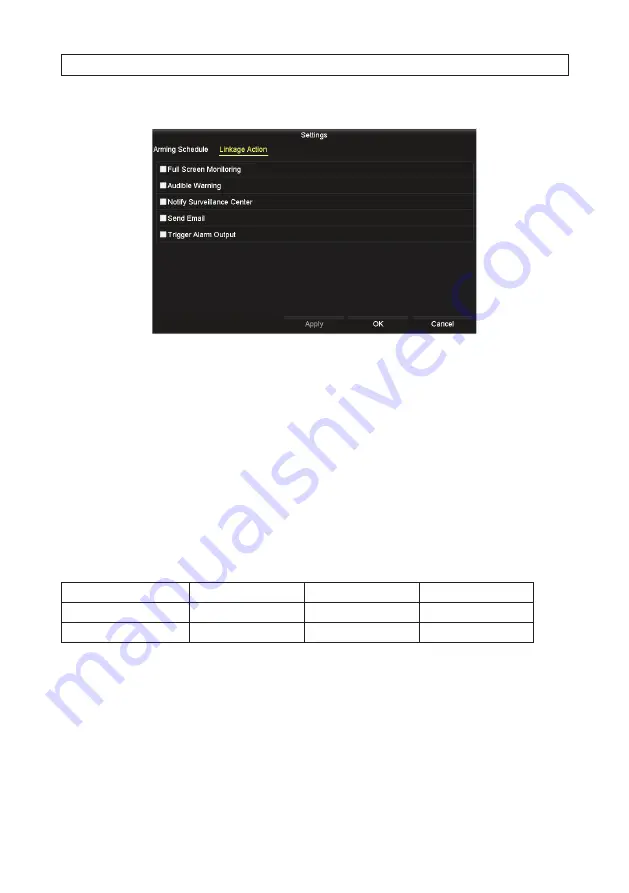
e.  Click the 

Linkage Action

 tab. In this tab you can cause certain actions to occur when video loss occurs. 

f.  Select the actions you want to occur, then click 

Apply

 to save your settings, and 

OK

 to return to the 

Video Loss

 menu. 

The 

Notify Surveillance Center

 and 

Send Emai

l options require additional network settings. 

4.  In the 

Video Loss

 menu, click 

Apply

 to save your settings for this camera. 

5.  Repeat sub-steps 

2

 through 

4

 above for each camera managed by the NVR.  

2.3.8  VCA

The VCA (Video Content Analysis) features of the NVR are used to configure the VCA features in the camera. The NVR can then 
retrieve VCA event information from the camera for triggering recording, reporting, generating alerts, etc. The NVR can only 
configure those VCA features supported by the camera; all VCA features are not supported by all cameras. VCA features supported 
of the camera can also be configured through remote login to the camera, where available. The recorders support the following VCA 
features: 

Face Detection

Region Entrance Detection

Object Removal Detection

Sudden Scene Change

Line Crossing Detection

Region Exiting Detection

Audio Exception Detection

PIR alarm

Intrusion Detection 

Unattended Baggage Detection

Defocus Detection

For more information about configuring VCA features, refer to “SECTION 6 VCA Features” on page 61. 

2.4  Adding cameras manually 

IP cameras can connect to the NVR either through the 4-, 8-, or 16-port integrated Ethernet switch on the back panel of the NVR, or 
through the LAN the NVR is connected to. IP cameras connected to the IP ports on the NVR back panel are automatically added to 
the system by the NVR. Cameras that exist on the LAN can be added manually through the NVR startup Wizard or Camera menus. 

SECTION 2: INITIAL NVR SETUP 

Summary of Contents for ALI-NVR71128R

Page 1: ...etwork Video Recorder Firmware V3 6 22 User Manual PLEASE READ THIS MANUAL BEFORE USING YOUR SYSTEM and always follow the instructions for safety and proper use Save this manual for future reference ALI NVR_3 6 22_RM 180327 ...

Page 2: ...t laws the software provided with Alibi video recorders is expressly prohibited Observint makes no representations concerning the legality of certain product applications such as the making transmission or recording of video and or audio signals of others without their knowledge and or consent We encourage you to check and comply with all applicable local state and federal laws and regulations bef...

Page 3: ...ideo Loss setup 21 2 3 8 VCA 23 2 4 Adding cameras manually 23 2 4 1 Configuring customized protocols 26 2 5 Checking HDD status 28 2 5 1 Additional HDD features 29 2 6 Configuring Exception Alarms 30 2 7 Setting sensor alarms 31 2 8 Setting alarm response actions 35 SECTION 3 Startup Shutdown Reboot 39 3 1 Starting Up Shutting Down and Rebooting the NVR 39 3 1 1 Startup 39 3 1 2 Shutdown 39 3 1 3...

Page 4: ...nitiating a Linear Scan 59 SECTION 6 VCA Features 61 6 1 Face Detection 62 6 2 Line Crossing Detection 65 6 3 Intrusion Detection 69 6 4 Region Entrance Detection 73 6 5 Region Exiting Detection 77 6 6 Unattended Baggage Detection 82 6 7 Object Removal Detection 85 6 8 Audio Exception Detection 89 6 9 Defocus Detection 93 6 10 Sudden Scene Change Detection 96 6 11 PIR Alarm 99 6 12 VCA Search feat...

Page 5: ...2 6 Playback by Sub Periods 135 7 2 7 Playing Back an external file 136 7 2 8 Playback Pictures 137 7 2 9 Playback using System logs 138 7 2 10 Auxiliary Functions Playback frame by frame 140 7 2 11 Auxiliary Functions Reverse Playback Multi channel 140 7 2 12 Digital Zoom 142 7 3 Backing up Record Files Export 142 7 3 1 Quick Export 142 7 3 2 Export by video search 144 7 3 3 Export by Event Searc...

Page 6: ...on 180 10 4 Upgrade Firmware 182 10 4 1 Upgrade from FTP server 183 10 5 Default 184 10 6 Net Detect 185 10 6 1 Checking NetworkTraffic 185 10 6 2 Testing Network Delay and Packet Loss 185 10 6 3 Exporting Network Packet 186 10 6 4 Checking the network status 187 10 6 5 Checking Network Statistics 188 10 6 6 HDD Detect 189 10 7 Disk Clone 192 SECTION 11 Managing HDDs without RAID 194 11 1 Initiali...

Page 7: ... 210 12 2 1 Rebuilding array process example 210 SECTION 13 Remote Access 212 13 1 Configure IE to run in Administrator mode 212 13 2 Login 213 13 3 LiveView screen 214 13 4 Playback screen 217 13 5 Picture screen 219 13 6 Configuration screen 220 13 6 1 Log information 221 APPENDIX A Glossary 223 ...

Page 8: ...viii www Observint com NOTES ...

Page 9: ...n VGA or HDMI screen Multiple screen display in Live view is supported the display sequence of channels is configurable Configurable Live View display of groups and tours Live view Quick setting menu Motion detection video tampering video exception alert and video loss alert functions Privacy mask Camera detected VCA alarm reporting and processing Zooming in by clicking the mouse and PTZ tracing b...

Page 10: ...Hot Spare working mode is configurable to constitute an N 1 hot spare system Alarm and Exception Configurable arming time of alarm input output Alarm for video loss motion detection tampering abnormal signal video input output standard mismatch illegal login network disconnected IP confliction record exception HDD error and HDD full etc Camera detected VCA alarm reporting Alarm triggers full scree...

Page 11: ...alarm status Remote keyboard operation Remote locking and unlocking of control panel and mouse Remote HDD formatting and program upgrading Remote system restart and shutdown RS 485 transparent channel transmission Alarm and exception information can be sent to the remote host Remotely start stop recording Remotely start stop alarm output Remote PTZ control Remote manual JPEG capture Virtual host f...

Page 12: ...ric Switch to symbols Backspace Switch to alphanumeric Enter Softkeyboard numeric Switch to alphanumeric Backspace Switch to numeric Enter Softkeyboard symbols A USB keyboard attached to the recorder has limited functionality It can be useful for entering text and numbers SECTION 1 SYSTEM OVERVIEW ...

Page 13: ...r replaced the HDD that HDD needs to be initialized by the recorder before it can be used to record data Select check the box for that HDD then click Init to initialize the disk NOTE Init will erase all data from the disk and can take several minutes to complete When the initialization is complete click Next to continue Network Settings By default the recorder acquires it s network settings using ...

Page 14: ... Next key in the lower right corner of the keyboard to complete the entry b Follow the on screen instructions provided to create a Strong password and then enter that in the Create New Passw and Confirm fields c Click OK to continue The confirmation window shown below sill appear Click OK to continue 4 In the Wizard window shown below click Next if you want to start the Wizard the next time the NV...

Page 15: ... set precisely to produce valuable evidence After configuring the date and time click Next to start the clock at the time entered 6 In the Network setup Wizard window a Open the Working Mode drop down list and select the way you prefer the LAN ports Fault tolerant or multi address does not allow DHCP b To enable fixed network settings first un check the Enable DHCP box If a DHCP server is active o...

Page 16: ...l be applied to that port e Click Next to continue 7 You can reconfigure the network ports you prefer to use and DDNS access Before changing your port configuration consult with your network administrator or your vendor for product support a To change the Server HTTP or RTSP port numbers click on the entry field and then use the pop up virtual keyboard to enter a new value b Check the select boxes...

Page 17: ...nfigured OtherRAIDmodescanbeconfiguredusingtheNVRfirmwaremenusystem If enabling RAID in the NVR follow the on screen instructions to configure and name the array A reboot of the NVR is required 9 The HDD management Wizard window will open If your NVR is a new NVR shipped with a pre configured HDD nothing needs to be done in this window If you installed an HDD or replaced the HDD om the NVR you mus...

Page 18: ...nd Alibi compatible storage servers are also listed You can add cameras to the NVR in two ways a Click the One touch Activate button to add Inactive cameras connected to the LAN to the NVR When the camera is activated it will be configured with the same admin password assigned to the NVR b Check the select boxes for the camera s you want to add than the click Add In the example below camera number...

Page 19: ...deo NOTE In the firmware menu system you can configure each camera individually for conditions that will trigger recording and when recordings are made Configuring cameras in this way improves the performance of the NVR and reduces storage requirements After selecting the recording mode click OK and then click Yes in the Attention popup window The Wizard will close automatically 2 2 Access the Men...

Page 20: ...nfigurations The Camera menu lists all cameras configured in the NVR and shows the channel name timestamp etc of each Using this menu you can assign names to each camera for easy recognition select areas for motion detection and privacy blocking and configure alarm features if supported by the camera To customize the configuration settings of each camera do the following 1 Open the Camera menu rig...

Page 21: ...User Manual 2 3 1 Camera OSD setup You can configure the OSD On Screen Display settings for the camera including date time day of week camera name etc 1 Click OSD in the left frame to open the OSD submenu SECTION 2 INITIAL NVR SETUP ...

Page 22: ...or the timestamp data to positions in the window that will not obscure important information 4 Change the date and time format and the Display Mode if needed using the drop down menus 5 Click Apply to save your settings for this camera 6 Repeat sub steps 2 through 5 above for each camera managed by the NVR 2 3 2 Camera Image setup 1 Click Image in the left frame to open the Image submenu 2 In the ...

Page 23: ...or more information 2 3 4 Camera Motion detection setup Follow the steps to set the motion detection parameters In the Live view mode when a motion detection event takes place the NVR can analyze it and do many actions to handle it Enabling the motion detection function can trigger certain channels to start recording or trigger full screen monitoring audio warning notify the surveillance center et...

Page 24: ...s a rectangular area of the video image where you want to detect for motion The area you select will be surrounded by a colored frame When you release the mouse button a grid will appear in that area c Click Apply to save your settings d Adjust the Sensitivity slider as needed to detect the motion of objects moving through the zones When motion is detected in a segment of the grid the segment is f...

Page 25: ...k the Arming Schedule tab In this tab you can define up to eight periods for each day Periods must not overlap c Click the down arrow in the Mon field see above to setup the schedule for a different day and or click Copy to copy the Arming Schedule you setup in the window to other days of the week Click OK to confirm your selections SECTION 2 INITIAL NVR SETUP ...

Page 26: ...r then click Apply to save your settings and OK to return to the Motion menu The Notify Surveillance Center and Send Email options require additional network settings 5 In the Motion menu click Apply to save your settings for this camera 6 Repeat sub steps 2 through 5 above for each camera managed by the NVR 2 3 5 Camera Privacy Mask setup 1 Click Privacy Mask in the left frame to open the Privacy...

Page 27: ... the window was blocked 4 You can create up to four privacy zones for each camera Use the clear buttons to remove zones you created 5 Click Apply to save your settings for this camera 6 Repeat sub steps 2 through 5 above for each camera managed by the NVR 2 3 6 Camera Video Tampering setup A Video Tampering alarm is created when the lens an area of the image is covered The alarm can cause the NVR ...

Page 28: ...ted 3 Check or un check the box to Enable Video Tampering Detection If you checked the box drag a rectangle across the area of the video that you want to monitor 4 Click the Settings icon In the Arming Schedule tab a In the Arming Schedule tab you can define up to eight periods for each day Periods must not overlap SECTION 2 INITIAL NVR SETUP ...

Page 29: ...tings and OK to return to the Tamper proof menu The Send Email option require additional network settings See SECTION 8 Managing User Accounts on page 156 for more information f In the Tamper proof menu click Apply to save your settings for this camera g Repeat sub steps 2 through 4 above for each camera managed by the NVR NOTE Testyoursettingsduringbroadconditionstoensurethatyourtamper proofsetti...

Page 30: ...ed the box do the following a Click the Settings icon b In the Arming Schedule tab you can define up to eight periods for each day Periods must not overlap c Click the down arrow in the Mon field see above to setup the schedule for a different day and or click Copy to copy the Arming Schedule you setup in the window to other days of the week d Click Apply to save the settings SECTION 2 INITIAL NVR...

Page 31: ...ted by the camera all VCA features are not supported by all cameras VCA features supported of the camera can also be configured through remote login to the camera where available The recorders support the following VCA features Face Detection Region Entrance Detection Object Removal Detection Sudden Scene Change Line Crossing Detection Region Exiting Detection Audio Exception Detection PIR alarm I...

Page 32: ... discovered on the LAN at IP address 192 168 4 3 will be added to NVR channel D2 1 Open the Camera Management menu Go to Main menu Camera 2 Click on a camera channel where no camera is assigned To determine if any camera is assigned to a channel click on the icon in the Status column to check the channel status In the example above cameras in the list shown above with the yellow alert triangle in ...

Page 33: ...ss of the camera to change 192 168 4 33 c On the Protocol line open the drop down list and then select the protocol of the camera shown in the channel table for this camera Alibi In the window the User Name for the camera will change to admin d Click the entry field on the Admin Password line and then enter the camera password for user admin e Click OK to save your settings The camera list will be...

Page 34: ...one that is secure 4 For the camera you added click the play icon in the Status column to view live video from the camera Adjust the direction pan tilt and horizon of the camera if needed 5 Repeat steps 2 through 4 above to add additional cameras 2 4 1 Configuring customized protocols Protocols in the Edit IP Camera window include 16 editable Custom protocols Custom Protocol 1 Custom Protocol 16 I...

Page 35: ...168 4 2 was selected 2 Click the Protocol button at the bottom of the window 3 Edit the Protocol Management window as needed In the window shown above Custom Protocol 1 was selected from the drop down list Refer to the camera manufacturer for the best options to choose here 4 Click Apply and then OK to save the changes you made to the custom protocol SECTION 2 INITIAL NVR SETUP ...

Page 36: ...Name for the camera 7 Similarly enter the Password for the User name in the field below 8 Click OK to save the settings The NVR will now use the Custom 1 protocol for the camera you configured 2 5 Checking HDD status Check the status of the HDD installed in the NVR to assure it is functioning normally 1 Open the HDD Information display Go to Menu HDD General SECTION 2 INITIAL NVR SETUP ...

Page 37: ...Ds is highly configurable You can simply save data to the internal HDD s in the chassis or add network based NAS or IP SAN devices to the system and save recordings and other data there You can also define where data for each camera or groups of cameras is saved and have 16 different storage groups Before an HDD is used by the NVR it must be initialized by the recorder Preconfigured HDD s are alre...

Page 38: ... that there is no more HDD space and overwrite is not enable Array Exception Indicates that a RAID array has failed Hot Spare Exception Indicates that a Hot Spare drive has failed Accessory Board Exception Indicates that either the HDMI decoding board or SFP Alarm I O expansion board has failed Responses to exception alarms include Audible Warning Trigger an audible beep when an alarm is detected ...

Page 39: ...t these steps for other Exception Types you want to configure 2 7 Setting sensor alarms Use this subsection to configure how the NVR reacts to sensor alarms wired to the camera alarm in out terminations Alarm inputs can be normally open N O or normally closed N C 1 Open the Alarm Input menu Go to Menu Configuration Alarm Alarm Input tab 2 Open the Alarm Input No drop down list and select the alarm...

Page 40: ...m or the Enable One key Disarming box to arm and disarm the unit by holding down the ESC key 4 Click Settings icon to open the alarm response Settings menus 5 Select the Trigger Channel tab if not selected Select one or more camera channels which will start to record or expand to full screen monitoring when the external alarm is active 6 Click Apply to save the settings SECTION 2 INITIAL NVR SETUP...

Page 41: ...ow to other days of the week 9 Click Apply to save the settings 10 Select the Linkage Action tab to set up alarm response actions of the alarm input 11 In the Linkage Action menu select the actions you want to occur when the alarm is active then click Apply to save the settings If PTZ cameras are not installed on your system click OK to return to the Alarm Input menu 12 If PTZ cameras are installe...

Page 42: ... Select the preferred options in the PTZ Linking menu then click Apply 14 Click OK to return to the Alarm Input menu 15 Repeat steps 3 15 above to configure additional alarm inputs connected to your NVR You can also copy an the alarm input setup you saved to other alarm inputs To do so a Click the Copy button at the bottom of the Alarm Input menu SECTION 2 INITIAL NVR SETUP ...

Page 43: ...rning buzzer Notify Surveillance Center Upload Picture to FTP Trigger Alarm Output and Send Email Event Hint Display When an event or exception happens a hint can be displayed on the lower left corner of live view image And you can click the hint icon to check the details The event to be displayed is configurable 1 Open the Exceptions menu Go to Menu Configuration Exceptions 2 Check the Enable Eve...

Page 44: ...time can be set by going to Menu Configuration Live View and then changing the Full Screen Monitoring Dwell Time setting Auto switch will terminate when the alarm condition ends The NVR will revert to the Live View interface NOTE Youmustselectthechannel s youwanttodisplaywithfullscreenmonitoringinthe TriggerChannel settingsmenu Audible Warning Trigger an audible beep when an alarm is detected Emai...

Page 45: ...an define up to eight periods for each day Periods must not overlap 6 Click the down arrow in the Mon field see above to setup the schedule for a different day and or click Copy to copy the Arming Schedule you setup in the window to other days of the week 7 Click Apply to save the settings then click OK to return to the Alarm Output menu 8 Repeat steps 3 7 above to configure additional alarm outpu...

Page 46: ...38 www Observint com b Check the boxes for the alarm outputs you want to copy the configuration to c Click OK to save your settings SECTION 2 INITIAL NVR SETUP ...

Page 47: ... Starting Up Shutting Down and Rebooting the NVR 3 1 1 Startup Proper startup and shutdown procedures are essential for getting the most out of your NVR To startup 1 Check the power cable is plugged into a standard electrical outlet It is HIGHLY recommended that an Uninterruptible Power supply UPS be used in conjunction with the device 2 Rock the POWER switch on the back panel to the on I position...

Page 48: ...es in the Attention window 5 When the message Please power off appears or three minutes have lapsed rock the power switch on the back panel to the off O position 3 1 3 Rebooting the NVR In the Shutdown menu you can also reboot the NVR 1 Open the Shutdown menu by clicking Menu Shutdown 2 In the Menu window click the Shutdown icon then click Reboot in the pop up window 3 Click Yes in the Attention w...

Page 49: ... to 36 channels at the same time with options to display 1 4 6 8 or more depending on the NVR capacity camera channels concurrently or playback recorded video LiveView2 2multi screendisplay Each camera channel displayed on the Live View screen may contain one two or no status icons in the upper right corner of the viewing frame The recorder can support up to two monitors if it provides both VGA an...

Page 50: ...tting Menu Output Mode on page 43 The pop up menu on the Main monitor can be used to configure the recorder control the number of Live View channels playback video and control PTZ cameras The pop up menu on the Aux monitor can only be used to control the number of Live View channels playback video and control PTZ cameras From the Main monitor you can switch control mouse pointer and menus to the A...

Page 51: ...played after the current one Start Auto switch the screen is automatically switched from one camera channel to the next You must set the dwell time before enabling auto switch Go to Menu Configuration Live View Dwell Time Start Recording Select Normal Record and Motion Detection record from the drop down list Add IP Camera Opens the IP Camera Management menu to add a camera to the system See 2 4 A...

Page 52: ...tem VGA The VGA port is always assigned as the Main monitor The mouse pointer and menu control can be switched to the Main monitor If no monitor is attached to the VGA port there is no visible mouse or menu control of the system When changing from one Menu Output Mode to another the recorder must be rebooted The behavior of Main and Aux modes is shown in the table below Main Output Mode HDMI monit...

Page 53: ...Zero and HDMI2 Live View Mode Designates the display mode screen split to be used for Live View 1 1 is a single camera view Several options are available Dwell Time The time in seconds to dwell between switching channels when auto switch is enabled in Live View Enable Audio Output Enables disables audio output for the selected video output Volume When Audio Output volume is enabled use the slider ...

Page 54: ... your settings 4 4 Using the mouse in Live view Table 1 Mouse operation in Live view Name Description Menu Enter the main menu of the system by right clicking the mouse Single Screen Switch to single full screen by choosing channel number from the drop down list Multi screen Select the screen layout from the drop down list Previous Screen Switch to the previous screen Next Screen Switch to the nex...

Page 55: ...om video loss video tampering motion detection sensor alarm etc Record Manual record schedule record motion detection or alarm triggered record Record and Alarm Both alarm and record status Event Exception For the occurrence of motion detection sensor alarm or exception information This icon appears at the lower left corner of the screen Click on the icon to display the event exception reason 4 6 ...

Page 56: ...ot Click to zoom out Drag the slider on the slider bar up or down to zoom in or out and then drag the video image with the mouse to zoom on another spot Right click the mouse to cancel the zoom feature Image Settings Click this icon to open menus for creating customized setting for the brightness contrast saturation and hue of the camera image After making an adjustment on in this menu the NVR wil...

Page 57: ...n to return to the Main stream Trigger Alarm Out Activates on the camera Alarm Out signal from a camera with Alarm Out feature 4 7 Channel Zero Encoding Use the Channel Zero Encoding menu to configure the NVR for viewing multiple video channels simultaneously with a remote client With this features you can decrease the bandwidth requirement without affecting the image quality To use Channel Zero E...

Page 58: ...ol Panel You can enter the PTZ control panel either of two ways In the Menu Camera PTZ menu click the PTZ button on the lower right corner It is next to the Back button In the Live View mode left click on the image from the PTZ camera and then click the PTZ Control icon on the Quick Settings toolbar The PTZ control panel has Configuration toolset for quickly controlling the camera A description of...

Page 59: ...t 1 The camera initiates a move to Preset 1 after the camera park time Preset 1 must be predefined Park time is set through the camera configuration interface The default park time is 5 seconds You can also select Restore Restore reboots the camera and restores the factory settings for Presets and Patrols General tab The General tab is used to call a preset patrol and pattern movement These moveme...

Page 60: ...ugh the RS 485 interface check that the PTZ and the NVR are connected and configured properly 1 Open the PTZ menu Go to Menu Camera PTZ 2 Choose the camera for PTZ setting in the Camera drop down list 3 Click the PTZ Parameter button SECTION 5 PTZ CONTROLS ...

Page 61: ...hat usually includes it s direction zoom iris setting and focus and may include other settings Follow the steps to set the Preset location which you want the PTZ camera to point to when an event takes place You can create up to 255 presets numbered 1 255 1 Open the PTZ settings menu Go to Menu Camera PTZ 2 Use the directional button to point the camera at the position where you want to create a pr...

Page 62: ...he camera to that position by calling that preset Use the PTZ More Settings interface to call a preset 1 Click the field to the right of Preset and then use the pop up virtual keyboard to enter a number to of the preset you want to call Complete the entry by clicking the 8 key 2 Click the Call button just below the Preset line to move the camera to that preset Call preset in live view mode 1 In th...

Page 63: ...can be set to position a PTZ camera to a KeyPoint Preset number and hold it there for a set duration dwell before moving on to another KeyPoint Preset number To create Preset positions for the camera see 5 3 1 Customizing Presets on page 53 You can create up to 4 patrols numbered 1 4 1 Open the PTZ settings menu Go to Menu Camera PTZ 2 Click the field to the right of the Patrol line and then selec...

Page 64: ... menu is complete click OK to save the patrol 8 You can test the patrol in the Camera PTZ menu by selecting the Patrol number from the patrol drop down list and then clicking Call 5 3 4 Calling Patrols in Live View Calling a patrol makes the PTZ to move according the predefined patrol path To Call a patrol in Live View 1 In the Live View screen left click on the image from the PTZ camera and then ...

Page 65: ...settings menu Go to Menu Camera PTZ 2 Click the Start button just underneath the Pattern line to start recording the camera movement Use the controls under the camera video window to move the camera You can also use the Zoom adjustment if needed 3 You can continue to record camera movement until the memory percentage shown on the video decrements to 0 Click the Stop button to end recording the cam...

Page 66: ...TZ setting interface or click the PTZ Control icon in the Quick Setting bar to enter the PTZ setting menu in live view mode General tab 2 Click the General tab 3 Click Call Pattern to start moving the camera in the pattern you recorded 4 Click Stop Pattern to start moving the camera SECTION 5 PTZ CONTROLS ...

Page 67: ... Go to Menu Camera PTZ 2 Use the direction buttons below the image from the camera to point the camera at the left most limit of a scan 3 Click the Left Limit button see above 4 Use the direction buttons below the image from the camera to point the camera at the right most limit of a scan 5 Click the Right Limit button 5 4 1 Initiating a Linear Scan 1 In the Live View screen left click on the imag...

Page 68: ...One touch tab Linear Scan 2 Click the One touch tab 3 Click Linear Scan to start moving the camera from the left limit to the right limit and back repeatedly 4 Click Linear Scan again to stop the scan SECTION 5 PTZ CONTROLS ...

Page 69: ...rder supports the following VCA features Additional VCA features shown in the display are not available at the time of this printing Face Detection Detects when a face appears in the field of view Line crossing detection You can specify the endpoints of an virtual line in the video image and then detect if something crosses the line from one side to the other side A to B vice versa side B to A or ...

Page 70: ...used by defocus of the lens occurs Sudden scene change detection Scene change detection detects the change of surveillance environment affected by an external factor such as the intentional rotation of the camera PIR alarm detection An infrared alarm is triggered when heat energy dissipated by a person or any other warm blooded entity such as a dog cat etc moves into the field of view 6 1 Face Det...

Page 71: ...gnition is reported This setting may require testing b Click OK to save the Sensitivity setting 7 Click the icon on the Settings line a In the Trigger Channel window select the other channels that should trigger recording on this channel then click Apply to save your settings b Click the Arming Schedule tab With the Arming Schedule you can define a schedule for each day of eight weeks 56 days when...

Page 72: ... d Click the Linkage Action tab In this tab you can cause certain actions to occur when face recognition is detected e Select the actions you want to occur then click Apply to save your settings f Click the PTZ Linking tab With PTZ linking you can configure the camera to perform a Preset Patrol and or Pattern when an event occurs SECTION 6 VCA FEATURES ...

Page 73: ...e crossing direction can be set as bidirectional from left to right or from right to left And you can set the duration for the alarm response actions such as full screen monitoring audible warning etc To configure Line Crossing Detection 1 Open the VCA menu Go to Menu Camera Management VCA 2 On the Camera line open the drop down list and then select the camera you want to configure 3 Check the Sav...

Page 74: ...rule number you want to configure You can configure up to 4 line crossing rules 7 In the image window create a virtual line by clicking on two points that define the endpoints of the line A blue line will appear in the image with one side labeled A and the other side B 8 Click Rule Settings SECTION 6 VCA FEATURES ...

Page 75: ...n an object moves across the virtual line from the A side to the B side an alarm is triggered B A An arrow appears on only the A side of the virtual line When an object moves across the virtual line from the B side to the A side an alarm is triggered b Adjust the Sensitivity slider to set the detection sensitivity range 1 100 Higher sensitivity number detects smaller objects This setting may requi...

Page 76: ...n also click Copy to copy the Arming Schedule setup in the window to other days of the week d Click the Linkage Action tab In this tab you can cause certain actions to occur when line crossing is detected e Select the actions you want to occur then click Apply to save your settings f Click the PTZ Linking tab With PTZ linking you can configure the camera to perform a Preset Patrol and or Pattern w...

Page 77: ...cts which enter and loiter in a pre defined virtual area of the field of view Certain actions can be performed when an intrusion alarm is triggered To configure Intrusion Detection in the camera 1 Open the VCA menu Go to Menu Camera Management VCA 2 On the Camera line open the drop down list and then select the camera you want to configure 3 Check the Save VCA Picture box to capture a live view im...

Page 78: ...gure You can configure up to 4 intrusion detection rules 7 In the image window create a virtual intrusion zone by clicking on in a circular manner the four corners of a quadrangle that define the corners of the zone A blue quadrangle will appear in the image with a number indicating the rule number 8 Click Rule Settings SECTION 6 VCA FEATURES ...

Page 79: ...bject that can trigger an alarm Percentage Use this option to set size Range 1 100 Percentage defines the ratio of the in zone part of the object which can trigger the alarm For example if the percentage is set to 50 an object that fills at least 50 of the zone can trigger an alarm NOTE For some camera models this option is greyed out in this menu For those cameras log into the camera directly and...

Page 80: ... 56 days when intrusion is monitored Time periods cannot overlap c Click Apply to save the settings You can also click Copy to copy the Arming Schedule setup in the window to other days of the week d Click the Linkage Action tab In this tab you can cause certain actions to occur when an intrusion is detected SECTION 6 VCA FEATURES ...

Page 81: ...ct the actions you want to occur then click Apply to save your settings h Click OK to return to the VCA menu 10 In the VCA menu click Apply to activate the settings 11 Repeat steps 2 through 10 above to configure other cameras 6 4 Region Entrance Detection Region entrance detection detects people vehicles or other objects which enter a pre defined virtual region in the field of view Certain action...

Page 82: ...lick on Region Entrance Detection If the camera supports this feature it will be highlighted 5 Check the Enable box to select this feature 6 Open the Rule drop down list and select the rule number you want to configure You can configure up to 4 region entrance detection rules 7 In the image window create a virtual region by clicking on in a circular manner the four corners of a quadrangle that def...

Page 83: ...alue of the sensitivity represents the size of the object which can trigger an alarm The higher the value the smaller the object that can trigger an alarm b Click OK to save your settings 9 Click the icon on the Settings line a In the Trigger Channel window select the other channels that should trigger recording on this channel then click Apply to save your settings SECTION 6 VCA FEATURES ...

Page 84: ...days when entrance detection is monitored Time periods cannot overlap c Click Apply to save the settings You can also click Copy to copy the Arming Schedule setup in the window to other days of the week d Click the Linkage Action tab In this tab you can cause certain actions to occur when an entrance is detected SECTION 6 VCA FEATURES ...

Page 85: ...the actions you want to occur then click Apply to save your settings h Click OK to return to the VCA menu 10 In the VCA menu click Apply to activate the settings 11 Repeat steps 2 through 10 above to create rules for other cameras 6 5 Region Exiting Detection Region exiting detection detects people vehicles or other objects which leave a pre defined virtual region in the field of view Certain acti...

Page 86: ...click on Region Exiting Detection If the camera supports this feature it will be highlighted 5 Check the Enable box to select this feature 6 Open the Rule drop down list and select the rule number you want to configure You can configure up to 4 region exiting detection rules 7 In the image window create a virtual region by clicking on in a circular manner the four corners of a quadrangle that defi...

Page 87: ...alue of the sensitivity represents the size of the object which can trigger an alarm The higher the value the smaller the object that can trigger an alarm b Click OK to save your settings 9 Click the icon on the Settings line a In the Trigger Channel window select the other channels that should trigger recording on this channel then click Apply to save your settings SECTION 6 VCA FEATURES ...

Page 88: ... days when exiting detection is monitored Time periods cannot overlap c Click Apply to save the settings You can also click Copy to copy the Arming Schedule setup in the window to other days of the week d Click the Linkage Action tab In this tab you can cause certain actions to occur when an entrance is detected SECTION 6 VCA FEATURES ...

Page 89: ...Z linking you can configure the camera to perform a Preset Patrol and or Pattern when an event occurs g Select the actions you want to occur then click Apply to save your settings h Click OK to return to the VCA menu 10 In the VCA menu click Apply to activate the settings 11 Repeat steps 2 through 10 above to configure other cameras SECTION 6 VCA FEATURES ...

Page 90: ... 3 Check the Save VCA Picture box to capture a live view image of the VCA event 4 In the VCA type selection line click on Unattended Baggage Detection If the camera supports this feature it will be highlighted 5 Check the Enable box to select this feature 6 Open the Rule drop down list and select the rule number you want to configure You can configure up to 4 unattended baggage detection rules 7 I...

Page 91: ...ely when the object enters the zone Sensitivity Click and drag the slider to set the detection sensitivity Range 1 100 Sensitivity defines the similarity with the background image Usually when the sensitivity is high a very small object left in the region can trigger the alarm b Click OK to save your settings 9 Click the icon on the Settings line a In the Trigger Channel window select the other ch...

Page 92: ...eeks 56 days when parking is monitored Time periods cannot overlap c Click Apply to save the settings You can also click Copy to copy the Arming Schedule setup in the window to other days of the week d Click the Linkage Action tab In this tab you can cause certain actions to occur when parking is detected SECTION 6 VCA FEATURES ...

Page 93: ...to occur then click Apply to save your settings h Click OK to return to the VCA menu 10 In the VCA menu click Apply to activate the settings 11 Repeat steps 2 through 10 above to configure other cameras 6 7 Object Removal Detection Object removal detection detects when an object such as an exhibit on display is removed from the pre defined area of the field of view A series of actions can be taken...

Page 94: ...If the camera supports this feature it will be highlighted 5 Check the Enable box to select this feature 6 Open the Rule drop down list and select the rule number you want to configure You can configure up to 4 unattended object removal detection rules 7 In the image window create a virtual object zone by clicking on in a circular manner the four corners of a quadrangle that define the corners of ...

Page 95: ...he object enters the zone Sensitivity Click and drag the slider to set the detection sensitivity Range 1 100 Sensitivity defines the similarity degree of the background image Usually when the sensitivity is high a very small object taken from the region can trigger the alarm b Click OK to save your settings 9 Click the icon on the Settings line a In the Trigger Channel window select the other chan...

Page 96: ... 56 days when parking is monitored Time periods cannot overlap c Click Apply to save the settings You can also click Copy to copy the Arming Schedule setup in the window to other days of the week d Click the Linkage Action tab In this tab you can cause certain actions to occur when object removal is detected SECTION 6 VCA FEATURES ...

Page 97: ...tions you want to occur then click Apply to save your settings h Click OK to return to the VCA menu 10 In the VCA menu click Apply to activate the settings 11 Repeat steps 2 through 10 above to configure other cameras 6 8 Audio Exception Detection Audio exception detection detects when an abnormal sound such as the sudden increase decrease of the sound intensity occurs in the surveillance area Cer...

Page 98: ...the Save VCA Picture box to capture a live view image of the VCA event 4 In the VCA type selection line click on Audio Exception Detection If the camera supports this feature it will be highlighted 5 On the Camera line open the drop down list and select the camera you want to configure 6 Check the Enable box to select this feature 7 Click Rule Settings SECTION 6 VCA FEATURES ...

Page 99: ...n the environment The louder the sound the higher the value should be Adjust this value with consideration of the actual ambient sound level Sudden Decrease of Sound Intensity Detection Check the select box of to detect a steep drop in the sound level in the surveillance area Sensitivity Range 1 100 Set the detection sensitivity for a steep drop in volume b Click OK to save your settings 8 Click t...

Page 100: ...d Click the Linkage Action tab In this tab you can cause certain actions to occur when an audio exception is detected e Select the actions you want to occur then click Apply to save your settings f Click the PTZ Linking tab With PTZ linking you can configure the camera to perform a Preset Patrol and or Pattern when an event occurs SECTION 6 VCA FEATURES ...

Page 101: ...senses when image blur caused by defocus of the lens occurs Certain actions can be taken when the alarm is triggered To configure Defocus Detection 1 Open the VCA menu Go to Menu Camera Management VCA 2 On the Camera line open the drop down list and then select the camera you want to configure 3 Check the Save VCA Picture box to capture a live view image of the VCA event 4 In the VCA type selectio...

Page 102: ...Enable box to select this feature 7 Click Rule Settings a In the Rule Settings window adjust the Sensitivity slider to set the detection sensitivity range 1 100 The higher the sensitivity number the more easily defocus is recognized This setting may require testing b Click OK to save the Sensitivity setting 8 Click the icon on the Settings line ...

Page 103: ...ings You can also click Copy to copy the Arming Schedule setup in the window to other days of the week c Click the Linkage Action tab In this tab you can cause certain actions to occur when defocus is detected d Select the actions you want to occur then click Apply to save your settings e Click the PTZ Linking tab With PTZ linking you can configure the camera to perform a Preset Patrol and or Patt...

Page 104: ... affected by an external factor such as the intentional rotation of the camera Certain actions can be taken when the alarm is triggered To configure Sudden Scene Change Detection 1 Open the VCA menu Go to Menu Camera Management VCA 2 On the Camera line open the drop down list and then select the camera you want to configure 3 Check the Save VCA Picture box to capture a live view image of the VCA e...

Page 105: ...lect this feature 7 Click Rule Settings a In the Rule Settings window adjust the Sensitivity slider to set the detection sensitivity range 1 100 The higher the sensitivity number the more easily a scene change is recognized This setting may require testing b Click OK to save the Sensitivity setting 8 Click the icon on the Settings line SECTION 6 VCA FEATURES ...

Page 106: ...Arming Schedule you can define a schedule for each day of eight weeks 56 days when scene change is monitored Time periods cannot overlap c Click Apply to save the settings You can also click Copy to copy the Arming Schedule setup in the window to other days of the week d Click the Linkage Action tab In this tab you can cause certain actions to occur when a scene change is detected SECTION 6 VCA FE...

Page 107: ...the actions you want to occur then click Apply to save your settings h Click OK to return to the VCA menu 9 In the VCA menu click Apply to activate the settings 10 Repeat steps 2 through 9 above to configure other cameras 6 11 PIR Alarm An infrared alarm is generated when heat energy dissipated by a person or any other warm blooded entity such as a dog cat etc moves into the field of view To confi...

Page 108: ...hlighted 5 Check the Enable box to select this feature 6 Click Rule Settings a In the Rule Settings window adjust the Sensitivity slider to set the detection sensitivity range 1 100 The higher the sensitivity number the more easily it can recognized a PIR Alarm condition This setting may require testing b Click OK to save the Sensitivity setting 7 Click the icon on the Settings line a In the Trigg...

Page 109: ...he settings You can also click Copy to copy the Arming Schedule setup in the window to other days of the week d Click the Linkage Action tab In this tab you can cause certain actions to occur when a PIR Alarm condition is detected e Select the actions you want to occur then click Apply to save your settings 8 In the VCA menu click Apply to activate the settings 9 Repeat steps 2 through 8 above to ...

Page 110: ...the VCA alarm is triggered To use VCA Search Behavior Search 1 Configure the camera for any of the following VCA features Line Crossing detection Intrusion Detection Unattended Baggage Detection Object removal Detection Region Entrance Detection Region Exiting Detection 2 Open the VCA Search Behavior Search menu Go to Menu VCA Search Behavior Search See above 3 Check the box es for the camera s yo...

Page 111: ... box es for the clip s you want to export and then click the Export button at the bottom of the screen 7 You can also view the result in List format by click the List option in the upper left corner In this screen you can play video clips and export them to an external device or flash drive To export a clip check the box es for the clip s you want to export and then click the Export button at the ...

Page 112: ...the VCA Search Face Search menu Go to Menu VCA Search Face Search 3 Check the box es for the camera s you want to search 4 Click the Start Time field and then set the date and time at which you want to search begin the search for data Similarly set the End Time field 5 Click the Search button at the bottom of the screen In this screen you can peruse thumbnails of video clips play them and export t...

Page 113: ...vice or flash drive 6 12 3 Plate Search Advanced Search enables you to detect license plates from specific countries The camera you use must be capable of using video content analytics VCA to detect these kinds of images in the video stream To use this feature 1 Open the Advanced Search menu Go to Menu VCA Search Plate Search NOTE CurrentlyAlibicamerasdonotsupporttheVCAPlateRecognitionfeature SECT...

Page 114: ... for data Similarly set the End Time field 3 Open the Type drop down list and then select the type of event you want to search for 4 Click the Search button at the bottom of the screen In this screen you can peruse thumbnails of video clips play them and export them to an external device or flash drive To export a clip check the box es for the clip s you want to export and then click the Export bu...

Page 115: ...tart counting across the report type you selected 6 Click Export to save the statistics report in Microsoft Excel format 6 12 6 Heat map The Heat Map feature presents a graphical representation of loitering data represented by colors A red color block indicates the most welcome area and blue color block 0 0 255 indicates the less popular area Heat map is normally used to analyze the visit times an...

Page 116: ...span for which you want to count alarms You can select either Daily Report Weekly Report Monthly Report or Annual Report 5 Click the Statistics Time field and then select the day for which to generate a report 6 Click the Counting button to start counting across the report type you selected 7 Click Export to save the statistics report in Microsoft Excel format SECTION 6 VCA FEATURES ...

Page 117: ...remotely with administrative privileges To open the Menu system from the Live View screen right click anywhere in the screen then select Menu After selecting Menu a login window will open In the Login window select a User Name with administrative privileges enter its password then click OK A window of Menu icons will open NOTE When the system option Enable ID Authentication is disabled see the Con...

Page 118: ...want to configure Use this menu to select different parameters for Continuous recording and Event recording You can configure the stream type the resolution and other parameters Enable H264 Uses enhanced H 264 encoding The camera must be rebooted after this option is selected 3 Click Apply to save your new configuration settings 4 Click More Settings to configure other parameters SECTION 7 RECORD ...

Page 119: ...pired Time The expired time is the longest time a recording is kept on the HDD If the deadline is reached the file will be deleted If you set the expired time to 0 the file will not be deleted This parameter is usually determined in consideration of the capacity of the HDD Record Audio Check the checkbox to enable audio recording Video Stream You can select Main Stream Sub Stream or Dual Stream fo...

Page 120: ...ave the settings 7 1 2 Configuring Record schedule The record schedule can be used to automatically start and stop recording at preset times 1 Open the Record Schedule menu Go to Menu Record Schedule SECTION 7 RECORD PLAYBACK AND VIDEO BACKUP ...

Page 121: ...list opens ii Open the Schedule line drop down list and select the day you want to create a record schedule for iii To schedule all day recording check the checkbox after the All Day item To setup specific start and end times click the clock icon to open a time setting popup window iv In the Type column select the type of recording trigger you want to use Motion recording is recording triggered by...

Page 122: ...he same schedule can also be applied to other days click Copy see the window below select the days you want to copy the schedule to then click OK The result will look like the following schedule vi To use the graphical method to draw the schedule Click the color icons on the right for the recording mode then drag the mouse pointer across the area of the chart day of the week hours of the day where...

Page 123: ... alarm Delete schedule or no recording scheduled NOTE AlarmtriggeredrecordingisavailableforonlysomecamerasmodelssupportedbytheAlibiNVR Consultyourvendorsupport organization formore information Recording schedules can include a combination of different modes An example of a graphically created schedule is shown below Click Apply to validate the settings 3 If the settings can be applied to other cam...

Page 124: ...e will be performed instead of the normal Monday through Sunday recording schedule setup using the procedure above in 7 1 2 Configuring Record schedule on page 112 To specify which days are holidays and create a recording schedule for these days do the following 1 Open the Record Holiday menu Go to Menu Record Holiday 2 Click on the Edit icon in an entry in the list You can define up to 31 differe...

Page 125: ...ection the Start Date and End Date fields will adjust accordingly 6 Edit the Start Date and End Date fields as needed A Holiday can be a single day or range of days In the window below a New Years Day holiday was specified 7 ClickApplytosaveyoursetting andthenclickOK TheHolidaySettingswindowwillshowtheholidaysyoucreated 8 OpentheRecordSchedulewindow GotoMenu Record Schedule See 7 1 2ConfiguringRec...

Page 126: ...dow open the Weekday drop down list and then select Holiday Edit the Edit window as needed and then click Apply and OK to save your settings 7 1 4 Record Advanced settings Use the Record Advanced Settings menu to configure the purpose of the storage device connected to the eSATA port ...

Page 127: ...menu Go to Menu Camera Motion 2 To configure Motion Detection see screen above a Choose camera you want to configure from the drop down list b Check the Enable Motion Detection box c Click the Full Screen select button d If you want to sense for motion detection in all areas of the video click Clear All and then drag a rectangle over the entire video screen NOTE The example shown here is for a Ali...

Page 128: ... save your settings g Click the Arming Schedule tab In this tab you can define up to eight periods for each day Periods must not overlap h Click the down arrow in the Mon field see above to setup the schedule for a different day and or click Copy to copy the Arming Schedule you setup in the window to other days of the week Click OK to confirm your selections ...

Page 129: ... to the Motion menu The Notify Surveillance Center and Send Email options require additional network settings 3 In the Motion menu click Apply to save your settings for this camera NOTE Testyoursettingsduringbroadconditionstoensurethatmotioninthefieldofviewtriggersanaction Youmayneedtoreturnto thismenulatertoadjusttheSensitivity slidertoensureitisworkingadequately 7 1 6 Manual record Follow the st...

Page 130: ...ee the example above c Click the icon after Normal or Motion Detection d When the Attention window opens click Yes 3 To disable Manual Record a Select Record on the left menu frame b Click the status button before camera number to change the label from ON to OFF c Click the icon after Norman or Motion Detection d When the Attention window opens click No NOTE Green ON iconmeansthatthechannelisconfi...

Page 131: ... to perform this configuration For more information see 11 3 Configuring the HDD Quota Group mode on page 197 7 1 8 Files Protection You can lock the recorded files or to protect them from being overwritten when the HDD becomes full 1 Open the Export menu Go to Menu Export 2 Check the box es for the channel s you want to investigate 3 Configure the Record Type File Type locked or unlocked and Star...

Page 132: ... icon shown Unlocked 6 To protect the record files determine which files you want to protect and then click the icon in the Lock column to show a locked padlock indicating that the file is locked Similarly unlock files by clicking on the locked icon to show an unlocked padlock When unlocking a file a confirmation window will open ...

Page 133: ...o 8 MP resolution and 16 channels at up to 1080p resolution 7 2 1 Instant playback by channel Playback the recorded video files of a specific channel in the live view mode Channel switch is supported Instant playback by channel In Live View mode click the channel you want to playback then click the playback icon on the Quick Setting toolbar In the instant playback mode only recordings made during ...

Page 134: ...k the day when the video clip you want to play was recorded In the example shown below October 28 2015 was selected Notice that colored marks in the timeline at the bottom of the screen appeared These marks indicate when and what type of recordings were made for that camera s selected Date selected yellow border Video recorded then colored fill Use u and t to select month and year 4 ClickthePlaybu...

Page 135: ...ofthewindowaredescribedbelow Start end time of recordings Recorded video clips Playback timestamp Timeline Playback motion controls Mute Volume Add default tag Add custom tag File Management Zoom Start stop clip Line crossing Detection Intrusion detection Motion Intrusion Detection Full Screen Result Filter Lock file Capture ...

Page 136: ...the position on the timeline when the frame being played back was recorded The exact recorder time is also shown Recorded video clips These marks indicate when video was recorded on the timeline The color legend is shown to the right When Smart analysis features are enabled green marks may appear above the timeline Timeline Graphical representation when video clips were recorded across a time span...

Page 137: ...bove the timeline where motion is detected in or out of the area Result Filter Feature that can filter Smart results for Gender Ages or Glasses To use this feature click the Filter icon at the bottom of the screen open the drop down lists for each parameter to select the options you prefer and then click OK to save and apply your settings Results of applying the filter are reflected in the Smart m...

Page 138: ...nt and Smart when video meets Smart search criteria Timeline shift L R Use to shift the timeline window Timeline Span options Click any option to set the length of the timeline Thumbnail search To open the thumbnail search feature rest the mouse pointer over the timeline during playback to open thumbnail images of the recording in the lower part of the playback screen To move to a thumbnail image ...

Page 139: ...eft corner of the screen 2 Click the Tag Name field and then enter a name for the tag using the virtual keyboard Click the key in the lower right corner of the keyboard to save the Tag Name 3 Click OK to close the Add Tag window 7 2 4 Playback by Event Search Play back record files on one or several channels searched out by restricting event type e g alarm input and motion detection 1 Open the Pla...

Page 140: ...t you want to search for Here Motion was selected 4 On the right side of the screen click the icons to select the Start Time and End Time within which the event occurred 5 Click Search A list of events channel and time that occurred during the time frame selected will appear on the right side of the screen 6 Select an entry in the list camera channel and the time then click the Play icon to show t...

Page 141: ... them later Tags are associated with video clips during playback using the icons in the lower left corner of the screen 1 Open the Playback interface Go to Menu Playback 2 Open the drop down list in the upper left corner of the screen then select Tag 3 Select the camera channel for which the tag was created If unsure select all channels 4 On the right side of the screen click the icons to select t...

Page 142: ... Click Search A list of tag names will appear 6 Select the tag you want to play and then click the Play icon to view the video Using File Management 7 Click the icon to open the Tag management window and then click the Tag tab In the example below three tags are shown ...

Page 143: ...for playback E g if there are video files existing between 16 00 and 20 00 and the 4 screen display mode is selected then it can play the video files for 1 hour on each screen simultaneously To use Sub periods playback 1 Open the Playback interface Go to Menu Playback 2 Open the drop down list in the upper left corner of the screen then select Sub periods 3 Select the camera channel for which you ...

Page 144: ...e upper left corner of the screen then select External File 3 Attach the external storage device containing the file to one of the USB ports If multiple storage devices are connected to USB ports open the Device drop down list in the upper right corner and select the device containing the file A USB Flash drive was plugged into one of the USB ports and then selected here 4 Open the File Type drop ...

Page 145: ...n a directory on the device click the icon to the left of the directory name to show the contents of the directory 6 Click the Play icon associated with the file you want to play 7 2 8 Playback Pictures Captures made during playback can be searched displayed and exported 1 Open the Playback interface Go to Menu Playback 2 Open the drop down list in the upper left corner of the screen then select P...

Page 146: ...ate range 4 Click Search A list of captures taken on the camera selected during the time range will be listed in the right frame 5 Click on the photo you want to display 7 2 9 Playback using System logs You can play back video file s associated with maintenance log entry 1 Open the Log Information menu Go to Menu Maintenance Log Information ...

Page 147: ...n select the Major Type of log entry and then the Minor Type of log entry 3 Click Search In the example below the search criterion specified are All Major Type entries 4 Find the entry in the search results list that is associated with a Play icon See the example above 5 Click the Play icon to watch the video associated with the event ...

Page 148: ...dvances playback to the next frame forward Click uu to increase the playback speed in forward During reverse playback click the button tt until the speed changes to Single One click on the playback screen advances playback to the next frame in reverse Click uu to increase the playback speed in reverse 7 2 11 Auxiliary Functions Reverse Playback Multi channel You can play back record files of multi...

Page 149: ...colored marks in the timeline at the bottom of the screen appeared These marks indicate when and what type of recordings were made for that camera s selected Date selected yellow border Video recorded then colored fill Use u and t to select month and year 3 Select the video channels you want to playback 4 To start playback click the Play button u in the playback controls panel at the bottom of the...

Page 150: ...o image and then use the mouse scroll wheel to zoom in or out at that spot Click the icon to zoom in on the video image and then drag the image the video image with the mouse to zoom on another spot Click to zoom out Drag the slider on the slider bar up or down to zoom in or out and then drag the video image with the mouse to zoom on another spot Right click the mouse to cancel the zoom feature 7 ...

Page 151: ...art Time and End Time of the period when the video clips of interest were recorded To change the time click on the field then select the target date or time from the pop up menu The time span cannot exceed 24 hours 5 Click the Quick Export button A pop up window will open showing the file structure of your external storage device If your USB device is not shown in the Device Name field click the R...

Page 152: ...es that were transferred Allow the operation to finish before continuing 8 Check the Export result by playing a file that was exported In the Export window click the file you want to play then click the associated icon in the Play column Note When the mp4 video file is exported player zip is also exported 7 3 2 Export by video search The Export by video search feature allows you to export specific...

Page 153: ...best options for your search 5 Select the Start Time and End Time of the period when the video clips of interest were recorded To change the time click on the field then select the target date or time from the pop up menu 6 Click Search to list the video clips recorded during the selected time span In the Search Result list you can play the video clip by clicking the icon in the Play column associ...

Page 154: ...st You can also play a clip in the window in the upper right corner by clicking the icon associated with the clip in the play column NOTE You can click the Lock icon to lock a video clip Locking a video clip prevents it from being erased when the HDD becomes full 9 Check the select box es associated with other video clip s you want to export and then click the Export button at the bottom of the wi...

Page 155: ...lick the file you want to play then click the associated icon in the Play column Note The Player utility player zip will be exported automatically during video clip export 7 3 3 Export by Event Search Video recordings triggered by Events such as motion detection can be searched for and exported to a USB storage device such as a USB flash drive or USB disk drive or USB optical drive 1 Attach an USB...

Page 156: ...ch for those kinds of events 4 Select the Start Time and End Time of the period when the video clips of interest were recorded To change the time click on the field then select the target date or time from the pop up menu 5 Check the box es of the camera s you want to apply the search for 6 Click Search Thumbnails of the search results will be shown Note that multiple pages of thumbnails may be in...

Page 157: ...from being erased when the HDD becomes full 8 Select the video clips you want to export by checking the box associated with an entry in the list You can also play a clip in the window in the upper right corner by clicking the icon associated with the clip in the play column 9 Check the select box es associated with the video clip s you want to export and then click the Export button at the bottom ...

Page 158: ...nt to play then click the associated icon in the Play column Note The Player utility player zip is exported automatically during video clip export 7 3 4 Export by Picture Search Pictures captures created during live view playback or through a capture schedule can be searched for and exported to a USB storage device such as a USB flash drive or USB disk drive or USB optical drive 1 Attach an USB st...

Page 159: ...ered etc to search for those kinds of events 4 Select the Start Time and End Time of the period when the photos of interest were captured To change the time click on the field then select the target date or time from the pop up menu 5 Check the box es of the camera s you want to apply the search for 6 Click Search Thumbnails of the search results will be shown Note that multiple pages of thumbnail...

Page 160: ...o export by checking the box associated with an entry in the list You can also see the photo in the window in the upper right corner by clicking on the file 9 Check the select box es associated with the file s you want to export and then click the Export button at the bottom of the window A pop up window will open showing the file structure of your external storage device If your USB device is not...

Page 161: ...lay 7 3 5 Exporting Video Clips during playback Segments of video recordings can be backed up exported during playback These files exported to a USB storage device such as a USB flash drive or USB disk drive or USB optical drive 1 Attach an USB storage device such as a USB flash drive or USB disk drive or USB optical drive to the NVR USB port 2 Playback a video file 3 Advance the file playback to ...

Page 162: ...f the screen to mark the end of the clip you want to save 5 Right click anywhere in the video window The Attention pop up window shown below will appear You can also click the File Management icon to export the video clip 6 Click Yes to save the video clip you marked 7 In the File Management window check the box es for the video clip s you want to export and then click the Export button ...

Page 163: ...hown in the Device Name field click the Refresh button NOTE Some USB devices types include the New Folder and Format options other types include only an Erase option 9 Click Export to save the video clip s to the location you chose 10 Click the Export button to start the Export Allow the operation to finish before continuing Click OK in the confirmation window to return to the Menu window ...

Page 164: ... Password and a selection of permissions granted to the user By default one user named admin is provided The admin user is granted all permissions with the system and can create modify and delete other users The NVR supports up to 32 user accounts 8 1 Adding a user account 1 Enter the User Management interface Go to Menu Configuration User 2 Click Add to open the Add User menu SECTION 8 MANAGING U...

Page 165: ... Remote Configuration and all operating permission in Camera Configuration by default Guest The Guest user has no permission of Two way Audio in Remote Configuration and only has the local remote playback in the Camera Configuration by default User s MAC Address The MAC address of the remote PC which logs onto the NVR If this option is configured and enabled a remote user with this MAC address onl...

Page 166: ...ions Local Log Search Searching and viewing logs and system information of NVR Local Parameters Settings Configuring parameters restoring factory default parameters and importing exporting configuration files Local Camera Management Use for adding deleting and editing of IP cameras Local Advanced Operation Operating HDD management initializing HDD setting HDD property upgrading system firmware cle...

Page 167: ... editing of the IP cameras Remote Serial Port Control Reserved for future expansion Remote Video Output Control Sending remote button control signal Two Way Audio Enable two way audio between the remote client and the NVR Remote Alarm Control Remotely arming notify alarm and exception message to the remote client and controlling the alarm output Remote Advanced Operation Remotely operating HDD man...

Page 168: ...ted camera s Local Playback Locally playing back recorded files of the selected camera s Remote Playback Remotely playing back recorded files of the selected camera s Local PTZ Control Locally controlling PTZ movement of the selected camera s Remote PTZ Control Remotely controlling PTZ movement of the selected camera s Local Video Export Locally exporting recorded files of the selected camera s 7 ...

Page 169: ...ser Management interface Go to Menu Configuration User 2 Click the entry for the user to be deleted from the list When the item is selected it is highlighted 3 Click the Delete trash can icon to delete the selected user 8 3 Editing a user account 1 Enter the User Management interface Go to Menu Configuration User 2 Select the user to be edited from the list see the User Management window above ...

Page 170: ...lds 5 Click OK to save the settings and exit the menu 8 3 1 Edit admin user Observint highly recommends that the password for the admin user be changed to improve system security To change the admin user password follow the steps in 8 3 Editing a user account on page 161 The admin username cannot be changed After changing the admin password reopen the Edit User window for admin and then click Expo...

Page 171: ...the Network Settings menu Go to Menu Configuration Network 2 Click the General tab 3 In the General Settings menu select or enter the following parameters NIC Type IPv4 Address IPv4 Gateway MTU valid range is value range of MTU is 500 9676 and DNS Server IP addresses If the DHCP server is available check the Enable DHCP box to automatically obtain an IP address and other network settings from the ...

Page 172: ...pply to save your settings 9 2 Configuring Advanced Settings 9 2 1 Configuring PPPoE Use the following screen to configure your PPPoE Point to Point Protocol over Ethernet connection 1 Open the PPPoEs menu Go to Menu Configuration Network a Click the PPPOE tab ...

Page 173: ... Yes to reboot the NVR 2 Allow the NVR to reboot before continuing 9 2 2 Configuring DDNS If your NVR is set to use PPPoE as its default network connection you may set Dynamic DNS DDNS to be used for network access Registration with your ISP is required before configuring the system to use DDNS 1 Open the Network Settings menu Go to Menu Configuration Network 2 Click the DDNS tab to open the DDNS ...

Page 174: ...ii In the NVR Domain Name text field enter the domain obtained from the DynDNS website iii Enter the User Name and Password registered in the DynDNS website NO IP Enter the account information in the corresponding fields i In a browser window go to the URL http alibiddns com ii In this website create a Domain Name User Name and Password for the recorder Record these for use later SECTION 9 NETWORK...

Page 175: ...word fields enter the information setup at the alibiddns com website For example yourdomainname alibiddnbs com vi Click Apply to save your settings PeanutHull PeanutHull is now part of NO IP Use the procedure above in NO IP to setup a DDNS connection 9 2 3 Configuring NTP Server A Network Time Protocol NTP Server can be configured on your NVR to ensure the accuracy of system date time 1 Open the N...

Page 176: ...s the server at the National Time Center IP Address 210 72 145 44 If the NVR is setup in a customized network NTP software can be used to establish a NTP server used for time synchronization NTP Server IP address of NTP server NTP Port Port of NTP server 5 Click Apply to save your settings and close the menu 9 2 4 Configuring Remote Alarm Host With a remote alarm host configured the NVR will send ...

Page 177: ...he multicast function more than 64 cameras are connectable A multicast address spans the Class D IP range of 224 0 0 0 to 239 255 255 255 We recommended that you use the IP address range from 239 252 0 0 to 239 255 255 255 1 Enter the Network Settings interface Go to Menu Configuration Network 2 Click the More Settings tab to open the More Settings menu 3 Set the Multicast IP address When adding a...

Page 178: ...ation Network 2 Click the More Settings 3 In the menu shown above enter the RTSP port number The default RTSP port is 1050 4 Click Apply to save your settings and close the menu 9 2 7 Configuring Server and HTTP Ports You can change the server and HTTP ports in the Network Settings menu The default server port is 8000 and the default HTTP port is 80 1 Open the Network Settings menu Go to Menu Conf...

Page 179: ...nfigured to send an Email notification to all designated users if an alarm event is detected etc an alarm or motion event is detected or the administrator password is changed Before configuring the Email settings the NVR must be connected to a local area network LAN that maintains an SMTP mail server The network must also be connected to either an intranet or the Internet depending on the location...

Page 180: ...ck the checkbox to enable SSL TLS if required by the SMTP server Sender The name of sender Sender s Address The Email address of sender Select Receivers Select the receiver Up to 3 receivers can be configured Receiver The name of user to be notified Receiver s Address The Email address of user to be notified Enable Attached Pictures Check the Enable Attached Picture box if you want to send email w...

Page 181: ...nications etc You can use the UPnP function to enable the fast connection of the device to the WAN via a router without port mapping If you want to enable the UPnP function of the device you must enable the UPnP function of the router to which your device is connected When the network working mode of the device is set as multi address the Default Route of the device should be in the same network s...

Page 182: ...s internal network ports used by the recorder for HTTP 80 RTSP 1050 Server 8000 and HTTPS 443 remain at their default values The new external port numbers will appear on this display Use these ports numbers when establishing a connection to the recorder from outside the local network Manual This option allows you to change the External Port numbers by clicking the icon in the Edit column for the H...

Page 183: ...evice Info screen includes a Check Update button for checking for updated firmware The FTP upgrade server must be operational for this feature to function properly See 10 4 Upgrade Firmware on page 182 for more information To view information about other parts of the system click the appropriate tab 10 2 Log Information Log Export System log information is continuously generated and saved in log r...

Page 184: ...ANCE 10 2 1 Log Search 1 Open the Log Information screen Go to Menu Maintenance Log Information 2 Select a Start Time End Time Major Type and Minor Type then click Search In the example below the search criterion specified are All Major Type entries ...

Page 185: ...layback button to play the file or click the icon in the Details column to see more information about the entry Click the icon in the Details column see below or Play column to see more information about the log entry 4 Click OK to return to the Search Result window 5 If the log entry is associated with a video clip or capture click the icon in the Play column to playback the video ...

Page 186: ...viewer such as Microsoft Windows Notepad or Wordpad The filename prefixed with the date and timestamp in the format YYYYMMDDHHMMSSlogBack txt To export the log file 1 In the Search Result window click the Export button 2 On the Device Name line open the drop down list and select the destination for the file export To export the file to a USB flash drive insert the flash drive into a USB port see t...

Page 187: ...he directory where you want to copy the files create a New Folder or save the log file to the root directory see above 4 Click the Export button to start the Export Allow the operation to finish before continuing 5 Check the Export result on a computer by opening a file that was saved ...

Page 188: ...u Maintenance Import Export 3 On the Device Name line open the drop down list and select the destination for the exported configuration file In this example a USB drive was selected Export configuration file 4 In the Device directory highlight the location where you want to save the configuration file 5 Click the Export button to start the export Allow the operation to finish before continuing Whe...

Page 189: ...p down list and select the destination of the exported configuration file The configuration backup file is a binary file with a timestamp in the format devCfg_ code _YYYYMMDDHHMMSS bin 2 If the configuration file was saved to a directory click the folder icon to the left of the directory name to open the directory 3 In the file list highlight the NVR configuration file you want to load and then cl...

Page 190: ...rmware upgrade should only be performed when recommended by your NVR support organization 1 To check the current firmware version open the System information display Go to Menu Maintenance System Information 2 Click the Check Update button to determine if a firmware update is available for this recorder 3 If the firmware needs to be upgraded click the Upgrade tab on the left 4 If installing firmwa...

Page 191: ... 5 If installing firmware from a FTP server a Click the FTP upgrade tab at the top of the menu b Click the firmware file you want to load c Click the Upgrade button the follow the on screen instructions for completing the upgrade The upgrade may require a reboot of the recorder 6 Open the System Information screen and verify that the new firmware version is installed 10 4 1 Upgrade from FTP server...

Page 192: ...Upgrade button at the bottom of the window and follow the on screen instructions to complete the upgrade 10 5 Default The default options enable you to revert the configuration to its original settings in one of three ways A reboot is often required to complete the operation To restore the device to a default configuration 1 Open the Log Information menu Go to Menu Maintenance Default ...

Page 193: ...fault settings Restore to Inactive Restore the device to inactive status 3 Follow the on screen instructions to complete the restore operation 10 6 Net Detect 10 6 1 Checking Network Traffic You can see real time information of your NVR network traffic such as linking status MTU sending receiving rate etc The traffic data is refreshed every 1 second 1 Open the Network Traffic menu Go to Menu Maint...

Page 194: ...etwork the captured network data packet can be exported to a USB device such as a flash drive HDD DVD R W and other local USB backup devices 1 Open the Network Traffic menu Go to Menu Maintenance Net Detect 2 Click the Network Detection tab to open the Network Detection menu 3 Select the backup device from the Device Name drop down list Note Click the Refresh button if the connected local backup d...

Page 195: ...d during one operation 10 6 4 Checking the network status You can also check the network status and quickly set the network parameters 1 Open the Network Traffic menu Go to Menu Maintenance Net Detect 2 Click the Network Detection tab to open the Network Detection menu 3 Click the Status button in the lower right corner to report the status ...

Page 196: ...5 Checking Network Statistics Use the following procedure to view real time network status of your NVR 1 Open the Network Traffic menu Go to Menu Maintenance Net Detect 2 Click the Network Stat tab to open the Network status report Use this display to check the bandwidth of the IP Camera bandwidth of Remote Live View bandwidth of Remote Playback bandwidth of Net Receive Idle and bandwidth of Net S...

Page 197: ...Display 1 Open the S M A R T display menu Go to Menu System Maintenance HDD Detect S M A R T data may be shown on this display 2 To execute a self evaluation test on an HDD a On the HDD line open the drop down list to select the HDD of interest b On the Self test Type line open the drop down list to select the type of test to execute You can choose either Short Test Expanded Test or Conveyance Tes...

Page 198: ...erent Refertothemanufacturer swebsiteforS M A R T data definitions Bad Sector Detection 1 Open the Bad Sector Detection menu Go to Menu System Maintenance HDD Detect Bad Sector Detection 2 On the HDD No line open the drop down list and select the number of the HDD you want to test 3 Open the drop down list to the right of the HDD number and then select either Key Area Detection or Full Detection K...

Page 199: ...YSTEM MAINTENANCE 4 Click the Detect button to start the detection Bad sectors are identified in the array as red colored cells Click Pause to temporarily stop the scan and click Cancel to end the scan Click Error info to see the detailed damage information ...

Page 200: ... interface that has the same capacity as the disk you want to clone 2 Verify that the eSATA HDD is initialized a Go to Menu HDD General b Check the status of the eSATA device c If Status does not show NORMAL status check the select box for the device and then click Init Allow the operation to complete before continuing 3 Open the Disk Clone menu Go to Menu HDD Advanced Disk Clone 4 Verify that the...

Page 201: ... 6 22 User Manual SECTION 10 SYSTEM MAINTENANCE 6 In the Clone Source list check the select box of the HDD you want to clone 7 Click the Clone button at the bottom of the screen Allow the operation to complete before continuing ...

Page 202: ...n the recorder it must be initialized before it can be used See 11 1 Initializing HDDs on page 194 for more information The recorder can also be used in RAID mode To configure the storage system for RAID see SECTION 12 RAID Arrays on page 206 11 1 Initializing HDDs An HDD must be initialized before it can be used by the recorder to store data Pre installed HDDs are initialized by your vendor Check...

Page 203: ...le formats To configure this storage 1 Open the HDD Information interface Go to Menu HDD General 2 Click the Add button at the bottom of the screen to open the Add NetHDD menu 3 In the NetHDD drop down list select the NetHDD ID NetHDD 1 NetHDD 8 you want to add 4 In the Type drop down list select either NAS or IP SAN 5 Configure the device type you selected For a NAS disk i Click the NetHDD IP Add...

Page 204: ...ally enter the directory in the text field of NetHDD Directory iv Click OK to add the NAS disk to your system The NAS will appear in the HDD Information menu NOTE Afteraddingastoragedevicetothesystem checkthestatusofthedevice IftheStatusisUninitialized orAbnormal initialize thedevicebeforecontinuing ChecktheselectboxoftheHDDtoinitialize thenclicktheInitbuttonatthebottomof thescreen ...

Page 205: ...ttonatthebottomof thescreen 6 Add additional disks as needed up to a maximum of 8 NAS or 7 NAS and 1 IP SAN Note that HDDs added to the system may need to be initialized before use See 2 5 Checking HDD status on page 28 for more information 11 3 Configuring the HDD Quota Group mode By default all cameras will record to the one partition s of the internal HDD s However the NVR can be configured to ...

Page 206: ...m SECTION 11 MANAGING HDDS WITHOUT RAID Configure for Quota mode To configure the recorder for Quota mode 1 Go to Menu HDD Advanced Storage Mode 2 Open the Mode drop down list and then select Quota if not already selected ...

Page 207: ... specify the space allocated to each If the Quota capacity is 0 zero all cameras will use the total capacity of the HDD for recordings and pictures c Click Apply to save the settings d Repeat sub steps a through c above for other cameras monitored by the recorder Configure for Group mode 3 If you prefer to use Group mode do the following a In the Mode select field select either Group b Check the b...

Page 208: ...u are changing the mode from Partition to Group reboot the system d After the reboot is complete go to Menu HDD General e Select an HDD from the list and then click the icon in the Edit column to open the Local HDD Settings menu In this example the Edit icon for HDD 1 was selected ...

Page 209: ...then click OK to confirm your settings The default group number is 1 g In the pop up Attention window click Yes go complete the setup h To configure an additional HDD for a different group of cameras do the following i Open the Menu HDD General menu ii Click the icon in the Edit column of an HDD not assigned to a group In this example the Edit icon for HDD 2 was selected ...

Page 210: ...ty you want to assign to the group iv Select the Group number to assign to the HDD In the example above Group 2 was selected v Click Apply to create the group and then click OK to close the window vi Open the Menu HDD Advanced Storage Mode menu vii Open the Record on HDD Group field and select the number of the group you just created Group 2 ...

Page 211: ...l groups to unassigned HDDs as needed 11 4 HDD Maintenance The HDD Detect feature provides two methods of monitoring the HDD display of S M A R T Self Monitoring Analysis and Reporting Technology data and Bad Sector Detection These methods can be used to assure the normal functioning of the disk and anticipate failures 11 4 1 S M A R T Display 1 Open the S M A R T display menu Go to Menu System Ma...

Page 212: ...Examine the S M A R T data provided for the HDD Check to ensure that the data in the value and Worst column does not exceed the data in the Threshold column NOTE S M A R T dataprovidedbyeachHDDmanufacturerisusuallydifferent Refertothemanufacturer swebsiteforS M A R T data definitions 11 4 2 Bad Sector Detection 1 Open the Bad Sector Detection menu Go to Menu System Maintenance HDD Detect Bad Secto...

Page 213: ...ING HDDS WITHOUT RAID 4 Click the Detect button to start the detection Bad sectors are identified in the array as red colored cells Click Pause to temporarily stop the scan and click Cancel to end the scan Click Error info to see the detailed damage information ...

Page 214: ...ID0 Atleast2HDDsmustbeinstalledforRAID1 Atleast3HDDsmustbeinstalledforRAID5 Ifyouinstall4HDDsoraboveforone touchconfiguration ahot sparediskwillbesetasdefault Atleast4HDDsmustbeinstalledforRAID6 4 6 8HDDsmustbeinstalledforRAID10 Bydefault one touchconfigurationcreatesonearrayandonevirtualdisk Ifthecapacityofthearraycreatedby one touchconfigurationislargerthan16TB twoarraysandtwovirtualdiskswillbec...

Page 215: ...ID ARRAYS 3 In the pop up window click YES to reboot the system 4 After the NVR reboots open the MENU HDD RAID menu 5 Click the Create button at the bottom of the screen NOTE You can click One touch Config to create the array automatically Click Create Array ...

Page 216: ...chronize the disks and detect and repair bad sectors During the background initialization the virtual disk is allowed to be used Foreground recommended During foreground initialization the RAID is initialized totally and bad disk sectors s can be detected and repaired The virtual disk can be used only after the initialization completes Fast The fast initialization usually takes short time and only...

Page 217: ...alizationiscomplete 12 1 1 Installing a Hot Spare disk To install a hot spare 1 Select a disk with the same capacity as the disks in the RAID configuration and then attach the disk mounting handles see the Quick Start Guide provided with your recorder 2 Insert the spare HDD into the chassis In the example below the spare HDD was installed in bay 4 The status of the HDD is shown on the MENU HDD RAI...

Page 218: ...ed the limit When the virtual disk is in Degraded status you can restore it to Functional status by rebuilding the array Offline All other conditions When the Status is neither Degraded nor Functional it is considered Offline The Status of the array is shown in the MENU HDD Array display Arrays are automatically rebuilt when the array status is Degraded and a Hot Spare HDD is installed in the syst...

Page 219: ...d as shown below As a result of the lost disk 2 in the array the Status of the array lowered to Degraded is shown in the MENU HDD Array display Notice that the current array Task is Rebuilding Rebuilding the array is a background task CAUTION Allowtherebuildingtasktocompletebeforepoweringoffthesystem DependingonthesizeoftheHDDs this processcanlastseveralhours ...

Page 220: ...st time you must install a plug in program named WebComponents The procedure for installing the program using IE 11 is shown below Subsequent log ins do not require you to reinstall WebComponents 13 1 Configure IE to run in Administrator mode You can configure IE to run in Windows 7 and Windows 10 The procedures are different Window 7 To run IE as an Administrator 1 Find or create an IE icon on yo...

Page 221: ...d enter the IP address of the NVR in the URL field In the example below the IP address of the NVR is 192 168 2 122 If this is the first time you log into an Alibi recorder with this version of firmware the following screen will appear requiring you to install a plugin If not go to step 3 below 2 If the screen above appears click OK close the browser and follow the on screen instructions to install...

Page 222: ...nd then click Login A Live View window will open 13 3 Live View screen The Live View window initially appears in a multi screen configuration with no live view images shown The display lists only the cameras configured in the NVR In this tab you can change the viewing screen layout by clicking the multi screen select button and selecting the icon for a 1 screen a 2 x 2 layout or other layouts depe...

Page 223: ... to record video Click icon to select stream Selected frame is outlined in orange NOTE TheNVRhastheabilitytocreateaTranscodedstream tohelpshowlivevideoinbandwidthconstrainedenvironments Youcan configureaTranscodedstreamoptioninthewebclientConfiguration Video Audio menu BydefaultitissettoAuto negotiate theresolution causingtheNVRtodetermineifthenetworkresourcesarelargeenoughtoshowfullresolutionandf...

Page 224: ...revious Next screens Enable disable e PTZ Full screen Enable mute audio For PTZ controls refer to 5 1 PTZ Control Panel on page 50 To view video from a camera in the Live View screen Click a viewing frame to select it When selected the frame is surrounded by a bright box Double click the camera channel you want to see To expand the image to full frame double click the image in the viewing frame To...

Page 225: ...outoreviewvideorecordedfrom onecameraorseveralcamerasconcurrently Also videocanbedownloadedtoyourlocalcomputer Camera channel selected Camera selected Stop all playback Download Full screen ePTZ Expand contract timeline Play motion controls Record legend Playback timestamp Recording Capture Clip Audio play mute Enable digital zoom Set playback time Multi screen mode select Smart search Timeline dr...

Page 226: ... the date when the video was recorded then click the Search button In the example above February 19 2018 was selected Month year controls Boarder indicates this day is selected for Search Stream select for Playback Mark indicates video was recorded on this day 4 At the bottom of the screen drag the timeline left or right to find when video was recorded for the camera selected The condition that ca...

Page 227: ...tatusisshownintheProgresscolumn Downloadedfiles aresavedinthelocationshownontheConfiguration Localscreen see 13 4Playbackscreen onpage217 Allowthe downloadtocompletebeforeclosingthebrowser 13 5 Picture screen OpenthePicturescreenbyclickingPictureinthescreenheader ThePIcturescreenallowsyoutosearchfor reviewanddownload capturefiles ItfunctionsverysimilartothePlaybackDownloadscreen ...

Page 228: ...the NVRconfigurationandmakeconfigurationchanges TheUserNameyouusetologintotheNVRmusthaveadministrativeprivileges tochangetheNVRconfiguration OptionsintheconfigurationmenuareidenticaltothoseintheembeddedNVRMenusystem Formoreinformationonhowtouse theseoptions refertotheNVRMenudescriptionsinprevioussectionsofthismanual Aftermakingconfigurationchangesclick Savetoapplyyourchanges ...

Page 229: ...owlivevideoinbandwidthconstrainedenvironments Youcan configureaTranscodedstreamoptioninthewebclientConfiguration Video Audiomenu BydefaultitissettoAuto negotiatethe resolution meaningthattheNVRwilldetermineifthenetworkresourcesarelargeenoughtoshowfullresolutionandframerate video Ifnot theNVRwillautoadjustdownbothtoensurethestreamisdeliveredOK 13 6 1 Log information Open the Log screen by clicking ...

Page 230: ...teria using the options at the top of the window and then clicking the Search button The search criteria menu includes filters to search for Major and Minor type events and specify the start and end time of the report Log reports can be saved in either text or Excel formats by clicking the Save Log icon ...

Page 231: ...tocol to transfer hypertext request and information between servers and browsers over a network DDNS Dynamic DNS is a method protocol or network service that provides the capability for a networked device such as a router or computer system using the Internet Protocol Suite to notify a domain name server to change in real time ad hoc the active DNS configuration of its configured hostnames address...

Page 232: ...224 www Observint com ...

Reviews: