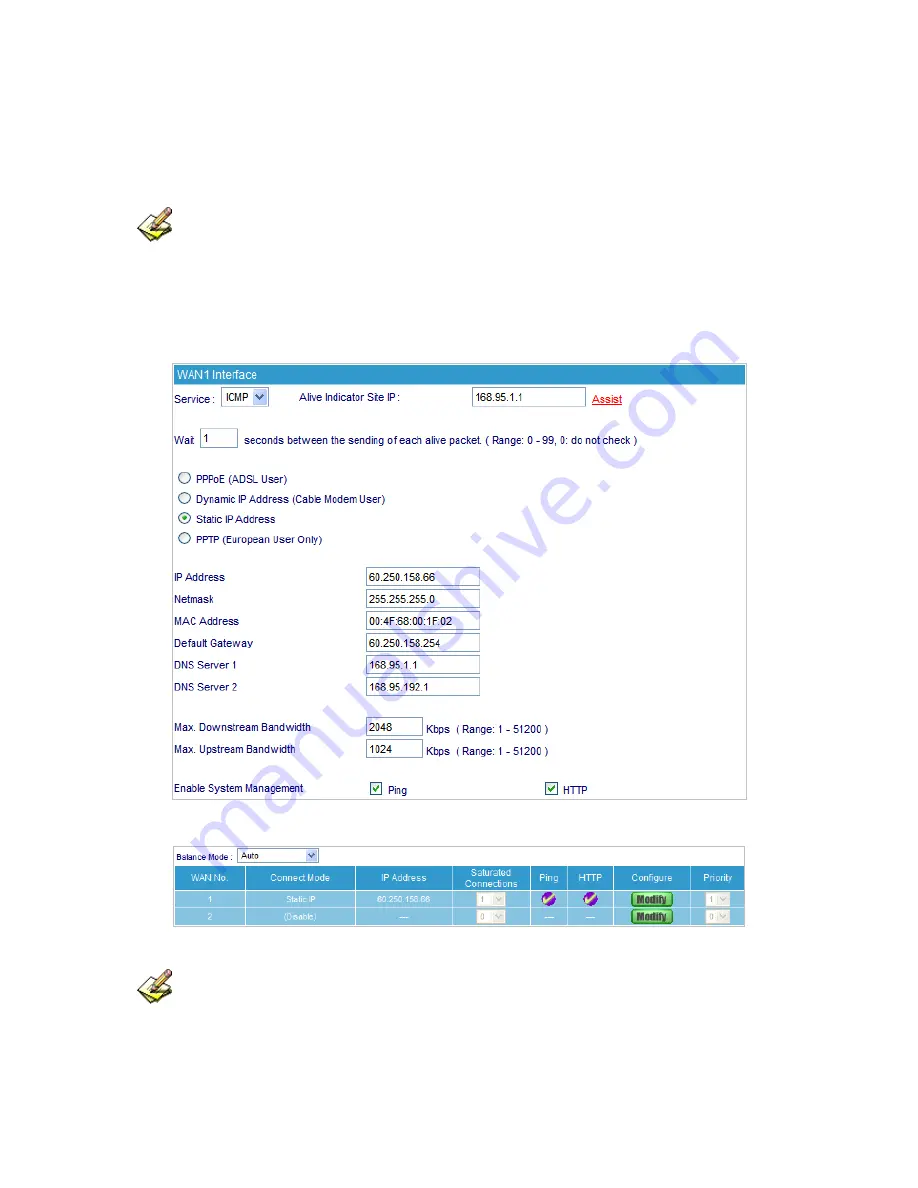
Static IP Address
(Figure 5-9)
1.
Select
Static IP Address
2.
Enter
IP Address
,
Netmask
, and
Default Gateway
that provided by ISP
3.
Enter
DNS Server1
and
DNS Server2
In WAN2, the connecting of Static IP Address does not need to set DNS Server
4.
Enter
Max. Downstream Bandwidth
and
Max. Upstream Bandwidth
(According to
the flow applied by user)
5.
Select
Ping
and
HTTP
6.
Click
OK
(Figure 5-10)
Figure 5-9 Static IP Address Connection
Figure 5-10 Complete Static IP Address Connection Setting
When selecting
Ping
and
WebUI
on
WAN
network Interface, users will be able to ping the
RS-3000 and enter the WebUI WAN network. It may influence network security. The suggestion is to
Cancel Ping
and
WebUI
after all the settings have finished. And if the System Administrator needs to
enter UI from WAN, he/she can use
Permitted IPs
to enter.
41
Summary of Contents for RS-3000
Page 1: ...1 RS 3000 Office UTM Gateway User s Manual ...
Page 45: ...Figure 5 11 PPTP Connection Figure 5 12 Complete PPTP Connection Setting 43 ...
Page 133: ...Figure15 3 Traffic Log Monitor WebUI 131 ...
Page 142: ...Figure15 19 Complete Policy Setting 140 ...
Page 183: ...Figure17 33 Create Folder WebUI 181 ...
Page 185: ...Figure17 35 Select Folder for Spam Mail to move to 183 ...
Page 187: ...Figure17 37 Compact SpamMail Folder 185 ...
Page 189: ...Figure17 39 Copy the File Address that SpamMail File Store 187 ...
Page 192: ...Figure17 42 Confirm that All of the Mail in SpamMail File had been Deleted 190 ...
Page 194: ...Figure17 44 Create Folder Function WebUI 192 ...
Page 196: ...Figure17 46 Select the Folder for Needed Spam Mail to Move to 194 ...
Page 198: ...Figure17 48 Compact HamMail File 196 ...
Page 200: ...Figure17 50 Copy the File Address that HamMail File Store 198 ...


