background image

58

EKI-7706 Series User Manual


4.5.8

Multicast

Multicast forwarding allows a single packet to be forwarded to multiple destinations.
The service is based on L2 switch receiving a single packet addressed to a specific
Multicast address. Multicast forwarding creates copies of the packet, and transmits
the packets to the relevant ports.

4.5.8.1

Multicast Filtering

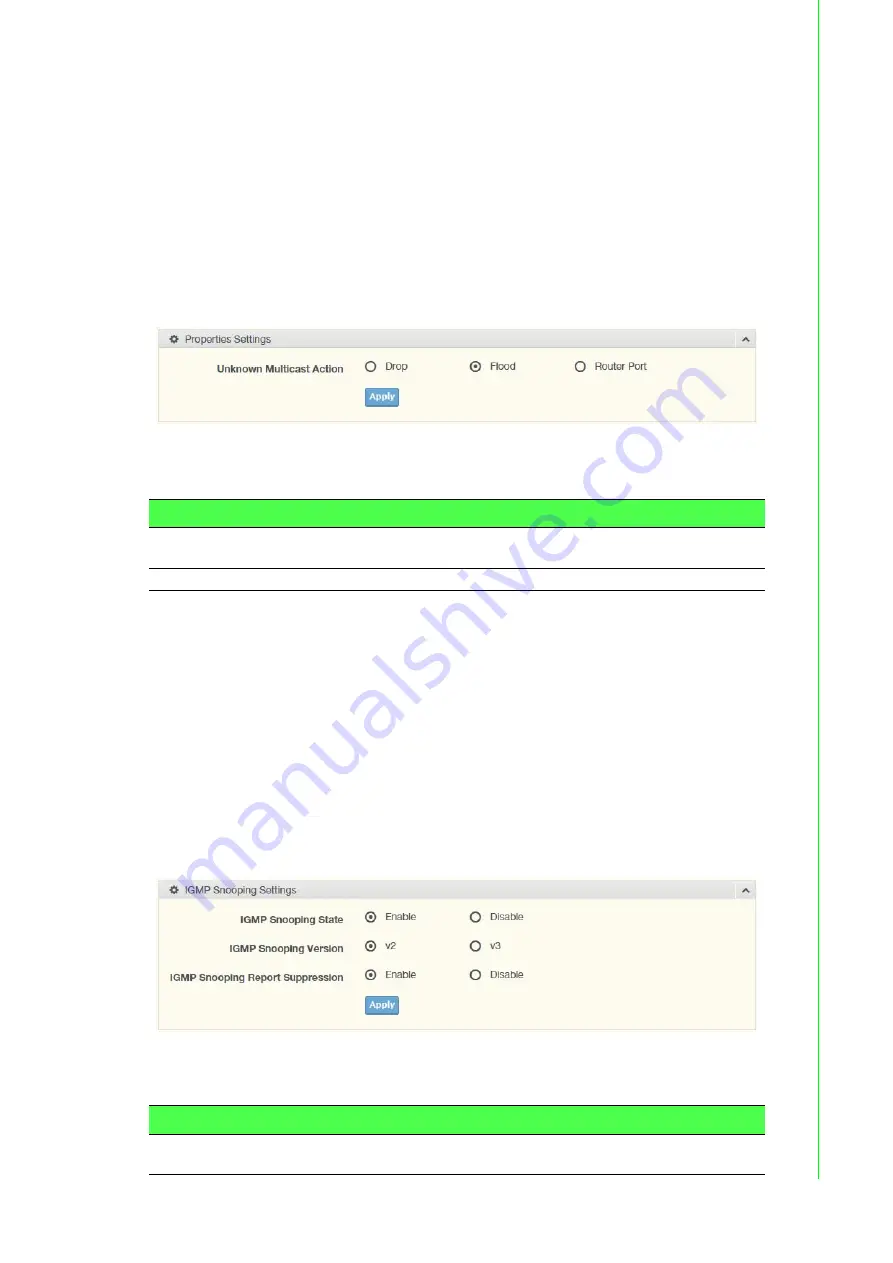
The Multicast Filtering page allows for the definition of action settings when an
unknown multicast request is received. The options include: Drop, Flood, or Router
Port.

To access this page, click 

L2 Switching

 > 

Multicast

 > 

Multicast Filtering

.

Figure 4.33 L2 Switching > Multicast > Multicast Filtering

The following table describes the items in the previous figure.

The ensuing table for 

Properties Information

 lists the following settings

(informational only): 

Unknown Multicast Action

4.5.8.2

IGMP Snooping

IGMP Snooping is defined as the process of listening to Internet Group Management
Protocol (IGMP) network traffic. IGMP Snooping allows a network switch to listen in
on the IGMP conversation between hosts and routers and maintain a map of which
links need which IP multicast streams. Multicasts can be filtered from the links which
do not need them in turn controlling which ports receive specific multicast traffic.

IGMP Settings

To access this page, click 

L2 Switching

 > 

Multicast

 > 

IGMP Snooping

 > 

IGMP

Settings

.

Figure 4.34 L2 Switching > Multicast > IGMP Snooping > IGMP Settings

The following table describes the items in the previous figure.

Item

Description

Unknown Multicast 
Action

Select the configuration protocol: Drop, Flood, or Router Port, to apply 
for any unknown multicast event.

Apply

Click 

Apply

 to save the values and update the screen.

Item

Description

IGMP Snooping 
State

Select 

Enable

 or 

Disable

 to designate the IGMP Snooping State.

Summary of Contents for EKI-7706 Series

Page 1: ...User Manual EKI 7706 Series 4FE 2G SFP 4GE 2G SFP L2 Managed Switch...

Page 2: ...lation Advantech assumes no liability under the terms of this warranty as a consequence of such events Because of Advantech s high quality control standards and rigorous testing most of our customers...

Page 3: ...nd can radiate radio frequency energy and if not installed and used in accordance with the instruction manual may cause harmful interference to radio communications Opera tion of this equipment in a r...

Page 4: ...1 x Industrial Ethernet Switch 1 x DIN Rail mounting Bracket and Screws 1 x Wall mounting Bracket 1 x Startup Manual Warning Warnings indicate conditions which if not observed can cause personal inju...

Page 5: ...ur any liquid into an opening This may cause fire or electrical shock 13 Never open the equipment For safety reasons the equipment should be opened only by qualified service personnel 14 If one of the...

Page 6: ...e einen Brand bzw elektrischen Schlag aus l sen 13 ffnen Sie niemals das Ger t Das Ger t darf aus Gr nden der elektrischen Sicherheit nur von authorisiertem Servicepersonal ge ffnet werden 14 Wenn fol...

Page 7: ...n period The following guidelines are also recommended Wear a grounded wrist or ankle strap and use gloves to prevent direct contact to the device before servicing the device Avoid nylon gloves or wor...

Page 8: ...onsole Port 18 2 7 Power Supply Installation 19 2 7 1 Overview 19 2 7 2 Considerations 20 2 7 3 Grounding the Device 20 2 7 4 Wiring a Relay Contact 21 2 7 5 Wiring the Power Inputs 21 2 8 Reset Butto...

Page 9: ...4 5 8 Multicast 58 4 5 9 Jumbo Frame 63 4 5 10 Spanning Tree 63 4 5 11 X Ring Elite 68 4 5 12 X Ring Pro 69 4 5 13 Loopback Detection 72 4 5 14 CFM 73 4 5 15 ERPS 74 4 6 MAC Address Table 75 4 6 1 Sta...

Page 10: ...M 128 4 10 6 LED Indication 129 4 11 Tools 129 4 11 1 IXM 129 4 11 2 Backup Manager 130 4 11 3 Upgrade Manager 131 4 11 4 Dual Image 132 4 11 5 Save Configuration 132 4 11 6 User Account 132 4 11 7 Re...

Page 11: ...re 2 23 Securing a Terminal Block to a Receptor 23 Figure 4 1 Login Screen 31 Figure 4 2 Changing a Default Password 32 Figure 4 3 Monitoring Device Information 32 Figure 4 4 Monitoring Logging Messag...

Page 12: ...X Ring Pro Groups Pair Settings 71 Figure 4 55 L2 Switching X Ring Pro X Ring Pro Groups RPair Settings 71 Figure 4 56 L2 Switching Loopback Detection Global Settings 72 Figure 4 57 L2 Switching Loopb...

Page 13: ...igure 4 112 Management TCP Modbus TCP Modbus Settings 109 Figure 4 113 Management DHCP Server Status Settings 110 Figure 4 114 Management DHCP Server Global Settings 111 Figure 4 115 Management DHCP S...

Page 14: ...Chapter 1 1Product Overview...

Page 15: ...Port LED Speed Link Activity Environment Operating Temperature Standard Temperature 10 C 60 C 14 F 140 F Wide Temperature 40 C 85 C 40 F 185 F Storage Temperature 40 C 85 C 40 F 185 F Ambient Relativ...

Page 16: ...eset button Button allows for system soft reset or factory default reset 3 Console serial port Console cable port to COM port DB9 male on computer to RS232 managed switch RJ45 female 4 ETH port RJ45 p...

Page 17: ...rash operation initiating 2 R M Solid green Active when determining ring master 3 PWR1 Solid green Powered up Off Powered down or not installed 4 PWR2 Solid green Powered up Off Power down or not inst...

Page 18: ...iption 1 DIN Rail mounting plate Mounting plate used for the installation to a standard DIN rail 2 Wall mounting holes Screw holes x3 used in the installation of a wall mounting plate 1 2 No Item Desc...

Page 19: ...6 EKI 7706 Series User Manual 1 2 4 Bottom View Figure 1 5 Bottom View No Item Description 1 Ground terminal Screw terminal used to ground chassis 1...

Page 20: ...Chapter 2 2Switch Installation...

Page 21: ...proper airflow the switch can overheat To prevent performance degradation and damage to the switch make sure there is clearance at the top and bottom and around the exhaust vents 2 1 1 Connecting Har...

Page 22: ...of the switch directly in front of the DIN rail making sure that the top of the DIN rail clip hooks over the top of the DIN rail as shown in the following illustration Make sure the DIN rail is inser...

Page 23: ...witch is correctly installed Otherwise re attempt the installation pro cess from the beginning 2 3 1 2 Removing the DIN Rail Mounting Kit 1 Ensure that power is removed from the switch and disconnect...

Page 24: ...need to remove the DIN rail plate 1 Rotate the device to the rear side and locate the DIN mounting plate 2 Remove the screws securing the DIN mounting plate to the rear panel of the switch 3 Remove th...

Page 25: ...ocation 7 Use the wall mount plates as a guide to mark the locations of the screw holes 8 Drill four holes over the four marked locations on the wall keeping in mind that the holes must accommodate wa...

Page 26: ...te over the screws on the wall 12 Install the wall mount plate on the screws and slide it forward to lock in place see the following figure 13 Once the device is installed on the wall tighten the scre...

Page 27: ...ct the Tx transmit port of device I to the Rx receive port of device II and the Rx receive port of device I to the Tx transmit port of device II If you make your own cable we suggest labeling the two...

Page 28: ...ure 2 10 Attaching a Fiber Optic Cable to a Transceiver 8 Repeat the previous procedures to install any additional SFP transceivers in the switch The fiber port is now setup Note If you are attaching...

Page 29: ...cable 2 Pull the optic cable out to release it from the transceiver Figure 2 11 Removing a Fiber Optic Cable to a Transceiver 3 Hold the handle on the transceiver and pull the transceiver out of the...

Page 30: ...J45 Ethernet ports are metallic and con nected to the GND terminal For best performance use shielded cabling Shielded cabling may be used to provide further protection Figure 2 13 Ethernet Plug Connec...

Page 31: ...RJ45 RJ45 port a wired connection for management can be established Figure 2 14 Serial Console Cable Figure 2 15 DB 9 Pin Position Figure 2 16 Pin Assignment DB9 Connector RJ45 Connector NC 1 Orange...

Page 32: ...ime as a result of power loss EKI 7706E 2F EKI 7706E 2FI EKI 7706G 2F EKI 7706G 2FI support 12 48 VDC Dual power inputs are supported which allow you to connect to a backup power source Figure 2 17 Po...

Page 33: ...for more effective manage ment and servicing 2 7 3 Grounding the Device Note Routing communications and power wiring through the same conduit may cause signal interference To avoid interference and s...

Page 34: ...erminal Receptor Relay Contact The terminal receptor includes a total of six pins two for PWR1 two for PWR2 and two for a fault circuit 2 7 5 Wiring the Power Inputs Note Before applying power to the...

Page 35: ...screws securing terminal block to the terminal block receptor 2 Remove the terminal block from the switch Figure 2 21 Removing a Terminal Block 3 Insert a small flat bladed screwdriver in the V1 V1 wi...

Page 36: ...ock to secure it to the terminal block recep tor If there is no gap between the terminal block and the terminal receptor the ter minal block is seated correctly Figure 2 23 Securing a Terminal Block t...

Page 37: ...Chapter 3 3Configuration Utility...

Page 38: ...explanation of how RSTP works is given in the Spanning Tree section The switch is capable of communicating with other SNMP capable devices on the network to exchange management information This stati...

Page 39: ...for network access select Add Menu Address Here to reach the System Settings menu The settings in this menu control the switch s general net work configuration DHCP Enabled Disabled The switch can au...

Page 40: ...is selected Choose to enable auto negotiation or use fixed settings 100Mbps Fiber ports are Fixed speed only Speed Duplex Flow Control The managed switch accepts three local area net work Ethernet St...

Page 41: ...subnet mask and default gateway value is the new value of the parameter If value is omitted the current value is displayed Please note that new values will not take effect until explicitly committed...

Page 42: ...work A PC also connected to the network is required to connect to the switch and access the interface through a web browser The required networking information is provided as follows IP address 192 1...

Page 43: ...Chapter 4 4Managing Switch...

Page 44: ...Recommended Practices One of the easiest things to do to help increase the security posture of the network infrastructure is to implement a policy and standard for secure management This practice is...

Page 45: ...ly save the changes 4 3 Monitoring 4 3 1 Device Information The Device Information menu lists information such as System Name System Location MAC Address Firmware version and more pertaining to the sy...

Page 46: ...umeric characters default is Default MAC Address Displays the MAC address of the switch IP Address Displays the assigned IP address of the switch Subnet Mask Displays the assigned subnet mask of the s...

Page 47: ...designate a severity level for the Logging Message Filter function Click the drop down menu to select the severity level target setting The level options are emerg Indicates system is unusable It is...

Page 48: ...atsJabbers etherStatsCollisions etherStatsPkts64Octets etherStatsPkts65to127Octets etherStatsPkts128to255Octets etherStatsPkts256to511Octets etherStatsPkts512to1023Octets and etherStatsPkts1024to1518O...

Page 49: ...al Statistics lists the following settings informational only Insertions Deletions Drops and Age Outs The ensuing table for LLDP Port Statistics lists the following settings informational only Port TX...

Page 50: ...e The ensuing table for IGMP Statistics lists the following settings informational only Total RX Valid RX Invalid RX Other RX Leave RX Report RX General Query RX Special Group Query RX Special Group S...

Page 51: ...he ensuing table for MLD Statistics lists the following settings informational only Total RX Valid RX Invalid RX Other RX Leave RX Report RX General Query RX Special Group Query RX Special Group Sourc...

Page 52: ...ay Static DNS Server 1 and Static DNS Server 2 Item Description Mode Click the radio button to select the IP Address Setting mode Static or DHCP IP Address Enter a value to specify the IP address of t...

Page 53: ...ing settings informational only Auto Configuration IPv6 In Use Address IPv6 In Use Router IPv6 Static Address IPv6 Static Router and DHCPv6 Client Item Description Auto Configuration Select the radio...

Page 54: ...ing Circuit ID Hex Circuit ID User Define Remote ID Format Remote ID String Remote ID Hex and Remote ID User Define Item Description Mode Click the radio button to enable or disable the DHCP Client Op...

Page 55: ...wing settings informational only Status 4 4 5 Management VLAN By default the VLAN is the management VLAN providing communication with the switch management interface To access this page click System M...

Page 56: ...Unicast SNTP requests will be sent to this address If this address is a DNS host name then that host name should be resolved into an IP address each time a SNTP request is sent to it SNTP Port Enter t...

Page 57: ...time Non Recurring From Click the drop down menu to designate a start date and time for a non recurring daylight saving time event Non Recurring To Click the drop down menu to designate the end date a...

Page 58: ...the radio button to enable or disable the Port Setting function Speed Click the drop down menu to select the port speed Auto Auto 10M Auto 100M Auto 1000M Auto 10 100M 10M 100M or 1000M Duplex Click t...

Page 59: ...uing table for Mirror Status lists the following settings informational only Session ID Destination Port Ingress State Source TX Port and Source RX Port Item Description Session ID Click the drop down...

Page 60: ...the following settings informational only Load Balance Algorithm 4 5 3 2 LAG Management Link aggregation is also known as trunking It is a feature available on the Ethernet gateway and is used with L...

Page 61: ...State Link Status Speed Duplex FlowCtrl Config and FlowCtrl Status 4 5 3 4 LACP Priority Settings The LACP Priority Settings page allows you to configure the system priority for LACP To access this pa...

Page 62: ...figure The ensuing table for LACP Port Information lists the following settings informational only Port Name Priority Timeout and Mode Item Description System Priority Enter the value 1 65535 to desi...

Page 63: ...ough this page you can add or delete VLAN listings and add a prefix name to an added entry To access this page click L2 Switching 802 1Q VLAN VLAN Management Figure 4 24 L2 Switching 802 1Q VLAN VLAN...

Page 64: ...ID Enter the VLAN ID you want assigned to untagged or priority tagged frames received on this port The value ranges 1 to 4094 The default is 1 Accepted Type Click the radio button to specify which fra...

Page 65: ...ing table describes the items in the previous figure Item Description Port Displays the assigned port to the entry Interface VLAN Mode Displays the assigned mode to the listed VLAN port Hybrid Port hy...

Page 66: ...s so the attached machine sees ordinary Ethernet frames via a single tagged tunnel port where the outer VLAN only is handled by the switch so the attached machine sees single tagged 802 1Q VLAN frames...

Page 67: ...Item Description Port Select Enter the switch port part of VLAN configuration to configure the selection as a tunnel port Outer PVID Enter the Port VLAN ID PVID to assigned the native VLAN ID All unt...

Page 68: ...ce of this timer exists for each GARP participant for each port Leave Time Enter a value to specify the time to wait after receiving an unregister request for a VLAN or multicast group before deleting...

Page 69: ...mational only GVRP 4 5 6 3 GMRP Settings To access this page click L2 Switching GARP GMRP Settings Figure 4 31 L2 Switching GARP GMRP Settings The following table describes the items in the previous f...

Page 70: ...r usage when inactive links or devices are detected To access this page click L2 Switching 802 3az EEE Figure 4 32 L2 Switching 802 3az EEE The following table describes the items in the previous figu...

Page 71: ...rmational only Unknown Multicast Action 4 5 8 2 IGMP Snooping IGMP Snooping is defined as the process of listening to Internet Group Management Protocol IGMP network traffic IGMP Snooping allows a net...

Page 72: ...oping To access this page click L2 Switching Multicast IGMP Snooping IGMP Querier Figure 4 35 L2 Switching Multicast IGMP Snooping IGMP Querier The following table describes the items in the previous...

Page 73: ...lick L2 Switching Multicast IGMP Snooping Multicast Groups The ensuing table for Multicast Groups lists the following settings informational only VLAN ID Group IP Address Member Ports Type and Life Se...

Page 74: ...ping Table lists the following settings informational only Entry No VLAN ID MLD Snooping Operation State Router Ports Auto Learn Query Robustness Query Interval sec Query Max Response Interval sec Las...

Page 75: ...Snooping Multicast Groups The ensuing table for Multicast Groups lists the following settings informational only ID Group IP Address Member Ports Type and Life Sec Router Ports To access this page cl...

Page 76: ...TP Global Settings The STP Global Settings page allows you to set the STP status select the configuration for a BPDU packet choose the path overhead force version and set the configuration revision ra...

Page 77: ...to save the values and update the screen Item Description Item Description Port Select Select the port list to specify the ports that apply to this setting Admin Enable Select Enabled or Disabled to s...

Page 78: ...lowing settings informational only Priority Forward Delay Max Age Tx Hold Count and Hello Time The ensuing table for STP Bridge Status lists the following settings informational only Bridge Identifier...

Page 79: ...T Config Identification The MST Config Identification page allows you to configure the identification setting name and the identification range To access this page click L2 Switching Spanning Tree MST...

Page 80: ...formational only MSTI ID and VID List 4 5 10 7 MST Instance Priority Settings The MST Instance Priority Settings allows you to specify the MST instance and the bridge priority in that instance To acce...

Page 81: ...P Statistics The ensuing table for STP Statistics lists the following settings informational only Port Configuration BPDUs Received TCN BPDUs Received Configuration BPDUs Transmitted and TCN BPDUs Tra...

Page 82: ...vents network loops 4 5 12 1 X Ring Pro Settings The X Ring Pro Settings page allows you to configure the status enabled or disabled of the function To access this page click L2 Switching X Ring Pro X...

Page 83: ...cribes the items in the previous figure Item Description Ring ID Enter a number to specifies a ranging from 1 to 255 to identify a given X Ring Pro group Port 1 Click the drop down menu to define the...

Page 84: ...couple setting Master Ring ID Click the drop down menu to designate the master ring Add Click Add to save the values and update the screen Item Description Pair Ring ID Enter a number to specifies a...

Page 85: ...escribes the items in the previous figure The ensuing table for Loopback Detection Global Information lists the following settings informational only State Interval and Recover Time 4 5 13 2 Port Sett...

Page 86: ...oups Figure 4 59 L2 Switching CFM ME Groups The following table describes the items in the previous figure The ensuing table for Information lists the following settings informational only Group Level...

Page 87: ...age click L2 Switching ERPS ERPS Settings Figure 4 61 L2 Switching ERPS ERPS Settings The following table describes the items in the previous figure The ensuing table for Information lists the followi...

Page 88: ...The Static MAC page allows you to configure the address for forwarding of packets the VLAN ID of the listed MAC address and the designated Port To access this page click MAC Address Table Static MAC...

Page 89: ...ollowing table describes the items in the previous figure The ensuing table for Dynamic Address Status lists the following settings informational only Aging time Item Description MAC Address Enter the...

Page 90: ...C Address Information lists the following settings informational only MAC Address VLAN Type Port and Add to Static MAC Item Description Port Click the drop down menu to select the port number to show...

Page 91: ...Security Storm Control Global Settings Figure 4 66 Security Storm Control Global Settings The following table describes the items in the previous figure The ensuing table for Storm Control Global Info...

Page 92: ...s Unknown Uni cast Kbps and Action Item Description Port Enter the port number to designate the local port for the Storm Control function Port State Select Disabled or Enabled to define the port state...

Page 93: ...69 Security Protected Ports The following table describes the items in the previous figure The ensuing table for Protected Ports Status lists the following settings informational only Protected Ports...

Page 94: ...re enabled or disabled the setting for each function To access this page click Security DoS Prevention DoS Global Settings Figure 4 70 Security DoS Prevention DoS Global Settings The following table d...

Page 95: ...agments function IPv4 Ping Max Size Click Enabled or Disabled to set the maximum ping size for the IPv4 protocol IPv6 Ping Max Size Click Enabled or Disabled to set a maximum ping size for the IPv6 pr...

Page 96: ...ll kinds of AAA lists with the Telnet line To access this page click Security Applications TELNET Figure 4 72 Security Applications TELNET The following table describes the items in the previous figur...

Page 97: ...this page click Security Applications HTTP Figure 4 74 Security Applications HTTP The following table describes the items in the previous figure The ensuing table for HTTP Information lists the follo...

Page 98: ...function provides port based authentication to prevent unauthorized devices clients from gaining access to the network 4 7 6 1 802 1x Settings The 802 1x Settings page allows you to set the state enab...

Page 99: ...ick Enabled or Disabled to set up 802 1x Setting function Server IP Enter the IP address of the local server providing authentication function Server Port Enter the port number 1 to 65535 assigned to...

Page 100: ...ne an IP Security entry To access this page click Security IP Security Entry Settings Figure 4 79 Security IP Security Entry Settings The following table describes the items in the previous figure The...

Page 101: ...ation MAC Mask Enter a value to specify the subnet mask for the destination MAC address Source MAC Address Enter the MAC address to set source MAC address Source MAC Mask Enter a value to specify the...

Page 102: ...gure Item Description Entry ID Type in the value designating the entry ID Destination IP Address Enter the IP address to set destination IP address Destination IP Mask Enter a value to specify the sub...

Page 103: ...lowing table describes the items in the previous figure The ensuing table for Global Information lists the following settings informational only Verify Ports 4 7 9 2 Entry Settings To access this page...

Page 104: ...y DHCP Snooping Global Settings DHCP Snooping Port Settings The following table describes the items in the previous figure Source IP Address Enter the IP address to set source IP address Port Select t...

Page 105: ...Address Lease Time VLAN Id and Port 4 7 11 ARP Spoofing To access this page click Security ARP Spoofing Figure 4 87 Security ARP Spoofing The following table describes the items in the previous figure...

Page 106: ...es performance predictable and bandwidth utilization much more effective The QoS implementation is based on the prioritization values in Layer 2 frames 4 8 1 1 QoS Properties The QoS Properties allows...

Page 107: ...te the importance weight of the queue relative to the other CoS queues WRR scheduling prevents low priority queues from being completely ignored during periods of high priority traffic The WRR schedul...

Page 108: ...evious figure Item Description Queue Queue entry for egress port Strict Select Strict to assign the scheduling designation to the selected queue WRR Select WRR to assign the scheduling designation to...

Page 109: ...ou need to modify them To access this page click QoS General DSCP Mapping Figure 4 92 QoS General DSCP Mapping The following table describes the items in the previous figure Queue to CoS Mapping Queue...

Page 110: ...ecedence Mapping The following table describes the items in the previous figure The ensuing table for IP Precedence Mapping Information lists the following settings informational only IP Precedence an...

Page 111: ...ss this page click QoS QoS Basic Mode Global Settings The function is only available when QoS Properties is set to Basic Figure 4 94 QoS QoS Basic Mode Global Settings The following table describes th...

Page 112: ...idth Control Figure 4 96 QoS Rate Limit Ingress Bandwidth Control The following table describes the items in the previous figure The ensuing table for Ingress Bandwidth Control Status lists the follow...

Page 113: ...ue The Egress Queue page allows you to set the egress bandwidth parameters To access this page click QoS Rate Limit Egress Queue Figure 4 98 QoS Rate Limit Egress Queue The following table describes t...

Page 114: ...nly Status Guarantee Bandwidth Guarantee Type UDP Source Port and Force Mode State Click Disabled or Enabled to set the Egress queue state CIR Kbps Enter the value in Kbps 16 to 1000000 to set the CIR...

Page 115: ...nsmit function and is received and processed by stations implementing the receive function 4 9 1 1 LLDP System Settings The LLDP System Settings allows you to configure the status enabled or disabled...

Page 116: ...ious figure Item Description Enabled Click Enabled or Disabled to set the Global Settings state LLDP PDU Disable Action Click to select the LLDP PDU handling action when LLDP is globally disabled Opti...

Page 117: ...o be carried multiple selections are allowed System Name To include system name TLV in LLDP frames Port Description To include port description TLV in LLDP frames System Description To include system...

Page 118: ...ption Capabili ties Supported Capabilities Enabled and Port ID Subtype The ensuing table for Port Status lists the following settings informational only Port Selected VLAN and Detail 4 9 1 4 LLDP Remo...

Page 119: ...SNMP is a protocol to facilitate the monitoring and exchange of management information between network devices Through SNMP the health of the network or status of a particular device can be determine...

Page 120: ...from the configuration settings to this page to configure the SNMP community To access this page click Management SNMP SNMP Community Figure 4 109 Management SNMP SNMP Community The following table de...

Page 121: ...e Access Right Click read only or read write to define the access right for the profile Encrypted Click the option to set the encrypted option for the user setting Auth Protocol Click the drop down me...

Page 122: ...mmunication between a switch module server and a device in the networking running MODBUS client software client 4 9 3 1 TCP Modbus Settings The TCP Modbus Settings page allows you to configure the mod...

Page 123: ...Settings The following table describes the items in the previous figure The ensuing table for Status Information lists the following settings informational only DHCP Server Service Time out Enter the...

Page 124: ...IP Address High IP Address Subnet Mask Gateway DNS and Clear Item Description Lease Time Type in the value designating the lease time 60 864000 in seconds for each setting lease Low IP Address Type in...

Page 125: ...way DNS Edit click to modify the settings and Clear Item Description Port Select Click the drop down menu to select a pre defined port to configure The suboptions are designated for the selected port...

Page 126: ...ay DNS Edit click to modify the settings and Clear Item Description Entry Click the drop down menu to select a pre defined port to configure VLAN ID Type in the value to use as an identifier for the V...

Page 127: ...it ID Format Click the drop down menu to select the format of the circuit ID string or hex Circuit ID Content Enter the circuit ID string on the switch on which the request was received Remote ID Form...

Page 128: ...ation lists the following settings informa tional only Entry ID Client MAC Address IP Address Subnet Mask and Modify Click Detail to display the detail information of desired entry id or Delete to del...

Page 129: ...bal Settings The following table describes the items in the previous figure The ensuing table for SMTP Information lists the following settings informational only Active Profile Id 4 9 5 2 Profile Set...

Page 130: ...dress Server IP Enter the IP address to designate the server host Server Port Enter the port number to designate the port associated with the server IP address Sender Mail Enter the email address of t...

Page 131: ...Sending Message The following table describes the items in the previous figure Item Description Title Assign the title of the email The maximum length is 20 characters alphanumeric symbols dot _ unde...

Page 132: ...gement RMON RMON Statistics Figure 4 124 Management RMON Rmon Statistics The following table describes the items in the previous figure The ensuing table for Statistics Information lists the following...

Page 133: ...the following settings informational only Index Port Buckets Requested Interval Owner and Delete Item Description Index Enter the index entry 1 to 65535 to select the number of new history table entri...

Page 134: ...cription Index Enter the index entry 1 to 65535 to define a specific Alarm Collection history entry Interval Enter a value 1 to 2147483647 to define the interval value for the Alarm Collection history...

Page 135: ...iagnostics is available 4 10 1 Cable Diagnostics The Cable Diagnostics page allows you to select the port for applying a copper test To access this page click Diagnostics Cable Diagnostics Figure 4 12...

Page 136: ...ng Giga ports are displayed with a channel A to D designation Copper Test Click Copper Test to display the test result for the selected port Item Description IP Address Enter the IP address or host na...

Page 137: ...of ping PING 172 17 8 254 172 17 8 254 56 data bytes 172 17 8 254 ping statistics 4 packets transmitted 0 packets received 100 packet loss Or PING 172 17 8 93 172 17 8 93 56 data bytes 64 bytes from 1...

Page 138: ...not retained across a power cycle Interval in sec Enter the interval between ping packets in seconds The default value is 1 The value ranges from 1 to 5 The interval you enter is not retained across a...

Page 139: ...Settings Status lists the following settings informational only Status Target Severity and Delete Item Description Target Enter the local logging target Severity Click the drop down menu to select th...

Page 140: ...address of the log server Server Port Enter the Udp port number of the log server Severity Click the drop down menu to select the severity level for local log messages The default is emerg The level o...

Page 141: ...e for Vendor Info lists the following settings informational only Refresh Port Connector Speed VendorName VendorOui VendorPn Vendor Rev VendorSn and DateCode Item Description Diagnostic Alarm Click th...

Page 142: ...IXM tool is an industrial Ethernet switch solution to help the users deploy industrial Ethernet switch hardware by allowing users with multiple managed Ethernet switches in the field to eliminate the...

Page 143: ...e IP Address Displays the device s IP address MAC Address Displays the device s IP MAC address Firmware Version Displays the device s firmware version System Indicator Displays the device s system ind...

Page 144: ...le describes the items in the previous figure Item Description Upgrade Method Click the drop down menu to select the upgrade method TFTP or HTTP Server IP Enter the IP address of the upgrade server Fi...

Page 145: ...onfiguration Click Save Configuration to FLASH to have configuration changes you have made to be saved across a system reboot All changes submitted since the previous save or system reboot will be ret...

Page 146: ...uration changes you have made since the last time you issued a save will be lost 4 12 Modbus TCP Mapping The data map addresses of Advantech switches shown in the following table start from Modbus add...

Page 147: ...byte n Word 2 Lo byte t Word 3 Hi byte e Word 3 Lo byte c Word 4 Hi byte h Word 4 Lo byte 0 Product Name EKI xxxx 16 words 32 chars ASCII 0x0020 30033 Product Name EKI xxxx Word 0 Hi byte E Word 0 Lo...

Page 148: ...0x1006 34103 Port 8 Status 1 word 16 bits HEX 0x1007 34104 Port 9 Status 1 word 16 bits HEX 0x1008 34105 Port 10 Status 1 word 16 bits HEX 0x1009 34106 Port 11 Status 1 word 16 bits HEX 0x100A 34107 P...

Page 149: ...Speed 1 word 16 bits HEX 0x110D 34366 Port 15 Speed 1 word 16 bits HEX 0x110E 34367 Port 16 Speed 1 word 16 bits HEX 0x110F 34368 Port 17 Speed 1 word 16 bits HEX 0x1110 34369 Port 18 Speed 1 word 16...

Page 150: ...ort 17 Flow Control 1 word 16 bits HEX 0x1210 34625 Port 18 Flow Control 1 word 16 bits HEX 0x1211 34626 Port 19 Flow Control 1 word 16 bits HEX 0x1212 34627 Port 20 Flow Control 1 word 16 bits HEX 0x...

Page 151: ...35241 Port 8 Description 20 words 40 chars ASCII 0x148C 35261 Port 9 Description 20 words 40 chars ASCII 0x14A0 35281 Port 10 Description 20 words 40 chars ASCII 0x14B4 35301 Port 11 Description 20 w...

Page 152: ...s HEX 0x1700 35889 Port 2 Link Up Counter 1 word 16 bits HEX 0x1701 35890 Port 3 Link Up Counter 1 word 16 bits HEX 0x1702 35891 Port 4 Link Up Counter 1 word 16 bits HEX 0x1703 35892 Port 5 Link Up C...

Page 153: ...31 Link Up Counter 1 word 16 bits HEX 0x171E 35919 Port 32 Link Up Counter 1 word 16 bits HEX 0x171F 35920 PoE Voltage 1 word 16 bits HEX 0x1800 0x181F 36145 36176 PoE Voltage V Ex poe voltage 5 Rece...

Page 154: ...16 bits HEX 0x181A 36171 Port 28 PoE Voltage 1 word 16 bits HEX 0x181B 36172 Port 29 PoE Voltage 1 word 16 bits HEX 0x181C 36173 Port 30 PoE Voltage 1 word 16 bits HEX 0x181D 36174 Port 31 PoE Voltage...

Page 155: ...word 16 bits HEX 0x1836 36199 Port 24 PoE Current 1 word 16 bits HEX 0x1837 36200 Port 25 PoE Current 1 word 16 bits HEX 0x1838 36201 Port 26 PoE Current 1 word 16 bits HEX 0x1839 36202 Port 27 PoE C...

Page 156: ...ower 1 word 16 bits HEX 0x1852 36227 Port 20 PoE Power 1 word 16 bits HEX 0x1853 36228 Port 21 PoE Power 1 word 16 bits HEX 0x1854 36229 Port 22 PoE Power 1 word 16 bits HEX 0x1855 36230 Port 23 PoE P...

Page 157: ...its HEX 0x186D 36254 Port 15 PoE Temperature 1 word 16 bits HEX 0x186E 36255 Port 16 PoE Temperature 1 word 16 bits HEX 0x186F 36256 Port 17 PoE Temperature 1 word 16 bits HEX 0x1870 36257 Port 18 PoE...

Page 158: ...8 38217 Port 8 Tx Packets 4 words 64 bits HEX 0x201C 38221 Port 9 Tx Packets 4 words 64 bits HEX 0x2020 38225 Port 10 Tx Packets 4 words 64 bits HEX 0x2024 38229 Port 11 Tx Packets 4 words 64 bits HEX...

Page 159: ...x4130 Port 1 Rx Packets 4 words 64 bits HEX 0x2100 38449 Port 2 Rx Packets 4 words 64 bits HEX 0x2104 38453 Port 3 Rx Packets 4 words 64 bits HEX 0x2108 38457 Port 4 Rx Packets 4 words 64 bits HEX 0x2...

Page 160: ...X 0x2174 38565 Port 31 Rx Packets 4 words 64 bits HEX 0x2178 38569 Port 32 Rx Packets 4 words 64 bits HEX 0x217C 38573 Tx Error Pack ets Counter 2 words 32 bits HEX 0x2200 0x223E 38705 38767 Tx Error...

Page 161: ...x Error Packets 2 words 32 bits HEX 0x222E 38751 Port 25 Tx Error Packets 2 words 32 bits HEX 0x2230 38753 Port 26 Tx Error Packets 2 words 32 bits HEX 0x2232 38755 Port 27 Tx Error Packets 2 words 32...

Page 162: ...bits HEX 0x2320 38993 Port 18 Rx Error Packets 2 words 32 bits HEX 0x2322 38995 Port 19 Rx Error Packets 2 words 32 bits HEX 0x2324 38997 Port 20 Rx Error Packets 2 words 32 bits HEX 0x2326 38999 Port...

Page 163: ...Chapter 5 5Troubleshooting...

Page 164: ...he length of any twisted pair connection does not exceed 100 meters 328 feet R replacement letter for Ohm symbol Diagnosing LED Indicators To assist in identifying problems the switch can be easily mo...

Page 165: ...tions are subject to change without notice No part of this publication may be reproduced in any form or by any means electronic photocopying recording or otherwise without prior written permis sion of...

Reviews: