background image


Chapter 1 

SA7 

1-24 

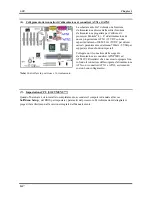
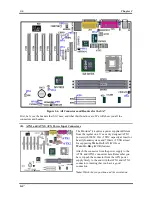
(6).  Подключение кабелей питания к разъемам ATX1 и ATX2 


Система питания SA7 отличается от стандартной 
(блок питания для процессоров Pentium

®

 4). Это 

новый стандарт ATX1 +12VDC с возможностью 
выдачи 300Вт, 20A +5В= для систем с высокой 
нагрузкой и 720mA +5В для поддержки особых 
функций. 

Подключите разъемы кабелей блока питания к 
разъемам ATXPWR1 и ATX12V1 на 
материнской плате. Не забудьте вставить 
разъемы кабелей питания ATX в разъемы ATX1 
и ATX2 до упора, чтобы быть уверенными в 
надежности контактов. 

Примечание:

 Обратите внимание на 

положение контактов и ориентацию разъема. 


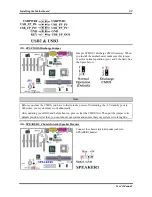
(7).  Настройка CPU [SOFT MENU™] 

По окончании установки аппаратуры включите питание и перейдите в меню BIOS 

SoftMenu 

Setup

, чтобы настроить параметры процессора. За более подробной информацией обращайтесь к 

руководству пользователя. 


Summary of Contents for SA7

Page 1: ...cidental or consequential damages arising from any defect or error in this manual or product Product names appearing in this manual are for identification purpose only and trademarks and product names or brand names appearing in this document are the property of their respective owners This document contains materials protected under International Copyright Laws All rights reserved No part of this...

Page 2: ......

Page 3: ...BOARD TO THE CHASSIS 3 2 3 2 INSTALL PENTIUM 4 PROCESSOR AND HEATSINK SUPPORTING BASE 3 3 3 3 INSTALLING SYSTEM MEMORY 3 4 3 4 CONNECTORS HEADERS AND SWITCHES 3 5 CHAPTER 4 INTRODUCING THE BIOS 4 1 4 1 CPU SETUP SOFT MENU 4 2 4 2 STANDARD CMOS FEATURES SETUP MENU 4 5 4 3 ADVANCED BIOS FEATURES SETUP MENU 4 8 4 4 ADVANCED CHIPSET FEATURES SETUP MENU 4 11 4 5 INTEGRATED PERIPHERALS 4 12 4 6 POWER MA...

Page 4: ...DRIVERS INSTALLATION FOR WINDOWS 2000 C 1 APPENDIX D LAN DRIVERS INSTALLATION FOR WINDOWS 2000 D 1 APPENDIX E BIOS UPDATE GUIDE E 1 APPENDIX F TROUBLESHOOTING NEED ASSISTANCE F 1 APPENDIX G HOW TO GET TECHNICAL SUPPORT G 1 ...

Page 5: ...est that you to read the full version manual first or ask a technician for assistance This guide is also printed in Chinese French German Japanese Italian and Russian 1 1 SA7 文快速安裝指引 感謝您購買 ABIT 的主機板 此主機板是設計給英特爾 Pentium 4 處理器所使用的 支援英特爾 Socket 478 架構的處理器 並支援最高至 2 GB 容量的記憶體 必需是非緩衝式 Unbuffered PC 2700 的記憶體模組 或是 3 GB 必需是非緩衝式 Unbuffered PC 1600 或是 PC 2100 的記憶體模組 如您要瞭解此主機板更詳細的資訊 請參閱我們的完整版使用手冊 裡面會有詳盡的說明 此...

Page 6: ...螺栓或墊片沒有接 觸到印刷電路板 的線路或是零件 2 請將處理器插槽釋放拉桿向插座的外側拉出 然 後將插槽釋放拉桿以 90 度角角度向 拉起 然 後請您以正確的方向將處理器插入處理器插 槽 由於您只能朝著 個固定的方向插入處理 器 因此如果當您在插入處理器時遇到阻礙的 話 切勿勉強或用力將處理器置入插槽 當處理 器正確 置入到處理器插槽之後 請將插槽釋放 拉桿再反方向推到底 並且將插槽釋放拉桿的卡 榫與處理器插槽鎖 如此即完成了處理器的安 裝 3 請將散熱片的平坦面向 朝著處理器 並沿著散 熱片固定架基座 個角落 支架的位置將散熱 片置入 直到散熱片完全 蓋住處理器為止 4 將散熱片的固定架蓋在散熱片 請確定散熱片 固定架 個邊角的鎖扣都已到達散熱片固定架 基座的鎖孔位置 5 將散熱片固定架兩側的固定夾 起往 壓 以將 散熱片固定架 的 個鎖扣與散熱片固定架基 座 的 個鎖孔扣 壓住散熱片...

Page 7: ... PC 1600 或是 PC 2100 的記憶體模 組 在主機板 有 個記憶體模組插槽 總共 有六個記憶體模組區塊 Bank 將DDR DIMM記憶體模組如圖3所示 插入DIMM 插槽 請注意記憶體模組的楔子是如何對應到 DIMM 插槽 的卡榫之 此種設計可確保 DDR DIMM 記憶體模組僅能由 個方向插到 DIMM 插 槽之 當您將 DDR DIMM 記憶體模組完全插 入 DIMM 插槽時 模組退出 固定 夾應該會將 DDR DIMM 記憶體模組自兩側卡緊並緊緊 固定 住記憶體模組 我們建議您將記憶體模組依照 DIMM1 至 DIMM3 的順序妥善 安裝於記憶體插槽 最後 您必需將所有必需的裝置纜線連接到主機板 相關的連接頭或是連接器 面 以完成您系統 的硬體安裝動作 5 連接器 連接頭以及其它附加卡的安裝 在任何 部電腦機殼的裡面 都必需連接 些纜線與插頭 這些纜線與插頭通常都是 對...

Page 8: ...型負載系統至少也可以提供 5V 直流電源之電流 20A 安培 以 的供電容量 而對支援 些其 他的特殊功能方面 它至少也可提供 5VSB 電壓 部份至少 720mA 毫安 的電流容量 請自您的 Pentium 4 專用 ATX 電源供應器 將 ATXPWR1 以及 ATX12V1 的電源纜線插頭插到 主機板 標示為 ATX1 以及 ATX2 的連接頭 去 請先檢查電源纜線插頭的方向正確之後 再 牢牢 把插頭插到連接頭裡固定 注意 請注意接腳的位置及方向 7 處理器參數的設定 SOFT MENU 當您將所有的硬體安裝完畢以後 就可以開啟電腦的電源並進入 BIOS 的選項 請選擇 SoftMenu Setup 的項目以進行處理器參數的設定 如您想要瞭解相關且更為詳細的資訊 請參閱我們的完 整版使用手冊 裡面會有詳盡的說明 ...

Page 9: ... plus détaillées veuillez vous référer à notre version complète du manuel utilisateur Ce guide d installation rapide est créé pour les assembleurs système expérimentés S il s agit de votre premier essai pour installer un ordinateur nous vous suggérons de lire d abord le manuel en version complète ou de demander l aide d un technicien pour vous aider à configurer le système ordinateur 8 Emplacement...

Page 10: ...er sur le levier de la socket du processeur vers le côté afin de l éloigner de la socket puis vers le haut sur 90 degrés Insérer le processeur dans le bon sens Ne pas forcer pour insérer le processeur il ne peut être installé que dans un sens Fermer le levier de la socket tout en maintenant le processeur vers le bas 3 Installer les faces du dissipateur de chaleur sur le processeur jusqu à ce qu el...

Page 11: ...s Ceci assure qu il n y qu une manière d insérer le module DDR DIMM Pressez fermement le module DDR DIMM dans l emplacement DDR DIMM assurez vous que le module est installé complètement dans l emplacement DDR DIMM Pour ces modules nous vous suggérons de remplir les emplacements de DIMM1 à DIMM3 en respectant l ordre Ensuite vous aurez à connecter les câbles de tous les périphériques nécessaires da...

Page 12: ...pour supporter certaines fonctions spécifiques Fixez le connecteur de la source d alimentation sur les connecteurs ATXPWR1 et ATX12V1 Rappelez vous que vous devez bien pousser le connecteur de votre alimentation sur les connecteurs ATX2et ATX1 pour vous assurer une bonne connexion Remarque Faites attention à la position des broches et à l orientation 14 Configuration du Processeur SOFT MENU Une fo...

Page 13: ...itsspeicher Beziehen Sie sich bitte für detaillierte Informationen über diese Hauptplatine auf die vollständige Version des Benutzerbuchs Diese Schnellinstallationsanleitung ist für erfahrene Systemaufbauer gedacht Ist es Ihr erster Versuch ein Computersystem aufzubauen dann empfehlen wir Ihnen zuerst das vollständige Benutzerhandbuch zu lesen oder einen Techniker zum Aufbauen des Systems zu Hilfe...

Page 14: ...ie den Hebel des Prozessorsockels seitwärts vom Sockel und dann im 90 Grad Winkel nach oben Setzen Sie den Prozessor mit der korrekten Ausrichtung hinein Wenden Sie keine Gewalt beim Einsetzen des Prozessors ein er passt nur in eine Ausrichtung hinein Drücken Sie den Sockelhebel wieder herunter während Sie den Prozessor heruntergedrückt halten 3 Setzen Sie das Kühlblech mit der Oberseite nach unte...

Page 15: ... Moduls in den Steckplatz passt Schauen Sie sich bitte Abb 5 an So ist sichergestellt dass das DDR DIMM Modul nur in eine Richtung in den Steckplatz eingesteckt werden kann Drücken Sie das DDR DIMM Modul fest in den DDR DIMM Steckplatz bis es komplett und fest darin sitzt Wir empfehlen Ihnen diese Module in der Reihenfolge von DIMM1 nach DIMM3 zu bestücken Danach müssen Sie alle nötigen Gerätekabe...

Page 16: ...r Funktionen Verbinden Sie die Netzstecker mit dem ATXPWR1 und ATX12V1 Anschluss Stecken Sie unbedingt die ATX Netzstecker komplett in den ATX1 und ATX2 Anschluss ein um eine gute Verbindung sicherzustellen Hinweis Achten Sie auf die richtige Ausrichtung und Position der Pole 7 CPU Setup SOFT MENU Schalten Sie nach der vervollständigten Hardwareinstallation den Computer ein und gehen zur Option So...

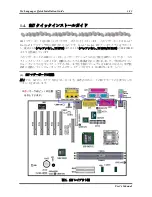
Page 17: ...ocket 478 アーキテクチャをサポート し 最高 2 GB バッファなし PC 2700 または 3 GB バッファなし PC 1600 PC 2100 の DDR SDRAM メモリを搭載しています このマザーボードの詳細については ユーザーズマニュアルの完全版を参照してください この クイックインストールガイドは 経験あるシステム構築者向けに書かれました 今回始めてコン ピュータシステムをセットアップする方は まず完全版のマニュアルをお読みになるか 専門技 術者に連絡してコンピュータシステムのセットアップを行うようお勧めします レバー 1 SA7 マザーボードの配置 図 1 では SA7 のレイアウト図を示しています 参考のために この図ですべての主要なコンポ ーネントを表示します 図 1 SA7 レイアウト図 ...

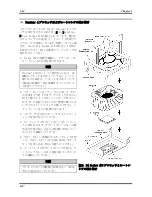
Page 18: ...を使用しており 金 属製のスタッドまたはスペーサをシャーシに 取り付ける場合は スタッドまたはスペーサ が基板の回線や一部に接触することがないよ う注意してください 2 ソケットレバーをソケットから外して 90 の角度まで引き上げます プロセッサを正しい 向きに挿入してください プロセッサは正しい 向きでしか固定できないので 無理に挿入しな いでください プロセッサが挿入できたら ソ ケットレバーを元の位置に戻します 3 プロセッサを完全にカバーするようにヒート シンクを取り付けてください 4 ヒートシンクのサポートカバーをヒートシン クに取り付けます サポートカバーの 4 つの留 め金が台座の差し込み口の位置に対応してい るかどうか確認してください 5 サポートカバー両側のホルダークリップを持 って サポートカバーを台座に固定します ク リップを差し込む方向に注意してください 6 ヒート...

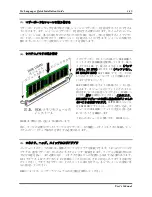
Page 19: ...ールソケットが搭載されて います 合計 6 バンク DDR DIMM を図に示すように拡張スロットに差し 込みます モジュールがソケットにどのように 固定されているか注意してください 詳細につ いては 図 3 を参照してください これにより DDR DIMM モジュールに差し込む方法が 1 つしか ないことを確認できます DDR DIMM モジュール を DDR DIMM ソケットにしっかりと押し込み モ ジュールが DDR DIMM ソケットに完全に差し込ま れていることを確認します これらのモジュールに関しては DIMM1 から DIMM3 まで順に差し込むようお勧めします 次に すべての必要なデバイスケーブルをマザーボードの関連ヘッダとコネクタに接続して シ ステムのハードウェア取付けを終了する必要があります 5 コネクタ ヘッダ スイッチおよびアダプタ コンピュータのケース内部には...

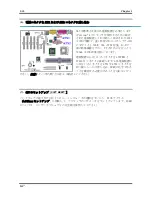
Page 20: ...00W 20A 5VDC 容量 および一 部の特殊機能をサポートするために少なくとも 720mA 5VSB 容量を持っています 電源装置から出ているコネクタを ATXPWR1 と ATX12V1 コネクタに接続します ATX 電源装置か ら出ているコネクタを ATX1 や ATX2 コネクタを 持つ端にしっかり押し込み 接続が完全である ことを確認する必要があることを忘れないでく ださい 注意 ピンの位置と方向をよく確認してください 7 CPU のセットアップ SOFT MENU ハードウェアの取り付けが完了したら コンピュータの電源をオンにし BIOS アイテム SoftMenu セットアップ に移動して プロセッサのパラメータをセットアップします 詳細 については ユーザーズマニュアルの完全版を参照してください ...

Page 21: ...ioni su questa scheda madre si prega di fare riferimento alla versione integrale del Manuale utente Questa guida all installazione veloce è intesa per costruttori esperi di sistemi Se questa è la prima volta che si cerca di installare un sistema si consiglia di leggere innanzi tutto la versione integrale del manuale oppure di chiedere aiuto ad un tecnico per l installazione 1 1 Disposizione scheda...

Page 22: ...ssore con il corretto orientamento Non sforzare per inserire il processore poiché si adatta solamente in un dato orientamento Chiudere la leva della presa mentre si trattiene il processore 3 Mettere il dispersore di calore a faccia in giù sul processore finché lo copre completamente 4 Mettere il coperchio di supporto del dispersore di calore sul dispersore di calore Assicurarsi che tutti quattro i...

Page 23: ...per dettagli Ciò assicura che ci sia un unico modo per collegare il modulo DDR DIMM Premere con fermezza il modulo DDR DIMM nello slot DDR DIMM assicurandosi che il modulo sia inserito completamente nello slot DDR DIMM Per questi moduli si suggerisce di inserire i chip elettronici in ordine da DIMM1 a DIMM3 Per completare l installazione dell hardware del sistema bisogna collegare tutti i cavi del...

Page 24: ...cune funzioni speciali Collegare qui il connettore dalla sorgente d alimentazione ai connettori ATXPWR1 ed ATX12V1 Ricordarsi che è necessario spingere fino in fondo il connettore della sorgente d alimentazione ATX con i connettori ATX1 e ATX2 assicurando così un buon collegamento Nota Controllare la posizione e l orientamento 7 Impostazione CPU SOFT MENU Quando l hardware è stato installato compl...

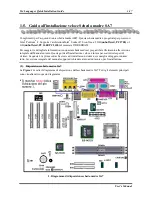
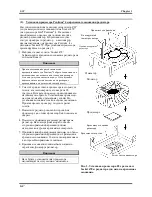
Page 25: ...буферизации PC 2700 или до 3 Гбайт без буферизации PC 1600 PC 2100 Более подробные сведения о материнской плате приведены в руководстве пользователя Краткое руководство по установке предназначено для опытных специалистов Если вы собираете компьютер впервые ознакомьтесь сперва с руководством пользователя или попросите техника помочь в настройке компьютерной системы 1 Расположение компонентов SA7 На...

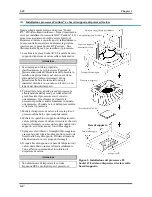
Page 26: ...зда а затем поверните его вверх на 90 градусов Вставьте процессор ориентировав его надлежащим образом Устанавливая процессор не прикладывайте чрезмерных усилий Его установка возможна только в одном положении Прижав процессор сверху опустите рычаг гнезда 3 Поместите радиатор плоской стороной на процессор так чтобы процессор был полностью закрыт 4 Поместите прижимную крышку радиатора на радиатор Все...

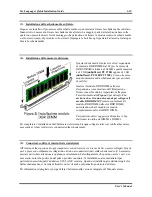
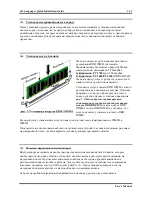
Page 27: ...руется в гнезде Более подробно процесс установки показан на рис 5 Таким образом гарантируется единственно возможный способ установки модуля DDR DIMM Вставьте модуль DDR DIMM в гнездо DDR DIMM и убедитесь что модуль надежно установлен в гнездо DDR DIMM Рекомендуется устанавливать модули памяти последовательно в направлении от DIMM1 к DIMM3 Подключите все необходимые кабели для подключения устройств...

Page 28: ...те разъемы кабелей блока питания к разъемам ATXPWR1 и ATX12V1 на материнской плате Не забудьте вставить разъемы кабелей питания ATX в разъемы ATX1 и ATX2 до упора чтобы быть уверенными в надежности контактов Примечание Обратите внимание на положение контактов и ориентацию разъема 7 Настройка CPU SOFT MENU По окончании установки аппаратуры включите питание и перейдите в меню BIOS SoftMenu Setup что...

Page 29: ...up to 2 7 GB Sec under DDR 333 and 1 GB Sec under PC 133 in order to sustain the bandwidth demand from the host processor as well as the multi I O masters and AGP masters DDR SDRAM is the newest memory standard and it provides maximum translation bandwidth and also greatly improves data transaction delays This feature improves whole system performance and speed especially in multimedia environment...

Page 30: ...odules up to 3 GB 4 System BIOS SOFT MENU technology can easily set the processor parameters AMI Plug and Play BIOS supports APM and Deaktop Management Interface DMI Supports ACPI Advanced Configuration Power Interface AMI BIOS 5 Audio Function C Media 9738 audio CODEC Supports 18 bit DAC Digital to Analog Converter resolution Supports 18 bit ADC Analog Digital Converter resolution 6 Multi I O Fun...

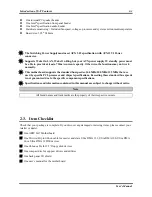
Page 31: ...z 100 MHz 133 MHz that are used by specific PCI processor and chipset specifications Exceeding these standard bus speeds is not guaranteed due to the specific component specifications Specifications and information contained in this manual are subject to change without notice Note All brand names and trademarks are the property of their respective owners 2 3 Item Checklist Check that your package ...

Page 32: ...Chapter 1 SA7 2 4 2 4 Layout Diagram for SA7 Figure 1 1 SA7 motherboard component location ...

Page 33: ...turn the ATX power supply switch off fully turn the 5V standby power off or take the power cord off Otherwise you may cause the motherboard components or add on cards to malfunction or be damaged User Friendly Instructions Please read our instructions carefully and follow them step by step Our objective is to enable the novice computer user to perform the installation by himself We have attempted ...

Page 34: ...otherboard with spacers Take the tip of the spacers and insert them into the slots After doing this to all the slots you can slide the motherboard into position aligned with the slots After the motherboard has been positioned check to make sure everything is OK before putting the casing back on Figure 2 2 shows you the way to affix the motherboard using studs or spacers Note If the motherboard has...

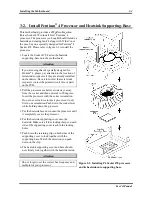
Page 35: ...s on the PCB 2 Pull the processor socket lever sideways away from the socket and then upwards to 90 degrees Insert the processor with the correct orientation Do not use extra force to insert processor it only fits in one orientation Push down the socket lever while holding down the processor 3 Put the heatsink face down onto the processor until it completely covers the processor 4 Put the heatsink...

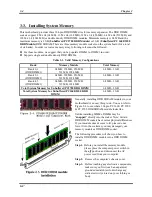
Page 36: ...DIMM3 64 MB 128 MB 256 MB 512 MB 1024 MB 64 MB 1 GB Total System Memory for Unbuffered PC2700 DDR DIMM 64 MB 2 GB Total System Memory for Unbuffered PC1600 2100 DDR DIMM 64 MB 3 GB Generally installing DDR SDRAM modules to your motherboard is an easy thing to do You can refer to Figure 2 4 to see what a 184 pin PC 1600 PC 2100 PC 2700 DDR SDRAM module looks like Unlike installing SIMMs DIMMs may b...

Page 37: ...the DDR SDRAM module The sticker will tell you which kind of structure module the DDR SDRAM is 3 4 Connectors Headers and Switches Inside the case of any computer several cables and plugs have to be connected These cables and plugs are usually connected one by one to connectors located on the motherboard You need to carefully pay attention to any connection orientation the cables may have and if a...

Page 38: ...m the regular one It s a newly designed ATX1 power with 300W 20A 5VDC capacity at least for heavily loaded system and 720mA 5VSB at least for supporting Wake On LAN WOL or Wake On Ring WOR features Attach the connector from the power supply to the ATX1 and ATX2 connectors here Remember you have to push the connector from the ATX power supply firmly to the end with the ATX1 and ATX2 connectors insu...

Page 39: ...ter you will find that the live wire slot will register a higher voltage If you reverse the polarity of AC plug it may affect the life of computer equipment or cause an electric shock when you touch the computer chassis We suggest that you plug the computer AC plug to a three hole wall outlet for better safety and to avoid electric shock 9 CPUFAN1 CHSFAN1 ADDFAN1 and BAKFAN1 headers Attach the con...

Page 40: ...output of internal CD ROM drive or add on card audio output There are two types connectors that you can choose to connect 12 USB2 and USB3 Headers Additional USB Plugs Header Thess headers are for connecting the additional USB port plugs Each connector can provides two additional USB plugs Which means total you can get two additional USB plugs from each connector You can use the special USB port e...

Page 41: ...Before you clear the CMOS you have to first turn the power off including the 5V standby power Otherwise your system may work abnormally After updating your BIOS and before boot up please clear the CMOS first Then put the jumper to its default position After that you can reboot your system and ensure that your system is working fine 14 SPEAKER1 Chassis Internal Speaker Headers Connect the chassis i...

Page 42: ...ED header 5V Standby LED By connecting the LED here the LED will light up after the power switch is pressed This LED will show you the 5V standby power situation 17 PANEL1 The Headers for Chassis s Front Panel Indicators and Switches FPIO1 are for switches and indicators for the chassis front panel There are several functions that come from this header You have to watch the pin position and the or...

Page 43: ...enable disable the power management function through hardware PANEL1 Pin 6 8 Power On Switch Header Attach the cable from the case s front panel power on switch to this header 18 FLOPPY1 Connector This 34 pin connector is called the floppy disk drive connector You can connect a 360K 5 25 1 2M 5 25 720K 3 5 1 44M 3 5 or 2 88M 3 5 floppy disk drive A floppy disk drive ribbon cable has 34 wires and t...

Page 44: ...documentation for jumper settings The first drive connected to IDE1 is usually referred to as Primary Master and the second drive as Primary Slave The first drive connected to IDE2 is referred to as Secondary Master and the second drive as Secondary Slave Keep away from connecting one legacy slow speed device like CD ROM together with another hard disk drive on the same IDE channel this will decre...

Page 45: ...ard to this connector We suggest you use a PS 2 keyboard for best compatibility 21 PS 2 Mouse Connector Attach a PS 2 mouse to this 6 pin Din connector 22 Serial Port COM1 COM2 Port Connectors This motherboard provides two COM ports you can connect an external modem mouse or other devices that support this communication protocol to these connectors You can decide which external devices you want to...

Page 46: ... Connectors This motherboard provides two USB ports Attach the USB connector from the individual device to these connectors You can attach USB devices such as a scanner digital speakers monitor mouse keyboard hub digital camera joystick etc to one of each USB connector You must make sure your operating system supports this feature and you may need to install an additional driver for individual dev...

Page 47: ...e please refer to the section CCMOS1 Header in Chapter 2 to see how to discharge the CMOS date When you start the computer the BIOS program controls it The BIOS first operates an auto diagnostic test called POST Power On Self Test for all of the necessary hardware It then configures the parameters of the hardware synchronization and detects all of the hardware Only when these tasks are completed d...

Page 48: ...put a label with these parameters on your hard disk 4 1 CPU Setup SOFT MENU The CPU can be setup through a programmable switch CPU SOFT MENU that replaces the traditional manual hardware configuration This feature allows the user to more easily complete the installation procedures You can install the CPU without configuring any jumpers or switches The CPU must be setup according its specifications...

Page 49: ...ttings shown as below x8 x10 x11 x12 x13 x14 x15 x16 x17 x18 x19 x20 x21 x22 x23 x24 Speed Error Hold Two options are available Disabled Enabled The default setting is Disabled If you change the setting to Enabled when the CPU speed setting is wrong the system will hold DRAM Ratio CPU DRAM Six options are available 1 1 3 4 3 5 4 3 4 5 By SPD This item lets you set the processor Front Side Bus and ...

Page 50: ...S Setup to set up CPU parameters again Attention After setting up the parameters and leaving the BIOS SETUP and having verified that the system can be booted do not press the Reset button or turn off the power supply Otherwise the BIOS will not read correctly the parameters will fail and you must enter SOFT MENU again to set up the parameters all over again CPU Core Voltage This option allows you ...

Page 51: ...o you can probably skip this operation Remember though the primary IDE HDD must have its partition set to active within the FDISK procedure If you are using an old HDD that is already formatted auto detection can t detect the correct parameters You may need to do a low level format or set the parameters manually and then check if the HDD is working IDE Primary Master Three settings are available N...

Page 52: ...his mode Auto Just let the BIOS detect your HDD access mode and make the decisions Capacity This item auto displays your HDD size Note that this size is usually slightly greater than the size given by a disk checking program of a formatted disk Note All the items below are available when you set the item Primary IDE Master to Manual Cylinder When disks are placed directly above one another along t...

Page 53: ...led Driver A Driver B Both The default setting is Disabled 3 Mode floppy disk drives FDD are 3 5 drives used in Japanese computer systems If you need to access data stored in this kind of floppy you must select this mode and of course you must have a 3 Mode floppy drive Video You can select the VGA modes for your video adapter four options are available EGA VGA CGA 40 CGA 80 MONO The default setti...

Page 54: ...run a series of tests in order to check the system and its peripherals If the Quick Power on Self Test feature is enable the BIOS will simplify the test procedures in order to speed up the boot process First Boot Device When the computer boots up the BIOS attempts to load the operating system from the devices in the sequence selected in these items floppy disk drive A LS120 ZIP100 devices hard dri...

Page 55: ...tic Rate Chars Sec Eight options are available 6 8 10 12 15 20 24 30 Back to 6 The default setting is 30 When you press a key continuously the keyboard will repeat the keystroke according to the rate you have set Unit characters second Typematic Delay Msec Four options are available 250 500 750 1000 Back to 250 The default setting is 250 When you press a key continuously if you exceed the delay yo...

Page 56: ...sor Specification If you use an older OS for dual processor executing please set this option to 1 1 OS Select For DRAM 64MB Two options are available Non OS2 or OS2 The default setting is Non OS2 When the system memory is bigger than 64MB the communication method between the BIOS and the operating system will differ from one operating system to another If you use OS 2 select OS2 if you are using a...

Page 57: ...t each item does please keep the default settings Wrong settings may cause system unstablity data loss or even prevent boot up System Performance Five options are available Safe Mode Normal Mode Fast Mode Turbo Mode Ultra Mode The default setting is Normal Mode CAS Latency Three options are available 2T 2 5T 3T The default setting is 2 5T You can select SDRAM CAS Column Address Strobe latency time...

Page 58: ...The default setting is Disabled If your AGP adapter can support thi sfunction then you can choose Enabled Otherwise choose Disabled Enabling this item can improve your system performance but it may also decrease system compatibility AGP Sideband Address Two options are available Enabled or Disabled The default setting is Disabled If your AGP adapter can support thi sfunction then you can choose En...

Page 59: ...s Auto The BIOS can auto detect the transfer mode of the IDE devices in order to set its data transfer rate Default You can select the PIO mode from Mode 0 to Mode 4 of the IDE devices in order to set its data transfer rate This field does not appear when the Internal PCI IDE field is Disabled or Primary Primary Master Ultra DMA Two options are available Disabled or Auto The default setting is Aut...

Page 60: ...t cannot support such fast performance If you are getting disk drive errors try setting this value to Disabled This field is not available to enter when the Internal PCI IDE field is Disabled SiS OnChip PCI Device AC97 AUDIO Two options are available Enabled or Disabled The default setting is Enabled Your motherboard has the built in AC97 Codec that can support AC97 specifications If you set this ...

Page 61: ...lowing items will appear ECP Mode Use DMA Two options are available 1 3 The default setting is 3 When the mode selected for the onboard parallel port is ECP or ECP EPP the DMA channel selected can be 1 Channel 1 or 3 Channel 3 Game Port Address Three options are available Disabled 201 209 Default setting is 201 You can choose the game port I O base address in this item to meet the need for game re...

Page 62: ... First Two options are available PCI Slot or AGP The default setting is PCI Slot When you install more than one display card you can choose either a PCI display card PCI Slot or an AGP display card AGP to display the boot up screen If you have only installed one display card the BIOS will detect which slot AGP or PCI you installed it and everything will be taken care of by the BIOS AGP Auto Calibr...

Page 63: ...at all devices and add on cards in your system must fully support ACPI both hardware and software drivers If you want to know if your devices or add on cards support ACPI or not please contact the device or add on card manufacture for more information If you want to know more about ACPI specifications please go to the address below for more detailed information http www teleport com acpi acpihtml ...

Page 64: ...s The processor s complex context is maintained Dynamic RAM context is maintained Power Resources are in a state compatible with the system S1 state All Power Resources that supply a System Level reference of S0 are in the OFF state Devices states are compatible with the current Power Resource states Only devices which solely reference Power Resources which are in the ON state for a given device s...

Page 65: ...vailable to the S3 state As such additional devices can be required to be in logically lower D0 D1 D2 or D3 state for S3 than S2 Similarly some device wake events can function in S2 but not S3 Because the processor context can be lost while in the S3 state the transition to the S3 state requires that the operating software flush all dirty cache to DRAM Above information for system S1 were refer to...

Page 66: ...e Always Off Always On Keep Pre State The default setting is Always Off This setting lets you set the system action after a power failure This item lets you sett the system power state when power recovers If you set it to Always Off when power returns whatever state your computer was in before the power failure the system will always turn off If you set it to Always On when power returns whatever ...

Page 67: ... when the Resume by Alarm field is Disabled Day of Month Alarm You can enter the decimal number from 1to 31 which means the date of 1 to date of 31 This field is not available to enter when the Resume by Alarm field is set to Disabled Time hh mm ss Alarm You can set the Time Alarm hh mm ss Any event occurring will awaken a system that has powered down This field is not available to enter when the ...

Page 68: ...t Manual to set which IRQis assigned to which PCI device or reserve it See the screen shot below PCI VGA Palette Snoop Two options are available Disabled or Enabled The default setting is Disabled This option allows the BIOS to preview VGA Status and to modify the information delivered from the Feature Connector of the VGA card to the MPEG Card This option can set the display inversion to black af...

Page 69: ...peratures as well as fan speeds CPU fan and chassis fan It cann t be changed by the user The following items list the voltage states of the system power It is also unchangeable Note The hardware monitoring features for temperatures fans and voltages will occupy the I O address from 294H to 297H If you have a network adapter sound card or other add on cards that might use those I O addresses please...

Page 70: ...ng any part of your system configuration Additionally when a password is enabled you can also require the BIOS to request a password every time your system is rebooted This would prevent unauthorized use of your computer You determine when the password is required within the BIOS Features Setup Menu and its Security option If the Security option is set to System the password will be required both ...

Page 71: ...atest service pack to get the best system performance You can download SP2 at Microsoft WEB site Note Details of the Windows 2000 operating system will not be mentioned in this manual If you have any problems with Windows 2000 installation operation or settings please refer to your Windows 2000 user s manual or other databases provided by Microsoft Corporation Insert the 645 series CD into your CD...

Page 72: ... version you see may differ because we may change the drivers or change the CD version If this happens the version may be different with this picture but the install process won t change at all Step 5 When the installation is complete the installer will ask you to restart your computer We suggest that you choose Yes I want to restart my computer now then click the Finish button to restart your com...

Page 73: ...t service pack to get the best system performance You can download SP2 at Microsoft WEB site Note Details of the Windows 2000 operating system will not be mentioned in this manual If you have any problems with Windows 2000 installation operation or settings please refer to your Windows 2000 user s manual or other databases provided by Microsoft Corporation Insert the 645 series CD into your CD ROM...

Page 74: ...the items please click the Next button to continue Step 5 The installer will show the install progress percentage Step 6 The Digital Signature Not Found menu show up Click Yes to go on This screen will show up again please click Yes to go on Step 7 When your computer system restarts Windows 2000 starts the update process and new hardware device will be found Step 8 You will now see the welcome scr...

Page 75: ...OM drivers Click Next button to go on Step 12 After searching program will fine Ultra DMA Channel device driver and tell you where it located Click Next button to go on Step 13 the Digital Signature Not Found screen show up click Yes to go on Step 14 When completing the upgrade device driver then click Finish button to go on Step 15 System Settings Change dialogue show up click the Yes button to r...

Page 76: ...alogue box Click Next button to go on The procedure will go through from Step 9 to Step 15 again After you restart the system again you can go to next step Step 16 When Windows 2000 restart you can then check the Device Manager to see that the devices are properly installed ...

Page 77: ...anual or other databases provided by Microsoft Corporation Insert the 645 series CD into your CD ROM drive and it should execute the program automatically If not you can go to the CD location and execute the execution file at the main directory of the CD After it has been executed you will see the screen below Step 1 Move the cursor to Audio Driver and click on it You will go to the next screen St...

Page 78: ...tup wizard will add program icons to those program folders listed Click Next to go on Step 7 When the File Association dialogue shows up you can choose the file type you like to associate with the C Media chip When you finish selecting click Next to go on Step 8 Setup program has enough information to coping the program files click Next to go on Step 9 Setup complete dialogue box show up Click Fin...

Page 79: ...rts and updates the drivers it will ask you to restart your computer system Click the Yes button to restart your computer again Step 13 When system restarts and enters the operating system you can then check the Device Manager to see that the devices are properly installed Step 14 You can choose from Start Programs then from item C Media Audio Media Rack to start the applications program You can s...

Page 80: ...Appendix C SA7 C 4 ...

Page 81: ... refer to your Windows 2000 user s manual or other databases provided by Microsoft Corporation Insert the 645 series CD into your CD ROM drive and it should execute the program automatically If not you can go to the CD location and execute the execution file at the main directory of the CD After it has been executed you will see the screen below Step 1 Move the cursor to LAN Driver and click on it...

Page 82: ...all progress percentage Step 5 Windows has completed installing the driver Click Finish to end the driver installation Step 8 When system restarts and enters the operating system you can then check the Device Manager see that the devices are properly installed ...

Page 83: ...e process The motherboard photo we show you below is SX7 533 1 Know your motherboard s PCB version number You can find it at the front or back of the motherboard Each motherboard always has the label Bar code sticker at a different place on the PCB to show the PCB version As shown in the photo below just for example 2 Know the current BIOS ID ...

Page 84: ...oad the correct BIOS file from our Web site You can click the Download button on the green line then go to our download center and choose the correct BIOS file and download it 4 Double click the download file it will self extract to awdflash exe and bin files 5 Make a bootable floppy disk and copy the necessary files onto it You may make a floppy disk bootable either in Explorer or in the DOS prom...

Page 85: ... User s Manual E 3 After formatting and transferring the system to the floppy disk copy two files into it One is the BIOS flash utility awdflash exe and the other is the decompressed BIOS bin file 6 Boot off floppy disk ...

Page 86: ...sed with your motherboard don t flash with the wrong BIOS file Otherwise you may cause system malfunctions Note Please do not use the Award flash memory writer version that earlier than Version 7 52C to flash your SA7 motherboard BIOS Otherwise it may cause flash fail or un anticipate problems Note During the updating the progress will be measured by white blocks The last four blue blocks of the f...

Page 87: ... form Fax this form to your dealer or to the company where you bought the hardware in order to benefit from our technical support You can refer to the examples given below Example 1 With a system including motherboard with processor DDR DRAM etc HDD CD ROM FDD graphic adapter MPEG 2 card SCSI adapter audio card etc After the system is assembled if you cannot boot up check the key components of the...

Page 88: ...GH C PLUGPLAY DWCFGMG SYS LASTDRIVE Z Restart the system If the system starts and does not reset you can be sure that the problem is due to the Sound Card Driver Write down the Sound Card model motherboard model BIOS identification number on the technical support file refer to main instructions and describe the problem in the space provided We will show you how to fill the Technical Support Form r...

Page 89: ... the box in the Brand space write Pioneer in the Specifications space write DVD 16 9 System Memory DDR SDRAM Indicate the brand and specifications DDR DIMM of your system memory Examples Density Description Module Components Module Part Number CAS Latency Speed MHz For example In the Brand space write Micron in the Specifications space write Density 128MB Description SS 16 Megx72 2 5V ECC Gold Mod...

Page 90: ...ct Person Fax Number 3 E mail Address Model Name BIOS ID Part Number Motherboard PCB Version Driver Version OS Applications Hardware Name Brand Specifications Processor Type Hard Disk Drive IDE1 IDE2 CD ROM Drive IDE1 IDE2 System Memory DDR DRAM Add On Card Problem Description ...

Page 91: ...written and thorough manual It is full of information that doesn t only pertain to motherboards The CD ROM included with your board will have the manual as well as drivers If you don t have either one go to the Program Download Area of our website or FTP server 2 Download latest BIOS software or drivers Please go to our Program Download area on our website to check to see if you have the latest BI...

Page 92: ...on t have the resources to serve every end user However we will try to do our best to help every customer Please also remember that for many of our technical support team English is a second language you will have a better chance of getting a helpful answer if your question can be understood in the first place Be sure to use very simple concise language that clearly states the problem avoid rambli...

Page 93: ...ty Problems to ABIT Because of tremendous number of email messages we receive every day we are forced to give greater weight to certain types of messages than to others For this reason any compatibility problem that is reported to us giving detailed system configuration information and error symptoms will receive the highest priority For the other questions we regret that we may not be able to rep...

Page 94: ...Appendix G SA7 G 4 ...

Reviews: