19
3D SYSTEMS, INC
.
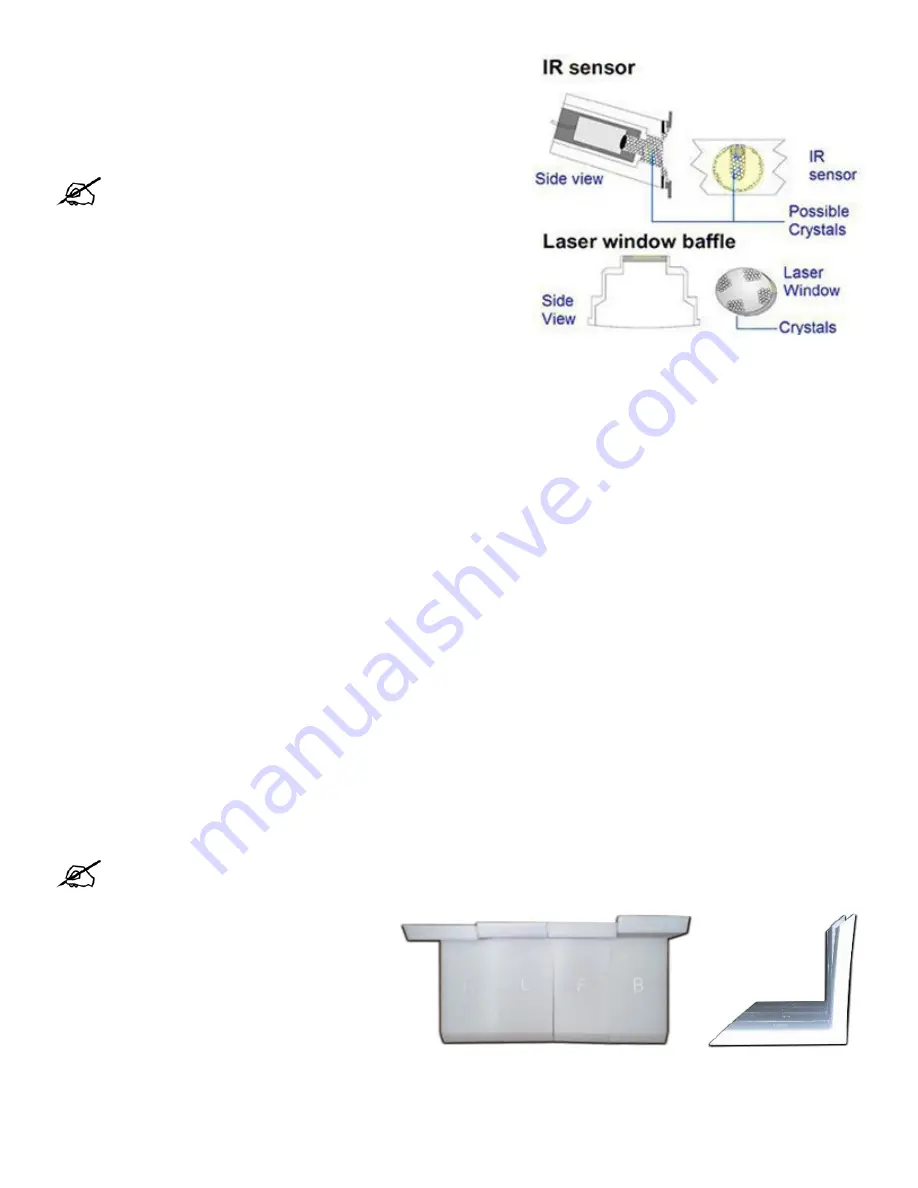
CRYSTALS AND CONDENSATION
Description:
During a print, a thin layer of needle-like crystals and/or a
film of condensation forms on cool surfaces in the print chamber. The N
flow across the IR sensor and the laser window will keep the IR sensor
and laser window clean, although the user should inspect them before
every build.
DISTORTION
Distortion can occur during scanning, during print process and during cooling.
NOTE: A slight amount of condensation will probably form
on the laser window every print. If the condensation is
extremely heavy across the entire window, call 3D Systems
Customer Service; this may indicate a problem with the SLS
system .
NOTE: Adjust parameters carefully to avoid introducing problems caused by too much heat. If you raise the
temperatures too much, and too quickly, you can cause material caking.
Distortion During Print - Curl
Description:
Edges or corners of the print rise above the print bed surface.
Theory of Cause:
During the print, temperature differences cause uneven shrinkage, which, in turn, causes curling. Curl during
printing can occur if the print bed temperature is too low or insufficient warm-up.
Visual Signs:
The edges of the print rise above the print bed surface after a layer is scanned. Curling usually occurs immediately
after a new layer of material is added, but a delay sometimes occurs between the addition of the material layer and the
observation of curling Some in-build distortion is not visible during the print.
Consequences:
Parts (especially those with large surface cross-sections) are not flat. If severe, the print may shift in the print
bed when the roller passes it.
Corrective Action:
Appropriate corrective actions depend on whether the curling is severe or minor.
For
minor curling
, changes during the print may help. Once moderate to severe curling has occurred, the part will continue to
appear curled even after adjustments have been made. Increasing the laser power significantly will help a part to stop curling,
but this will also cause growth on the part.
If
severe curling
occurs, you may want to terminate the print and begin a new one. Consider the following changes to prevent
the problem in future prints:
•
Make sure the system has gone through a full warm-up stage.
•
Check the Feed Hopper Set Point and the Part bed Heater Set Point. Consider increasing the part bed set point by 0.5 to 1.0
degrees
•
Verify blackbody is clean
•
Excess feed material may contribute to curling during printing, as some of the feed material may not be hot enough,
especially with short layer times.
•
Verify MQC blend.
Distortion During Print - Sidewall Lean or Ripples
Description
: Occurs on parts with straight walls built
at the edge of the suggested build area. The bottom
of the part is flat; but straight sidewalls “lean” or
have “bumps”.
Theory of Cause
: Excessive cylinder heat not
allowing powder to slide as build piston indexes
down.
Visual Signs
: You cannot observe this until the part
is broken out.
Corrective Actions
: Reduce cylinder heater set point
5°C


