background image


P O Box 159 • Crestwood, KY 40014 • (877) 243-0042 • (502) 243-0039 fax 

www.e2di.com 


[email protected]


the bottom of the display.  

Note:  These limits can be adjusted at any time without affecting 

your data. 

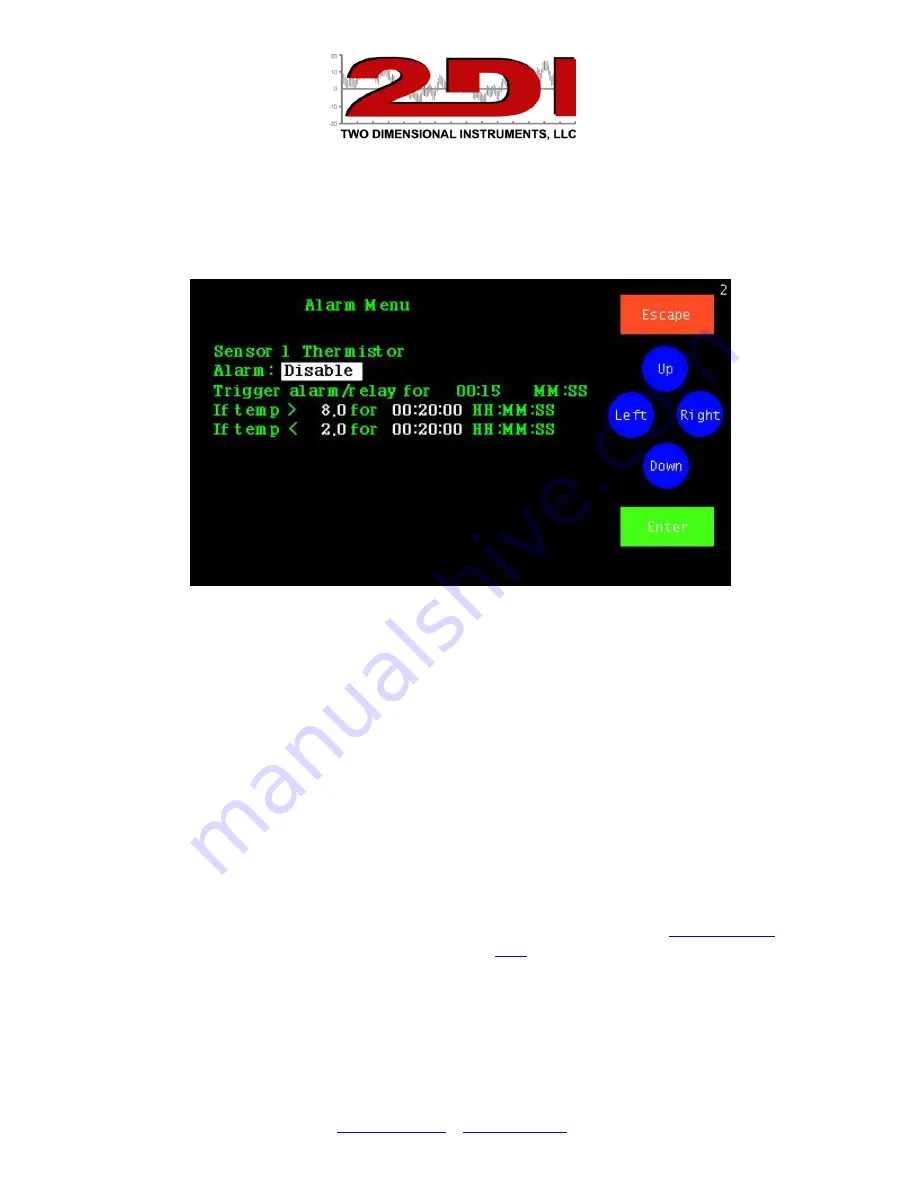
Setting the sensor alarms 
 

6.


Highlight ‘Set Alarm’ and touch ‘Enter’. 


7.


8.


The alarm for this sensor is disabled by default.  To enable the alarm touch 'Up' and then 'Enter'.    


A.


Set the trigger-alarm-time to any value between 0:00 and 99:00.  This controls how long the 
alarm will sound and the relay will be closed.  


Note:  If 

you are using an auto-dialer set it for at least 00:22 (22 seconds) but not 

longer than 06:00 (Six minutes). 


B.


Scroll in the alarm upper limit and delay time and then the alarm lower limit and its delay 
time with 'Up’ and ‘Down’ touching 'Enter' to move to each field in turn.


Note:


The delay time is how long the temperature must remain above (or below) the set 

temperature before the alarm occurs. This helps prevent false alarms.


9.


You do not need to enter the Calibration Menu at this time.  (

For calibration procedures see the 

document Entitled ‘Calibration Procedures’ found on the support page of the 

www.e2di.com


website.  It can also be downloaded from our website 

here

.


10.


 Touch 'Escape'


until you return to the Status Screen. 


You are done! 

Summary of Contents for TV2

Page 1: ...Two Dimensional Instruments LLC P O Box 159 Crestwood KY 40014 877 241 0042 502 243 0039 fax 502 243 0042 international 1 ...

Page 2: ...uch you can navigate to the menu screens a temperature history chart for each sensor zoom in or out of a chart to see more data set the alarms silence an alarm set the data storage rate and much more Sensor Accuracy The TV2 logs and displays information it receives from its sensors The accuracy of that data depends on the sensors The digital wired sensors are accurate to 0 3 C the wireless thermis...

Page 3: ...wer the TV2 for 72 hours After 7 years the display should be returned to 2di for battery replacement Operating on batteries If normal USB power fails and the Missing AC alarm is active the internal buzzer will beep in 1 second intervals for 60 seconds sleep for 10 minutes then beep every second for another 60 seconds etc At the same time the TV2 will enter a light sleep mode during which time the ...

Page 4: ...7 Setting the Alarms pg 8 Installation Tips pg 9 TV2 Status Screen pg 10 LED Reset controls pg 11 Navigating with Easy Touch pg 12 Main Menu pg 14 Operational Modes pg 17 Main Mode pg 18 Sleep Mode pg 21 Calibration pg 23 TView Software pg 24 Frequently Asked Questions pg 33 Appendix pg 35 Disclaimers pg 38 Warranty pg 38 FCC CE Mark Certifications pg 39 Addendum pg 39 ...

Page 5: ... contact the factory or the distributor reseller from whom you ordered the TV2 for a replacement ID Sensor Type Range Accuacy Temperature Only Digital Sensor Wired 20 to 75 C 0 3 C Thermistor Wired or wireless 20 to 75 C 0 3 C Differential Pressure Wired 0 002 w c 0 007 w c Thermocouple Wired or wireless E 200 to 870 C 1 0 C or 5 1 C or 1 J 0 to 760 C 1 4 C or 75 T 200 to 370 C 1 0 C or 75 1 0 C o...

Page 6: ... touch Enter The highlight will move to the next field 3 Touch Up to select the date format MM DD YY DD MM YY or YY MM DD and then Enter The date format defaults to the US style MM DD YY date 4 Set the day month year hour and minute in the appropriate field by scrolling through the possible values with Up or Down after moving to the appropriate field with Enter Note If you move to another field by...

Page 7: ...n 1 min and 24 hrs with Up or Down touching Enter to move to the next field or accept the default by touching Enter The default value is ten minutes 00 10 00 5 Select the type of averaging with UP or Down and touch Enter There are three possible selections a Fast no averaging occurs The exact measurement at the time of sampling will be stored and displayed Not normally used except during calibrati...

Page 8: ... an auto dialer set it for at least 00 22 22 seconds but not longer than 06 00 Six minutes B Scroll in the alarm upper limit and delay time and then the alarm lower limit and its delay time with Up and Down touching Enter to move to each field in turn Note The delay time is how long the temperature must remain above or below the set temperature before the alarm occurs This helps prevent false alar...

Page 9: ...er so the signal can be transmitted back to the TV2 3 Power for TV2 Plug the USB cable into the TV2 into a USB port on a computer or into the power cube wall plug supplied 4 Backup Battery A non user serviceable Lithium ion battery is installed in the display unit to provide temporary power during a power outage If a power outage occurs the display will turn off to decrease the load on the battery...

Page 10: ... spots For example 1 Touch a temperature to see the logged data for that sensor 2 Touch a Max Min area to reset it to zeros 3 Touch Main Menu to set or change various settings such as the scale the data logging rate high low alarms for each sensor etc Current temperature Updated every few seconds Max Min temperature recorded since the last reset Appears in red if the reading is above or below the ...

Page 11: ...ng and logging data from the sensors The Red LED blinks when the display is operating on batteries If an alarm occurs it will glow a steady red The small hole on the left of the green and red LEDs is the reset button Insert the paper clip slowly until you feel the button press down It will pop back up as soon as you release the paper clip and a system reset will occur Your settings and data will b...

Page 12: ...P O Box 159 Crestwood KY 40014 877 243 0042 502 243 0039 fax www e2di com info 2di com Touch Main Menu to change settings Touch a Max Min temperature to reset it ...

Page 13: ... 502 243 0039 fax www e2di com info 2di com The Main Menu Touch Main Menu at the bottom of the Status Screen to enter the menu system When the Main Menu opens the System Setup field will be highlighted Touch Enter to enter the System Setup Menu ...

Page 14: ...ange between C and F the date and time activate a password to restrict access to the menu system reset all values to the factory default use the Network menu and put the TV2 into a deep sleep mode Warning Do not use deep sleep mode unless you intend the TV2 to be in this mode for a long time You will lose some or all of your data ...

Page 15: ... first field on the page 2 Once the field is highlighted change the value by touching Up or Down The appropriate values will be scrolled through 3 Touch Enter after selecting the proper value Note It is possible to move to the next field by touching Right but your change will not be saved The change is only finalized by touching Enter Operational Tip Keeping your finger on Up or Down scrolls throu...

Page 16: ...The TV2 main display current status will change depending on how many sensors you are receiving data from If you have one sensor plugged into or linked to the TV2 the display will look like the one below Once you plug a second sensor into the TV2 the current status screen will change to show both sensors see below ...

Page 17: ... 243 0039 fax www e2di com info 2di com Once a third sensor is plugged into or linked to the TV2 display the current status screen will change to a screen divided into quadrants one quadrant for each sensor as illustrated below TV2 with four sensors ...

Page 18: ...nsors violated an alarm condition in which case it will be red Note It is possible a max or min temperature was too high or low but an alarm was not triggered This would happen if the violation was shorter than the delay time 2 If a wireless sensor is not linked to the TV2 a message stating Sensor Not Installed will be displayed in that quadrant 3 If a wireless sensor has been linked to the displa...

Page 19: ... the values in this case temperature were collected The dates on this line will change if you scroll left or right or zoom out or in to view additional data 4 The bottom two rows of the display show the current day and time along with the most recent reading from each sensor Also shown at the bottom right of the screen is the zoom level See FAQ on page 35 for an explanation of this feature Use the...

Page 20: ...can view additional information Touching the bottom blue triangle doubles the amount of data displayed on the chart see zoom in FAQ The top blue triangle zooms into the display so less data is displayed The green triangle on the left scrolls backward showing older data while the green triangle on the right shows more recent data To return to the status screen touch Escape Esc ...

Page 21: ... while running on batteries performing all normal functions including taking and storing temperatures sounding alarms and downloading data if auto downloads are setup Note A deep sleep mode can be selected on the main menu to turn off the TV2 In this mode only the clock continues to run To exit from deep sleep mode touch the TV2 after supplying power If the TV2 needs to be shut off for a long peri...

Page 22: ...sensors To calibrate a sensor access the sensor setup menu by touching Main Menu and Right until the sensor setup area is highlighted Touch Enter to see the sensor setup menu Touch Left to highlight Calibrate Sensor and touch Enter The calibration table for that sensor will be shown Calibration Table ...

Page 23: ...ration to the sensors 1 One point Any temperature will be offset from the measured value 2 Two Points Any temperature will be adjusted by the offset equal to the point on a line drawn between the two points 3 Three Points Any temperature will be adjusted by the offset equal to the point on a line drawn between the three points The line could be straight or the slope between point 1 and 2 could be ...

Page 24: ...om the display Downloading or copying data from a TV2 to a personal computer is done via the USB cable or from your local area network if a TV2 is present on the LAN You can unplug the USB cable from the power cube and plug it into a USB socket on your computer This will not affect the data you have already collected ...

Page 25: ...rights to do so You will also be given an opportunity to install the software in a directory other than the default directory We recommend that you accept the default directory This works just like any other Windows installation process 6 Once the software is installed click on the TView icon to open the program The icon will be in the Two Dimensional Instruments folder You can of course copy the ...

Page 26: ...2s will be listed by name Select the one you want to download data from a Select the device to download by left clicking it b Select the date range you want to download by clicking one of the buttons to the left of the green download button The All Data button is selected by default so that all stored data for the selected sensor s will be downloaded and displayed Clicking on last month last week ...

Page 27: ...ay the scale will be adjusted accordingly 3 Once the chart has been copied to your computer the actual data can be moved around or zoomed into to highlight a particular area Since you can control the chart once displayed on your screen it is recommended that you download all data instead of specifying a particular date range a To zoom into an area of the chart draw a box around it with the mouse P...

Page 28: ...iption in the text box This will rename the chart and the tab 2 You can hover over any point of the curve with the mouse cursor to see the value the date and the time it was saved 3 A value scale is on the left of the chart and a RH scale if humidity has been downloaded is the right side of the chart You can change the temperature scale to Fahrenheit by clicking the box to the right of the chart u...

Page 29: ...ctive chart to your computer The saved chart will be encrypted and have a TXV suffix It is encrypted with the username and password you entered when the program was opened iv Export Chart to XLS This exports the chart shown on the active tab to an XLS file that can be opened with Microsoft s Excel Each sensor s data will be transferred to a separate worksheet on the Excel chart It is possible to c...

Page 30: ...ly be written to your file every few minutes 1 Select the TV2 to be downloaded by clicking Add New Device and selecting the one you want 2 Type in the file name and specify the location on your computer where you want the data stored The file name will be proceeded by a year month Note You must have rights to create and to write files on your computer when you schedule an auto download iii Add The...

Page 31: ...displaying the word Alarm in red letters to alert the user By double clicking this button the alarm log will be shown After reviewing the alarm click Mark as Reviewed to hide it or right click an alarm and delete to remove the alarm from this list iii Email alerts A log of all emails sent can be seen for any registered TV2 which is auto downloading d Current Readings This screen displays real time...

Page 32: ... occurs for that sensor the temperature will turn red and the alarm status button on the main page will be updated e Help 1 User guide 2 Email Alert Setup This word document contains a step by step guide to implementing the Email Alert Setup 3 TView Diagnostics Menu will be used when requested by a 2di technician All activity of the TView software is archived This information can be saved to a fil...

Page 33: ...t linked touch Enter Highlight Add for the sensor you want to add and touch Enter The display will then change Attach a 9vdc battery to the sensor The display will present the sensor setup screen so you can configure the sensor 4 What should I do if a wireless sensor quits transmitting data Reposition the sensor replace the battery and as a last resort re link the sensor see 3 above 5 What do I ne...

Page 34: ...y you will need to reenter the calibration data A sample calibration procedure can be obtained from our web site www e2di com It is just a sample procedure Your calibration service or QC department may have a different procedure 7 How is the data transmitted from the sensor to the TV2 The sensor is attached to a transmitter which sends a signal to the TV2 which has a built in base station that rec...

Page 35: ... cold temperature will shorten the battery life of the sensor They will not work from within walk in refrigerators or freezers b Sensors with external Thermistors or thermocouples are made to be used with freezers and refrigerators All external sensors have two parts The transmitter the black box with the battery that is placed outside the fridge or freezer and the actual sensor which is attached ...

Page 36: ...e TV2 or TView The TView program has no such limitation and will save and display all data 14 Can I move TV2 to a new location without losing data Yes and no If you just unplug the TV2 and move it your data will be kept If you put the TV2 into Deep Sleep Mode you will lose some or all of your data Go to the Main menu by touching Enter twice and touch Left to highlight Deep Sleep Mode Touch Enter T...

Page 37: ...xt description of the alarm settings i e TView detected a new alarm during auto download Ubidots TV2 7 3d 21d f4 Alarm reported from ThermaViewer Ubidots TV2 7 3d 21d f4 s n 18041601 sensor 1 Temperature 8 Degrees for 00 02 00 Alarm started 6 25 2013 7 40 AM There is a problem with the freezer The device name is the name the user gave to the TV2 when it was first identified by TView To change the ...

Page 38: ...o be upgraded in the field In this case the TV2 display must be returned to Two Dimensional Instruments LLC for reprogramming for which service additional charges may be incurred Disclaimers Copyright 1 All copyrights TView software including all of the programs and all related documents are the sole property of Two Dimensional Instruments LLC 2 TView software with Email notification is for use fr...

Page 39: ...all under no circumstances be liable for consequential or incidental damages resulting from failure or malfunction of its products The manufacturer makes no warranty for products not manufactured by itself or for any products modified by the buyer or subjected to misuse or neglect Under no circumstances shall the manufacturer be liable for consequential or incidental damages to any other products ...

Page 40: ...y its MAC address When the TV2 is plugged into a hub or switch the TV2 will be assigned an IP address by the DHCP server on your network Access the Network Menu on the System Setup page on the TV2 To assign a static IP address disable the DHCP first and then enter the IP address into the IP Address position Whether you enable DHCP or assign a static IP address make a note of it so you can enter it...

Page 41: ...mputer b If a TV2 is plugged into the PC with a wireless network card all wireless networks that the computer sees will be listed in the WiFi Network SSID box 3 Select the correct com port from the drop down menu by clicking on Connect a If a TV2 is plugged into a USB port the TV2 Port Names box will be populated with a port name If there is nothing in that box plug a TV2 into a USB port on the co...

Page 42: ...om a Once Send is clicked you should see some text in the Commands and Responses field 7 It can take up to one minute for the TV2 to connect to the network Once it does the red X will disappear from the icon at the bottom of the TV2 main display Connected to LAN Not connected to a LAN ...

Page 43: ...ions can be seen from anywhere with internet Your IT department will provide the IP address to access the web page below with a browser You will be able to view the information below but you can not make changes to the TV2 or go to the chart display remotely Notes 1 You can copy the temperature history from the TV2 via the USB cable plugged into a PC or over the LAN but these are mutually exclusiv...

Reviews: