background image

©2019, Zortrax S.A. All rights reserved. All trade names, logos and trademarks mentioned in the following 
document are registered trademarks of Zortrax and are subject to legal protection

13

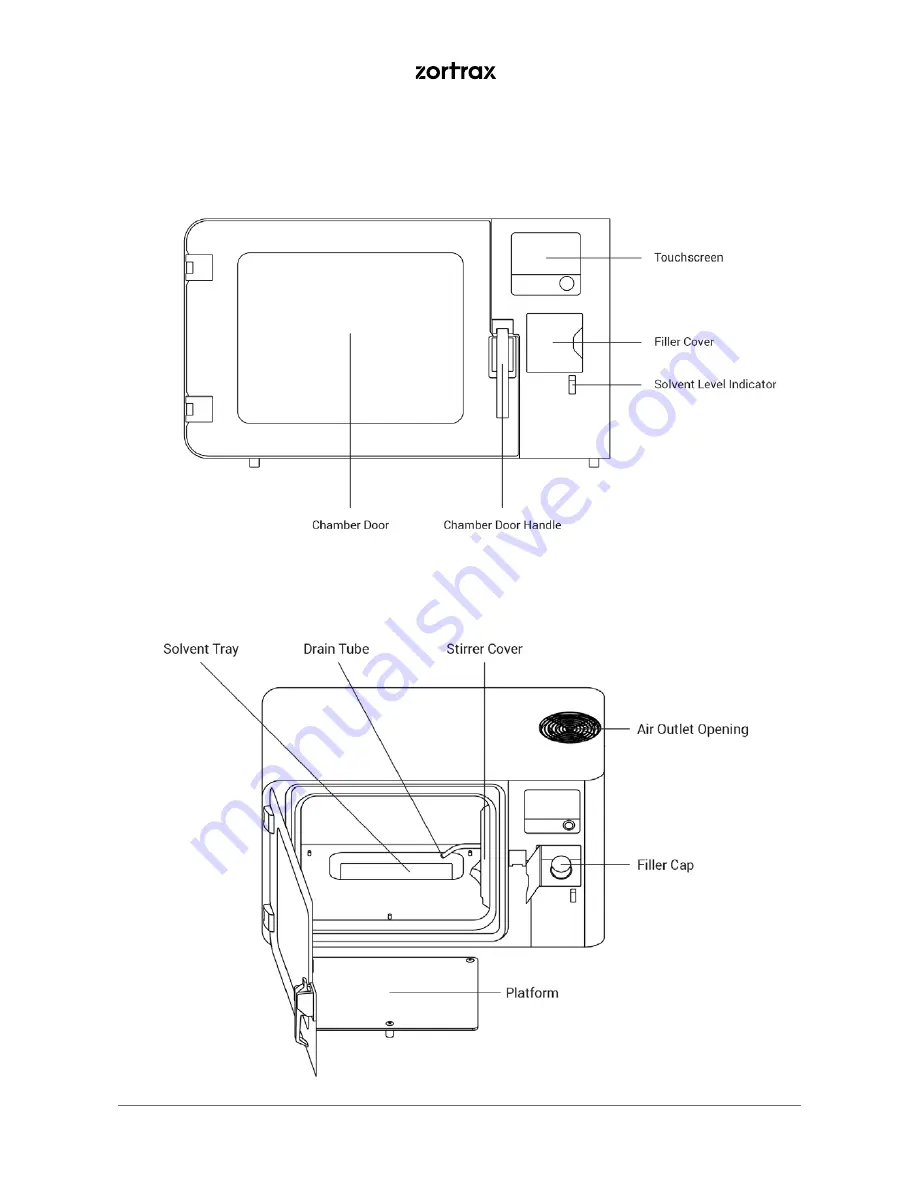
1. Front view (closed)

2. Front view (open)

Main Components

Содержание Apoller

Страница 1: ...Device User Guide Apoller...

Страница 2: ...s in the Box 12 Main Components 13 Zortrax Apoller Technology Glossary 14 First Use Preparations 17 Navigating through the Menu 27 Light Signals and Operating Modes 30 Adding the Solvent 31 Changing t...

Страница 3: ...ontrol as well as other conditions influencing the device and those that are beyond the Manufacturer s knowledge the Manufacturer is not responsible for damage injuries fa ilures and costs resulting f...

Страница 4: ...ty signs used in the User Guide Symbol Description A warning to strictly follow the instructions included in the User Guide to ensure safety and full functionality of the device Information especially...

Страница 5: ...nforms to the provisions of the Directive 2006 42 EC Due to the nature of the technological process the device has been designed and produ ced in such a way to prevent the risk of explosion caused by...

Страница 6: ...planation Explosion protection mark Symbol of equipment for use in explosive at mospheres Note Read the equipment category explana tion Equipment group II Equipment intended for use in explosive at mo...

Страница 7: ...space could lead to accidents The vapors released during the smoothing process do not pose a hazard the device is tight However the room dedicated for operating the device should be properly and regul...

Страница 8: ...the required value provided on the nameplate at the back of the device Avoid overloading the outlet with too many devices The device must be well grounded Always make sure that the ground complies wit...

Страница 9: ...isable to provide safe pallet storage but not higher than 1 7 m 5 7 The packages must not project beyond the outli ne of the pallet Packages stacked on the pallet should be then bound together and wra...

Страница 10: ...e possible to run it Do not ignore notifications displayed on the screen Do not pour solvent directly into the tray inside the device Only 3D printed models can be placed in the chamber 3D printed mod...

Страница 11: ...used for the next smoothing processes How does the Zortrax Apoller work After the device is turned on users gain access to the main menu where it is possible to adjust several settings for the smoothi...

Страница 12: ...019 Zortrax S A All rights reserved All trade names logos and trademarks mentioned in the following document are registered trademarks of Zortrax and are subject to legal protection 12 What s in the B...

Страница 13: ...l rights reserved All trade names logos and trademarks mentioned in the following document are registered trademarks of Zortrax and are subject to legal protection 13 1 Front view closed 2 Front view...

Страница 14: ...rocess is finished DRYING a gradual process of warming up models and vaporizing a reacted substance from their surface Next the device starts the final evaporation procedure during which the models ar...

Страница 15: ...f Zortrax Apoller on which a user places models that will be subjected to post processing The platform can easily be removed as well as inserted back into the device POWER OUTLET AND MAIN SWITCH the s...

Страница 16: ...aining the machine becomes easier and more effective SUPPORT STRUCTURES if your model has any overhanging or protruding parts they have to be supported with special structures so that they don t fall...

Страница 17: ...s logos and trademarks mentioned in the following document are registered trademarks of Zortrax and are subject to legal protection 17 First Use Preparations 2 Remove the upper and side cushioning 1 O...

Страница 18: ...ll rights reserved All trade names logos and trademarks mentioned in the following document are registered trademarks of Zortrax and are subject to legal protection 18 3 Take the device out of the box...

Страница 19: ...e the device on a flat and stable surface Before the first use make sure that your work area is safe and well ventilated Keep the device away from heat sources flammable materials and equipment emitti...

Страница 20: ...trade names logos and trademarks mentioned in the following document are registered trademarks of Zortrax and are subject to legal protection 20 7 Remove the Starter Kit with the platform from the cha...

Страница 21: ...tioned in the following document are registered trademarks of Zortrax and are subject to legal protection 21 9 Remove the foil from the platform Place the platform on pins inside the chamber 10 Open t...

Страница 22: ...ent into the wash bottle Fill the tank with liquid up to the line marked with arrows the most optimum level Tightly close the solvent container and put it in a safe place For the smoothing process use...

Страница 23: ...d in the following document are registered trademarks of Zortrax and are subject to legal protection 23 13 Tilt the metal grid A to place it in the chamber B Next adjust the grid so that it is in the...

Страница 24: ...nd are subject to legal protection 24 15 Move the grid forward A so that it is on the front pins B 16 Plug in the power cable and turn on the device Connect it to a network via Wi Fi or Ethernet Go to...

Страница 25: ...elect Settings About Device Check for updates to check if there is a newer firmware version available If so follow the instructions displayed on the screen 18 If the device isn t connected to a networ...

Страница 26: ...ghts reserved All trade names logos and trademarks mentioned in the following document are registered trademarks of Zortrax and are subject to legal protection 26 19 You have finished the set up Your...

Страница 27: ...ating the device s functions and settings is possible through the touchscreen The HOME screen displays all relevant information about the device and its current state IP address the type of connection...

Страница 28: ...oothed There are two options available SHELL for prints with thin walls and NORMAL for prints with thick sections In the next step you have to choose the material type which has been used to print the...

Страница 29: ...ce all settings are chosen the device starts the diagnostic procedure of the surroun ding conditions and the degree of preparation for the smoothing process At first the device has to check the ambien...

Страница 30: ...tifications displayed on the screen Every time the device changes its operating mode the LED backlight inside the chamber changes its color into a different one as well Light signals Blue ready for op...

Страница 31: ...ection 31 Adding the Solvent Use only solvents approved by the Manufacturer acetone or MEK Wear protective gloves and glasses during all procedures 2 Pour solvent into the wash bottle Fill the tank wi...

Страница 32: ...es logos and trademarks mentioned in the following document are registered trademarks of Zortrax and are subject to legal protection 32 3 Tightly screw the filler cap Make sure the cap is properly att...

Страница 33: ...egal protection 33 Changing the Solvent Use only solvents approved by the Manufacturer acetone or MEK Wear protective gloves and glasses during all procedures 2 Prepare the wash bottle delivered with...

Страница 34: ...ntioned in the following document are registered trademarks of Zortrax and are subject to legal protection 34 3 Tightly screw the filler cap Make sure the cap is properly attached and then tightened A...

Страница 35: ...document are registered trademarks of Zortrax and are subject to legal protection 35 5 Put the syringe tube on the drain tube inside the device and start the procedure of emptying the tank Select Too...

Страница 36: ...oned in the following document are registered trademarks of Zortrax and are subject to legal protection 36 7 Remove the syringe from the device and pour the liquid into the container with solvent 8 Pl...

Страница 37: ...t are registered trademarks of Zortrax and are subject to legal protection 37 10 Pour solvent into the wash bottle Fill the tank with liquid up to the line marked with arrows the most optimum level Ti...

Страница 38: ...s logos and trademarks mentioned in the following document are registered trademarks of Zortrax and are subject to legal protection 38 11 Tightly screw the filler cap Make sure the cap is properly att...

Страница 39: ...d trademarks of Zortrax and are subject to legal protection 39 Starting the Process Preparing a Open the chamber door b Put a model on the platform If you smooth more than one model keep appropriate d...

Страница 40: ...erved All trade names logos and trademarks mentioned in the following document are registered trademarks of Zortrax and are subject to legal protection 40 c Inspect the chamber door gasket If it s nec...

Страница 41: ...oned in the following document are registered trademarks of Zortrax and are subject to legal protection 41 e If it s necessary add more solvent Tightly screw the filler cap Make sure the cap is proper...

Страница 42: ...Select settings mode solvent type material type smoothing intensity Stages 1 Once the smoothing is started the chamber door remains blocked until the end of the process 2 Procedure of creating negati...

Страница 43: ...arks mentioned in the following document are registered trademarks of Zortrax and are subject to legal protection 43 a Turn off the device and unplug the power cable Completing b Open the chamber door...

Страница 44: ...s mentioned in the following document are registered trademarks of Zortrax and are subject to legal protection 44 c Remove the model s from the platform d Close the door The device cannot start the ne...

Страница 45: ...f Zortrax and are subject to legal protection 45 Preparing for Transport Wear protective gloves and glasses during all procedures 2 Prepare the wash bottle delivered with the device Squeeze it and put...

Страница 46: ...ing document are registered trademarks of Zortrax and are subject to legal protection 46 3 Tightly screw the filler cap Make sure the cap is properly attached and then tightened A Close the filler cov...

Страница 47: ...document are registered trademarks of Zortrax and are subject to legal protection 47 5 Put the syringe tube on the drain tube inside the device and start the procedure of emptying the tank Select Too...

Страница 48: ...oned in the following document are registered trademarks of Zortrax and are subject to legal protection 48 7 Remove the syringe from the device and pour the liquid into the container with solvent 8 Pl...

Страница 49: ...rights reserved All trade names logos and trademarks mentioned in the following document are registered trademarks of Zortrax and are subject to legal protection 49 9 Wrap the device in foil 10 Put t...

Страница 50: ...ts reserved All trade names logos and trademarks mentioned in the following document are registered trademarks of Zortrax and are subject to legal protection 50 11 Place the side and upper cushioning...

Страница 51: ...he surface finish ACETONE MEK Z ABS Glossy finish layers on vertical surfaces are invisible Glossy finish layers on vertical surfaces are invisible Z ASA Pro Semi matte finish layers on vertical surfa...

Страница 52: ...esents maintenance guidelines connected with each section of the device together with specific check points necessary activities and their frequency Activity Frequency Solutions to the problem Necessa...

Страница 53: ...ne MEK and thoroughly clean the gasket direc ting the cloth along the gasket s profile The gasket should not be cleaned with the use of sharp tools gloves a piece of cloth chemical or degre asing subs...

Страница 54: ...leaning liquids only in very small amounts Do not spray them and avoid spillage After maintenance wait at least one hour before running the device Service work can only be carried out by the Manufactu...

Страница 55: ...m The most common problems are listed below along with the list of possible solutions Lack of tightness of the vacuum system or too fast pressure drop Make sure the gasket of the chamber door is not d...

Страница 56: ...the stirrer fuse If the problem reoccurs contact Zortrax Support Center through the support form https support zortrax com support form 005 PRESSURE_DROP_ERROR Pressure in the chamber is too high The...

Страница 57: ...zortrax com support form 015 NTC4_ERROR Thermistor no 4 has failed Contact Zortrax Support Cen ter through the support form https support zortrax com support form 016 NTC5_ERROR Thermistor no 5 has fa...

Страница 58: ...rature does not exceed 30 C 86 F If the problem reoccurs contact Zortrax Support Cen ter through the support form https support zortrax com support form 023 TO_PELTIER_COLDSIDE Cooling system has not...

Страница 59: ...mensions W x D x H 671 x 396 x 388 mm 26 4 x 15 6 x 15 3 in Internal dimensions 340 x 270 x 260 mm 13 4 x 10 6 x 10 2 in Device weight 30 kg 66 lb Device Build volume 300 x 250 x 250 mm 11 8 x 9 8 x 9...

Страница 60: ...legal protection 60 Process Maximum working temperature 90 C 194 F Minimum working temperature 20 C 4 F Minimum absolute working pressure 0 4 bar Ambient operation temperature 15 30 C 59 86 F Storage...

Страница 61: ...ectrical and electronic equipment cannot be disposed of in landfills and must be recycled For information on where to dispose of waste equip ment contact the reseller the Manufacturer or the importer...

Страница 62: ...office office zortrax com technical support support zortrax com more information zortrax com 2019 Zortrax S A All rights reserved...

Отзывы: