ZIPPER MASCHINEN ZI-STE1800IV Скачать руководство пользователя страница 30


OPERATION 

ZIPPER MASCHINEN GmbH     www.Zipper-Maschinen.at



30   

ZI-STE1800IV 

18.1.1


Grounding 

Before putting the machine into operation, install a grounding system!  


However, if there is any uncertainty, have a competent electrician set up a grounding 

system. 


Exact grounding instructions for portable machiness depend on the jurisdiction of the country in 

which the machine is commissioned. Please observe them exactly. 


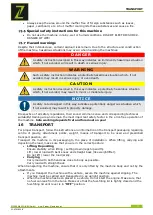
Before putting the machine into operation: 
1.


Make sure that the machine is switched off before 

installing the grounding. 

2.


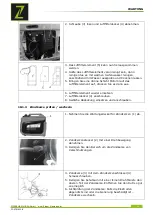
Connect the ground clamp to the ground terminal (1) of 

the machine. 

3.


Push the attached grounding rod into the ground. 

NOTICE:

 Ensure that the grounding wire does not represent 

a tripping hazard. 


After stopping the machine: 
4.


Ensure that the machine has been switched off and has 

cooled down before removing the ground clamp. 

18.1.2


Test Run Initial Start-up 


Let the machine run idle for about 3 minutes. 


Pay attention to abnormal noises. 


Pay attention to the exhaust fumes (too black, too white)? 

18.1.3


Notes on the first 20 operating hours 

In order to optimize the life expectancy of your machine, the following points should be 
observed: 


Do not operate the engine for the first 20 operating hours at maximum load (this also 

applies to used engines after extensive maintenance). This means lower speed and lower 

maximum working load than during normal operation. 


Change the engine oil after the first 20 hours of operation. 


Operating Instructions 

18.2.1


Integration into stationary system (mains) 

This machine is designed exclusively for the operation of electrical devices whose maximum 
power lies within the power specifications of the machine. A higher starting current from 
inductive loads must be taken into account.  
The machine is designed for the operation of conventional ohmic and inductive loads such as 
light chains, electric hand tools (drilling machines, electric chain saws, compressors). 


When connecting to stationary systems such as heating, house supply, air 
conditioning or for the power supply of mobile homes, an electrician and the heating 
manufacturer must be consulted regarding connection and grounding. 
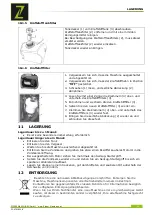
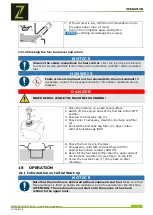
18.2.2


Devices are connected to the AC terminals 


Check that the run light (green) lights up after starting the machine. 


Before connecting a device on the AC socket you must control the perfect condition of the 

device. 


When you recognize that a connected device acts unusual you must stop the machine 

and disconnect the device. Control whether the device is damaged or if the machine was 

overloaded by the device. 


Please consult the rating specifications on the connected electrical devices, these can 

usually be found next to the serial or manufacturing number. 


Please consider: Some devices, for instance cooling devices need up to 5 times more 

starting current than current during the operation. 

Содержание ZI-STE1800IV

Страница 1: ...riginalfassung DE BETRIEBSANLEITUNG Stromerzeuger bersetzung Translation EN USER MANUAL Generator ACHTUNG l kontrollieren Motor startet nicht bei lmindermenge ATTENTION Check Oil Engine don t start wi...

Страница 2: ...bshinweise 13 8 2 1 Einbindung in ein bestehendes Stromnetz 13 8 2 2 Anschluss von Ger ten an die AC Steckdosen 14 8 2 3 Betrieb der Maschine auf ber 1500m Meeresh he 14 AC Betrieb 14 DC Betrieb 14 Be...

Страница 3: ...Spark plug check exchange 36 20 1 4 Draining the carburettor 37 20 1 5 Fuel tank cap filter 38 20 1 6 Fuel filter 38 21 STORAGE 38 22 DISPOSAL 39 23 TROUBLESHOOTING 39 24 ERSATZTEILE SPARE PARTS 40 E...

Страница 4: ...nnenr umen und in der N he von offenen Fenstern und Bel ftungen verwenden EN Danger of Intoxication CO Only use outdoors and far from open windows and vents DE Warnung vor hei er Oberfl che EN Hot Sur...

Страница 5: ...ng reset restart the engine when overloaded 4 Seitliche Abdeckung side cover 14 DC Gleichstromanschluss 5 V DC current socket 5 V 5 Choke choke lever 15 Erdungsanschluss ground end 6 Tankdeckel Entl f...

Страница 6: ...e angegebenen Werte sind Emissionswerte und m ssen damit nicht zugleich auch sichere Arbeitsplatzwerte darstellen Obwohl es eine Korrelation zwischen Emissions und Immissionspegeln gibt kann daraus ni...

Страница 7: ...d Inhalte geringf gig abweichen Sollten Sie Fehler feststellen informieren Sie uns bitte Technische nderungen vorbehalten Kontrollieren Sie die Ware nach Erhalt unverz glich und vermerken Sie etwaige...

Страница 8: ...Verantwortung oder Garantieleistung 5 1 1 Technische Einschr nkungen Die Maschine ist f r den Einsatz unter folgenden Umgebungsbedingungen bestimmt Rel Feuchtigkeit max 65 Temperatur Betrieb 5 C bis...

Страница 9: ...niemals in Gegenwart brennbarer Fl ssigkeiten oder Gase Explosionsgefahr berbeanspruchen Sie die Maschine nicht Setzen Sie die Maschine vor Einstell Umr st Reinigungs Wartungs oder Instandhaltungsarbe...

Страница 10: ...zw hoher Luftfeuchtigkeit STROMSCHLAGGEFAHR LEBENSGEFAHR Gefahrenhinweise Trotz bestimmungsm iger Verwendung bleiben bestimmte Restrisiken bestehen Bedingt durch Aufbau und Konstruktion der Maschine k...

Страница 11: ...schlossenen Fahrzeug kann sich der Kraftstoff durch berhitzung entz nden 7 MONTAGE Lieferumfang pr fen Vermerken Sie sichtbare Transportsch den stets auf dem Lieferschein und berpr fen Sie die Maschin...

Страница 12: ...oben wurde manchmal verkantet er sich 6 l Messstab wieder herausziehen und lstand ablesen Es gibt zwei Markierungen L min lstand H max lstand 7 Bei niedrigem lstand empfohlenes l bis zum max lstand na...

Страница 13: ...ine Erdung einrichten Genaue Erdungsvorschriften von der tragbaren Maschine h ngen von der Gesetzgebung des Landes ab in dem die Maschine in Betrieb genommen wird Bitte halten Sie diese genau ein Vor...

Страница 14: ...ist neben der Serien oder Fertigungsnummer Bitte beachten Sie K hlger te z B brauchen beim Einschalten bis zu 7 mal mehr Anlaufstrom als ihre Nennstromaufnahme HINWEIS Durch wesentliches berschreiten...

Страница 15: ...e nicht auf Position RUN 7 ECON Schalter auf ON stellen HINWEIS wird der ECON Schalter auf ON gestellt verbraucht die Maschine weniger Kraftstoff Aktivieren Sie den ECON Schalter jedoch nur wenn die a...

Страница 16: ...e stets alle Verbraucher aus und trennen Sie diese von den AC bzw DC Anschl ssen bevor Sie die Maschine stoppen 2 Lassen Sie die Maschine einige Zeit 1 2 min ohne angeschlossene Verbraucher laufen um...

Страница 17: ...h abgeschaltet um Motorsch den welche durch eine unzureichende lmenge verursacht werden zu verhindern F llen Sie Motor l auf ein ausreichendes Level nach Gehen Sie dabei wie oben beschrieben vor Die g...

Страница 18: ...n je nach Luftqualit t variieren 2 sollte nur von Spezialisten durchgef hrt werden Vor jeder Inbetrieb nahme F r neue Maschine nach 1 Monat oder 20 Arbeits stunden Alle 3 Monate oder 50 Arbeits stunde...

Страница 19: ...Achten Sie darauf dass der Stab wirklich ganz eingeschoben wurde manchmal verkantet er sich 8 l Messstab wieder herausziehen und lstand ablesen 9 Bei korrektem lstand max bis zur Obergrenze des l Mes...

Страница 20: ...aus 6 Luftfilterelement wieder einsetzen 7 Luftfilterdeckel 4 anschrauben 8 Seitliche Abdeckung einsetzen und anschrauben 10 1 3 Z ndkerze pr fen wechseln 1 Nehmen Sie die Wartungsdeckel f r Z ndkerze...

Страница 21: ...ze um eine 1 4 1 8 Drehung festziehen 12 Den Z ndkerzenstecker wieder aufsetzen und den Wartungsdeckel wieder einschieben 10 1 4 Entleeren des Vergasers bei l ngerer geplanter Stillstandszeit Kraftsto...

Страница 22: ...n und schrauben Sie diese fest 11 LAGERUNG Lagerdauer bis zu 1 Monat Es ist keine besondere Vorbereitung erforderlich Lagerdauer l nger als ein Monat Entleeren Sie den Tank Entleeren Sie den Vergaser...

Страница 23: ...mehrmals ziehen Z ndkerze wieder reinschrauben Z ndkerze lose Z ndkerze festschrauben Z ndkerze besch digt Z ndkerze wechseln Z ndkerzenstecker nicht aufgesteckt Z ndkerzenstecker aufstecken Kein Z nd...

Страница 24: ...tly If you notice any errors please inform us Technical changes reserved Please check the product contents immediately after receipt for any eventual transport damage or missing parts Claims from tran...

Страница 25: ...5 C bis 40 C Temperature for storage and or transport 20 C bis 55 C 15 1 2 Prohibited Use Forseeable Misuse Operation of the machine without adequate physical and mental aptitude Operating the machin...

Страница 26: ...at oil sharp edges or moving parts Proper plugs and sockets reduce the risk of electric shock Water entry into machine increases the risk of electric shock Do not expose machine to rain or moisture Th...

Страница 27: ...afety regulations their sound common sense and corresponding technical suitability training are and remain the most important safety factor in the error free operation of the machine Safe working depe...

Страница 28: ...as possible 17 2 1 Checking the engine oil level NOTICE A too low oil level will damage the engine and shorten the life of the machine Therefore check the engine oil level before every start and top u...

Страница 29: ...Place the machine on a safe level surface 2 Switch off the engine and set the fuel tap to the OFF position 3 Unscrew the fuel tank cap 1 4 Check and if necessary clean the fuel tank cap filter 2 5 Rei...

Страница 30: ...er speed and lower maximum working load than during normal operation Change the engine oil after the first 20 hours of operation Operating Instructions 18 2 1 Integration into stationary system mains...

Страница 31: ...and heavy start the engine AC Operation Connect the devices to the AC socket The most devices need more power for starting than declared Always connect the devices in a falling chronology of their kW...

Страница 32: ...t let the recoil starter handle run back slowly not in an uncontrolled manner If the engine does not start try again Normal start up to 12 attempts are necessary NOTICE Never pull the recoil starter h...

Страница 33: ...chine 5 Stop the machine 6 Check the power specifications of the connected devices 7 Wait 2 minutes 8 Start the machine again 9 When the red overload indicator light 2 goes out and the green run light...

Страница 34: ...tions or defects which could impair the safety of the user must be rectified immediately NOTICE Only a properly maintained equipment may be a satisfactory tool Care and maintenance deficiencies can ca...

Страница 35: ...lace the machine on a flat surface 6 Wipe the oil dipstick with a clean lint free cloth or a non fibrous paper towel 7 Push the oil dipstick back into the opening as far as possible but do not screw i...

Страница 36: ...r cover 4 3 The air filter element 5 can now be removed 4 If the air filter element is dirty clean it with warm soapy water then rinse it with water and let it dry 5 Apply a thin layer of engine oil t...

Страница 37: ...not to damage the thread 11 Use the spark plug wrench to tighten the spark plug New spark plug tighten by 1 2 turn to compress the washer well Old spark plug 1 4 1 8 turn for proper washer compressio...

Страница 38: ...low the fuel filter 3 5 Remove and replace the fuel filter 3 6 Insert the new fuel filter 3 7 Re clamp the clips 4 above and below the fuel filter 3 8 Reinstall the side cover and secure it with screw...

Страница 39: ...cts Refuel Fuel line fault Check fuel line for kinks or damage Engine flooded Unscrew spark plug clean and dry then pull the recoil starter handle several times screw spark plug back in again Spark pl...

Страница 40: ...die Online Bestellm glichkeit ber den Ersatzteilkatalog bzw Ersatzteilanforderungsformular auf unserer Homepage Bestelladresse sehen Sie unter Kundendienstadressen im Vorwort dieser Dokumentation EN...

Страница 41: ...SCHALTPLAN WIRING DIAGRAM ZIPPER MASCHINEN GmbH www Zipper Maschinen at 41 ZI STE1800IV 25 SCHALTPLAN WIRING DIAGRAM...

Страница 42: ...SCHALTPLAN WIRING DIAGRAM ZIPPER MASCHINEN GmbH www Zipper Maschinen at 42 ZI STE1800IV Explosionszeichnung exploded view 25 1 1 Machine housing 25 1 2 Spare parts list machine housing...

Страница 43: ...SCHALTPLAN WIRING DIAGRAM ZIPPER MASCHINEN GmbH www Zipper Maschinen at 43 ZI STE1800IV 25 1 3 Display 25 1 4 Spare parts list display...

Страница 44: ...LAN WIRING DIAGRAM ZIPPER MASCHINEN GmbH www Zipper Maschinen at 44 ZI STE1800IV 25 1 5 Fuel tank 25 1 6 Spare parts list fuel tank 25 1 7 Bottom of the machine 25 1 8 Spare parts list bottom of the m...

Страница 45: ...LAN WIRING DIAGRAM ZIPPER MASCHINEN GmbH www Zipper Maschinen at 45 ZI STE1800IV 25 1 9 Ignition module 25 1 10 Spare parts list ignition module 25 1 11 Filter housing 25 1 12 Spare parts list filter...

Страница 46: ...SCHALTPLAN WIRING DIAGRAM ZIPPER MASCHINEN GmbH www Zipper Maschinen at 46 ZI STE1800IV 25 1 13 Muffler 25 1 14 Spare parts list muffler 25 1 15 Impeller 25 1 16 Spare parts list impeller...

Страница 47: ...SCHALTPLAN WIRING DIAGRAM ZIPPER MASCHINEN GmbH www Zipper Maschinen at 47 ZI STE1800IV 25 1 17 Carburettor 25 1 18 Spare parts list carburettor...

Страница 48: ...SCHALTPLAN WIRING DIAGRAM ZIPPER MASCHINEN GmbH www Zipper Maschinen at 48 ZI STE1800IV 25 1 19 Engine 25 1 20 Spare parts list engine...

Страница 49: ...lschem Treibstoffen Frostsch den in Wasserbeh ltern Treibstoff ber Winter im Benzintank des Ger tes c Ausgeschlossen sind Defekte an Verschlei teilen wie Kohleb rsten Fangs cke Messer Walzen Schneidep...

Страница 50: ...water tanks leaving fuel in the tank during the winter etc c Defects on wear parts are excluded e g carbon brushes collection bags knives cylinders cutting blades clutches sealings wheels saw blades...

Страница 51: ...Quality Management policy Your opinion is essential for further product development and product choice Please let us know about your Impressions and suggestions for improvement experiences that may b...

Страница 52: ...PRODUKTBEOBACHTUNG PRODUCT MONITORING ZIPPER MASCHINEN GmbH www Zipper Maschinen at 53 ZI STE1800IV...

Отзывы: