56
Zehnder Eversky
21. Troubleshooting
First of all, check that the electrical connectors and terminal blocks are correctly connected and tightened and that this
operation has not been omitted during the start-up phase of the equipment. Also check the tightness of the screw
connectors.
Defective parts must be replaced exclusively with original components in order to comply with the regulations applicable
to the product. The replacement of defective parts with non-original parts will result in the loss of the manufacturer's
warranty for the entire equipment.
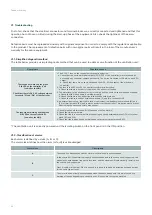
21.1. Simplified diagnostic method
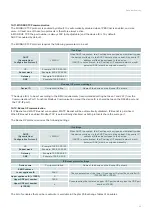
The table below provides a simple diagnostic method that can be used to address a malfunction of the ventilation unit:
Symptoms
Possible causes
The fans do not work and the green
P/B LED on the controller is off
(as well as the HMI)
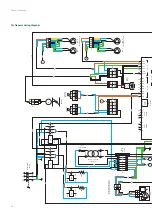
Check that there is 24 V AC voltage between
terminals "G" and "G0" of the controller.
1. The 3.15 A T fuse on the fuse holder terminal is defective:
a. Check that the customer digital outputs (DO5/DO7 of the controller) are relayed and do
not supply any consumer component directly. The current is limited to 100 mA on each DO
output.
b. Check that there are no short circuits on the AO1... AO5 outputs of the electronic
controller.
2. The fuse in the 230 Vac/24 Vac control transformer is defective:
a. Check that there is no short circuit in the 24 Vac control section.
3. The water level in the condensate tray is too high and the overflow sensor has been tripped:
a. Check that the lifting pump is working properly
b. Check that there is no obstruction in the condensate drain line
c. Check that there is a shunt between terminals (3) and (4) of connector J6.
4. An external device (e.g. remote fire stop or equivalent) is wired between terminals (21) and
(22) of terminal block (B2) and removes power from the controller. This device must be reset
after taking the necessary safety precautions.
The fans are not working and the green
P/B LED on the controller is lit
(as well as the HMI)
1. Check for active alarms (see XXI.10 Presence of active alarms)
2. Check the time programme
3. Check that there is no external stop request (open circuit between terminal (75) of terminal
block (B7) and DI5)
4. Check that the low speed and normal speed set points are greater than 30%.
*The ventilation unit is correctly powered and the isolating switch on the front panel is in the ON position.
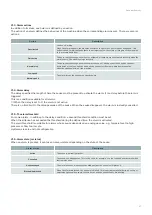
21.2. Classification of alarms
Each alarm is defined by a class (A, B, or C).
The alarm class defines how the alarm (or fault) is acknowledged.
Alarm class
Description
A
The cause has disappeared and the alarm must be manually acknowledged.
In the controller, if the alarm is manually acknowledged before the cause has disappeared, this
manual acknowledgement request is recorded, and the machine will automatically restart when
the cause has disappeared.
Class A and B are identical. What is needed is to be able to make a distinction between actions
for the same type of reset.
B
C
The alarm is automatically acknowledged when the cause disappears. It is mainly used as a
warning, although depending on the action set, it is possible to stop the machine.


