Содержание EcoAIR DESIGN

Страница 1: ...EcoAIR DESIGN...

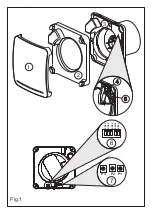
Страница 2: ...Fig 1 6 7 P2 P3 P1 SW1 1 SW1 2 SW1 3 SW1 4 SW1 5 1 2 3 4 5...

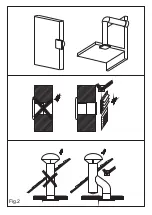
Страница 3: ...Fig 2...

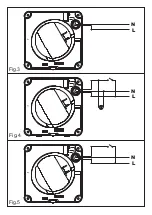
Страница 4: ...Fig 4 Fig 3 Fig 5 L N L N L N...

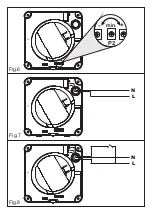
Страница 5: ...Fig 7 Fig 6 Fig 8 P2 min L N L N...

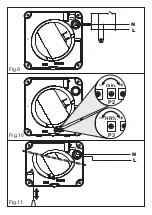
Страница 6: ...Fig 10 Fig 9 Fig 11 L N P2 min P3 HR L N...

Страница 7: ...a hacia el exterior o a conducto individual fig 2 Realizar un orificio en la pared o techo de di metro 105 mm Si el montaje se hace con conducto individual utilizar un conducto de di metro normalizado...

Страница 8: ...rato siga funcionando en velocidad m xima el tiempo determinado por la temporizaci n despu s que el interruptor haya sido abierto fig 5 El esquema fig 4 muestra como conectar el aparato con temporizac...

Страница 9: ...HR el extractor funcionar siempre a velocidad m xima Si la humedad en el local a ventilar esta siempre inferior a 60 el extractor no pasar nunca en velocidad m xima en la modalidad autom tica Si el e...

Страница 10: ...ectly to the outside or via an individual ducting system see Fig 2 Make a hole in the wall or ceiling of diameter 105 mm If the unit is to be installed with individual ducting use a standard duct of d...

Страница 11: ...circuit to allow the fan to be boosted To set the timer turn the potentiometer P2 on the printed circuit board as fig 6 Manufacture setting 1 minute To reduce the run on time turn anticlockwise min 1...

Страница 12: ...will only operates at trickle speed when running in automatic operation If the fan never runs at boost The setting of the humidistat is to the maximum Change the setting The level of humidity in the...

Страница 13: ...otentiom tres de r glage L EcoAIR DESIGN peut tre install soit au mur soit au plafond en rejet d air directement vers l ext rieur ou en conduit individuel fig 2 Pratiquer dans le mur ou le plafond une...

Страница 14: ...e maximale le temps d termin par la temporisation apr s que l interrupteur ait t ouvert fig 5 Le sch ma de c blage fig 4 montre comment avec le m me interrupteur commander la lumi re dans la pi ce et...

Страница 15: ...est dire maintenir dans la pi ce un taux d humidit sup rieur 60 HR tourner avec pr caution le potentiom tre P3 situ sur le circuit imprim fig 10 dans le sens des aiguilles d une montre Si vous d sirez...

Страница 16: ...g an der Decke oder an der Wand befestigt werden Abb 2 In die Wand oder Decke muss ein 105 mm Loch gebohrt werden Wird der Einbau mit einer individuellen Leitung vorgenommen ist eine Leitung mit norma...

Страница 17: ...gt die Ger teschaltung mit Timer an damit mit dem Lichtschalter auf H chstgeschwindigkeit umgeschaltet werden kann Zur Einstellung des Timers Potentiometer P2 s Aufdruck Abb 6 drehen Werkseinstellung...

Страница 18: ...tfeuchtigkeit im Raum liegt unter 60 rF Der Abzug l uft immer auf H chstgeschwindigkeit Die Einstellung des Hygrostats befindet sich nicht in Maximalstellung Einstellungswert ndern Die Luftfeuchtigkei...

Страница 19: ...ordt gemonteerd met een individuele buis gebruikt u een buis met een genormaliseerde diameter van 100 mm Zorg ervoor dat de luchtdoorstroming niet wordt gehinderd en dat de ventilator vrij kan draaien...

Страница 20: ...st met een instelbare timer Via de timer kan het apparaat gedurende de ingestelde periode op maximumsnelheid blijven werken nadat de schakelaar wordt ingeschakeld fig 5 Het schema in fig 4 laat zien h...

Страница 21: ...gen moet u de potentiometers op de gedrukte schakeling gebruiken Deze potentiometers zijn broos en moeten met de nodige zorg worden behandeld De instelling van de hygrostaat mag niet worden gewijzigd...

Страница 22: ...rede com descarga directa para o exterior ou com conduta individual fig 2 Deve ter um buraco na parede ou no tecto de 105mm de di metro Se a montagem for feita em conduta individual utilize uma condut...

Страница 23: ...fig 4 mostra como ligar o aparelho com temporizador para que passe a velocidade m xima com o mesmo interruptor da luz Para ajustar a temporiza o gire o potenci metro P2 situado no circuito impresso f...

Страница 24: ...ncionar sempre na velocidade m xima Se a humidade no local a ventilar esta sempre abaixo dos 60 o extractor nunca passar a velocidade m xima na modalidade autom tica Se o extractor n o passar a veloci...

Страница 25: ...all esterno o attraverso un condotto individuale Fig 2 Eseguire un foro nella parete o nel soffitto di diametro 105 mm Il ventilatore deve essere installato con un condotto standard individuale di dia...

Страница 26: ...ventilatore di funzionare continuamente per il periodo di tempo prescelto dopo la chiusura dell interruttore fig 5 Fig 4 Mostra come collegare il ventilatore con il temporizzatore per passare alla alt...

Страница 27: ...ostato al di fuori del locale dove il ventilatore viene installato Se il livello di umidit sempre superiore al 90 il ventilatore funzioner sempre alla alta velocit Se il livello di umidit nel locale i...

Страница 28: ...ylacyjnego Fig 2 W przypadku monta u w cianie lub suficie nale y wykona otw r o rednicy 105 mm W przypadku pod czania urz dzenia do systemu wentylacyjnego nale y u y standardowych przewod w wentylacyj...

Страница 29: ...dko ci przez okre lony czas po wy czeniu prze cznika Fig 5 lub w cznika wiat a Fig 4 Aby ustawi warto op nienia czasowego nale y obr ci potencjometr P2 na p ytce elektronicznej fig 6 Ustawienia fabryc...

Страница 30: ...zawsze pracowa z pe n wydajno ci Je li wilgotno w pomieszczeniu jest zawsze poni ej 60 wentylator b dzie pracowa tylko z pr dko ci minimalna w trybie automatycznym Je li wentylator nigdy nie pracuje w...

Страница 31: ......

Страница 32: ......

Страница 33: ......

Страница 34: ......

Страница 35: ...poate evacua aerul direct afara sau prin intermediul unei tubulaturi vezi Fig 2 Faceti o gaura in tavan sau perete cu diametrul de 105 mm Daca unitatea este instalata pe tubulatura folositi una standa...

Страница 36: ...ntru o anumita perioada setata fig 5 Fig 4 arata cum se conecteaza ventilatorul cu timer utilizand acelasi comutator ca si pentru circuitul de lumina Pentru setarea timer ului rotiti potentiometrul P2...

Страница 37: ...viteza maxima Daca umiditatea este intotdeauna sub 60 ventilatorul va functiona doar la viteza minima cand se afla in modul automat Daca ventilatorul nu functioneaza niciodata la viteza maxima Umidos...

Страница 38: ...us leikk 1 ja suojalevy 2 Puhallin voidaan asentaa sein n tai kattoon mukana seuraavien nelj n kumipalan ja ruuvien avulla Varmista ett mik n ei est ilman kulkua ja ett siipipy r py rii vapaasti Sy t...

Страница 39: ...it on my s varustettu ajastimella s t v li 1 30 minuuttia K ytt 1 Automaattinen kuva7 Puhallin toimii automaattisesti s detyll nopeudella Kun huoneen kosteus ylitt ennalta asetetun arvon alkaa puhalli...

Страница 40: ...M EcoAIR DESIGN M malli on sama kuin H malli vetonarulla varustettuna Vetonarusta aktivoidaan boosti kuva11 Kun vetonaru on pois p lt k y puhallin boostilla ajastimen asetuksn mukaisesti jonka j lkeen...

Страница 41: ......

Страница 42: ......

Страница 43: ......

Страница 44: ...24 00 C Llevant 4 08150 Parets del Vall s Barcelona ESPA A Tel 93 571 93 00 Fax 93 571 93 01 Fax int 34 93 571 93 11 e mail consultas solerpalau com Web www solerpalau com Soler Palau Sistemas de Ven...

Отзывы: