


91
7.16 ROX Dissolved Oxygen
Service
You can perform two services on the ROX DO sensor, rehydration and membrane assembly replacement.
Rehydration
The ROX DO sensor must always be stored in a moist environment (water or water-saturated air). If the sensor is
exposed to ambient air for more than two hours (or less if the air is extremely dry), you should perform the following
rehydration steps.
1. Fill a 600 mL (or similar size) glass beaker with approximately 400 mL of water.
2. Heat the water to a temperature of 50 ±5 degrees C.
3. Place the probe tip containing the sensor membrane in the warm water.
4. Maintain the temperature for approximately 24 hrs with the probe tip submerged in the water.
5. Following rehydration, store the probe as usual in water or water-saturated air.
Be sure that the water does not evaporate. If possible, cover the container to prevent evaporation. DO NOT
use plastic vessels.
Membrane Assembly Replacement
YSI recommends that you replace the optical DO membrane assembly once a year to ensure maximum sensor
accuracy. You may also need to replace the membrane assembly if it becomes excessively scratched. Although you
should not worry about small pinholes in the protective black paint covering, however, YSI recommends that you
change the membrane assembly if the face has a hole 1 mm or larger.
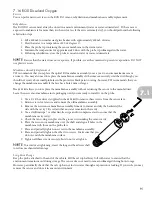
The 6155 kit allows you to replace the membrane assembly without returning the sensor to the manufacturer.
Leave the new sensor membrane in its packaging until you are ready to install it on the probe.
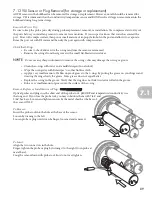
1. Use a 1/16" hex driver (supplied in the 6155 kit) to remove three screws from the sensor face.
2. Retain screws for later use and remove the old membrane assembly.
3. Remove the new sensor membrane assembly from its container and dry the backside (the
side with the cavity). Be certain that no water remains in the cavity.
4. Use a dry Kimwipe ® or other lint-free wipe and/or compressed air to ensure that the
membrane cavity is dry.
5. Check that an o-ring is in place in the groove surrounding the sensor cavity.
6. Place the new sensor membrane over the shaft and align all holes in the
membrane with those on the probe face.
7. Place and partially tighten one screw in the membrane assembly.
8. Place and partially tighten the other two screws. Make sure that you
do not scratch the membrane surface.
9. Tighten all three screws securely, but do not over tighten.
To avoid over tightening, insert the long end hex driver shaft
to reduce mechanical advantage.
Long-Term Storage
Keep the probe attached to the end of the vehicle. Fill the cal cup half-way full with water to ensure that the
environment remains moist during storage. The sensor does not need to remain submerged throughout storage.
However, periodically check that the cal cup has not lost its water through evaporation or leaking. If you wish, you may
remove the sensor and store it in a moist environment.
NOTE
NOTE
7.1