


65
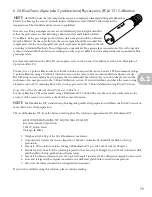
6.13 Prepare the EcoMapper for Calibration
Due to the sensitive nature of calibration, we recommend that you perform sensor calibration on a flat stationary
surface near a sink, ideally on a lab countertop. If possible, position the sensors over a sink for easy rinse and disposal
of fluids. If you cannot use a sink, have a bucket available into which you can empty liquids from the cal cup. The
EcoMapper is equipped with a longer calibration cup to prevent turbidity sensor interference; the cup also has two
end-caps: a unique removable endcap with plumbing ports that you will use during calibration and a second standard,
flat end-cap that will be used for transport and storage.
In order to calibrate the vehicle properly, you should observe several procedures for all calibrations.
• Leave the vehicle firmly attached in its stand.
• Have all required calibration standards available.
Attach the specialized AUV calibration cup end-cap (with drain).
1. With the calibration cup attached to the vehicle, unscrew (counterclockwise) and remove the standard black
cup end.
2. Screw (clockwise) the AUV calibration cup end (including drain and fluid port) into the tip of the
calibration cup. Twist the end until it is snug and the drain is located on the bottom side.
3. Insert the funnel into the fluid port on top of the cup end before you pour the calibration standards.
4. Observe proper pre-rinse and rinse procedures throughout calibration.
5. Turn the knob on the drain counter-clockwise and carefully tilt the vehicle forward to empty all fluids
from the cal cup. Close the drain once you have sufficiently rinsed and emptied the cup.
You may want to save used calibration solution to reuse as a pre-rinse solution at a later date.
NOTE
6.1