Connections
MOTIF XS Owner’s Manual
87
Basic Structure
Basic Operation
Connections
Basic Section
parameters
5
–
9
are not necessary. Set this
parameter to “off,” if your network does not use a
device with the DHCP server function.
)
Security
Set this parameter to “workgroup,” if your network
administrator does not specify otherwise.
Parameters
1
and
2
are not necessary here.
Parameters
5
–
9
are necessary to be set if your
network does not use a device with the DHCP server
function. For details, see page 260. For instructions on
setting these parameters, consult your network
administrator or provider.
For information on the other parameters, refer to the
explanation of the Network display (page 260) in the
Utility mode.
3
Press the [ENTER] button to actually apply the
settings to the MOTIF XS.
4
Set the shared directory on your computer.
On your computer, set the folder which you want to access
from the MOTIF XS via network to the shared folder. For
details, refer to the owner’s manual of your computer.
5
Confirm whether or not the MOTIF XS and the
computer are properly connected to the
network.
Press the [FILE] button to enter the File mode, then press
the [F2] button to call up the Mount display (page 277). If
the MOTIF XS and the computer are connected properly,
the computer name is shown in the HOST column. If the
computer name is not shown, press the [SF5] Char button
then enter the computer name directly in the Host (
$
)
column. If the MOTIF XS and the computer are connected
properly, the name you input will be recognized.
n
Confirm the computer name on the operating system of
your computer. For details, refer to the owner’s manual of
your computer.
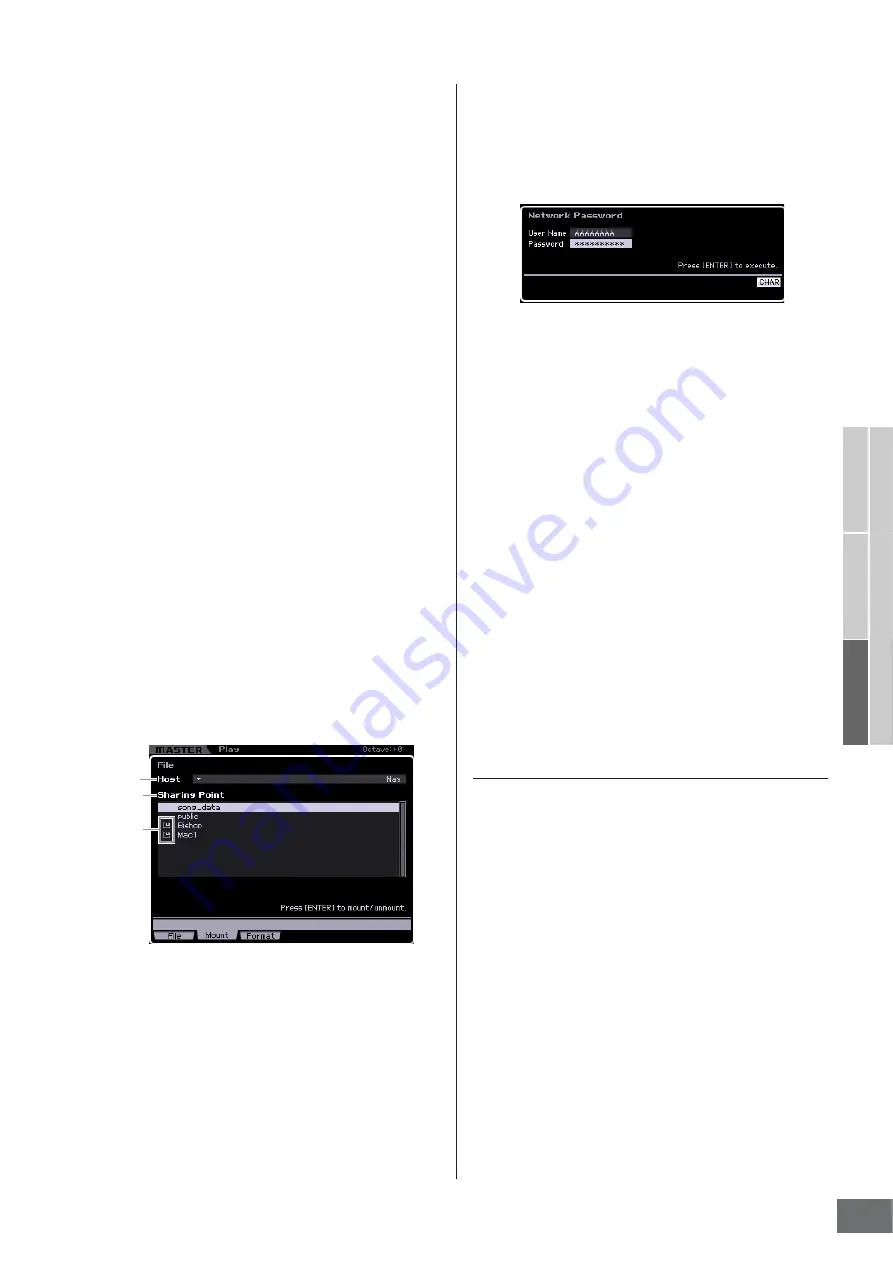
6
In the File mode of the MOTIF XS, access the
computer via network so that the shared
directory appears on the display.
Call up the Mount display of the File mode. When setting
the HOST (
1
) to a computer name containing the desired
shared directory, “Press [ENTER] to access” appears on
the display. Next, press the [ENTER] button so that the
display prompts you to enter the password as illustrated
below. Here, enter the User Account of your computer to
the User Name box, enter the password of your computer
to the Password box, then press the [ENTER] button so
that the access between the MOTIF XS and the computer
is established. The shared directories of the selected
computer are listed in the Sharing Point box (
2
).
n
Once access between the MOTIF XS and the computer
has been established, the shared directories are
automatically listed on the display simply by selecting a
computer in the Host column. If you turn the power off,
however, the operations for establishing access (entering
the User Account and Password) are necessary after
turning the power on next time.
n
For details about how to confirm the User Account and
Password of your computer, refer to the owner’s manual of
your computer.
n
If a password has not been set on your computer, you
need not enter the password. Access can be established
even if you enter no password.
7
Mount the desired directories.
In the Sharing Point box (
2
), you can mount the shared
directory by moving the cursor to the desired directory,
then pressing the [ENTER] button. The mount indicator
appears at the left side of the mounted directory’s name.
By following the instructions above, you can access a
computer from the MOTIF XS via the LAN network. For
details, see page 86.
File Sharing for accessing the MOTIF XS from
a computer
Follow the instructions below so that you can access the
MOTIF XS (actually a USB storage device connected to the
MOTIF XS) from a computer via the LAN network. Call up
the Network display (page 260) in the Utility mode.
n
Keep in mind that the internal Flash memory of the MOTIF XS
cannot be accessed from a computer via the LAN network.
Only the data saved to a USB storage device connected to the
MOTIF XS can be accessed from a computer via the LAN
network. If you want to share files between the MOTIF XS and
a computer, save the data stored in internal Flash memory to
an external USB storage device.
1
Call up the Network display (page 260) then set
the File Server Account (
#
).
If the account has not been set, the MOTIF XS can be
accessed using the account named “nobody.”
2
Set the password.
Press the [SF5] Password button to call up the password
window. For instructions on setting, see page 262.
3
Set the File Server parameter (
4
) to “on.”
$
%
Mount
Indicator
Содержание MOTIF XS6
Страница 1: ......


