background image

M7CL  Owner’s Manual

Using mute groups

128

5

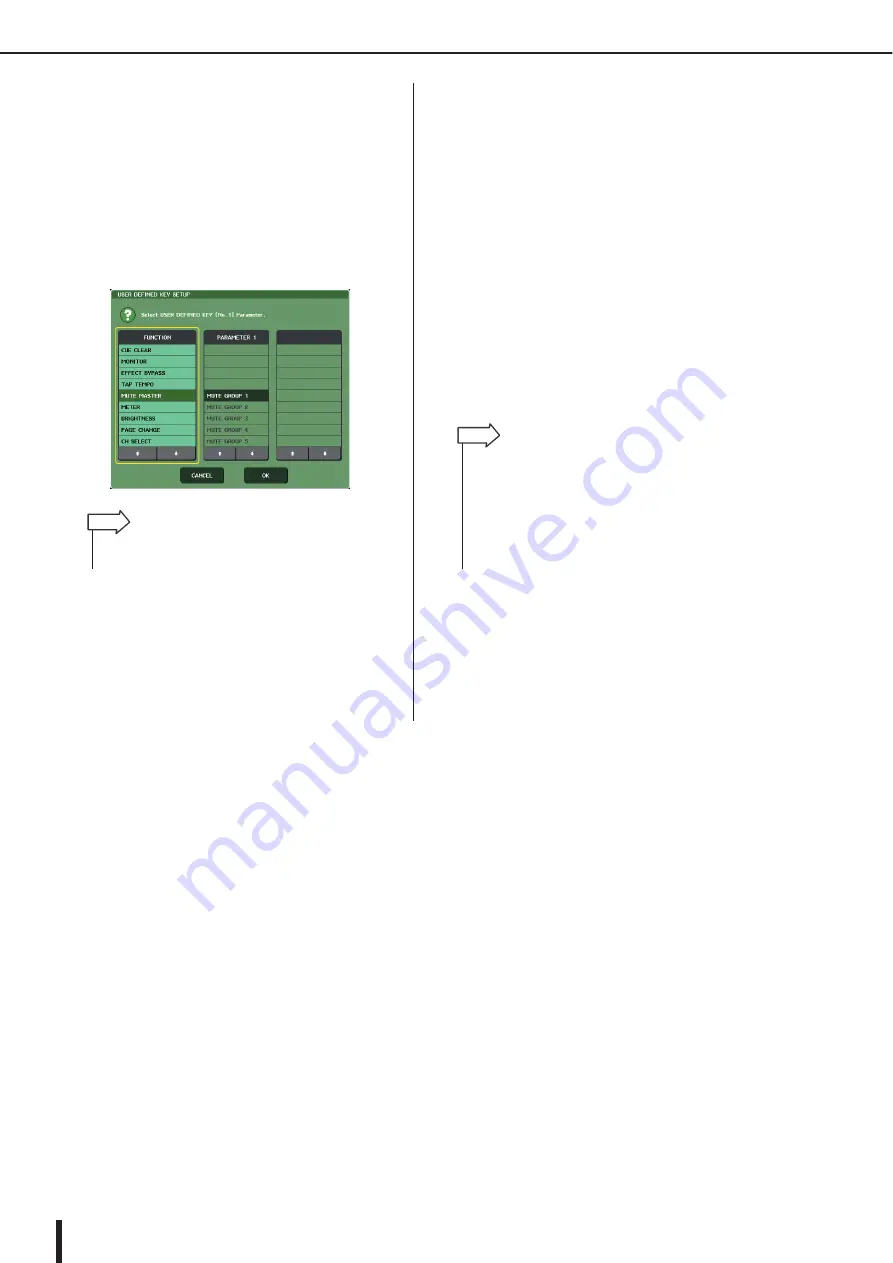
Choose “MUTE MASTER” in the FUNCTION 
column, and choose “MUTE GROUP x” 
(where “x” is the mute group number) in the 
PARAMETER 1 column. Then press the OK 
button.

To select an item in each column, use 

/

 buttons or 

the multifunction encoders. When you press the OK 
button, the Mute On/Off function for the specified 
mute group will be assigned to the user-defined key 
you selected in step 4, and you will return to the USER 
DEFINED KEYS page.

6

In the same way, assign the Mute On/Off 
function for another mute group to a differ-
ent user-defined key.

7

When you have finished assigning func-
tions to user-defined keys, press the “

×

” 

symbol to close the USER DEFINED KEYS 
page.

8

In the function access area, press the 
SETUP button to close the SETUP screen.

9

To mute a mute group, press the user-
defined key [1]–[12] that’s assigned to the 
desired mute group.

The LED of the user-defined key will light, and all 
channels belonging to the selected mute group will be 
muted. At this time, the [ON] key of the muted chan-
nels will blink. You can turn on more than one user-
defined key to mute multiple mute groups.

10

To defeat muting of a mute group, press the 
user-defined key that you lit in step 9.

• For more about user-defined keys, refer to “User-defined 

keys” (

 p. 216).

HINT

• Even if a channel is assigned to a mute group, it will not be 

affected by operations of the user-defined key if the [ON] key 
of that channel is already turned off to begin with.

• If you cancel the assignment of the user-defined key, that 

mute group will be forcibly set to the unmuted state. 
If, after synchronizing with M7CL Editor, the system goes 
offline, mute groups not assigned to user-defined keys will 
forcibly be un-muted.

HINT

Содержание M7CL StageMix V1.5

Страница 1: ...M7CL 32 M7CL 48 M7CL 48ES Owner s Manual EN ...

Страница 2: ...a Corporation of America or its subsidiar ies IMPORTANT NOTICE FOR THE UNITED KINGDOM Connecting the Plug and Cord WARNING THIS APPARATUS MUST BE EARTHED IMPORTANT The wires in this mains lead are coloured in accordance with the following code GREEN AND YELLOW EARTH BLUE NEUTRAL BROWN LIVE As the colours of the wires in the mains lead of this apparatus may not correspond with the coloured markings...

Страница 3: ...pparatus combination to avoid injury from tip over 13 Unplug this apparatus during lightning storms or when unused for long periods of time 14 Refer all servicing to qualified service personnel Servicing is required when the apparatus has been damaged in any way such as power supply cord or plug is damaged liquid has been spilled or objects have fallen into the apparatus the apparatus has been exp...

Страница 4: ...cautions listed below to avoid the possibility of physical injury to you or others or damage to the device or other property These precautions include but are not limited to the following Remove the electric plug from the outlet when the device is not to be used for extended periods of time or during electrical storms When removing the electric plug from the device or an outlet always hold the plu...

Страница 5: ...hen have qualified Yamaha service personnel replace the backup battery The average life of the internal backup battery is approximately 5 years depending on operating conditions Data items maintained in the internal memory by the backup battery are as follows Current scene parameters and number Library data Always turn the power off when the device is not in use The performance of components with ...

Страница 6: ...57 Specifying the channel name and icon 59 Making HA Head Amp settings 61 Sending the signal from an input channel to the STEREO MONO buses 63 Sending the signal from an input channel to a MIX bus 67 Using the SELECTED CHANNEL section 67 Using the Centralogic section 69 Using the faders SENDS ON FADER mode 70 Sending the signal from an input channel to the MATRIX buses 72 Using the SELECTED CHANNE...

Страница 7: ...d effects 171 About the virtual rack 171 Virtual rack operations 172 Graphic EQ operations 175 About the graphic EQ 175 Inserting a GEQ in a channel 175 Using the 31BandGEQ 177 Using the Flex15GEQ 178 About the internal effects 180 Using an internal effect via send return 181 Inserting an internal effect into a channel 183 Editing the internal effect parameters 184 Using the Tap Tempo function 186...

Страница 8: ...t 246 Dynamics Parameters 249 Effect Type List 252 Effects Parameters 253 Effects and tempo synchronization 265 Scene Memory Effect Library to Program Change Table 266 Parameters that can be assigned to control changes 270 Control change parameter assignments 272 NRPN parameter assignments 274 Mixing parameter operation applicability 277 Functions that can be assigned to user defined keys 280 MIDI...

Страница 9: ...nnel on which you re focus ing This section can be operated just like a module on an analog mixer In the center of the top panel is located the newly devel oped Centralogic section which lets you control eight channels at once You can control fader cue and on off settings for the eight channels or DCA groups recalled to this section by pressing a single key The display is a touch screen You can tu...

Страница 10: ...nvironment for yourself The rear panel provides three slots in which separately sold mini YGDAI cards can be installed AD cards DA cards or digital I O cards can be installed in these slots to add inputs and outputs If an external head amp unit such as theYamaha AD8HR that supports a special protocol is connected to the REMOTE connector the phantom power and gain settings of the external head amp ...

Страница 11: ...at supports a special pro tocol INPUT jacks 1 32 are located at the right side of the rear panel and INPUT jacks 33 48 are located at the left side of the rear panel 1 INPUT jacks 1 32 B INPUT jacks 33 48 C ST IN jacks 1 4 D REMOTE jack E OMNI OUT jacks 1 16 In addition to the channel strip for INPUT channels 1 32 located at the left side of the front panel there is a channel strip for INPUT chann...

Страница 12: ...are no INPUT jacks at the left side of the rear panel 1 INPUT jacks 1 32 B ST IN jacks 1 4 C REMOTE jack D OMNI OUT jacks 1 16 The channel strip for INPUT channels 1 32 is located in the left side of the front panel just as on the M7CL 48 model but there is no channel strip for INPUT channels in the right side 1 Channel strip for INPUT channels 1 32 M7CL 32 3 2 1 4 1 In this owner s manual wheneve...

Страница 13: ...ent EtherSound devices You can remotely control via the EtherSound connector an external head amp device that supports a special proto col 1 OMNI IN jacks 1 8 B EtherSound connectors C OMNI OUT jacks 1 8 In addition to the channel strip for INPUT channels 1 32 located at the left side of the front panel there is a channel strip for INPUT channels 33 48 located at the right side of the front panel ...

Страница 14: ...tions of signals and mix balances can be sent out from the M7CL When the M7CL is in the default state the following out put ports are assigned M7CL 32 48 port assignment M7CL 48ES port assignment STEREO channel MONO channel These channels process the signals that are sent from the input channels or MIX channels and send them to the cor responding output port These channels are used as the main ste...

Страница 15: ...and the other devices receive this word clock signal and synchronize to it In order to transmit or receive digital audio signals to or from an external device via a digital I O card installed in a slot of the M7CL or EtherSound jacks of the M7CL 48ES The word clock must be synchronized between the devices Be aware that if the word clock is not synchronized the signal will not be sent correctly or ...

Страница 16: ...on checking the version number and updating the firmware please refer to the SB168 ES Firmware Update Guide The SB168 ES firmware can be updated from a computer connected to the rear panel NETWORK connector Information about the latest versions and firmware down loads are available on the Yamaha pro audio website SB168 ES product page http www yamahaproaudio com products The EtherSound module firm...

Страница 17: ...CTED CHANNEL section P 19 Meter bridge option P 19 Display section P 20 SCENE MEMORY MONITOR section P 22 INPUT section P 18 ST IN Stereo Input section P 18 Centralogic section P 21 USER DEFINED KEYS section P 22 NAVIGATION KEYS section P 23 STEREO MONO MASTER section P 23 INPUT section P 18 This illustration shows the top panel of the M7CL 48 48ES The M7CL 32 does not have the INPUT section at th...

Страница 18: ... light In SENDS ON FADER mode this is an on off switch for the signal sent from each channel to the currently selected MIX MATRIX bus E Fader Adjusts the input level of the channel In SENDS ON FADER mode this adjusts the send level of the signal from each channel to the currently selected MIX MATRIX bus In this section you can control the main parameters of monaural input channels 1 32 1 48 In thi...

Страница 19: ... L C R channels of the STEREO bus When a ST IN channel is selected This adjusts the left right balance of the signals that are sent from the selected two channels to the STE REO bus When a MIX channel MONO x 2 is selected This adjusts the panning of the signal that is sent from the selected channel to the L R channels of the STE REO bus When a MIX channel STEREO is selected This adjusts the left r...

Страница 20: ...urface of the screen A USB connector is provided on the right side of the display 1 Display touch screen This display shows the information you need to operate the M7CL and lets you make system wide settings and control mix parameters for input and output channels Since this is a touch screen you can use your finger on the screen to select menus or set parameters However you cannot press two or mo...

Страница 21: ...rage device capacities and formats The operation of storage media with capacities of up to 16GB has been verified However this does not necessarily guarantee the operation of all USB storage media The FAT12 FAT16 and FAT32 for mats are supported On the M7CL V1 12 or higher storage media with a capacity of 4GB or larger will be formatted in FAT32 and storage media with a capacity of 2GB or smaller ...

Страница 22: ...s shown in the function access area in the right of the touch screen You can press the keys simulta neously to return to the current scene number D MONITOR LEVEL knob Adjusts the signal level of the monitor output If the PHONES LEVEL LINK function is turned on in the MONITOR screen this will also adjust the level of the front panel PHONES jack These keys execute the functions that have been assign...

Страница 23: ...t the channels that will be con trolled by the Centralogic section and in the touch screen 1 IN 1 8 key B IN 9 16 key C IN 17 24 key D IN 25 32 key These keys select INPUT channels 1 8 9 16 17 24 and 25 32 respectively E ST IN key This key selects ST IN channels 1 4 F DCA key This key selects the DCA groups G MIX 1 8 key H MIX 9 16 key These keys select MIX channels 1 8 and 9 16 respec tively I MA...

Страница 24: ...input level is 62 dBu to 10 dBu B OMNI IN jacks M7CL48 ES These are balanced XLR 3 31 female input jacks for inputting analog audio signals from line level devices or microphones Nominal input level is 62 dBu to 10 dBu Rear panel 1 E Q O 1 1 R N J I H G F D C P D M7CL 48 2 4 4 6 8 9 J 5 Q K R O P L M N M7CL 48ES 1 2 hot 3 cold 1 ground Male XLR plug 2 2 hot 3 cold 1 ground Male XLR plug ...

Страница 25: ... connectors These are BNC connectors used to transmit receive word clock signals to from an external device The WORD CLOCK IN connector is internally terminated by 75 ohms I MIDI IN OUT connectors These connectors are used to transmit and receive MIDI messages to and from external MIDI devices The MIDI IN connector receives messages from an external device and the MIDI OUT connector transmits mess...

Страница 26: ...if its own internal power supply shuts down due to a problem R Grounding screw The AC power cord is a 3 wire type If the AC outlet used is earthed grounded this device will be properly earthed as well Also grounding the screw sometimes reduces hum and interference noise M M K L The use of Ethernet cables with Neutrik EtherCon compatible RJ 45 plugs is recommended Standard RJ45 plugs can also be us...

Страница 27: ... you monitor the MONITOR OUT or CUE signal C TALKBACK jack This is a balanced XLR 3 31 jack to which a talkback mic can be connected You can make settings in the screen to supply 48V phantom power to this jack This is used to send instructions from the mixer operator to the desired output channel D TALKBACK GAIN knob This adjusts the input level of the mic connected to the TALKBACK jack Under the ...

Страница 28: ...M7CL Owner s Manual 28 ...

Страница 29: ...el move it in the left right direction to specify a range within a character string You will use this mainly when assigning a name to a scene or library For the channel select buttons you can select multiple but tons by moving your finger across the touch screen while continue to press Normally you will press a top panel key once but in some cases you can access a special function by rapidly press...

Страница 30: ... function and edit the parameter values in the touch screen The section below explains the various user interface components shown in the touch screen and how to use them Some screens shown in the display consist of multiple pages In screens of this type the page name is shown at the top and bottom The area of the display showing a page name is called a tab Tabs are used to switch between pages wi...

Страница 31: ...ine around the circumference will become thinner this clearly identifies the knob that you are operating Also a frame will appear around the numer ical value Knobs for which a double frame is displayed indicate PAN BALANCE The following type of window will appear when you need to select items from a list such as a list of user defined keys Within the list the highlighted item always shown in the c...

Страница 32: ...e operation you just performed Press the OK button to execute the operation The opera tion will be cancelled if you press the CANCEL button The M7CL s touch screen shows the following information and is broadly divided into two areas 1 Selected channel This shows the number name and icon of the channel that is currently selected for operation For details on assign ing a name p 34 on selecting an i...

Страница 33: ...alent to CUE CLEAR J SETUP When you press this button the SYSTEM screen will appear in the main area allowing you to make basic sys tem settings and user specific settings p 229 K SCENE This indicates the number and name of the scene that was last stored or recalled An R symbol is displayed for read only scenes and a lock icon is displayed for write protected scenes If you edit the parameters from...

Страница 34: ... in the text input box INS button Inserts a space blank at the cursor position DEL button Deletes the character at the right of the cursor or the string of characters selected in the text box BS button Deletes the character at the left of the cursor or the string of characters selected in the text box TAB button This button accesses the next selectable item For example in the SCENE STORE window yo...

Страница 35: ...e buffer memory with the settings of the currently selected channel EQ dynamics or rack GEQ effect For some windows the following tool buttons are also shown SET ALL Sets all parameters in the window CLEAR ALL Clears all parameters in the window ALL PRE Specifies PRE as the position from which all signals are sent to the speci fied bus ALL POST Specifies POST as the position from which all signals...

Страница 36: ... the channel EQ dynamics or rack GEQ effect for which you want to recall settings The method of selecting a channel or rack will depend on the type of popup window that is displayed ATT HPF EQ popup window 1 ch DYNAMICS 1 2 popup window 1 ch Use the panel SEL keys or the channel select button in the function access area to select a channel ATT HPF EQ popup window 8 ch ALL DYNAMICS 1 2 popup window...

Страница 37: ...a the SEL key is different from the one selected in the list in the out put channel library CONFLICT appears to the right of CURRENT TYPE You can recall the data even if CONFLICT appears although the data would include different parameters Parameters that do not exist in the library will be set to the default value Dynamics library The dynamics library contains three types of data Dynamics 1 and D...

Страница 38: ...re opera tion 7 To execute the Store operation press the OK button The current settings will be stored to the library num ber you selected in step 4 If you decide to cancel the Store operation press the CANCEL button instead of the OK button You can make settings so that a dialog box will ask you to confirm the Recall operation For details on this setting refer to p 214 HINT If you recall channel ...

Страница 39: ...Q dynamics settings of the currently selected channel or the effect settings of a rack to their default state A GEQ can be initialized by the FLAT button in the screen 1 Open a popup window that provides the tool buttons 2 Select the channel EQ dynamics or rack effect whose settings you want to initial ize 3 Press the DEFAULT button A dialog box will ask you to confirm the initialization operation...

Страница 40: ...r rack GEQ effect 3 Press the COPY button to place the current settings in the buffer memory This will be the first set of settings 4 Edit the settings of the currently selected channel EQ dynamics or rack GEQ effect This will be the second set of settings Copying pasting settings Only 31BandGEQ settings that use less than fifteen bands can be copied to a Flex15GEQ HINT Be aware that if you copy o...

Страница 41: ...e cur rent settings will be exchanged with the settings held in the buffer memory Unlike the Paste operation the Compare operation always lets you return to the previous settings as long as the buffer memory has not been overwritten COPY The first set The first set The first set The first set Edit the settings The second set Buffer memory Buffer memory Buffer memory The second set COMPARE The sett...

Страница 42: ...M7CL Owner s Manual 42 ...

Страница 43: ...de a total of 48 input channels and 16 output channels A problem in the network such as a disconnected cable will not affect operation of the entire network For detailed information on EtherSound refer to the EtherSound website http www ethersound com And EtherSound Setup Guide on the M7CL product page at theYamaha pro audio website http www yamahaproaudio com products When the unit is shipped fro...

Страница 44: ... 16 CH 1 16 OUTPUT 1 6 jacks ES OUT 1 6 MIX 1 6 OUTPUT 7 8 jacks ES OUT 7 8 STEREO L R ID 2 INPUT 1 16 jacks ES IN 17 32 CH 17 32 OUTPUT 1 6 jacks ES OUT 9 14 MIX 7 12 OUTPUT 7 8 jacks ES OUT 15 16 STEREO L R ID 3 INPUT 1 16 jacks ES IN 33 48 CH 33 48 OUTPUT 1 6 jacks ES OUT 17 22 MATRIX 1 6 OUTPUT 7 8 jacks ES OUT 23 24 STEREO L R Daisy chain connection M7CL 48ES SB168 ES ID 1 OUT IN SB168 ES ID ...

Страница 45: ... screen press the RACK button 1 to access the VIRTUAL RACK window 5 Press the EXT ES HA tab 2 to display the EXT ES HA field 6 Press the AUTO CONFIGURE button below the EXT ES HA field The AUTO CONFIGURE button is set to off and its indicator turns off 7 Press the RING button to the right of the AUTO CONFIGURE button The connection setting is configured for a ring connection 8 Press the AUTO CONFI...

Страница 46: ...ES OUT 9 14 1 MIX 7 12 1 OUTPUT 7 8 jacks ES OUT 15 16 1 STEREO L R 1 If you select a ring connection word clock master will be set to EtherSound 48kHz To change the input or output channel patches on the M7CL 48ES access the M7CL 48ES PATCH NAME popup win dow If you want to change the EtherSound patches from AVS ESMonitor refer to Changing the EtherSound settings from AVS ESMonitor M7CL 48ES p 24...

Страница 47: ...OUT L R C channels to the desired output jacks you can monitor this same signal through external speakers p 154 Analog output connections PW800W power supply Monitor speakers foldback Monitor speakers Power cable Main speakers M7CL 48 OMNI OUT jacks 1 12 MIX channels 1 12 OMNI OUT jacks 13 14 MATRIX channels 1 2 OMNI OUT jacks 15 16 STEREO channel L R OMNI OUT jacks 1 4 MATRIX channels 1 4 OMNI OU...

Страница 48: ...lling separately sold mini YGDAI I O cards in slots 1 3 you can add input output jacks to the M7CL or connect HDR Hard Disk Recorder or speaker processor units Refer to the Yamaha professional audio website for the most recent information on I O cards http www yamahaproaudio com Digital input output connections CD recorder Main speakers Speaker processor e g Yamaha DME64N Digital I O card M7CL 48 ...

Страница 49: ...ace and remove the slot cover Keep the removed slot cover in a safe place 3 Align the edges of the card with the guard rails inside the slot and insert the card into the slot Push the card all the way into the slot so that the con nector at the end of the card is correctly inserted into the connector inside the slot 4 Use the screws included with the card to fasten the card in place Malfunctions o...

Страница 50: ...this equipment must be synchronized to the same word clock as the M7CL in order for digital audio signals to be transferred between the M7CL and the external equipment To do so set one device as the word clock master transmitting device and the other devices as the slaves receiving devices so that the slaves will synchronize to the word clock master There are two ways in which the M7CL can operate...

Страница 51: ...put channel to which a mic or instrument is con nected On the M7CL channel parameters can be controlled using either the SELECTED CHANNEL section to make set tings for a single channel or using the Centralogic section to make settings for up to eight channels Use the method that s appropriate for your situation Using the SELECTED CHANNEL section settings for one channel With this method you select...

Страница 52: ...ess any of the encoders When you press one of the encoders in the SELECTED CHANNEL section the SELECTED CHANNEL VIEW screen will appear in the touch screen SELECTED CHANNEL section 1 HA encoder The SELECTED CHANNEL section provides focused control of the currently selected channel i e the channel whose SEL key is lit SELECTED CHANNEL VIEW screen 1 HA field The SELECTED CHANNEL VIEW screen shows mo...

Страница 53: ...9 16 key IN 17 24 key IN 25 32 key These keys select INPUT channels 1 8 9 16 17 24 and 25 32 respectively ST IN key This key selects ST IN channels 1 4 IN 33 40 key M7CL 48 48ES only IN 41 48 key M7CL 48 48ES only These keys select INPUT channels 33 40 and 41 48 respectively When you press a navigation key the OVERVIEW screen will appear in the display and the principal parameters of the up to eig...

Страница 54: ...s how to adjust the gain to set the level of the signal sent from an input channel to the STEREO bus and adjust the pan balance so that the signal can be monitored from external speakers connected to the STE REO channel The following procedure lets you check whether the connections from the mic or instrument to the external speakers are appropriate In this case as well you can either use the SELEC...

Страница 55: ...an appropriate volume In this state you should now hear sound from the speaker system that is patched to the STEREO chan nel If you don t hear sound check whether the LR meters are moving in the METER field of the function access area METER field of the function access area If the LR meters are moving It may be that the STEREO channel is not correctly patched to the output jacks that are connected...

Страница 56: ... 0 dB 5 In the Centralogic section raise the fader of the corresponding input channel to an appropriate volume In this state you should now hear sound from the speaker system that is patched to the STEREO chan nel If you don t hear sound check whether the LR meters are moving in the METER field of the function access area If the LR meters are moving It may be that the STEREO channel is not correct...

Страница 57: ...1 3 15 MIX2 4 16 MATRIX1 3 7 MATRIX2 4 8 CUE L CUE R PRE EQ PRE FADER POST ON PRE EQ PRE FADER POST ON PRE EQ PRE FADER POST ON PRE EQ PRE FADER POST ON DYNA2OUT PRE EQ PRE HPF Keyin Self PRE EQ Self POST EQ MIX13 16 OUT CH 1 8 9 16 17 24 25 32 POST EQ 32 CH 1 8 9 16 17 24 25 32 33 40 41 48 POST EQ 48 PRE EQ INSERT OUT POSTEQ ATT To MIX To MIX To MATRIX To MATRIX To MIX To MIX VARI VARI FIXED FIXE...

Страница 58: ...R Left Center Right This sends the signal of the input channel as a three chan nel output the MONO C channel and the L R channels to the STEREO bus MONO bus MIX ON OFF MIX send on off This is an on off switch for the signal sent from the input channel to MIX buses 1 16 MIX LEVEL 1 16 MIX send level 1 16 This adjusts the send level of the signal sent from the input channel to VARI type MIX buses 1 ...

Страница 59: ... field a keyboard window allow ing you to assign a name will appear D Tabs Use these tabs to switch between items 3 To select the icon for that channel press the icon button The lower part of the popup window will change as follows 1 Icon select buttons These buttons select the icon used for this channel B Sample name select buttons These buttons select a sample name associated with the currently ...

Страница 60: ...r details on how to use the keyboard window refer to p 34 7 Use the SEL keys to switch input chan nels and specify the icon or channel name for other channels in the same way When the PATCH NAME popup window is shown you can use the SEL keys to switch the channel being edited 8 When you re finished with your input press the symbol in the upper right of the win dow You can press the TAB button to s...

Страница 61: ...di ate right of the knob indicates the input level for the corresponding port D ø Phase button This switches the head amp assigned to the channel between normal phase black and reverse phase orange E INPUT PORT popup button This shows the input port assigned to this channel You can press this button to access the INPUT PORT SELECT popup window where you can select the input port for each channel F...

Страница 62: ...assigned to the channel To adjust the value press the knob to select it and operate multifunction encoders 1 8 The indicator located at the immediate right of the knob indicates the presence or absence of a signal for the corresponding port C 48V This indicates the phantom power on red or off black status for the head amp assigned to the chan nel D ø Phase This indicates either normal phase black ...

Страница 63: ...e signal sent from the input channel to the STE REO L R bus and to the MONO C bus The TO ST PAN knob BALANCE knob specifies the level of the signal sent from the input channel to the STEREO L R bus and MONO C bus 1 Make sure that an input source is con nected to the input channel you re adjust ing and set the phantom power supply gain and phase of the head amp to obtain the optimum input signal p ...

Страница 64: ...ignals sent from the channel to the STEREO L R bus and to the MONO C bus in a range of 0 100 To adjust the value press the knob to select it and operate the corre sponding multifunction encoder TO STEREO MONO popup window ALL The screen shows the status of the signals sent from all input channels to the STEREO bus MIX bus Here you can also adjust the pan or balance in groups of the selected eight ...

Страница 65: ...the TO STEREO MONO popup window use the TO ST PAN knob to set the panning of the signal sent from the input channel to the STEREO bus and MONO C bus If the CSR knob is set to 0 operating the TO ST PAN knob of an INPUT channel will change the level of the signals sent to the STEREO L R bus and MONO C bus as shown in the following diagram In this case the TO ST PAN knob operates as a conven tional P...

Страница 66: ...e ST IN L R channels to the STEREO L R bus and MONO C bus as shown in the following diagram Signal sent from the ST IN L channel to the STEREO L bus Signal sent from the ST IN L channel to the MONO C bus TO ST BALANCE knob C L R Signal level C L R Signal sent from the ST IN R channel to the STEREO R bus Signal sent from the ST IN R channel to the MONO C bus TO ST BALANCE knob Signal level ...

Страница 67: ...onitor system or external effect processor etc is connected to the corresponding output port For details on assigning an output port to a MIX bus refer to p 105 For details on connecting an external device refer to p 46 2 Use the SEL keys of the top panel to select the input channel that will send sig nals to the MIX buses 3 Press any one of the encoders of the SELECTED CHANNEL section to access t...

Страница 68: ...O MIX PAN knob for a ST IN channel it will operate as the TO MIX BALANCE knob For an INPUT channel the right knob will adjust the common send level to the two MIX buses and the left knob will adjust the panning between the two MIX buses Turning the left TO MIX SEND LEVEL knob toward the left will increase the amount of signal sent to the odd numbered MIX bus and turning it toward the right will in...

Страница 69: ... the TO MIX SEND ON OFF button is off the knob will be dimmed C TO MIX SEND ON OFF button These are on off switches for the signal sent from the input channels to the MIX bus These buttons are shown only when the send destination MIX bus is a FIXED type 3 Press the TO MIX SEND LEVEL knob for the desired send destination MIX bus A bold frame will appear around all TO MIX SEND LEVEL knobs for that M...

Страница 70: ...o a specific MIX bus 1 Make sure that an output port is assigned to each MIX bus to which you want to send signals and that your monitor system or external effect etc is connected to the cor responding output port For details on assigning an output port to a MIX bus refer to p 105 For details on connecting an external device refer to p 46 2 In the function access area press the SENDS ON FADER butt...

Страница 71: ...urn to normal mode Alternatively press a SEND LEVEL knob in the SELECTED CHANNEL section to display a popup window from which you can select a MIX bus You can also select a MIX bus by using the navigation keys and the SEL keys in the Centralogic section If the MIX buses or MATRIX buses are selected when you press the SEL keys the setting of the MIX MTRX ON FADER switch button will be changed autom...

Страница 72: ... 1 Make sure that an output port is assigned to the MATRIX bus to which you want to send signals and that your external device is connected to the corresponding output port For details on assigning an output port to a MATRIX bus refer to p 105 For details on connecting an exter nal device refer to p 46 2 Use the SEL keys of the top panel to select the input channel that will send sig nals to the M...

Страница 73: ...TRIX buses Turning the left TO MATRIX SEND LEVEL knob toward the left will increase the amount of signal sent to the odd numbered MATRIX bus and turning it toward the right will increase the amount sent to the even numbered MATRIX bus For a ST IN channel the right knob adjusts the com mon send level for the two MATRIX buses and the left knob adjusts the volume balance of the left and right signals...

Страница 74: ...adjacent knobs will be linked as the TO MATRIX PAN knob 3 Press theTO MATRIX SEND LEVEL knob for the desired send destination MATRIX bus A bold frame will appear around all TO MATRIX SEND LEVEL knobs for that MATRIX bus 4 Use multifunction encoders 1 8 to adjust the send level of the signals sent from the up to eight input channels to the selected MATRIX bus If necessary you can use the navigation...

Страница 75: ...IX bus 8 Repeat steps 3 6 to adjust the send level for other MATRIX buses in the same way Here s how you can use the faders on the top panel to adjust the signal that is sent from all input channels to a specific MATRIX bus 1 Make sure that an output port is assigned to each MATRIX bus to which you want to send signals and that your monitor system or external effect etc is connected to the corresp...

Страница 76: ... will return to its prior state and the M7CL will exit SENDS ON FADER mode and return to normal mode Alternatively press a SEND LEVEL knob in the SELECTED CHANNEL section to display a popup window from which you can select a MIX bus You can also select a MATRIX bus by using the navigation keys and the SEL keys in the Centralogic section If the MIX buses or MATRIX buses are selected when you press ...

Страница 77: ...els To recall each library press the corresponding LIBERARY button in the SELECTED CHANNEL VIEW screen For details on using the library refer to Using libraries p 35 Channel library operations INPUT CHANNEL LIBRARY OUTPUT CHANNEL LIBRARY You can recall 200 different settings each from the input channel library and from the output channel library Each library includes one read only preset The input...

Страница 78: ...M7CL Owner s Manual 78 ...

Страница 79: ...BAND EQ METER LEVEL LEVEL LEVEL METER METER Keyin INSERT LEVEL METER METER PRE EQ PRE EQ INSERT OUT INSERT CUE ON ST L PAN ST R MONO C MATRIX1 3 7 MATRIX2 4 8 PRE EQ POST EQ PRE FADER INSERT OUT PRE FADER PFL POST ON AFL PRE FADER POST ON PRE FADER POST ON EQ OUT GR METER DYNA OUT COMP COMPAND EXPAND PRE FADER To OUTPUT PATCH INSERT OUT 1 16 INSERT IN 1 16 MIX OUT1 16 PRE FADER INSERT OUT POST ON ...

Страница 80: ...ly You can send the output signals of MIX channels 13 16 to dynamics processors and use them as key in signals to control the dynamics RACK IN PATCH This patches the output signal of the output channel to an input of the rack OUTPUT PATCH This assigns an output port to an output channel MONITOR SELECT This selects the output signal of an output channel as a monitor source MATRIX CUE MIX ST L R C L...

Страница 81: ...ng an icon or changing the channel name you will return to the output port select screen D Tabs These tabs select the items shown in the lower part of the screen 3 To select the icon for the channel press the icon button The lower part of the popup window will change as follows 1 Icon select buttons These buttons select the icon used for this channel B Sample name select buttons These buttons sele...

Страница 82: ...e MIX channel to the STEREO bus and to the MONO bus independently The signal sent from the MIX channel to the STEREO bus and to the MONO bus can be switched on off individually The panning of the signal sent from a monaural MIX channel to the STEREO bus L R is controlled by the TO ST PAN knob The signal sent to the MONO bus is not affected by this knob The left right volume balance of the signal s...

Страница 83: ...utton An indicator ST MONO or LCR immediately above the button will light to indicate the currently selected mode C STEREO MONO buttons These buttons are individual on off switches for the signal that is sent from each channel to the STEREO bus MONO bus when the MONO button is set to ST MONO mode D TO ST PAN BALANCE knob For monaural MIX channels this acts as the PAN knob that adjusts the left rig...

Страница 84: ...alogic section 7 Make sure that the ON key of that channel is on and use the fader in the Centralogic section to raise the master level of the MIX channel to an appropriate position Channels for which ST MONO mode is selected 8 In the TO STEREO MONO popup window use the STEREO MONO button to turn the signal sent from the MIX channel to the STEREO bus MONO bus on or off For a channel that is set to...

Страница 85: ...an also be selected directly by using the SEL keys of the STEREO MONO MASTER section 4 Press any one of the encoders of the SELECTED CHANNEL section to access the SELECTED CHANNEL VIEW screen The SELECTED CHANNEL VIEW screen will show all the mix parameters of the corresponding channel Adjustments of send levels to the MATRIX buses is done in the TO MATRIX field of this screen 1 TO MATRIX field In...

Страница 86: ...e refer to p 46 2 Use the navigation keys to access the OVERVIEW screen that includes the chan nel MIX channels 1 8 9 16 or STEREO MONO channels that you want to control In the OVERVIEW screen you can use the TO MATRIX field to adjust the send levels to the MATRIX bus 1 TO MATRIX field This field specifies the send level of the signal sent from the MIX and STEREO MONO channels to the MATRIX bus B ...

Страница 87: ... on E TO MATRIX SEND ON OFF button This is an on off switch for the signal sent from the MIX or STEREO MONO channel to the MATRIX bus F TO MATRIX SEND LEVEL knob This adjusts the send level of the signal sent from the MIX or STEREO MONO channel to the MATRIX bus To adjust the level operate multifunction encod ers 1 8 If the send destination MATRIX bus is set to stereo the TO MATRIX PAN knob for a ...

Страница 88: ... each library press the corresponding LIBERARY button in the SELECTED CHANNEL VIEW screen For details on using the library refer to Using libraries p 35 Channel library operations INPUT CHANNEL LIBRARY OUTPUT CHANNEL LIBRARY You can recall 200 different settings each from the input channel library and from the output channel library Each library includes one read only preset The input channel libr...

Страница 89: ...xer and allows you to manually adjust all the major parameters of the currently selected channel Operations in this section will affect the channel that was most recently selected by its SEL key For a ST IN channel or STEREO channel either the L or the R channel is selected and the major parameters are linked You can use the encoders on the panel to control mix parameters such as head amp gain HPF...

Страница 90: ... the input level OVER indicator C PATCH field output channels only For output channels the PATCH field is shown in the 2 area This field indicates the output port that is patched to the output channel If two or more output ports are patched only will be shown as a representative D TO ST PAN BALANCE field When an INPUT channel or monaural MIX channel is selected This functions as an on off switch f...

Страница 91: ...en press the SEL key for the desired channel The number and name of the currently selected chan nel is shown in the channel select field located in the function access area of the touch screen 2 Press any one of the knobs in the SELECTED CHANNEL section When you press a knob in the SELECTED CHAN NEL section the SELECTED CHANNEL VIEW screen for the currently selected channel will appear If you leav...

Страница 92: ... coded in the screen to adjust the send levels of the signal sent to each bus If desired you can use the TO MIX TO MATRIX SEND ON OFF buttons to switch the signal sent to each bus on off Above each of these buttons is shown the position from which the signal is sent from the current channel For details on changing the send position p 70 Adjusting the send level from the MIX channels to a specific ...

Страница 93: ...For details on the popup window p 108 Setting the pan balance To adjust the pan balance of the signal sent from that channel to the STEREO bus use the PAN encoder of the SELECTED CHANNEL section and the TO ST PAN BALANCE field of the SELECTED CHANNEL VIEW screen The TO ST PAN BALANCE field includes the fol lowing items 1 PAN BALANCE knob The following parameter will change according to the channel...

Страница 94: ...knobs indicate the values of parameters other than THRESHOLD To edit the dynamics settings switch the DYNAMICS ON OFF button on and use the DYNAMICS 1 DYNAMICS 2 encoders of the SELECTED CHANNEL section to adjust the THRESHOLD parameter If you want to edit parameters other than THRESHOLD or to recall existing data from the library press any loca tion within the field to access the DYNAMICS 1 DYNAM...

Страница 95: ...tton the INSERT DIRECT OUT popup window will appear allowing you to make settings for insert and direct output B DIRECT OUT LEVEL indicator This indicates the currently specified DIRECT OUT LEVEL value C DIRECT OUT ON OFF button Turns the direct output on off To make direct out settings in the SELECTED CHAN NEL VIEW screen press the DIRECT OUT popup button to access the INSERT DIRECT OUT popup win...

Страница 96: ...ssigned to each DCA group or mute group B DCA buttons 1 8 These buttons select the DCA group s to which this channel is assigned To assign the channel to a DCA group turn on the desired DCA button 1 8 multiple selections are allowed To check the channels that are assigned to each DCA group press the DCA popup button to open the DCA MUTE GROUP ASSIGN MODE popup window For details on the popup windo...

Страница 97: ...ultaneously con trol a set of up to eight input channels output channels or DCA groups Use the navigation keys of the NAVIGATION KEYS section to select the channels that will be controlled When you press one of the navigation keys in the NAVIGATION KEYS section the channels DCA groups corresponding to that key will be assigned to the Centralogic section and can be controlled using the faders ON ke...

Страница 98: ...UE keys will control the up to eight channels shown in the OVER VIEW screen The OVERVIEW screen contains the following items 1 Channel number Channel name field This shows the number name and icon for the up to eight channels selected for control in the OVERVIEW screen B HA PHASE field input channels only For input channels that have a rear panel input jack or external head amp device e g Yamaha A...

Страница 99: ... the STEREO bus or the left right volume balance if the send source is stereo To adjust the value press the knob to select it and operate multifunction encoders 1 8 K DCA MUTE GROUP field This shows the DCA group input channels only and mute group to which each channel belongs L Channel number Channel name field This shows the number channel name and icon for the up to eight channels that are curr...

Страница 100: ...al head amp device e g Yamaha AD8HR SB168 ES is patched you can use the HA PHASE field of the OVERVIEW screen to control the head amp The HA PHASE field includes the following items 1 GAIN knob This indicates the gain of the head amp assigned to the channel To adjust the value press the knob to select it and operate multifunction encoders 1 8 B 48V This indicates the phantom power on red or off bl...

Страница 101: ...ch channel When you press the EQ graph field the ATT HPF EQ popup window 1 ch will appear In this window you can use the on screen buttons and the multifunction encoders to control all of the ATT HPF EQ parameters For details on the popup window p 115 Making Dynamics 1 2 settings In the OVERVIEW screen you can use the DYNAMICS 1 DYNAMICS 2 fields to make Dynamics 1 2 settings for each channel Thes...

Страница 102: ...ey will adjust the volume balance of the left and right channels sent to the two buses B TO MIX SEND ON OFF button These are on off switches for the signal sent from the input channel to the MIX buses These buttons are shown only when the send source is an input channel and the send destination is a FIXED type MIX bus To switch the on off status of the signal sent from the channel to VARI type MIX...

Страница 103: ...ndicator will light if any of the level detection points in each channel reach the OVER level C ST MONO indicator INPUT ST IN and MIX channels only This indicates the on off status of the signal sent from that channel to the STEREO L R bus and MONO C bus To switch this on off press the selected knob once again to open the TO STEREO MONO popup window If an INPUT ST IN or MIX channel is set to LCR m...

Страница 104: ...selected in step 2 will light The lit status indicates that the correspond ing channels can be controlled in the OVERVIEW screen and by the multifunction encoders The following illustration shows the example of when the DCA groups are fixed to the Centralogic section and INPUT channels 1 8 are controlled in the OVER VIEW screen 3 As desired use the navigation keys to switch the group of eight chan...

Страница 105: ...ort assigned to each output channel The window includes the follow ing items Changing the output patch settings OMNI OUT jacks 1 12 MIX channels 1 12 OMNI OUT jacks 13 14 MATRIX channels 1 2 OMNI OUT jacks 15 16 STEREO channel L R 2TR OUT DIGITAL jack STEREO channel L R Slot 1 output channels 1 8 MIX channels 1 8 Slot 1 output channels 9 16 MIX channels 1 8 Slot 2 output channels 1 8 MIX channels ...

Страница 106: ...y the out put port that will be assigned to that channel If the output port select buttons are not shown at the bottom of the window press the PATCH tab 4 Use the navigation keys and the SEL keys to switch the output channels being con trolled and specify their output ports in the same way 5 When you have finished making settings press the symbol located in the upper right to close the window You ...

Страница 107: ...ur rent value is shown immediately below the knob I Level meter This meter indicates the level of the signal assigned to the output port J Output port select tabs These tabs switch the output ports controlled in the popup window in groups of up to eight ports 3 Use the output port select tabs at the bot tom of the popup window to select the out put port you want to control Each tab corresponds to ...

Страница 108: ...signed to each input channel PATCH NAME popup window PATCH 1 Input port button This indicates the currently selected input port If you press this button when selecting an icon or changing the channel name you will return to the input port select screen B Icon button This indicates the icon selected for that channel When you press this button a screen will appear in which you can select an icon or ...

Страница 109: ...ort to the currently selected input channel F Tabs Use these tabs to switch between thems 3 Access the input port selection screen of the PATCH NAME popup window and use the input port select tabs and input port select buttons to select an input port 4 When you have finished making settings press the symbol located in the upper right to close the window You will return to the OVERVIEW screen 5 Rep...

Страница 110: ...the ON key as the insert out in position C INSERT IN HA field M7CL 48ES only This field appears if the OMNI IN jack is used as insert in and enables you to turn on or off the phan tom power to the OMNI IN jack and to set the HA gain D INSERT OUT popup button This indicates the output port that is selected as the insert out for this channel Press this button to open a popup window where you can sel...

Страница 111: ...ndow will appear allowing you to select the input port used for insert in Each tab corresponds to the following input ports OMNI M7CL 48ES only OMNI IN jacks 1 8 will be displayed SLOT 1 SLOT 3 Input channels 1 16 of slots 1 3 will be displayed RACK Output ports to rack 1 8 will be dis played 7 Specify the input port you will use for insert in and press the CLOSE button 8 Press the INSERT ON OFF b...

Страница 112: ...e the following items INSERT DIRECT OUT popup window 1ch 1 Icon Channel number Channel name This indicates the icon selected for that channel the channel number and the channel name B DIRECT OUT field Here you can make settings for direct output Press a field to select PRE HPF before the HPF PRE EQ after the attenuator PRE FADER before the fader or POST ON after the ON key as the position for dire...

Страница 113: ... the following output ports ES M7CL 48ES EtherSound output channels 1 24 will be displayed OMNI OMNI OUT jacks 1 16 1 8 on the M7CL 48ES will be displayed SLOT 1 SLOT 3 Output channels 1 16 of slots 1 3 will be displayed B Output port select buttons These buttons assign the output port used for direct output of the currently selected INPUT channel 5 Use the output port select tabs and the out put ...

Страница 114: ...M7CL Owner s Manual 114 ...

Страница 115: ...The EQ field shows the response of the EQ In this OVERVIEW screen you can use the EQ encoders of the SELECTED CHANNEL section to edit the param eter settings 2 If you want to edit while watching the ATT HPF EQ parameter values press the EQ field in the OVERVIEW screen to access the ATT HPF EQ popup window In the ATT HPF EQ popup window you can edit the EQ and high pass filter parameters and switch...

Страница 116: ...e multifunction encoder 2 to adjust the cutoff frequency in a range of 20 600 Hz K Q FREQUENCY GAIN knobs These knobs adjust the Q FREQUENCY center fre quency and GAIN amount of boost cut for each band LOW LOW MID HIGH MID and HIGH Press a knob to select the band you want to control and use multifunction encoders 3 8 to make adjust ments L High pass filter button output channels only If this butto...

Страница 117: ...t channel operate the HPF knob or HPF ON OFF button in the ATT HPF EQ popup window Input channels provide a high pass filter that is inde pendent of the four band EQ The HPF ON OFF but ton switches the high pass filter on off and the HPF knob adjusts the cutoff frequency 5 If you want to copy EQ settings to another channel or initialize the EQ settings use the tool buttons of the ATT HPF EQ popup ...

Страница 118: ... the corresponding channel is stereo a ST IN channel a MIX MATRIX channel set to stereo or the STEREO channel level meters for two channels are displayed D DYNAMICS ON OFF button Turns the dynamics on off E KEY IN CUE button only for GATE and DUCKING This button cue monitors the currently selected key in signal F THRESHOLD knob This specifies the threshold at which the dynamics will begin operatin...

Страница 119: ...tor showing the open closed state of the gate is shown C Dynamics graph This mini graph displays the approximate response of the dynamics processor D THRESHOLD knob This specifies the threshold at which the dynamics processor will begin operating You can use multifunc tion encoders 1 8 to control this E DYNAMICS ON OFF button This turns the dynamics processor on off DYNAMICS 1 2 popup window ALL T...

Страница 120: ... PRE EQ The pre EQ attenuator signal of the cur rently selected input channel SELF POST EQ The post EQ signal of the currently selected input channel CH 1 48 POST EQ STIN 1L 1R 4L 4R POST EQ The post EQ signal of the corresponding input channel 1 MIX OUT 13 16 The post ON signal of the corresponding MIX channel SELF PRE EQ The pre EQ attenuator signal of the cur rently selected output channel SELF...

Страница 121: ...an input channel s Dynamics 1 and Dynamics 2 and an output channel s Dynamics 1 Types that cannot be selected cannot be recalled To recall an item from the dynamics library press the LIBRARY tool button in the DYNAMICS 1 2 popup window For details on using the library refer to Using libraries p 35 Using the EQ or Dynamics libraries EQ library Library button You can recall 199 different settings ea...

Страница 122: ...M7CL Owner s Manual 122 ...

Страница 123: ... keys 1 12 to mute unmute multiple channels in a single operation You can use this to cut out multiple channels simultaneously Mute groups 1 8 can be used with both input channels and output channels Both types of channel can exist in the same group This section explains how to assign input channels to the eight DCA groups and use the faders of the Centralogic section to control them To assign a c...

Страница 124: ...e DCA MUTE GROUP field of the OVERVIEW screen indi cates the DCA group s to which each channel is assigned Numbers that are lit yellow in the upper line of this field indicate the DCA groups to which that channel belongs Selecting the DCA groups to which a specific channel will belong 1 Press a SEL key to select the input chan nel for which you want to make assign ments 2 Press any one of the enco...

Страница 125: ... the Centr alogic section will be controlling the DCA groups 4 Operate the Centralogic section fader cor responding to the DCA group you want to use The level of the channels assigned to that DCA group will change while preserving the level differences you established in step 1 5 To switch a DCA group on off press the Centralogic section ON key for that DCA group When you press a Centralogic secti...

Страница 126: ...the mute groups For more about mute safe refer to Using the Mute Safe function p 129 E CLEAR ALL button You can press this button to clear the channels that are assigned to the mute groups 3 Use the MUTE GROUP 1 8 buttons to select the mute group to which you want to assign channels 4 Press the SEL key of the input channels output channels you may select more than one that you want to assign The S...

Страница 127: ... select buttons to select the mute group s to which the currently selected channel will be assigned multiple selections are allowed 4 Select the mute group s for other channels in the same way To use mute groups you must first assign the Mute On Off function for a mute group 1 8 to a user defined key and then operate that user defined key 1 In the function access area press the SETUP button to acc...

Страница 128: ...o close the SETUP screen 9 To mute a mute group press the user defined key 1 12 that s assigned to the desired mute group The LED of the user defined key will light and all channels belonging to the selected mute group will be muted At this time the ON key of the muted chan nels will blink You can turn on more than one user defined key to mute multiple mute groups 10To defeat muting of a mute grou...

Страница 129: ...button This lets you select the channels that will be set to Mute Safe status 3 Press the MUTE SAFE button 4 Press a SEL key to select the channel s you want to exclude from mute groups multiple selections are allowed The SEL key will light and the corresponding chan nel in the channel display field of the window will be highlighted in green You can cancel the Mute Safe status by pressing a lit SE...

Страница 130: ... access area press the CH JOB button 2 Press the CH LINK button to open the CH LINK MODE popup window In this popup window you can view the channels that are linked and specify the parameters that will be linked The window includes the following items 1 Channel display field When you create a link group the corresponding channels will be highlighted If there are two or more link groups each group ...

Страница 131: ...t to MATRIX buses FADER button Fader operations CH ON button ON key operations MX 1 16 buttons MIX buses 1 16 MT 1 8 buttons MATRIX buses 1 8 If you link Dynamic 1 and 2 for two or more input channels the parameter values will be linked but the key in signals are not linked For more about dynamics refer to Using dynam ics p 118 If you turn on the EQ button or DYNAMICS 1 2 button library recall ope...

Страница 132: ...ameters that will be copied You may turn both buttons on if desired If both buttons are on the following parameters will be copied MODULE PARAMETERS button All parameters of the copy source channel SENDS button On off status and send level settings of the send signals sent to the copy source channel D COPY Executes the copy 3 To select the copy source channel press the corresponding SEL key to mak...

Страница 133: ...annel that is shown C MOVE Executes the move 3 To select the move source channel press the corresponding SEL key to make it light The corresponding channel is highlighted in the SOURCE CH field of the window When you select the move source channel the DES TINATION CH field will automatically be embold ened allowing you to select the move destination If you want to re select the move source channel...

Страница 134: ...ld to cancel the selected channel B CLEAR Executes the initialization 3 To select the channel s to be initialized press the corresponding SEL key to make it light multiple selections are allowed The corresponding channel s is are highlighted in the TARGET CHs field of the window If you want to de select all of the selected channels press the TARGET CHs field 4 To execute the initialization press t...

Страница 135: ...nals sent to MIX buses On off status and send level of signals sent to MATRIX buses DCA group settings Mute group settings Channel link settings This section explains how to store and recall the M7CL s mix parameters as scenes To store the current mix settings as a scene memory you can either use the keys of the top panel SCENE MEM ORY MONITOR section or use the SCENE LIST win dow Using the keys o...

Страница 136: ...Y STORE key or the STORE button located in the lower part of the SCENE STORE popup window The SCENE STORE popup window will close and a dialog box will ask you to confirm the Store operation 6 To execute the Store operation press the OK button The current mix settings will be stored to the scene number you selected in step 2 When storing is com pleted the scene number in the function access area w...

Страница 137: ...le or comment to the scene 5 Assign a title or comment to the scene as desired For details on entering text refer to Entering names p 34 6 Press the STORE button located at the bot tom of the SCENE STORE popup window The SCENE STORE popup window will close and a dialog box will ask you to confirm the Store operation 7 To execute the Store operation press the OK button The current mix settings will...

Страница 138: ...selected in the scene list C RECALL UNDO button This button cancels Undo or re executes Redo the most recently performed scene Recall operation D Scene select knob This knob lets you rapidly select the desired scene number You can use any of the multifunction encoders to operate this knob 2 Turn one of the multifunction encoders to select the recall source scene number 3 Press the RECALL button A ...

Страница 139: ...his window includes several pages which you can switch between using the tabs located at the bottom of the window 3 Press the USER DEFINED KEYS tab to select the USER DEFINED KEYS page The USER DEFINED KEYS page lets you assign functions to user defined keys 1 12 4 Press the popup button for the user defined key to which you want to assign a function The USER DEFINED KEY SETUP popup window will ap...

Страница 140: ...rotect sym bol By pressing this area for scenes 001 300 you can switch between protected and un protected settings E Scene select knob This knob selects a scene number shown in the scene list You can use any of the multifunction encoders to operate this knob In addition you can select multiple scenes by pressing the multifunction encoder while you turn it F MULTI SELECT button You can select multi...

Страница 141: ...order of scene number B TITLE Sorted in numeric alphabetical order of title C COMMENT Sorted in numeric alphabetical order of comment D TIME STAMP Sorted in order of date of creation 5 If you want to edit the title or comment of a scene press the TITLE field or COMMENT field of the scene to access the SCENE TITLE EDIT or SCENE COMMENT EDIT popup window For details on entering text refer to Enterin...

Страница 142: ...n to the state prior to editing the scene 2 Perform the desired editing operation For details on the procedure refer to the following explanations Here s how to copy a scene into buffer memory and then paste it to a different scene number 1 Press the SCENE field in the function access area The SCENE LIST window will appear 2 Turn any one of the multifunction encoders to select the copy source scen...

Страница 143: ...ss the CLEAR button A dialog box will ask you to confirm the Clear opera tion 3 To execute the Clear operation press the OK button The scene number s you selected in step 2 will be cleared If you decide to cancel the Clear operation press the CANCEL button instead of the OK button Be aware that when you paste to a scene number in which a scene has already been stored the existing scene will be ove...

Страница 144: ...num ber and then press the INSERT button A dialog box will ask you to confirm the Insert opera tion 4 To execute the Insert operation press the OK button The scene stored in the buffer memory will be insert at the scene number you selected in step 3 If you selected multiple scenes as the insert destination the same scene will be inserted multiple times starting at the scene number you selected Sce...

Страница 145: ...the Global Paste INPUT Input channels and parameters OUTPUT Output channels and parameters RACK RACK 1 8 PATCH NAME Input output patching and channel names Using the Global Paste function The Global Paste function can be used only by users for whom SCENE LIST STORE SORT is turned on in their user level set tings NOTE ALL All input channel parameters except INPUT PATCH and INPUT NAME HA Settings fo...

Страница 146: ...d TO Use multi function encoder 7 to select FROM and multi function encoder 8 to select TO 6 Press the PASTE button The selected items of the current scene will be pasted to the scene s in memory A progress bar will be shown while the Paste opera tion is being performed The STOP button is shown while the Paste function is being executed you can stop by pressing this button In this case the Paste f...

Страница 147: ... button 5 Recall a scene for which you ve made Focus settings If buttons other than ALL are turned on for the scene only the parameters whose buttons are on will be recalled If the ALL button is turned on for the scene all parameters will be updated Using the Focus function As a function similar to Focus there is also a Recall Safe function that lets you select channels and parameters to be exclud...

Страница 148: ...L keys of the DCA groups the parameters for DCA groups 1 8 will be shown simultaneously E APPLY TO ALL INPUT button APPLY TO ALL OUTPUT button If these buttons are on when you operate the SAFE PARAMETER SELECT buttons the changes will apply to all input or output channels This is conve nient when you want to make settings for all channels together 3 To select the channel or DCA group whose Recall ...

Страница 149: ... PATCH Insert patching DIRECT OUT Direct out settings MIX SEND Send levels of signals sent to MIX buses MIX ON On off status of signals sent to MIX buses MATRIX SEND Send levels of signals sent to MATRIX buses MATRIX ON On off status of signals sent to MATRIX buses FADER Fader positions CH ON On off status of ON keys Button name Corresponding parameters ALL All parameters ATT Attenuator settings E...

Страница 150: ...link group or one of two channels set to stereo the parameter settings of that channel may differ from those of the other channel s In such cases the applicable parameter will be auto matically re linked the next time it is operated Button name Corresponding parameters ALL All parameters except for WITH MATRIX SEND ATT Attenuator settings EQ EQ settings DYNA 1 Dynamics 1 settings INSERT Insert set...

Страница 151: ...ons switch the Fade function on off for each scene D Fade time These indicate the fade time the time over which the fader will reach the new value 3 Press the SET button to access the FADE TIME popup window In this popup window you can select the channel to which Fade will be applied and adjust the fade time 1 Channel display field The channels or DCA groups to which Fade is applied are highlighte...

Страница 152: ...occurs and will reach the values of the recalled scene over the course of the specified fade time The fade time you specify here is used for all channels and DCA groups selected in step 4 HINT Scenes for which Fade settings are made are shown by a FADING indication in the STATUS field of the SCENE LIST window HINT The Fade function settings can be applied individually even if faders are linked by ...

Страница 153: ...MONITOR OUT L R C channels If PHONES LEVEL LINK is ON this will also affect the level at the PHONES OUT jack MONITOR FADER Use the STEREO MASTER fader or MONO MASTER fader to adjust the output level of the MONITOR OUT L R C channels MONITOR FADER is positioned in serial with MONITOR LEVEL If PHONES LEVEL LINK is ON this setting will also affect the level at the PHONES OUT jack About the monitor cu...

Страница 154: ...onitoring B SOURCE SELECT field Use the buttons in this field to select the monitor source C DIMMER field The Dimmer function which temporarily attenuates the monitor signal can be switched on off here If you press the knob in this field so that it is enclosed by a heavy frame you can use multifunction encoder 4 to adjust the amount of attenuation D MONITOR FADER field This adjusts the monitor fad...

Страница 155: ...is in large auditoriums where there is a time difference between the monitor signal and the direct sound MONITOR DELAY knob Adjusts the delay time for the moni tor signal You can use multifunction encoder 6 to control this MONITOR DELAY ON button If this button is on the monitor sig nal will be delayed according to the setting of the MONITOR DELAY knob G MONO MONITOR button This button allows mona...

Страница 156: ...ng through headphones 10Make settings for Dimmer Delay and Mon aural as desired MIX 1 16 buttons Output signals of MIX channels 1 16 MTRX 1 8 buttons Output signals of MATRIX channels 1 8 STEREO L R button STEREO L R channel output signal MONO C button MONO channel output signal ST IN 1 4 buttons M7CL 32 48 ST IN jacks 1 4 input signals OMNI 1 2 7 8 buttons M7CL 48ES OMNI IN jacks 1 8 input signal...

Страница 157: ... CUE key or a CUE KEY IN CUE but ton in the screen belongs will take priority and the CUE keys of the previously selected group will be defeated However if you switch the Cue signal group in a specific order the state of the CUE keys of the previously selected group will be restored when the current Cue sig nal is defeated The following illustration shows the priority order of the CUE keys After y...

Страница 158: ...e of the following positions from which input channels will be cued PFL Pre Fader Listen button The pre fader signal will be output AFL After Fader Listen button The post fader signal will be output POST PAN button The post pan signal will be output PFL TRIM knob If PFL is selected you can adjust the output level of the cue signal in a range of 20 dB 10 dB You can operate this knob using multifunc...

Страница 159: ... last turned on will be monitored LAST CUE mode 4 Use the buttons and knobs of the INPUT field DCA field and OUTPUT field to spec ify the output position and output level for each Cue group Refer to the explanation for each item in step 2 and make the desired settings 5 Press the CUE key of a desired channel or DCA group to turn it on The Cue signal of the corresponding channel will be sent to the...

Страница 160: ... in the Meter field to clear all Cue selections If you press the CUE meter in the function access area all Cue selections will be cleared All Cue selections will be cleared if you switch between MIX CUE mode and LAST CUE mode in the CUE MODE section You can also assign the same function as the CLEAR CUE button to a user defined key p 216 HINT ...

Страница 161: ...flow of the talkback oscillator signals About the talkback and oscillator functions 48V MASTER 48V 48V 48V ON TALKBACK INPUT INPUT SELECT TALKBACK TALKBACK OSCILLATOR INPUT INPUT 1 32 48 ST IN 1L 4R TALKBACK GAIN INPUT 1 2 3 1 2 3 AD AD ON GAIN TRIM HA HA METER INPUT TB INPUT 1 32 48 ST IN 1L 4R METER 48V ST IN L 1 2 3 AD GAIN TRIM HA METER 48V 1 2 3 AD GAIN TRIM HA METER LEVEL Burst Noise METER H...

Страница 162: ...nt You can press this field to open the TALKBACK popup window E TALKBACK ON button Switches talkback on off 2 Press the popup button or the ASSIGN field to open the TALKBACK popup window In this popup window you can make detailed settings for talkback 1 TALKBACK IN field 48V button This is an on off switch for the phan tom power 48V supplied to the TALKBACK jack TALKBACK jack level This indicates ...

Страница 163: ...k signal will be sent multiple selections are allowed These buttons correspond to the following buses 6 To enable talkback press the TALKBACK ON button to turn it on The TALKBACK ON button will alternately turn on off each time you press the button Latch operation While talkback is on the signal from the TALKBACK jack and the selected INPUT jack will be output to the destination bus The PAD will b...

Страница 164: ...ff 2 Press the popup button or the ASSIGN field to open the OSCILLATOR popup window In this popup window you can make detailed settings for the oscillator 1 MODE field Press a button in this field to select the type of oscilla tor This operation can also be performed using the MODE button in the MONITOR screen B Parameter field Here you can adjust the parameters for the oscillator you selected in ...

Страница 165: ...lator signal will be sent to the bus you selected in step 5 When you press the button again the oscillator will turn off Oscillator type Parameters SINE WAVE 1CH LEVEL FREQ PINK NOISE LEVEL HPF LPF BURST NOISE LEVEL HPF LPF WIDTH INTERVAL Parameters Details LEVEL Oscillator output level FREQ Frequency of the sine wave output from the oscillator HPF High pass filter on off switch cutoff fre quency ...

Страница 166: ...M7CL Owner s Manual 166 ...

Страница 167: ...REO channel L R MONO channel This area indicates the output levels and fader values of the STEREO channel L R and MONO channel Operating the corresponding fader will change the value in realtime D INPUT channels This area indicates the input levels and fader values of the INPUT channels Operating the corresponding fader will change the value in realtime E ST IN channels This area indicates the inp...

Страница 168: ... point select button to switch the metering point The metering point for the level meter can be specified independently for input channels and output channels You can choose the following metering points Input channels PRE HPF Immediately before the high pass fil ter PRE FADER Immediately before the fader POST ON Immediately after the ON key Output channels PRE EQ Immediately before the attenuator...

Страница 169: ...s OVER 3dB 6dB 9dB 12dB 15dB 18dB 24dB 30dB 40dB 50dB 60dB You can select the metering point the point at which the level is detected from the following choices To change the metering point refer to the preceding section Opera tions in the METER screen p 168 PRE EQ Immediately before the attenuator PRE FADER Immediately before the fader POST ON Immediately after the ON key Using the MBM7CL meter b...

Страница 170: ...M7CL Owner s Manual 170 ...

Страница 171: ...the signal flow for the virtual racks About the virtual rack RACK IN PATCH MIX OUT 1 16 MATRIX OUT 1 8 STEREO OUT L R MONO C STEREO INSERT OUT L R MONO C MATRIX INSERT OUT 1 8 CH INSERT OUT 1 32 48 MIX INSERT OUT 1 16 RACK1 IN RACK2 IN RACK3 IN RACK4 IN RACK5 IN RACK6 IN RACK7 IN RACK8 IN A L B R A L B R A L B R A L B R A L B R A L B R A L B R A L B R CH INSERT IN 1 32 48 MIX INSERT IN 1 16 STEREO...

Страница 172: ...to the rack shown at the right E INPUT button This button displays the OUTPUT CH SELECT popup window where you can select the input source for the rack F Virtual rack This area shows eight virtual racks in which GEQ or effects can be mounted Racks 1 4 are only for GEQ and either GEQ or effects can be mounted in racks 5 8 However depending on the effect type some can be mounted only in rack 5 or 7 ...

Страница 173: ...patching will be defeated when you change the item mounted in a rack HINT Be aware that if you remove a GEQ or effect that was mounted in a rack and close the window all parameter set tings for that GEQ or effect will be discarded If you have not yet closed the window you can recover the parameter set tings by mounting the same GEQ or effect once again NOTE You can also display the RACK MOUNTER po...

Страница 174: ...all Safe refer to Using the Recall Safe function p 148 Tab name Button name Output source CH 1 32 1 CH 1 32 INPUT channel 1 32 inputs CH 33 48 M7CL 48 48ES only 1 CH 33 48 INPUT channel 33 48 inputs STIN 1 STIN 1L 1R 4L 4R ST IN channel 1 4 inputs CH 1 32 INSERT IN CH 1 32 INPUT channel 1 32 Insert In CH 33 48 INSERT IN M7CL 48 48ES only CH 33 48 INPUT channel 33 48 Insert In OUT CH INSERT IN MIX ...

Страница 175: ...utput If you mount a Flex15GEQ in each rack you ll be able to use up to sixteen GEQ units simultaneously The M7CL s GEQ units can be patched to the insert in out of any channel except the ST IN channels Here s how to insert a GEQ into the selected channel for use 1 As described in Virtual rack operations p 172 steps 1 6 mount a GEQ in a rack and set its input source and output destina tion The rac...

Страница 176: ...using a stereo source link the two GEQ units You will be able to use the GEQ LINK button if you have selected a 31BandGEQ or Flex15GEQ for adja cent odd numbered even numbered racks When you turn this button on the following popup window will appear To enable linking press any button other than CANCEL The popup window contains the following items 1 GEQ x y button x and y are the rack number or the...

Страница 177: ...EQ units in adjacent odd num bered even numbered racks will be linked H FLAT button This returns all bands of the currently selected GEQ to 0 dB I GEQ ON OFF button Switches the currently selected GEQ on off 3 Press the GEQ ON OFF button to turn on the 31BandGEQ 4 Press one of the buttons in the FADER ASSIGN field to select the group of bands you will control using the Centralogic sec tion s fader...

Страница 178: ...Flex15GEQ The GEQ popup window for GEQ A or GEQ B will appear 1 EQ graph This indicates the approximate response of the current Flex15GEQ settings B Faders These faders indicate the amount of boost cut for each band of the Flex15GEQ The actual values are shown in the numerical boxes below C FADER ASSIGN field In this field you can select the group of bands that will be controlled by the faders AVA...

Страница 179: ...bands to the flat position before you can operate any other band 6 Repeat steps 4 and 5 to adjust up to fifteen bands 7 When you ve finished making settings turn off the buttons of the FADER ASSIGN field The faders and ON keys of the Centralogic section will return to their previous function 8 If you want to copy the currently displayed Flex15GEQ settings to the Flex15GEQ of another rack or to ini...

Страница 180: ...ernal effects fall into two categories STEREO type 2 in 2 out effects that process the L R channel input signals independently and MIX type 1 in 2 out effects that mix the two channels before processing them If signals are assigned to both the L and R inputs of an effect the way in which the L R channels are processed will depend on whether a Stereo effect type or a Mix effect type is selected as ...

Страница 181: ...he rack in the same way 4 Press the rack in which you mounted the effect The EFFECT popup window will appear allowing you to edit the parameters of the effect 1 INPUT L R buttons These buttons display the OUTPUT CH SELECT popup window The operating procedure is the same as for the INPUT button in the GEQ EFFECT field B OUTPUT L R buttons These buttons display the INPUT CH SELECT popup window The o...

Страница 182: ...u press the selected knob once again the MIX SEND popup window 8 ch for the send destination MIX bus will appear This popup window contains on off switches for the signals sent from each channel to the corresponding bus and lets you select the send point PRE or POST p 70 9 To adjust the master level of the effect send call up the MIX channel you specified as the input source of the rack in step 2 ...

Страница 183: ... is now assigned to the L output of the effect If you are inserting in a channel that handles a stereo source assign the R channel insert out insert in to the R input output 4 Use the navigation keys to access the OVERVIEW screen for the channel in which you want to insert the effect 5 Press the INSERT DIRECT OUT field to access the INSERT DIRECT OUT popup window Make sure that the rack you insert...

Страница 184: ...rack A rack in which an effect is mounted will show the following information 1 Effect title type This shows the effect title the name of the type that is used and a graphic The number of input output chan nels 1 IN 2 OUT or 2 IN 2 OUT of this effect is also shown B Input output meters These indicate the level of the signals before and after the effect 2 Press the rack in which the effect you want...

Страница 185: ...ew effect type to select it 4 To edit the effect parameters press a knob in the effect parameter field to select it and turn the corresponding multifunction encoder 5 Edit the settings in the special parameter field as necessary For some effect types parameters such as the follow ing will appear in the special parameter field TEMPO This is shown if a tempo type or modulation type effect is selecte...

Страница 186: ...an do so using the tool buttons at the top of the popup window For details on how to use these buttons refer to Using the tool buttons p 35 Tap tempo is a function that lets you specify the delay time of a delay effect or the modulation speed of a modu lation effect by striking a key at the desired interval To use the Tap function you must first assign Tap Tempo to a user defined key and then oper...

Страница 187: ...effects and can be used to specify the delay time or modulation speed 9 Set the SYNC parameter to ON 10At the desired tempo repeatedly press the user defined key to which you assigned the Tap Tempo function The average interval BPM at which you press the key will be calculated and that value will be reflected by the BPM parameter User defined keys popup buttons If you specify CURRENT PAGE in the P...

Страница 188: ...EC button C Progress bar 5 To begin recording sampling press the REC button and then press the PLAY but ton The signal being input to the effect will be recorded The progress bar shows the current recording location When a fixed time has elapsed the buttons will auto matically turn off 6 To play back the recorded sample press the PLAY button Using the Freeze effect Effect types FREEZE and HQ PITCH...

Страница 189: ...and recall effect settings 199 items can be recalled from the effect library Library items 1 54 are read only presets and correspond to effect types 1 54 respectively Library items 55 57 are reserved for use by the system Other library item numbers can be freely read and written To recall an item from the effect library press the LIBRARY button located in the upper part of the window when the EFFE...

Страница 190: ...AD8HR s DIGITAL OUT A or B to an I O card installed in a slot of the M7CL 32 48 Alternatively you can use a daisy chain connection to remotely control multiple AD8HR units simultaneously To do this connect the AD8HR s HA REMOTE 2 connec tor to the second AD8HR s HA REMOTE 1 connector If you use three Yamaha MY16 AE units you can connect up to six AD8HR units Using an external head amp Connecting t...

Страница 191: ... to the NAI48 ES s AES EBU connector The signals from the NAI48 ES to the M7CL 48ES are sent via EtherSound connection Alternatively you can use a daisy chain connection to remotely control multiple AD8HR units simultaneously To do this connect the AD8HR s HA REMOTE 2 connec tor to the second AD8HR s HA REMOTE 1 connector If you use the NAI48 ES you can connect up to six AD8HR units Connecting the...

Страница 192: ...an use a daisy chain or ring connection and install two MY16 EX expansion cards in the slots on the M7CL 32 48 to remotely control up to three SB168 ES units simultaneously Daisy chain connection Ring connection Connecting the M7CL 32 48 to the SB168 ES M7CL 32 48 SB168 ES SB168 ES SB168 ES OUT HA REMOTE connector MY16 ES64 Audio signals Remote signals IN OUT IN IN OUT REMOTE connector MY16 EX MY1...

Страница 193: ...is mounted its settings GAIN setting phantom power and HPF on off are shown When you press a rack the EXTERNAL HA popup window for that rack will appear D EXTERNAL HA PORT SELECT popup button M7CL 32 48 This button accesses the EXTERNAL HA PORT SELECT popup window where you can specify the input ports to which the external HA mounted in the rack will be connected E Field select tabs Use these tabs...

Страница 194: ...ediate right of the knob indicates the input level for the corresponding port D FREQUENCY knobs HPF buttons These controls switch the external HA s built in high pass filter on off and adjust its cutoff frequency If you press the FREQUENCY knob to select it you ll be able to adjust it using the corresponding multifunction encoder E Rack select tabs These tabs switch the rack that is displayed in t...

Страница 195: ...ed to the exter nal HA With these settings the external HA can be used in the same way as the M7CL s own HA For details on the HA PATCH popup window refer to Making HA Head Amp settings p 61 HA PHASE field Input port popup button External HA settings are saved as part of the scene How ever the phantom master setting is an exception to this When you adjust the brightness of the M7CL s panel LEDs th...

Страница 196: ...M7CL Owner s Manual 196 ...

Страница 197: ...vents can be executed when control change messages are received from an external device This allows you to record fader and key operations on a MIDI sequencer or other external device and play them back later Parameter change SysEx transmission and reception When specific events fader encoder or key operations changes in system settings or user settings are executed parameter change system exclusi...

Страница 198: ...ton Opens the MIDI SETUP popup window where you can select the MIDI message transmission Tx and reception Rx channels D PROGRAM CHANGE field Here you can make settings for program change trans mission and reception Tx button Switches program change transmis sion on off Rx button Switches program change recep tion on off ECHO button This selects whether incoming pro gram changes are echoed out from...

Страница 199: ...will be used to transmit or receive each type of MIDI mes sage press the transmit Tx or receive Rx port select popup button The MIDI SETUP popup window for selecting the port will appear Operations in this window are the same for both transmission Tx and reception Rx and include the following items 1 TERMINAL field Select the port that will transmit or receive MIDI mes sages You can choose from th...

Страница 200: ...executed when a program change message is received from an external device 1 Connect the M7CL to your external device The following illustration shows an example of using the MIDI IN OUT connectors to transmit and receive MIDI messages 2 In the function access area press the SETUP button to access the SETUP screen 3 In the center of the screen press the MIDI button to access the MIDI popup window ...

Страница 201: ...b This knob scrolls the contents of the list You can use multifunction encoder to control this 6 Use the buttons of the PROGRAM CHANGE MODE field to select the program change transmission reception mode You can select one of the following two program change transmission reception modes Multi mode when the MULTI button is on Program changes of all MIDI channels will be trans mitted and received The...

Страница 202: ...RAM CHANGE popup window 10Assign events to other program numbers in the same way With these settings executing the specified event on the M7CL will cause the corresponding program change or bank select program change message to be transmitted to the external device When an external device transmits a program change or bank select program change message on the appropriate channel the event assigned...

Страница 203: ...ived as described in Basic MIDI settings p 198 5 Press the CONTROL CHANGE tab to access the CONTROL CHANGE page In the CONTROL CHANGE page you can specify how control changes will be transmitted and received and assign the event fader encoder operation ON key on off operation etc assigned to each control number This page includes the following items 1 CONTROL CHANGE field Here you can switch contr...

Страница 204: ... 2 field In conjunction with the MODE field this specifies the type of event 9 In the order of the MODE field PARAME TER 1 field PARAMETER 2 field specify the type of event you want to assign Use the buttons to select an item Press the OK button to confirm the change and close the MIDI CONTROL CHANGE popup window 10Assign events to other control numbers in the same way When you operate the paramet...

Страница 205: ...5 Use the Tx button and Rx button of the PARAMETER CHANGE field to turn on parameter change transmission reception In this state when you operate specific parameters on the M7CL the corresponding parameter change mes sages will be transmitted If valid parameter change messages are transmitted from an external device the parameters assigned to those parameter changes will be controlled Using parame...

Страница 206: ...M7CL Owner s Manual 206 ...

Страница 207: ...e with each other output settings etc can be locked to prevent unintended operations Preferences of each operator can easily be switched There are three types of user as follows In order to operate the M7CL you must log in as a user Administrator This is the administrator of the M7CL and can use all of its functionality Only one set of Administrator settings is maintained inside the M7CL The Admin...

Страница 208: ...ord can be up to eight characters If the two passwords that were entered match the Administrator password will be set For details on entering a password refer to Entering names p 34 Logged in user User defined keys and preferences editing User Level setting Password setting Comment editing User authentication key USB storage device Create new Overwrite save Administrator Available can edit Adminis...

Страница 209: ... off and user rights press the CREATE button If you are logged in as the Administrator the user authentication key will be saved on the USB storage device If you are logged in as a Power User a dialog box will ask you to confirm the store destination USB storage device If you want to save the user authentication key on a different USB storage device connect the desired USB storage device and then ...

Страница 210: ...een 3 Press the log in button to open the LOGIN window 4 Press the LOAD button for EXTERNAL USER KEY The SAVE LOAD popup window will appear and the files and directories saved on the USB storage device will be displayed User authentication keys have a file name of User name M7U 5 Turn multifunction encoder to select the user authentication key for the user as whom you want to log in For details on...

Страница 211: ...r logs out The Guest account does not have a password 1 In the function access area press the SETUP button to access the SETUP screen 2 Press the PASSWORD CHANGE button A keyboard window will appear allowing you to enter a password 3 Enter the current password and press the OK button For details on entering a password refer to Entering names p 34 When you enter the correct password a keyboard win ...

Страница 212: ...ver write save the user authentication key 4 Press OK to overwrite save the user authentication key Here s how to view or change the user level For the Administrator There is no such setting for the Administrator himself but the setting for the Guest account can be changed For the Guest The setting of the Guest account can be viewed It cannot be changed For a normal User The setting of that User a...

Страница 213: ...NPUT PATCH NAME Operations for input channel patch ing and names will be restricted OUTPUT PATCH NAME Operations for output channel patching and names will be restricted BUS SETUP Operations for bus setup will be restricted RACK 1 8 Operations for the racks 1 8 will be restricted However there will be no restriction on operating the MIDI CLK button displayed for delay type and modu lation type eff...

Страница 214: ... is already patched C ERROR MESSAGE Here you can select whether a warning will be dis played when the following problems occur DIGITAL I O ERROR This appears if a sync error is detected in the digital input output MIDI I O ERROR This appears if an error is detected in MIDI transmission reception D PANEL OPERATION These buttons let you turn on off options related to panel operations You can select ...

Страница 215: ...g the SCENE MEMORY key will select the next lowest numbered scene Key presses will increment decrement the scene number LIST UP DOWN Pressing the SCENE MEMORY key will scroll the list upward and pressing the SCENE MEMORY key will scroll the list downward The up down key corresponds to the direction in which the list will scroll LIST ORDER This specifies the order in which scene memories and librar...

Страница 216: ... shown below the corresponding button If nothing is assigned to the but ton an indication of is shown 4 Press the button for the user defined key to which you want to assign a function The USER DEFINED KEY SETUP window will appear In this window you can select a function to assign to the user defined key and select option parameters 5 Make sure that the FUNCTION field is enclosed by a yellow frame...

Страница 217: ...OLE LOCK screen will appear the Con sole Lock function will be enabled and all controls except MONITOR LEVEL knob will become inopera ble 1 In the CONSOLE LOCK screen press the UNLOCK button If you are logged in as a user for whom no password is set the console will be unlocked If you are logged in as a user for whom a password is set a keyboard window will appear allowing you to enter the passwor...

Страница 218: ...racters and press the SAVE button When the file has finished being saved the popup window showing the save progress indication and the type of data will close Using a USB storage device to save load data Operation is guaranteed only with USB flash memory The operation of storage media with capacities of up to 16GB has been verified However this does not necessarily guarantee the operation of all U...

Страница 219: ... or turn multifunc tion encoder on the panel The highlighted line in the file list indicates the file that is selected for operations 4 Press the LOAD button and a confirmation dialog box will appear 5 Press the OK button to begin loading the file When the file has finished being loaded the popup window showing the progress indication and the type of data will close Even if you cancel during this ...

Страница 220: ...cted for operations Using Internal HA Using External HA via Slot INPUT 1 16 SLOT1 IN 1 16 INPUT 17 32 SLOT2 IN 1 16 INPUT 33 48 SLOT3 IN 1 16 ST IN 1L 4R ST IN 1L 4R SLOT1 IN 1 16 INPUT 1 16 SLOT2 IN 1 16 INPUT 17 32 SLOT3 IN 1 16 INPUT 33 48 TALKBACK TALKBACK OMNI OUT 1 16 SLOT1 OUT 1 16 SLOT1 OUT 1 16 OMNI OUT 1 16 SLOT2 OUT 1 16 SLOT2 OUT 1 16 SLOT3 OUT 1 16 SLOT3 OUT 1 16 2TR DIGITAL OUT 2TR D...

Страница 221: ...be loaded Some setting data may not load depending on the USER LEVEL setting during the conversion operation Here s how you can perform editing operations such as sorting the files and directories on a USB storage device editing the file names or comments copying or pasting File editing 1 In the function access area press the SETUP button to access the SETUP screen 2 Press the SAVE LOAD button to ...

Страница 222: ...ou can operate this knob using multifunction encoder I SAVE button Saves all of the M7CL s internal settings together p 218 J LOAD button Loads the selected M7CL setting file p 219 K CREATE USER KEY button Creates a user authentication key p 209 L FORMAT button Formats media on the USB storage media p 224 3 Perform the desired editing operation For details on the procedure refer to the explanation...

Страница 223: ...oder to select the copy source file and press the COPY but ton The highlighted line in the file list indicates the file that is selected for operations 2 If necessary press the directory icon and change the directory To move to the next higher level press the arrow but ton in the PATH field 3 Press the PASTE button A keyboard window will appear allowing you to enter the file name For details on en...

Страница 224: ... of 4GB or larger will be formatted in FAT32 and storage media with a capacity of 2GB or smaller will be formatted in FAT16 1 In the function access area press the SETUP button to access the SETUP screen 2 Press the SAVE LOAD button to access the SAVE LOAD popup window 3 Press the FORMAT button A keyboard window will appear allowing you to enter the volume name that will be applied after formattin...

Страница 225: ...m 2 In the function access area press the SETUP button to access the SETUP screen 3 Press the SAVE LOAD button to access the SAVE LOAD popup window 4 To select the Help file extension xml you want to load press one of the Help files shown in the file list or turn multi function encoder on the panel 5 Press the LOAD button a confirmation dia log box will appear 6 Press the OK button to load the fil...

Страница 226: ... the text file The Help function is able to display the following text files character code sets languages Text files written in the ISO 8859 1 character code set English German French Spanish etc Text files written in the Shift_JIS character code set Japanese Text files of the above languages written in the UTF 8 character code set 2 In the function access area press the SETUP button to access th...

Страница 227: ...s in the tool bar button Scrolls to the chapter that precedes the currently displayed location button Returns to the preceding item in the history of links you pressed button Proceeds to the subsequent item in the history of links you pressed 6 To close the window press the Help button of the function access area or the button of the HELP popup window 1 Before you proceed load the Help file from y...

Страница 228: ...down the user defined key to which the Help function is assigned 10If the corresponding controller has an explanation associated with it the HELP popup window will appear and you will automatically scroll to the corresponding item If there are multiple explanations for the same control ler you can repeat step 9 to successively display these explanations 11To close the window once again press the u...

Страница 229: ...S HA field open This field enables you to switch the STAGE BOX SETUP function on and off p 242 G OUTPORT SETUP button Use this button to access the OUTPUT PORT popup win dow where you can make output port settings p 106 H MIDI button Use this button to access the MIDI popup window where you can make MIDI related settings p 198 I 48V MASTER ON OFF button This button switches the phantom master powe...

Страница 230: ...ck master and then set the remaining devices the word clock slaves so that they synchronize to the word clock master If you wish to use the M7CL as a word clock slave that is synchronized to the word clock supplied from an external device you must specify the appropriate clock source the port through which the word clock is obtained The following steps show how to select the clock source that the ...

Страница 231: ...is occurring normally between that device and the M7CL If the sampling frequency is close this status may be displayed even if not syn chronized LOCK BUT NOT SYNC ED yellow A valid clock is being input but is not synchronized with the selected clock source If an external device is connected to the corresponding connector input output cannot occur correctly between that device and the M7CL SRC ON g...

Страница 232: ...UP button to access the SETUP screen 2 In the SYSTEM SETUP field located in the center of the SETUP screen press the CAS CADE button to open the CASCADE popup window The CASCADE popup window contains the following items 1 Port select popup buttons These buttons access a popup window where you can select the input output port for each bus B CASCADE IN PATCH CASCADE OUT PATCH tabs These switch betwe...

Страница 233: ...ETUP screen press the CAS CADE button to open the CASCADE popup window 3 Press the CASCADE IN PATCH tab to access the CASCADE IN PATCH page 4 Press the port select popup button for the bus whose port you want to assign The INPUT PORT SELECT popup window will appear 5 Use the slot select tabs and port select but tons to select the desired slot and input ports and press the CLOSE button The port wil...

Страница 234: ...he MIX bus and MATRIX bus setting screens 3 Use the MIX BUS SETUP MATRIX BUS SETUP tabs to view either the MIX buses or the MATRIX buses 4 Use the buttons in the SIGNALTYPE field to specify whether each bus will function as STEREO main parameters will be linked for two adjacent odd numbered even num bered buses or MONOx2 use as two mon aural channels 5 Use the buttons of the BUS TYPE SEND POINT fi...

Страница 235: ...e stamp used when saving a scene 1 In the function access area press the SETUP button to access the SETUP screen 2 Press the DATE TIME button located in the bottom row of the SETUP screen to open the DATE TIME popup window The popup window includes the following items 1 DATE Specifies the date of the internal clock B TIME Specifies the time of the internal clock C DISPLAY FORMAT Specifies the form...

Страница 236: ...nnector on your computer use the LINK MODE buttons to select the specification of the network to which you will be connect ing 4 Press the knob in the screen to select it and use the top panel multifunction encod ers to specify the address If you are connecting the M7CL to your computer in a one to one connection we recommend that you make the following initial settings IP address 192 168 0 128 or...

Страница 237: ...ers SCREEN Adjusts the brightness of the touch screen PANEL Adjusts the brightness of the top panel LEDs If the optional MBM7CL meter bridge is installed this will also affect the LEDs of the meter bridge LAMP Adjusts the brightness of the lamps connected to the rear panel LAMP jacks 4 If desired switch between banks A B and make settings for the other bank in the same way Now you can switch betwe...

Страница 238: ...the INITIALIZE button A dialog box will ask you to reconfirm the operation 4 Press the OK button in the confirmation dialog box Initialization will begin 5 A message indicates that the initialization process is complete Press the EXIT button The M7CL will start up in normal operating mode Initializing the M7CL s internal memory The entire contents of memory will be lost if you initialize the inter...

Страница 239: ...l appear 4 Press the OK button in the dialog box A cross shaped cursor will appear in the screen 5 This cursor will appear a total of three times Press each location at which it appears 6 Press the EXIT button The M7CL will start up in normal operating mode Adjusting the detection point of the touch screen Calibration function When you cannot start calibration by touching press the SCENE MEMORY ke...

Страница 240: ...lem was detected at start up will already be selected 4 Press the START button A confirmation dialog box will appear 5 Press the OK button in the dialog box 6 Each of the specified faders will move to the target positions in the following sequence Manually move the fader to the correct positions 1 all the way down B 20 dB C 0 dB D 10 dB all the way up 7 When you ve adjusted the fader position pres...

Страница 241: ...cified analog input port in 0 1 dB steps OUTPUT PORT TRIM Fine adjustment of the output ports Access the OUTPUT PORT TRIM window and make fine adjustments to the gain of the specified analog output port in 0 01 dB steps SLOT OUTPUTTRIM Fine adjustment of the out put ports Access the SLOT OUTPUT TRIM window and make fine adjustments to the gain of the output ports of the specified slot in 0 01 dB s...

Страница 242: ... the M7CL 48ES or SB168 ES to start up with the settings made in AVS ESMonitor switch this button off B DAISY CHAIN RING buttons Use these buttons to switch to DAISY CHAIN daisy chain connection or RING ring connection setup according to the connection with the SB168 ES For more information on daisy chain and ring connec tions please refer to Connecting SB168 ES units to the M7CL 48ES using the ST...

Страница 243: ...write the modified data to Non Volatile Memory non volatile memory of the EtherSound module Changing the EtherSound settings from AVS ESMonitor M7CL 48ES If the AUTO CONFIGURE button has been turned on the Stage Box Setup function of the M7CL 48ES will take priority Thus the setting data written to non volatile memory will not affect either the M7CL 48ES or SB168 ES If you want to use the setting ...

Страница 244: ...M7CL Owner s Manual 244 ...

Страница 245: ...12 Syn Bass 2 PEAKING PEAKING PEAKING H SHELF G 2 5 dB 0 0 dB 1 5 dB 0 0 dB F 125 Hz 180 Hz 1 12 kHz 12 5 kHz Q 1 6 8 0 2 2 13 Piano 1 L SHELF PEAKING PEAKING H SHELF G 6 0 dB 0 0 dB 2 0 dB 4 0 dB F 95 0 Hz 950 Hz 3 15 kHz 7 50 kHz Q 8 0 0 90 14 Piano 2 PEAKING PEAKING PEAKING H SHELF G 3 5 dB 8 5 dB 1 5 dB 3 0 dB F 224 Hz 600 Hz 3 15 kHz 5 30 kHz Q 5 6 10 0 0 70 15 E G Clean PEAKING PEAKING PEAKI...

Страница 246: ...HELF PEAKING PEAKING H SHELF G 9 0 dB 1 5 dB 2 0 dB 0 0 dB F 90 0 Hz 212 Hz 5 30 kHz 17 0 kHz Q 4 5 1 25 36 Piano 3 PEAKING PEAKING PEAKING H SHELF G 4 5 dB 13 0 dB 4 5 dB 2 5 dB F 100 Hz 475 Hz 2 36 kHz 10 0 kHz Q 8 0 10 0 9 0 37 Piano Low PEAKING PEAKING PEAKING H SHELF G 5 5 dB 1 5 dB 6 0 dB 0 0 dB F 190 Hz 400 Hz 6 70 kHz 12 5 kHz Q 10 0 6 3 2 2 38 Piano High PEAKING PEAKING PEAKING PEAKING G ...

Страница 247: ... 18 E B Slap COMPRESSOR Threshold dB 12 Ratio 1 1 7 Attack ms 6 Out gain dB 4 0 Knee hard Release ms 133 Title Type Parameter Value 19 Syn Bass COMPRESSOR Threshold dB 10 Ratio 1 3 5 Attack ms 9 Out gain dB 3 0 Knee hard Release ms 250 20 Piano1 COMPRESSOR Threshold dB 9 Ratio 1 2 5 Attack ms 17 Out gain dB 1 0 Knee hard Release ms 238 21 Piano2 COMPRESSOR Threshold dB 18 Ratio 1 3 5 Attack ms 7 O...

Страница 248: ...o 1 2 5 Attack ms 26 Out gain dB 1 5 Knee 3 Release ms 331 35 Chorus COMPRESSOR Threshold dB 9 Ratio 1 1 7 Attack ms 39 Out gain dB 2 5 Knee 2 Release ms 226 36 Click Erase EXPANDER Threshold dB 33 Ratio 1 2 Attack ms 1 Out gain dB 2 0 Knee 2 Release ms 284 37 Announcer COMPANDER H Threshold dB 14 Ratio 1 2 5 Attack ms 1 Out gain dB 2 5 Width dB 18 Release ms 180 38 Limiter1 COMPANDER S Threshold ...

Страница 249: ... 48kHz 0 02 ms 1 96 sec 160 points This determines how long the gate stays open once the trigger signal has fallen below the threshold DECAY ms 44 1kHz 6 ms 46 0 sec 48kHz 5 ms 42 3 sec 160 points This determines how fast the gate closes once the hold time has expired The value is expressed as the duration required for the level to change by 6 dB GATE Input Level Time Time Output Level Input Level...

Страница 250: ...For higher knee set tings compression is applied gradually as the signal exceeds the specified threshold creating a more natural sound COMPRESSOR Input Level Time Time Output Level Input Level Output Level Time Series Analysis RATIO 1 RATIO THRESHOLD THRESHOLD Input signal Output Signal ATTACK RELEASE I O Characteristics KNEE hard OUT GAIN 0 0dB Parameter Range Description THRESHOLD dB 54 to 0 55 ...

Страница 251: ...nes the level at which compression is applied RATIO 1 0 1 1 1 1 1 3 1 1 5 1 1 7 1 2 0 1 2 5 1 3 0 1 3 5 1 4 0 1 5 0 1 6 0 1 8 0 1 10 1 20 1 15 points This determines the amount of compression ATTACK ms 0 120 121 points This determines how soon the signal is compressed or expanded once the com pander has been triggered RELEASE ms 44 1kHz 6 ms 46 0 sec 48kHz 5 ms 42 3 sec 160 points This determines ...

Страница 252: ...EV FLANGE Reverb and flanger in parallel Rev Flange REV FLANGE Reverb and flanger in series Rev Sympho REV SYMPHO Reverb and symphonic in parallel Rev Sympho REV SYMPHO Reverb and symphonic in series Rev Pan REV PAN Reverb and auto pan in series Delay Er DELAY ER Delay and early reflections in par allel Delay Er DELAY ER Delay and early reflections in series Delay Rev DELAY REV Delay and reverb in...

Страница 253: ...High frequency feedback ratio HPF THRU 21 2 Hz 8 00 kHz High pass filter cutoff fre quency LPF 50 0 Hz 16 0 kHz THRU Low pass filter cutoff fre quency Parameter Range Description TYPE Type A Type B Type of early reflection simulation ROOMSIZE 0 1 20 0 Reflection spacing LIVENESS 0 10 Early reflections decay characteris tics 0 dead 10 live INI DLY 0 0 500 0 ms Initial delay before reverb begins DIF...

Страница 254: ...ith TEMPO to determine DELAY R NOTE FB 1 Used in conjunction with TEMPO to determine FB DLY Parameter Range Description DELAY L 0 0 1350 0 ms Left channel delay time DELAY R 0 0 1350 0 ms Right channel delay time FB DLY L 0 0 1350 0 ms Left channel feedback delay time FB DLY R 0 0 1350 0 ms Right channel feedback delay time FB G L 99 to 99 Left channel feedback gain plus values for normal phase fe...

Страница 255: ...0 Hz 8 00 kHz EQ peaking type frequency EQ G 12 0 to 12 0 dB EQ peaking type gain EQ Q 10 0 0 10 EQ peaking type bandwidth HSH F 50 0 Hz 16 0 kHz High shelving filter frequency HSH G 12 0 to 12 0 dB High shelving filter gain Parameter Range Description FREQ 0 05 40 00 Hz Modulation speed DEPTH 0 100 Modulation depth FB GAIN 99 to 99 Feedback gain plus values for normal phase feedback minus values ...

Страница 256: ...00 to 100 Channel 1 level plus values for normal phase minus values for reverse phase PAN 1 L63 to R63 Channel 1 pan DELAY 1 0 0 1000 0 ms Channel 1 delay time FB G 1 99 to 99 Channel 1 feedback gain plus values for normal phase feed back minus values for reverse phase feedback MODE 1 10 Pitch shift precision PITCH 2 24 to 24 semitones Channel 2 pitch shift FINE 2 50 to 50 cents Channel 2 pitch sh...

Страница 257: ...e MASTER 0 100 Master volume BASS 0 100 Bass tone control MIDDLE 0 100 Middle tone control TREBLE 0 100 High tone control N GATE 0 20 Noise reduction CAB DEP 0 100 Speaker cabinet simulation depth EQ F 100 Hz 8 00 kHz EQ peaking type frequency EQ G 12 0 to 12 0 dB EQ peaking type gain EQ Q 10 0 0 10 EQ peaking type bandwidth Parameter Range Description SOURCE INPUT MIDI Control source input signal...

Страница 258: ... 0 100 Pitch modulation depth MOD DLY 0 0 500 0 ms Modulation delay time WAVE Sine Tri Modulation waveform SYNC OFF ON Tempo parameter sync on off NOTE 1 1 Used in conjunction with TEMPO to determine FREQ Parameter Range Description REV TIME 0 3 99 0 s Reverb time INI DLY 0 0 500 0 ms Initial delay before reverb begins HI RATIO 0 1 1 0 High frequency reverb time ratio DIFF 0 10 Spread DENSITY 0 10...

Страница 259: ...ff frequency LPF 50 0 Hz 16 0 kHz THRU Low pass filter cutoff frequency FREQ 0 05 40 00 Hz Modulation speed DEPTH 0 100 Modulation depth MOD DLY 0 0 500 0 ms Modulation delay time WAVE Sine Tri Modulation waveform SYNC OFF ON Tempo parameter sync on off NOTE 1 1 Used in conjunction with TEMPO to determine FREQ Parameter Range Description REV TIME 0 3 99 0 s Reverb time INI DLY 0 0 500 0 ms Initial...

Страница 260: ...in conjunction with TEMPO to determine left channel DELAY L NOTE R 1 Used in conjunction with TEMPO to determine right channel DELAY R NOTE FB 1 Used in conjunction with TEMPO to determine FB DLY Parameter Range Description DELAY L 0 0 1000 0 ms Left channel delay time DELAY R 0 0 1000 0 ms Right channel delay time FB DLY 0 0 1000 0 ms Feedback delay time FB GAIN 99 to 99 Feedback gain plus values...

Страница 261: ...FB GAIN 99 to 99 Feedback gain plus values for normal phase feedback minus values for reverse phase feedback DELAY HI 0 1 1 0 Delay high frequency feedback ratio DLY BAL 0 100 Delay and delayed reverb balance 0 all delayed reverb 100 all delay HPF THRU 21 2 Hz 8 00 kHz High pass filter cutoff frequency LPF 50 0 Hz 16 0 kHz THRU Low pass filter cutoff frequency REV TIME 0 3 99 0 s Reverb time INI D...

Страница 262: ...op start point in milliseconds LOOP NUM 0 100 Number of times the sample plays PITCH 12 to 12 semi tones Playback pitch shift FINE 50 to 50 cents Playback pitch shift fine MIDI TRG OFF C1 C6 ALL PLAY button can be triggered by using MIDI Note on off messages START SAMPLE 0 131000 Playback start point in samples END SAMPLE 0 131000 Playback end point in samples LOOP SAMPLE 0 131000 Loop start point...

Страница 263: ...nd ROOM SIZE setting Reverb time INI DLY 0 0 120 0 ms Initial delay before reverb begins HI RATIO 0 1 1 0 High frequency reverb time ratio LO RATIO 0 1 2 4 Low frequency reverb time ratio LO FREQ 22 0 Hz 18 0 kHz Frequency point for LO RATIO set ting DIFF 0 10 Reverb diffusion left right reverb spread ROOM SIZE 0 28 Size of room DECAY 0 53 Gate closing speed HPF THRU 22 0 Hz 8 00 kHz High pass fil...

Страница 264: ... Gain of EQ1 MID1 Q 0 50 16 00 Q of EQ2 MID1 F 16 0 Hz to 20 0 kHz Center frequency of EQ2 MID1 G 18 0 to 18 0 dB Gain of EQ2 MID2 Q 0 50 16 00 Q of EQ3 MID2 F 16 0 Hz to 20 0 kHz Center frequency of EQ3 MID2 G 18 0 to 18 0 dB Gain of EQ3 INPUT 18 0 to 18 0 dB Input gain OUTPUT 18 0 to 18 0 dB Output gain MID3 Q 0 50 16 00 Q of EQ4 MID3 F 16 0 Hz to 20 0 kHz Center frequency of EQ4 MID3 G 18 0 to ...

Страница 265: ...e set In this case the DELAY or FREQ value is calculated as follows DELAY or FREQ original DELAY or FREQ x previous TEMPO new TEMPO Example 1 When SYNC ON DELAY 250 ms TEMPO 120 you change NOTE from 8th note to quarter note DELAY new NOTE x 4 x 60 TEMPO 1 4 x 4 x 60 120 0 5 sec 500 ms Thus the DELAY will change from 250 ms to 500 ms Example 2 When SYNC ON DELAY 250 ms NOTE 8th note you change TEMP...

Страница 266: ...7 117 054 054 118 118 055 055 119 119 056 056 120 120 057 057 121 121 058 058 122 122 059 059 123 123 060 060 124 124 061 061 125 125 062 062 126 126 063 063 127 127 064 064 128 128 Program Change Scene Effect Preset Program Change Scene Effect Preset 001 Scene 129 065 Scene 193 002 130 066 194 003 131 067 195 004 132 068 196 005 133 069 197 006 134 070 198 007 135 071 199 008 136 072 200 009 137 ...

Страница 267: ... 294 102 039 295 103 040 296 104 041 297 105 042 298 106 043 299 107 044 300 108 045 000 109 046 No Assign 110 047 111 048 112 049 113 050 114 051 115 052 116 053 117 054 118 055 119 056 120 057 121 058 122 059 123 060 124 061 125 062 126 063 127 064 128 Program Change Scene Effect Preset Program Change Scene Effect Preset 001 No Assign 065 No Assign 002 066 003 067 004 068 005 069 006 070 007 071...

Страница 268: ...fect Preset 001 No Assign 002 003 128 Program Change Scene Effect Preset 001 No Assign 002 003 128 Program Change Scene Effect Preset 001 RACK5 001 002 002 003 003 128 128 Program Change Scene Effect Preset 001 RACK6 001 002 002 003 003 128 128 Program Change Scene Effect Preset 001 RACK7 001 002 002 003 003 128 128 Program Change Scene Effect Preset 001 RACK8 001 002 002 003 003 128 128 Program C...

Страница 269: ...91 006 049 092 007 050 093 008 051 094 009 052 095 010 053 096 011 054 097 012 055 098 013 056 099 014 057 100 015 058 101 016 059 102 017 060 103 018 061 104 019 062 105 020 063 106 021 064 107 022 065 108 023 066 109 024 067 110 025 068 111 026 069 112 027 070 113 028 071 114 029 072 115 030 073 116 031 074 117 032 075 118 033 076 119 034 077 120 035 078 121 036 079 122 037 080 123 038 081 124 0...

Страница 270: ...VEL L MATRIX 1 LEVEL H MATRIX 8 LEVEL H MATRIX 1 LEVEL L MATRIX 8 LEVEL L MIX 1 2 PAN MIX 15 16 PAN MATRIX1 2 PAN MATRIX7 8 PAN MIX TO STEREO TO STEREO ON MIX 1 MIX 16 TO MONO ON PAN MIX TO MATRIX MATRIX 1 POINT MATRIX 8 POINT MIX 1 MIX 16 MATRIX 1 ON MATRIX 8 ON MATRIX 1 LEVEL H MATRIX 8 LEVEL H MATRIX 1 LEVEL L MATRIX 8 LEVEL L MATRIX 1 2 PAN MATRIX 7 8 PAN STEREO TO MATRIX MATRIX 1 POINT MATRIX...

Страница 271: ...MIX 1 MIX 16 MATRIX 1 MATRIX 8 STEREO L MONO C ATTACK THRESHOLD RELEASE H RELEASE L RATIO GAIN H GAIN L KNEE WIDTH EFFECT BYPASS RACK5 8 MIX BALANCE PARAM 1 H PARAM 32 L GEQ ON A RACK1 8 ON B GAIN A 1 GAIN A 31 GAIN B 1 GAIN B 31 DCA ON DCA 1 DCA 8 FADER H FADER L MUTE MASTER ON MASTER 1 MASTER 8 RECALL SAFE ON CH 1 CH 48 STIN1L STIN4R MIX 1 MIX 16 MATRIX 1 MATRIX 8 STEREO L MONO C RACK1 8DCA 1 DC...

Страница 272: ... 44 CH 12 45 CH 13 46 CH 14 47 CH 15 48 CH 16 49 CH 17 50 CH 18 51 CH 19 52 CH 20 53 CH 21 54 CH 22 55 CH 23 56 CH 24 57 DCA DCA 1 58 DCA 2 59 DCA 3 60 DCA 4 61 DCA 5 62 DCA 6 63 DCA 7 64 CH ON INPUT CH 1 65 CH 2 66 CH 3 67 CH 4 68 CH 5 69 CH 6 70 CH 7 71 CH 8 72 CH 9 73 CH 10 74 CH 11 75 CH 12 76 CH 13 77 CH 14 78 CH 15 79 CH 16 80 CH 17 81 CH 18 82 CH 19 83 CH 20 84 CH 21 85 CH 22 86 CH 23 87 CH...

Страница 273: ... 16 17 18 19 20 21 22 23 24 25 26 27 28 29 30 31 33 34 35 36 37 38 39 40 41 42 43 44 45 46 47 48 49 50 51 52 53 54 55 56 57 58 59 60 61 62 63 64 65 66 67 68 69 70 71 72 73 74 75 76 77 78 79 80 81 82 83 84 85 86 87 88 89 90 91 92 93 94 95 102 103 104 105 106 107 108 109 110 111 112 113 114 115 116 117 118 119 Control Change Mode Parameter 1 Parameter 2 ...

Страница 274: ... MATRIX STEREO LR 0C2C 0C49 Input to Mix9 16 Matrix1 4 PRE POST MIX9 SEND 0C4A 0C81 MIX10 SEND 0CAA 0CE1 MIX11 SEND 0D0A 0D41 MIX12 SEND 0D6A 0DA1 MIX13 SEND 0DCA 0E01 MIX14 SEND 0E2A 0E61 MIX15 SEND 0E8A 0EC1 MIX16 SEND 0EEA 0F21 INPUT TO MATRIX1 0F4A 0F81 INPUT TO MATRIX2 0FAA 0FE1 INPUT TO MATRIX3 100A 1041 INPUT TO MATRIX4 106A 10A1 EQ INPUT MIX MATRIX STEREO LR ON 1304 1381 LOW Q 1382 13FF LO...

Страница 275: ...AA 29E1 MIX5 SEND 29EA 2A21 MIX6 SEND 2A2A 2A61 MIX7 SEND 2A6A 2AA1 MIX8 SEND 2AAA 2AE1 INPUT TO MATRIX5 2AEA 2B21 INPUT TO MATRIX6 2B2A 2B61 INPUT TO MATRIX7 2B6A 2BA1 INPUT TO MATRIX8 2BAA 2BE1 MONO C to Matrix LEVEL MATRIX1 SEND 2BEA 2BEE MATRIX2 SEND 2BF0 2BF4 MATRIX3 SEND 2BF6 2BFA MATRIX4 SEND 2BFC 2C00 MATRIX5 SEND 2C02 2C06 MATRIX6 SEND 2C08 2C0C MATRIX7 SEND 2C0E 2C12 MATRIX8 SEND 2C14 2C...

Страница 276: ...1 RECALL SAFE ON 3A66 3AEA HA GAIN1 3B06 3B15 GAIN2 3B16 3B25 GAIN3 3B26 3B35 GAIN4 3B36 3B45 GAIN5 3B46 3B55 GAIN6 3B56 3B65 GAIN7 3B66 3B75 GAIN8 3B76 3B85 Parameter From HEX To HEX HA 48v 1 3B86 3B95 48v 2 3B96 3BA5 48v 3 3BA6 3BB5 48v 4 3BB6 3BC5 48v 5 3BC6 3BD5 48v 6 3BD6 3BE5 48v 7 3BE6 3BF5 48v 8 3BF6 3C05 HPF1 3C06 3C15 HPF2 3C16 3C25 HPF3 3C26 3C35 HPF4 3C36 3C45 HPF5 3C46 3C55 HPF6 3C56 ...

Страница 277: ...RT O 5 INPUT PROCESSING O Point O INPUT INSERT O 5 INPUT PROCESSING O Direct Out Out Patch O INPUT DIRECT OUT 8 OUTPUT PORT PATCH INPUT PATCH On Level O INPUT DIRECT OUT O 5 INPUT PROCESSING O Point O INPUT DIRECT OUT O 5 INPUT PROCESSING O Att O INPUT EQ O INPUT ATT O INPUT ATT INPUT PROCESSING O HPF O INPUT EQ O INPUT EQ O INPUT EQ INPUT PROCESSING O EQ O INPUT EQ O INPUT EQ O INPUT EQ INPUT PRO...

Страница 278: ...ND 7 O to MATRIX SEND 7 MIX FADER ON 4 O Pre Post O O MIX to MATRIX SEND 7 O to MATRIX SEND 7 MIX PROCESSING 4 O To Stereo Mono O O 5 O 5 MIX PROCESSING O Pan Balance O O 5 O 5 MIX FADER ON O LCR On O O 5 O 5 MIX PROCESSING O CSR O O 5 O 5 MIX PROCESSING O On O O MIX ON O OUTPUT ON MIX FADER ON O Fader O O MIX FADER O OUTPUT FADER MIX FADER ON O From Input On WITH MIX SEND WITH SEND FROM SOURCE CH...

Страница 279: ...O MONO INSERT PATCH O 5 STEREO MONO PROCESSING On O O STEREO MONO INSERT O 5 STEREO MONO PROCESSING O Point O O STEREO MONO INSERT O 5 STEREO MONO PROCESSING O Att O O STEREO MONO ATT O OUTPUT ATT STEREO MONO PROCESSING O EQ O O STEREO MONO EQ O OUTPUT EQ STEREO MONO PROCESSING O Dynamics1 Key In Source O STEREO MONO DYNA1 O OUTPUT DYNA1 STEREO MONO PROCESSING Others O O STEREO MONO DYNA1 O OUTPUT...

Страница 280: ...ored Pressing the key again will recall the stored setting Settings can be stored in multiple keys to facilitate rapid assignment switch ing SOURCE SELECT M7CL 32 48 STEREO L R MONO C LCR STIN1 4 DEFINE Recall the selected signal to the monitor M7CL 48ES STEREO L R MONO C LCR OMNI1 8 DEFINE DIMMER ON Switch the monitor dimmer function on off MONO MONITOR Switch MONO MONITOR on off EFFECT BYPASS RA...

Страница 281: ... OUTPUT PATCH INPUT INSERT PATCH OUTPUT INSERT PATCH DIRECT OUT PATCH PATCH LIST RACK EDITOR RACK RACK1 8 METER INPUT METER OUTPUT METER GROUP LINK DCA GROUP MUTE GROUP CHANNEL LINK SCENE SCENE MEMORY RECALL SAFE FADE TIME PARAMETER1 SENDS ON FADER PARAMETER2 HELP Opens and closes the HELP pop up window Operating the con trollers on the panel excluding faders or controllers on the screen while hol...

Страница 282: ... curValue paramSteps add mod 2 1 If the assigned parameter has fewer than 128 steps paramWidth 128 rxValue Control value 2 If the assigned parameter has 128 or more but less than 16 384 steps paramWidth 16384 2 1 When High and Low data is received rxValue Control value High 128 Control value Low 2 2 When only Low data is received rxValue curValue 16256 Control value Low 2 3 When only High data is ...

Страница 283: ...nt Data without Recall Safe 768 Current Data with Recall Safe S 512 Setup Memory 513 Mixer Setting 514 Output Port 515 Monitor 516 MIDI Setting 517 Library Number s 512 515 User Defined Key 1 4 516 519 User Defined Key Guest 1 4 520 523 User Defined Key Admin 1 4 524 Preference 525 User Key 526 User Key Guest 527 Preference Guest 528 Preference Admin Y 1 199 Library number 512 559 Dynamics1 Input ...

Страница 284: ...ceived when Parameter change Rx is on and the Device number of both Rx CH and SUB STATUS are matched The data will be echoed when Parameter change ECHO is on The corresponding parameter will be changed immediately the data is received Transmission Data will be transmitted with the Device Number in Tx CH when Parameter change Tx is on Command rx tx function F0 43 1n 3E 11 F7 RARAMETER CHANGE rx tx ...

Страница 285: ...FFECT LIB 1 199 7 tx rx LibUnRcl SCENE 0 5 tx INPUT CH LIB 0 1 tx OUTPUT CH LIB 0 2 3 4 tx INPUT EQ LIB 0 1 tx OUTPUT EQ LIB 0 2 3 4 tx Dynamics LIB 0 1 2 3 4 8 tx GEQ LIB 0 6 tx EFFECT LIB 0 7 tx LibStrUd SCENE 0 0 LibRclUd SCENE 0 0 1 0 CH1 47 CH48 48 ST IN 1L 55 ST IN 4R 2 256 MIX1 271 MIX16 3 512 MATRIX1 519 MATRIX8 4 1024 STEREO L 1026 MONO C 5 512 will be used if the recalling or storing dat...

Страница 286: ...bit 0ddddddd dd Data21 27bit 0ddddddd dd Data14 20bit 0ddddddd dd Data7 13bit 0ddddddd dd Data0 6bit EOX 11110111 F7 End of exclusive STATUS 11110000 F0 System exclusive message ID No 01000011 43 Manufacture s ID number YAMAHA SUB STATUS 0011nnnn 3n n 0 15 Device number MIDI Channel GROUP ID 00111110 3E Digital mixer MODEL ID 00010001 11 M7CL DATA CATEGORY 00000000 00 OTHER DATA FUNCTION NAME 0100...

Страница 287: ... INEQ____ 41 199 OUTPUT EQ LIB OUTEQ___ 4 199 Dynamics LIB DYNA____ 42 199 GEQ LIB GEQ_____ 1 199 EFFECT LIB EFFECT__ 58 199 STATUS 11110000 F0 System exclusive message ID No 01000011 43 Manufacture s ID number YAMAHA SUB STATUS 0001nnnn 1n n 0 15 Device number MIDI Channel GROUP ID 00111110 3E Digital mixer MODEL ID 00010001 11 M7CL DATA CATEGORY 00000000 00 OTHER DATA FUNCTION NAME 01001100 C AS...

Страница 288: ...ameter change ECHO is on the message will be sent as it is STATUS 11110000 F0 System exclusive message ID No 01000011 43 Manufacture s ID number YAMAHA SUB STATUS 0001nnnn 1n n 0 15 Device number MIDI Channel GROUP ID 00111110 3E Digital mixer MODEL ID 00010001 11 M7CL DATA CATEGORY 00000000 00 OTHER DATA FUNCTION NAME 01000011 C 01101000 h 01101100 l 01010000 P 01101001 i 01110010 r 01000011 C 01...

Страница 289: ...ish the process Please restart the M7CL and try again The process has failed to be completed Restart the M7CL and execute the process again File Access is Busy The following operation has not been performed yet because the USB storage device is being accessed File Already Exists The USB storage device already contains a file directory with the same name as the one you are attempting to save rename...

Страница 290: ...the screen This Operation is Not Allowed This operation has been ignored because the current user does not have permission Too Many Bands Used Cannot Compare More than 15 bands are used when trying to copy 31BandGEQ and then compare with Flex15GEQ Too Many Bands Used Cannot Paste to Flex15GEQ More than 15 bands are used when trying to copy 31BandGEQ and then paste to Flex15GEQ Total Slot Power Cap...

Страница 291: ...al head amp set to an appropriate level p 51 61 Is the fader of the input channel raised Could the EQ gain be set to an extremely low setting p 115 Could the GATE COMP threshold or ratio be set to an extreme setting p 118 Is the EQ attenuator raised p 115 Is the fader of the output channel raised Try using the various screens of the METER function to check the levels p 167 Is the DCA fader assigne...

Страница 292: ...turned off p 147 Could user level restrictions have been specified p 212 You turn on a CUE button in the EFFECT screen but it is automatically defeated This is defeated automatically when you switch screens in the display p 184 When you recall a scene it takes a certain amount of time for the faders to stop Could you have specified a fade time p 151 The panel LEDs or LCD display are too dark too b...

Страница 293: ...jucent Input Channels OMNI IN 1 8 GAIN min to OMNI OUT 1 8 Dimensions M7CL 48 48ES 1274 x 286 x 701 mm W x H x D M7CL 32 1060 x 286 x 701 mm W x H x D Net Weight M7CL 48 50 kg M7CL 32 42 kg M7CL 48ES 46 kg Power Requirements wattage M7CL 48 300 W M7CL 32 250 W M7CL 48ES 150 W Power Requirements voltage and hertz US Canada 120V 60Hz Japan 100V 50 60Hz China 110 240V 50 60Hz Korea 220V 60Hz Other 11...

Страница 294: ...pe Balanced 1 18 dB 2 dBu 616 mV 18 dBu 6 16 V PHONES 15 Ω 8 Ω Phones 75 mW 4 150 mW Stereo Phone Jack TRS Unbalanced 2 40 Ω Phones 65 mW 4 150 mW Terminal Format Data Length Level Audio Connector 2TR OUT DIGITAL 1 AES EBU AES EBU Professional Use 1 24 bit RS422 XLR 3 32 type Balanced 2 EtherSound M7CL 48ES Ethersound 24 bit 100Base TX 48ch Input 24ch Output 48kHz etherCON 3 byte bit field name fi...

Страница 295: ...OUT 1 8 M7CL 48ES 600 Ω Full scale output Output level 24 0 dBu Typ 0 5 0 0 5 PHONES 8 Ω 30 dBFs phones level control max Output level 0 dBu Typ 0 5 0 0 5 Input Output RL Conditions Min Typ Max Unit INPUT 1 48 M7CL 48 INPUT 1 32 M7CL 32 OMNI OUT 1 16 600 Ω 4 dBu 20 Hz 20 kHz GAIN Max 0 1 4 dBu 20 Hz 20 kHz GAIN Min 0 05 ST IN 1 4 L R M7CL 32 48 OMNI IN 1 8 M7CL 48ES OMNI OUT 1 16 M7CL 32 48 OMNI O...

Страница 296: ...A GAIN Min 108 dB ST IN 1 4 L R M7CL 32 48 OMNI IN 1 8 M7CL 48ES OMNI OUT 1 16 M7CL 32 48 OMNI OUT 1 8 M7CL 48ES 600 Ω AD DA GAIN Min 108 OMNI OUT 1 16 M7CL 32 48 OMNI OUT 1 8 M7CL 48ES 600 Ω DA Converter 110 Parameter Conditions Min Typ Max Unit External Clock Frequency Range M7CL 32 48 39 69 50 88 kHz Frequency Range M7CL 48ES 43 00 49 20 Internal Clock Frequency Word Clock Int 44 1 kHz 44 1 Wor...

Страница 297: ...Ratio 1 1 to 1 Attack 0 msec to 120 msec Release 5 msec to 42 3 sec Gain 18 dB to 0 dB 0 dB to 18 dB Knee Hard to 5 soft Key In Self Pre EQ Self Post EQ Mix Out 13 16 Ch1 STIN4R 8ch block Fader Level 1024 steps 138 dB to 10 dB On On Off DCA Group 8 Groups Mute Group 8 Groups Mix Send 16 sends Fix Variable can be set each two mixes Mix Send Point Pre EQ Pre Fader Post On Level 1024 steps 138 dB to ...

Страница 298: ...RX 7 RTS 3 TX 8 CTS 4 TX 9 GND 5 N C 5 9 1 6 Pin Signal Name Pin Signal Name 1 24V 13 GND 2 24V 14 GND 3 24V 15 GND 4 24V 16 GND 5 24V 17 GND 6 24V 18 GND 7 24V 19 CAUTION 8 24V 20 CAUTION 9 24V 21 DETECT A 10 GND 22 DETECT B 11 GND 23 DETECT GND 12 GND Frame GND 1 2 3 4 5 6 7 8 9 10 11 12 13 14 15 16 17 18 19 20 21 22 23 ...

Страница 299: ...y locale please check with your Yamaha dealer European models Purchaser User Information specified in EN55103 1 and EN55103 2 Inrush Current 21A Conforms to Environments E1 E2 E3 and E4 Dimensions 955 PSL360 option 18 4 535 442 297 30 672 1026 1274 144 13 22 124 340 MBM7CL option 286 216 3 5 8 102 111 185 370 701 146 168 PSL360 option 25 130 955 PSL360 option 18 4 535 442 83 30 672 812 1060 144 13...

Страница 300: ...ed from the rear panel 6 Insert the two screws B which you removed in step 2 into holes G of the MBM7CL s attachment fix ture and tighten them 7 Tighten screws C two locations to fasten the MBM7CL to the M7CL 8 Using screw A which you removed in step 1 fasten the cable cover included with the MBM7CL This completes the installation procedure Installing the MBM7CL meter bridge option C A C B B 2 mm ...

Страница 301: ...x o After Key s x x Touch Ch s x x Pitch Bend x x 0 32 o o Bank Select 6 38 o o Data Entry 98 99 o o NRPN LSB MSB 1 31 33 98 o o Assignable Cntrl Control 102 119 Change Prog o 0 127 o 0 127 Assignable Change True 0 300 System Exclusive o 1 o 1 System Song Pos x x Common Song Sel x x Tune x x System Clock x o Effect Control Real Time Commands x x All Sound Off x x Aux Reset All Cntrls x x Local ON ...

Страница 302: ...libration function 239 Cascade connections 232 Cascade master 233 Cascade slave 232 Centralogic section 21 97 Operations 100 CH CLEAR 134 CH COPY 132 CH JOB 33 123 CH LINK 130 CH MOVE 133 Changing Input patch settings 108 Output patch settings 105 Password 211 User level 212 Channel Link 130 Channel name and icon 59 81 Channel parameters Copying 132 Initializing 134 Moving 133 Channel structure 14...

Страница 303: ...the channels or DCA groups of the Centralogic section 104 Flex15GEQ 171 175 178 FOCUS 147 Focus function 147 Freeze effect 188 Function access area 32 Functions that can be assigned to user defined keys 280 G GATE 249 GATEWAY ADDRESS 236 General Specifications 293 GEQ library 189 GLOBAL RECALL SAFE 148 Graphic EQ 171 175 Grounding screw 26 Guest 207 H HA Head Amp gain settings 51 HA Head Amp setti...

Страница 304: ...tput patch settings 105 OVERVIEW screen 33 98 P Parameter change 197 Password 211 PATCH NAME popup window PATCH 108 Phase ø 58 PHONES LEVEL 154 PHONES LEVEL knob 27 PHONES LEVEL LINK 154 PHONES OUT headphone output jack 27 Pin Assignment 298 Popup windows 32 POWER switch 26 PRE EQ 234 PRE FADER 234 Preferences 214 Program Change 197 Protect symbol 136 R R symbol READ ONLY symbol 136 RACK 33 Rear p...

Страница 305: ...ack 27 Tap Tempo function 186 Time 32 Time stamp 141 TO STEREO MONO popup window 8 ch 63 83 ALL 64 83 Tool buttons 35 Top panel 17 Touch screen 20 29 Troubleshooting 291 U Under the front pad 27 USB connector 20 USB storage device Formatting media 224 Save load data 218 User 207 User authentication keys 207 209 212 User defined keys 22 216 280 USER DEFINED KEYS section 22 User level 212 User Level...

Страница 306: ...M7CL Owner s Manual 306 ...

Страница 307: ... POST EQ 48 Keyin Self PRE EQ Self POST EQ MIX13 16 OUT STCH 1L 4R POST EQ PRE EQ INSERT OUT POSTEQ ATT To MIX To MIX To MATRIX To MATRIX To MIX To MIX VARI VARI FIXED FIXED STEREO VARI STEREO VARI STEREO GATE DUCK EXPAND COMP COMP COMPAND DE ESSER HPF GR METER GR METER PRE HPF PRE EQ PRE FADER POST ON INSERT IN PATCH RACK1 OUT A L B R RACK2 OUT A L B R RACK3 OUT A L B R RACK4 OUT A L B R RACK5 OU...

Страница 308: ...OUT A L B R RACK8 OUT A L B R ST IN 1L 4R OUTPUTS ATT HPF ON ON EQ OUT DYNA1OUT DYNA 2OUT 4BAND EQ GATE DUCK EXPAND COMP COMP COMPAND DE ESSER KeyinFilter KeyinFilter LCR CSR MONO C ON ON CUE R CUE L ON To OUTPUT PATCH To OUTPUT PATCH To OUTPUT PATCH To OUTPUT PATCH To OUTPUT PATCH To OUTPUT PATCH To OUTPUT PATCH To OUTPUT PATCH To OUTPUT PATCH To OUTPUT PATCH To OUTPUT PATCH To RACKIN PATCH INSER...

Страница 309: ... ST IN GAIN MIN INPUT 1 48 GAIN MAX ST IN GAIN MAX TRACKBACK GAIN MIN TRACKBACK GAIN MAX GAIN Analog INSERT ATT Analog Digital Digital dBFS 0dBu 0 775Vrms 0dBFS Full Scale Max Input 30dBu Nominal Input 10dBu Max Input 4dBu Nominal Input 16dBu Max Input 40dBu Max Input 42dBu Nominal Input 60dBu Nominal Input 62dBu INSERT LEVEL DCA x8 ON BUS Adder INSERT ATT EQ x4 DYN MASTER LEVEL BAL MASTER ON OUTP...

Страница 310: ...N 1 8 GAIN MIN 2 OMNI IN 1 8 GAIN MAX 3 TALKBACK GAIN MIN 4 TALKBACK GAIN MAX GAIN Analog INSERT ATT Analog Digital Digital dBFS 0dBu 0 775Vrms 0dBFS Full Scale Max Input 30dBu Nominal Input 10dBu Max Input 4dBu Nominal Input 16dBu Max Input 40dBu Max Input 42dBu Nominal Input 60dBu Nominal Input 62dBu INSERT LEVEL DCA x8 ON BUS Adder INSERT ATT EQ x4 DYN MASTER LEVEL BAL MASTER ON OUTPUT PATCH DE...

Страница 311: ...a S A Ctra de la Coruna km 17 200 28230 Las Rozas Madrid Spain Tel 91 639 8888 SWEDEN Yamaha Scandinavia AB J A Wettergrens Gata 1 Box 30053 S 400 43 Göteborg Sweden Tel 031 89 34 00 DENMARK YS Copenhagen Liaison Office Generatorvej 6A DK 2730 Herlev Denmark Tel 44 92 49 00 NORWAY Norsk filial av Yamaha Scandinavia AB Grini Næringspark 1 N 1345 Østerås Norway Tel 67 16 77 70 RUSSIA Yamaha Music Ru...

Страница 312: ...C S G Pro Audio Division 2005 2011 Yamaha Corporation 102POTO H0 Printed in Japan WS34720 Yamaha Pro Audio global web site http www yamahaproaudio com Yamaha Manual Library http www yamaha co jp manual ...

Отзывы: