background image

Notes:

51

XUSB4DVR User Guide

APPENDIX 4

Содержание XUSB4DVR

Страница 1: ...SB DVR Card and Software Before you begin Please unpack all boxes carefully and identify that all the parts are present Do not cut the cables this will void the warranty Model XUSB4DVR 4 Camera 25fps...

Страница 2: ...2 3 3 3 Record Setup 13 3 3 4 Record Status Panel 14 3 3 5 Manual Record Mode 14 3 3 6 Schedule Record Mode 14 3 3 7 Motion Detection Record Mode 14 3 3 8 Sensor Alarm Record Mode 15 3 3 9 Recycling R...

Страница 3: ...K 34 7 2 1 Remote Playback Server Configuration 34 7 2 2 Remote Playback Client side Setup 34 7 2 3 Remote Playback Configuration and Control Setup 35 7 3 MOBILE SURVEILLANCE 37 7 3 1 Introduction to...

Страница 4: ...s the window system 43 App 1 4 2 Why I can t find the recorded files 43 App 1 4 3 Why is the screen s display is unstable with dithering and water wave images 43 App 1 4 4 Why is there a delay to play...

Страница 5: ...tion detection sensitivity for each channel The system will only begin to record only when motion in the detection area occurs and it will stop recording after a period of time which also is adjustabl...

Страница 6: ...nce You can view playback and have PTZ Control from a remote PC on the same LAN or Internet 15 Alerts Set buzzer and Email alerts with image snapshots when motion is detected 16 User friendly graphica...

Страница 7: ...IFICATIONS Format PAL NTSC Resolution 352x288 704x576 PAL Maximum Frame rate 25 fps PAL Screen set Resolution 1024x768 16 bits or 32 bits Compression code rate 50kbps 1 2Mbps Data format MPEG4 7 XUSB4...

Страница 8: ...2 2 Welcome Page 8 XUSB4DVR User Guide 2 HARDWARE INSTALLATION Please Note Make sure that your PC USB interface is 2 0 the XUSB4DVR card can only support USB 2 0 Please follow the steps to safely rem...

Страница 9: ...at After this process the application package SmartDVR will begin installation Select a suitable destination option and click Next Fig 2 4 Select installation destination Click Next to continue Fig 2...

Страница 10: ...1 Shortcut of SmartDVR 10 XUSB4DVR User Guide Please Note When you install the driver software on a Microsoft VISTA system you need select the option shown below when you start the installation proce...

Страница 11: ...nce you enter the system Refer to Chapter 4 7 Users Configuration 3 2 DISPLAY CONTROL PANEL The Display Control Panel includes Display Mode buttons a Free Disk Space indicator Next Page button Auto Dw...

Страница 12: ...n it will return to the former display mode 3 3 RECORD 3 3 1 Record Modes The XDVR4USB offers 4 kinds of record modes 1 Schedule record mode timer 2 Manual record mode 3 Motion Detection record mode 4...

Страница 13: ...r Schedule recording day or night of corresponding cameras The times of recording can be set within the Configuration page Schedule Record Frame Rate Select the recording frame rate required for Sched...

Страница 14: ...en light will change to lime green Please refer to chapter 4 2 for details 3 3 7 Motion Detection Record Mode This mode will enable the system to detect image changes and begin to record automatically...

Страница 15: ...he recording storage will automatically jump to the next partition when it is full If all the partitions are full and Recycling Record mode has been enabled the new data will overwrite the oldest reco...

Страница 16: ...wn Caption There are four options to select for all the channels Select from dropdown None means no title ID means camera numbers i e 1 2 3 4 Name means camera names i e Cam1 Cam2 etc ID Name means bo...

Страница 17: ...artDVR system offers powerful schedule configuration options Every channel has three kinds of record modes Schedule Record Motion Detection Record and Sensor Alarm Record You can set schedules from Su...

Страница 18: ...Within the green boxed areas set the value for Motion Detection Sensitivity The higher the number the higher the sensitivity of detection 4 5 ALARM CONFIGURATION Click to enter Alarm Configuration pag...

Страница 19: ...Output Tab Click Alarm Output tab to configure the Alarm Outputs for your system Video Loss Users can select alarm output for this option For example users select alarm_out1 and alarm_out3 and remote...

Страница 20: ...If some settings are wrong a pop up window will appear showing corresponding warning message 4 5 5 Emap Tab Click Emap tab to access the following functions Auto Hide Check the box and the the require...

Страница 21: ...etails shown and then click OK 4 7 2 Change User rights Select a user in User Configuration area and click Edit to enter Edit User area refer to Fig 4 14 Users can edit user s password and rights here...

Страница 22: ...e displayed in the E map interface Draw icons of cameras to the corresponding position on the map You can add a maximum of 16 cameras in total To edit a camera image right click on the default image a...

Страница 23: ...rm menu in the E map Tab Here you can select if you wish the E map alarm screen to Auto hide after the live image pops up on screen and the holding time the E map stays on screen when an alarm is trig...

Страница 24: ...hannel then users can begin to control the P T Z control enabled camera You can also can select different Pan speed Tilt speed Focus speed and Zoom speed for P T Z devices Click on the button to adjus...

Страница 25: ...eset1 preset2 and preset3 for group1 preset1 preset2 and preset3 will be automatically accessed in sequence after users select group1 for auto scout Click on the button and a popup window as following...

Страница 26: ...ng methods above to search for needed record files 6 2 RECORD PLAYBACK AND CONTROL The functions in the Search Playback interface are Play Pause Stop Play backwards This button is valid when playing b...

Страница 27: ...the recorded files The different colours of the bar indicates the different kind of record modes of the files The following are the definitions of the colour bars Manual Record Events Schedule Record...

Страница 28: ...nterval by channels selected in area A In area C users can set backup path Click Start to backup files 6 3 2 Delete Recorded Files Click to enter the Delete Recorded Files menu First select the channe...

Страница 29: ...icture You can also print the images that have been captured Click to enter the Print Setup menu Use this area to assign a printer to the application and configure your printer settings You can see a...

Страница 30: ...ontinuously the image will be zoomed out continuously Zoom In Select and click on the channel to zoom in on the image By clicking continuously the image will be zoomed in continuously Default size Cli...

Страница 31: ...Data transmission port default value is 1159 Command Port Control command port default value is 1259 Picture Quality Default value is higher 7 1 2 Remote Surveillance Client side Setup On the client s...

Страница 32: ...stall WebCam the client side program for viewing live images After initialisation has completed WebCam will be installed automatically You can choose path by clicking Browse Click Next to continue 32...

Страница 33: ...gging in the server you will get the first channel video from server and you can adjust screen mode just like SmartDVR Fig 7 8 shows the WebCam Surveillance mode interface The Status Panel and PTZ con...

Страница 34: ...layback and click OK For details on the installation process refer to Chapter 7 1 2 After installation the playback client side main interface will appear as shown in Fig 7 12 34 XUSB4DVR User Guide F...

Страница 35: ...settings Log in Remote Playback System by clicking after finishing the configurations and input the right user name and password to enter the remote playback main interface After you log into the sys...

Страница 36: ...have occurred per camera allowing you to select a recording by event rather than just by time and date Click to play the recorded files Press to pause You can use the time bar to adjust the time peri...

Страница 37: ...low Other brands models are being added regularly see www x vision co uk for latest details 7 3 2 Client Configuration of Windows Mobiles The Server Configuration on SmartDVR needs to be set before th...

Страница 38: ...el by selecting the channel in drop down Channel menu Click Stop at any time to disconnect the communication with the server 7 3 3 Client Configuration of Symbian 60 The Server Configuration on SmartD...

Страница 39: ...icking the icon Enter the main menu by clicking Options Click Settings to set the login information Input the server s address username and password respectively in the fields Server Username and Pass...

Страница 40: ...play option in the pop up window of DirectX Tools and click the three buttons DirectDraw Direct3D and AGP Texture Appendix 1 1 3 Unspecified error in the End of Installation Possible causes 1 On Engli...

Страница 41: ...few of days In the Basic Configuration refer to Fig 4 1 page 16 input Windows user name and password Note Not SmartDVR user name and password and set the time interval The Windows system will automati...

Страница 42: ...to Chapter 7 to learn more Appendix 1 3 2 Why I can t download the client side software Possible causes 1 The client side computer has not been properly connected to Internet or LAN 2 The server end h...

Страница 43: ...e card may not be well installed Unplug the card and try it again Appendix 1 4 2 Why I can t find the recorded files The main cause of this would be there was not enough HDD space and the files were n...

Страница 44: ...eleted 2 SmartDVR has deleted recorded file when recycle option has been chosen 3 Recorded files can not be opened because they are being recorded Appendix 1 4 7 Why do I see some old recorded section...

Страница 45: ...SmartDVR APPENDIX 1 5 SYSTEM QUESTIONS Appendix 1 5 1 How do I use REPAIRDB to repair SmartDVR database Enter the installation directory of SmartDVR C ProgramFiles SmartDVR SmartDVR open the REPAIRDB...

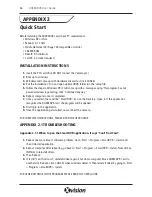
Страница 46: ...ktop Open it If this application recognizes the XUSB4DVR card the program will be opened 8 First login to the application 9 Once the application gets started now connect the Camera FOR COMPLETE INSTRU...

Страница 47: ...ce This will download the WebCam application Download Remote Playback as well On your desktop now you should see the WebCam and Remote Playback icon 6 Open up webcam click the Login button the KEY sym...

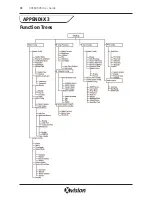
Страница 48: ...Function Trees 48 XUSB4DVR User Guide APPENDIX 3...

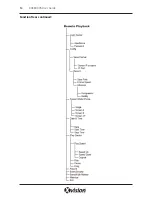
Страница 49: ...Function Trees continued 49 XUSB4DVR User Guide...

Страница 50: ...Function Trees continued 50 XUSB4DVR User Guide...

Страница 51: ...Notes 51 XUSB4DVR User Guide APPENDIX 4...

Страница 52: ...for any Xvision product please contact your local distributor LIMITED WARRANTY This product is supplied with a 1 Year warranty The Warranty excludes products that have been misused including accidenta...

Отзывы: