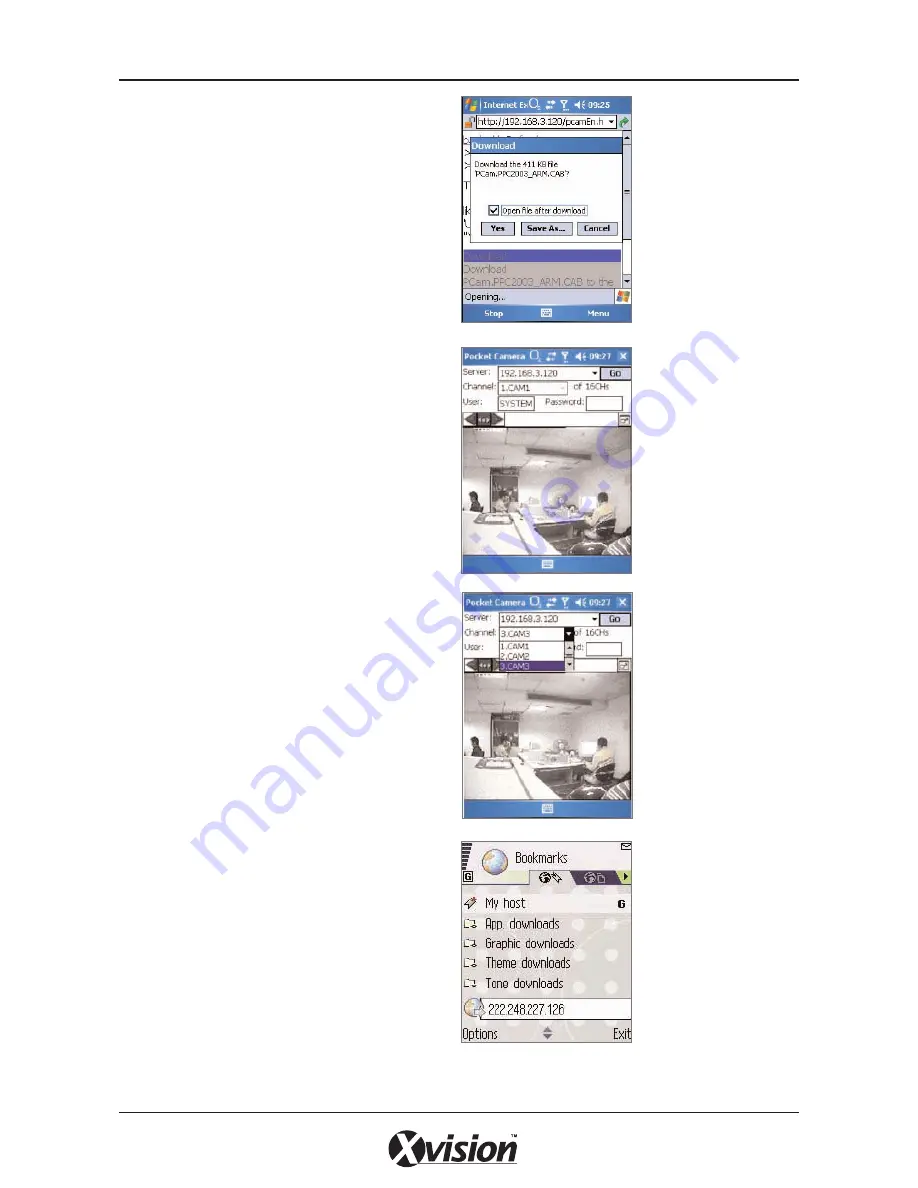
Click ‘PCam v1.0.6.5291’.
A dialog box will pop up as shown in Fig 7.19.
Click “Yes” to start installing.
PCam will be opened after the download is
finished.
Input the server’s address, username and password
respectively in the fields ‘Server’, ‘User’ and
‘Password’ and then click ‘Go’ to login to the
server. Successful login information will appear if
the server address, username and password are all
correct.
Channel 1 is the default displaying channel after
successful login. You can change the displayed
channel by selecting the channel in drop down
‘Channel’ menu.
Click ‘Stop’ at any time to disconnect the
communication with the server.
7.3.3 Client Configuration of Symbian 60
The Server Configuration on SmartDVR needs to be
set before the function on phone is activated.
Please refer to Section 7.1 ‘Remote Live
Surveillance’. First activate the Network Access on
the mobile phone and then run ‘Internet Explorer’
after the Server Configuration is complete.
Input the server address in a new-built bookmark.
Click this bookmark to connect to the server.
38
XUSB4DVR User Guide
Fig 7.19 Downloading
dialog box
Fig 7.20 Main Interface
of PCam
Fig 7.21 Selecting
channel
Fig 7.22 Open Web
Browser & build new
bookmark
Содержание XUSB4DVR
Страница 48: ...Function Trees 48 XUSB4DVR User Guide APPENDIX 3...
Страница 49: ...Function Trees continued 49 XUSB4DVR User Guide...
Страница 50: ...Function Trees continued 50 XUSB4DVR User Guide...
Страница 51: ...Notes 51 XUSB4DVR User Guide APPENDIX 4...

