


02/2000
2-62
DocuPrint N2025/N2825
RAP 67
Initial Issue
Status Indicator Repair Analysis Procedures
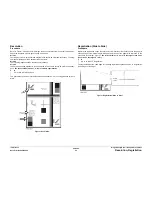
RAP 67 C5: OCT Tray Full
Error code indicates that the OCT Output Tray is full.
Procedure
Enter Diagnostics and select Component Test. Scroll to Sensor Input test and press Enter.
Actuate and deactuate the Stack Full Sensor Actuator. The number on the LCD increments
each time you press and release the actuator.
Y
N
Visually inspect the Stack Full Sensor Actuator. The actuator moves freely and is in
good condition (not broken or damaged).
Y
N
Replace the Stack Full Actuator (REP 5.3).
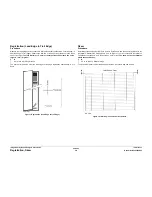
Switch the printer power off. Remove the Left Side Cover (REP 1.1) and the Print Engine
Controller PWB Cover (REP 8.5). Disconnect P/J19 from the Print Engine Controller
PWB. Switch the printer power on. On the Print Engine Controller PWB, measure the volt-
age between P19 pin 11 and frame ground and between P19 pin 13 and frame ground.
Both voltages are +3.3VDC.
Y
N
Measure the voltage between P/J16 pin 4 and frame ground. The voltage is
+3.3VDC.
Y
N
Replace the LVPS (REP 8.6).
Replace the Print Engine Controller PWB (REP 8.5).
Switch the printer power off. Reconnect P/J19 to the Print Engine Controller PWB. Enter
Diagnostics and select Component Test. Scroll to Sensor Input test and press Enter. On
the Print Engine Controller PWB, measure the voltage between P/J19 pin 13 and frame
ground. There is +3.3VDC between P19 pin 13 and frame ground when the Stack Full
Sensor is deactuated and 0.0VDC when actuated.
Y
N
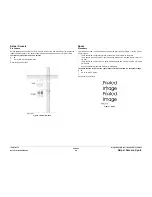
Switch the printer power off. Open the Rear Cover. Disconnect P/J527 (3-pin con-
nector on HVPS Cover). Switch the printer power on. Measure the voltage between
P/J527 pin 3 and frame ground and between P/J527 pin 1 and frame ground. Both
voltages are +3.3VDC.
Y
N
Switch the printer power off. Remove the HVPS Cover (REP 8.2). Measure the
resistance between P/J502 and P/J527 as follows:
•
J527-1 and J502-1
•
J527-2 and J502-2
•
J527-3 and J502-3
There is continuity between each of the pins.
Y
N
Repair or replace the Stack Full Sensor Harness, as necessary (PL 6.1).
Disconnect P/J501 from the Duplex Interface PWB and P/J19 from the Print
Engine Controller PWB. Measure the resistance between P/J501 and P/J19 as
follows:
•
J501-1 and J19-13
•
J501-2 and J19-12
•
J501-3 and J19-11
There is continuity between each of the pins.
Y
N
Repair or replace the Duplex Interface Harness, as necessary (PL 9.1).
Replace the Duplex Interface PWB (REP 8.3).
Switch the printer power off. Disconnect P/J507 from the Stack Full Sensor. Check
the continuity between P/J507 and P/J527 as follows.
•
J507-1 and J527-3
•
J507-2 and J527-2
•
J507-3 and J527-1
There is continuity between each of the pins.
Y
N
Repair or replace the Stack Full Sensor(REP 5.2) or Stack Full Sensor Harness
(PL 6.1), as necessary.
Replace the Stack Full Sensor (REP 5.2).
Replace the Print Engine Controller PWB (REP 8.5).
It appears that the Stack Full Sensor is working correctly. If a problem persists, replace the
Print Engine Controller PWB (REP 8.5).
A
A
B
B
C
C
Содержание DocuPrint N2025
Страница 12: ...02 2000 1 2 DocuPrint N2025 N2825 Initial Issue Service Call Procedures...
Страница 20: ...02 2000 2 2 DocuPrint N2025 N2825 Initial Issue Status Indicator Repair Analysis Procedures...
Страница 64: ...02 2000 2 46 DocuPrint N2025 N2825 RAP 46 RAP 47 Initial Issue Status Indicator Repair Analysis Procedures...
Страница 72: ...02 2000 2 54 DocuPrint N2025 N2825 RAP 56 Initial Issue Status Indicator Repair Analysis Procedures...
Страница 76: ...02 2000 2 58 DocuPrint N2025 N2825 RAP 59 RAP 60 Initial Issue Status Indicator Repair Analysis Procedures...
Страница 86: ...02 2000 3 2 DocuPrint N2025 N2825 Initial Issue Image Quality Repair Analysis Procedures...
Страница 114: ...02 2000 4 4 DocuPrint N2025 N2825 Introduction Initial Issue Repair Adjustment...
Страница 120: ...02 2000 4 10 DocuPrint N2025 N2825 REP 1 8 REP 1 9 Initial Issue Repair Adjustment...
Страница 128: ...02 2000 4 18 DocuPrint N2025 N2825 REP 2 10 REP 2 11 Initial Issue Repair Adjustment...
Страница 134: ...02 2000 4 24 DocuPrint N2025 N2825 REP 3 7 Initial Issue Repair Adjustment...
Страница 144: ...02 2000 4 34 DocuPrint N2025 N2825 REP 5 5 Initial Issue Repair Adjustment...
Страница 152: ...02 2000 4 42 DocuPrint N2025 N2825 REP 7 6 REP 7 7 Initial Issue Repair Adjustment...
Страница 160: ...02 2000 4 50 DocuPrint N2025 N2825 REP 8 9 Initial Issue Repair Adjustment...
Страница 186: ...02 2000 4 76 DocuPrint N2025 N2825 REP 11 21 REP 11 22 Initial Issue Repair Adjustment...
Страница 204: ...02 2000 4 94 DocuPrint N2025 N2825 REP 12 29 Initial Issue Repair Adjustment...
Страница 206: ...02 2000 4 96 DocuPrint N2025 N2825 ADJ 1 1 Initial Issue Repair Adjustment...
Страница 208: ...02 2000 5 2 DocuPrint N2025 N2825 Initial Issue Parts list...
Страница 234: ...02 2000 6 2 DocuPrint N2025 N2825 Initial Issue General Procedures Information...
Страница 236: ...02 2000 6 4 DocuPrint N2025 N2825 GP 1 1 Initial Issue General Procedures Information...
Страница 257: ...02 2000 6 25 DocuPrint N2025 N2825 GP 3 3 General Procedures Information Initial Issue Figure 2 Password Menu...
Страница 258: ...02 2000 6 26 DocuPrint N2025 N2825 GP 3 3 Initial Issue General Procedures Information Figure 3 Tray Menu...
Страница 259: ...02 2000 6 27 DocuPrint N2025 N2825 GP 3 3 General Procedures Information Initial Issue Figure 4 PCL Menu...
Страница 260: ...02 2000 6 28 DocuPrint N2025 N2825 GP 3 3 Initial Issue General Procedures Information Figure 5 System Menu...
Страница 262: ...02 2000 6 30 DocuPrint N2025 N2825 GP 3 3 Initial Issue General Procedures Information Figure 8 USB Menu...
Страница 263: ...02 2000 6 31 DocuPrint N2025 N2825 GP 3 3 General Procedures Information Initial Issue Figure 9 Ethernet Menu...
Страница 264: ...02 2000 6 32 DocuPrint N2025 N2825 GP 3 3 Initial Issue General Procedures Information Figure 10 Token Ring Menu...
Страница 265: ...02 2000 6 33 DocuPrint N2025 N2825 GP 3 3 General Procedures Information Initial Issue Figure 11 Novell Menu...
Страница 274: ...02 2000 6 42 DocuPrint N2025 N2825 GP 3 5 Initial Issue General Procedures Information...
Страница 282: ...02 2000 6 50 DocuPrint N2025 N2825 GP 4 8 Initial Issue General Procedures Information...
Страница 324: ...02 2000 6 92 DocuPrint N2025 N2825 GP 5 23 Initial Issue General Procedures Information...
Страница 326: ...02 2000 6 94 DocuPrint N2025 N2825 GP 6 1 GP 6 2 Initial Issue General Procedures Information...
Страница 328: ...02 2000 6 96 DocuPrint N2025 N2825 GP 7 1 Initial Issue General Procedures Information...
Страница 330: ...02 2000 6 98 DocuPrint N2025 N2825 GP 8 1 Initial Issue General Procedures Information...
Страница 332: ...02 2000 7 2 DocuPrint N2025 N2825 Initial Issue Wiring Data...
Страница 336: ...02 2000 7 6 DocuPrint N2025 N2825 Base Engine Initial Issue Wiring Data Wiring Diagram Notations...
Страница 361: ...02 2000 7 31 DocuPrint N2025 N2825 Base Engine Wiring Data Initial Issue Figure 16 Figure 17...