


02/2000
2-19
DocuPrint N2025/N2825
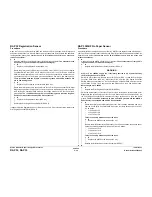
RAP 10, RAP 11
Status Indicator Repair Analysis Procedures
Initial Issue
Run a Test Print. Inspect paper path between Paper Transport Assembly and the
pinch roll of the Fuser Assembly. The paper passes through the Exit Roll Assem-
bly and the pinch roll of the Fuser Assembly.
Y
N
Replace the Fuser Assembly (REP 5.1).
Enter Diagnostics and select Component Test. Scroll to Sensor Input test and press
Enter [4]. Actuate and release the Fuser Exit Sensor. The number on the LCD
increments each time you actuate and release the Fuser Exit Sensor.
Y
N
Go to RAP 48.
Replace the Print Engine Controller PWB (REP 8.5).
Run a Test Print. Inspect paper path between Registration Rolls and the pinch roll of the
Fuser Assembly. The paper passes through the Registration Rolls and the pinch roll
of the Fuser Assembly.
Y
N
Replace the Fuser Assembly (REP 5.1).
Enter Diagnostics and select Component Test. Scroll to Sensor Input test and press Enter
[4]. Actuate and release the Fuser Exit Sensor. The number on the LCD increments
each time you actuate and release the Fuser Exit Sensor.
Y
N
Go to RAP 48.
Replace the Print Engine Controller PWB (REP 8.5).
Replace with fresh, dry paper.
RAP 11 E4: Paper Jam / Exit
There is a paper jam at the Exit Sensor.
Procedure
Check the paper path for paper or other obstructions. Enter Diagnostics and select Test Print.
Run 25 prints from Tray 1. When the E4 Exit Jam is displayed, there is paper on the Exit
Sensor.
Y
N
Select Component Test and scroll to Sensor Input test. Press the Enter Key [4]. Actuate
and deactuate the Exit Sensor. The number on the LCD increments each time you
press and release the actuator.
Y
N
Go to RAP 48.
Replace Print Engine Controller PWB (REP 8.5).
The printer has the Duplex Option installed.
Y
N
Enter Diagnostics and select Component Test. Scroll to Main Motor and press Enter [4].
The Exit Rollers and Pinch Rollers on the Rear Cover rotate smoothly.
Y
N
Remove the Left Side Cover (REP 1.1), scroll to Main Motor and press Enter [4].
Observe the Exit and Fuser Drive Gears. The gears rotate smoothly.
Y
N
Replace the Fuser Assembly (REP 5.1).
Replace Rear Cover Assembly (REP 1.9).
Select Test Print and run test prints. The Error Code reappears.
Y
N
Problem solved
Check the Fuser Assembly for obstructions or contamination. The Fuser assembly is
clean and free of obstructions.
Y
N
Clean or replace the Fuser Assembly (REP 5.1), as necessary.
Check the Exit Assembly. Clean or replace as necessary.
Enter Diagnostics and select Component Test. Scroll to Exit Motor Fwd L and press Enter [4].
The Exit Rollers and Pinch Rollers on the Rear Cover rotate smoothly.
Y
N
Remove the Left Side Cover (REP 1.1). Enter Diagnostics and select Component Test.
Scroll to Exit Motor L press Enter [4]. Observe the Exit Drive Gears and Exit Motor L.
The gears rotate smoothly.
Y
N
The Exit Motor L is rotating.
Y
N
Replace Duplex Assembly (REP 9.1).
A
B
C
A
B
C
Содержание DocuPrint N2025
Страница 12: ...02 2000 1 2 DocuPrint N2025 N2825 Initial Issue Service Call Procedures...
Страница 20: ...02 2000 2 2 DocuPrint N2025 N2825 Initial Issue Status Indicator Repair Analysis Procedures...
Страница 64: ...02 2000 2 46 DocuPrint N2025 N2825 RAP 46 RAP 47 Initial Issue Status Indicator Repair Analysis Procedures...
Страница 72: ...02 2000 2 54 DocuPrint N2025 N2825 RAP 56 Initial Issue Status Indicator Repair Analysis Procedures...
Страница 76: ...02 2000 2 58 DocuPrint N2025 N2825 RAP 59 RAP 60 Initial Issue Status Indicator Repair Analysis Procedures...
Страница 86: ...02 2000 3 2 DocuPrint N2025 N2825 Initial Issue Image Quality Repair Analysis Procedures...
Страница 114: ...02 2000 4 4 DocuPrint N2025 N2825 Introduction Initial Issue Repair Adjustment...
Страница 120: ...02 2000 4 10 DocuPrint N2025 N2825 REP 1 8 REP 1 9 Initial Issue Repair Adjustment...
Страница 128: ...02 2000 4 18 DocuPrint N2025 N2825 REP 2 10 REP 2 11 Initial Issue Repair Adjustment...
Страница 134: ...02 2000 4 24 DocuPrint N2025 N2825 REP 3 7 Initial Issue Repair Adjustment...
Страница 144: ...02 2000 4 34 DocuPrint N2025 N2825 REP 5 5 Initial Issue Repair Adjustment...
Страница 152: ...02 2000 4 42 DocuPrint N2025 N2825 REP 7 6 REP 7 7 Initial Issue Repair Adjustment...
Страница 160: ...02 2000 4 50 DocuPrint N2025 N2825 REP 8 9 Initial Issue Repair Adjustment...
Страница 186: ...02 2000 4 76 DocuPrint N2025 N2825 REP 11 21 REP 11 22 Initial Issue Repair Adjustment...
Страница 204: ...02 2000 4 94 DocuPrint N2025 N2825 REP 12 29 Initial Issue Repair Adjustment...
Страница 206: ...02 2000 4 96 DocuPrint N2025 N2825 ADJ 1 1 Initial Issue Repair Adjustment...
Страница 208: ...02 2000 5 2 DocuPrint N2025 N2825 Initial Issue Parts list...
Страница 234: ...02 2000 6 2 DocuPrint N2025 N2825 Initial Issue General Procedures Information...
Страница 236: ...02 2000 6 4 DocuPrint N2025 N2825 GP 1 1 Initial Issue General Procedures Information...
Страница 257: ...02 2000 6 25 DocuPrint N2025 N2825 GP 3 3 General Procedures Information Initial Issue Figure 2 Password Menu...
Страница 258: ...02 2000 6 26 DocuPrint N2025 N2825 GP 3 3 Initial Issue General Procedures Information Figure 3 Tray Menu...
Страница 259: ...02 2000 6 27 DocuPrint N2025 N2825 GP 3 3 General Procedures Information Initial Issue Figure 4 PCL Menu...
Страница 260: ...02 2000 6 28 DocuPrint N2025 N2825 GP 3 3 Initial Issue General Procedures Information Figure 5 System Menu...
Страница 262: ...02 2000 6 30 DocuPrint N2025 N2825 GP 3 3 Initial Issue General Procedures Information Figure 8 USB Menu...
Страница 263: ...02 2000 6 31 DocuPrint N2025 N2825 GP 3 3 General Procedures Information Initial Issue Figure 9 Ethernet Menu...
Страница 264: ...02 2000 6 32 DocuPrint N2025 N2825 GP 3 3 Initial Issue General Procedures Information Figure 10 Token Ring Menu...
Страница 265: ...02 2000 6 33 DocuPrint N2025 N2825 GP 3 3 General Procedures Information Initial Issue Figure 11 Novell Menu...
Страница 274: ...02 2000 6 42 DocuPrint N2025 N2825 GP 3 5 Initial Issue General Procedures Information...
Страница 282: ...02 2000 6 50 DocuPrint N2025 N2825 GP 4 8 Initial Issue General Procedures Information...
Страница 324: ...02 2000 6 92 DocuPrint N2025 N2825 GP 5 23 Initial Issue General Procedures Information...
Страница 326: ...02 2000 6 94 DocuPrint N2025 N2825 GP 6 1 GP 6 2 Initial Issue General Procedures Information...
Страница 328: ...02 2000 6 96 DocuPrint N2025 N2825 GP 7 1 Initial Issue General Procedures Information...
Страница 330: ...02 2000 6 98 DocuPrint N2025 N2825 GP 8 1 Initial Issue General Procedures Information...
Страница 332: ...02 2000 7 2 DocuPrint N2025 N2825 Initial Issue Wiring Data...
Страница 336: ...02 2000 7 6 DocuPrint N2025 N2825 Base Engine Initial Issue Wiring Data Wiring Diagram Notations...
Страница 361: ...02 2000 7 31 DocuPrint N2025 N2825 Base Engine Wiring Data Initial Issue Figure 16 Figure 17...