


13
ACW-DINDxxx_UG_EN_V1.8
3.
Set up
a.
Antenna positioning
This version was designed for installation in a cabinet. If the latter is made of insulating materials (PVC,
ABS, fiberglass), it is possible to simply use a small half wave whip antenna (Ref: ANT868-12FSC). This
antenna must be correctly screwed on the SMA connector and positioned vertically, preferably
upwards.
In the case of a metal box, it is imperative to deport the antenna to the outside to have good results in
radio (avoid the Faraday cage).
For optimal results, it is advisable to deport the antenna in height, clear of any metallic obstacle in a
radius of one meter.
b.
Modem connection
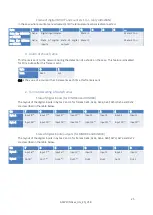
Antenna (SMA connector)
Before powering the product, a 50
Ω
/ 868MHz antenna must be
connected, either directly to the SMA connector or via a 50
Ω
cable in
case of antenna offset.
Power Supply (Lower terminal)
The ACW-DINDxxx module must be powered with a DC power supply
between 10V and 30V that can provide a minimum current of 100mA.
The POWER pin corresponds to the + terminal and the GND pin to the -
(0V) terminal.
Note: All GND terminals of the ACW-DINDxxx are interconnected
internally. Only the GND terminal, bottom right, should be used to
connect the power cable.
Jack connector
This connector is used to connect an optional temperature sensor
(supplied with a 2m cable).
Micro USB
This connector is used for product configuration via USB interface on
PC.
Note : The configuration via USB can directly power the ACW-DINDxxx and does not require an external
power supply (10 / 30V). But an external power supply can also be present.


