background image

15

Tools Needed:

Tools Needed:

Please Do Not Return This Product To The Store. 

Contact your local Wayne-Dalton dealer. To find your local Wayne-Dalton dealer, refer to your 

local yellow pages/business listings or go to the 

Find a Dealer

 section online at 

www.Wayne-Dalton.com

INST

ALLA

TION

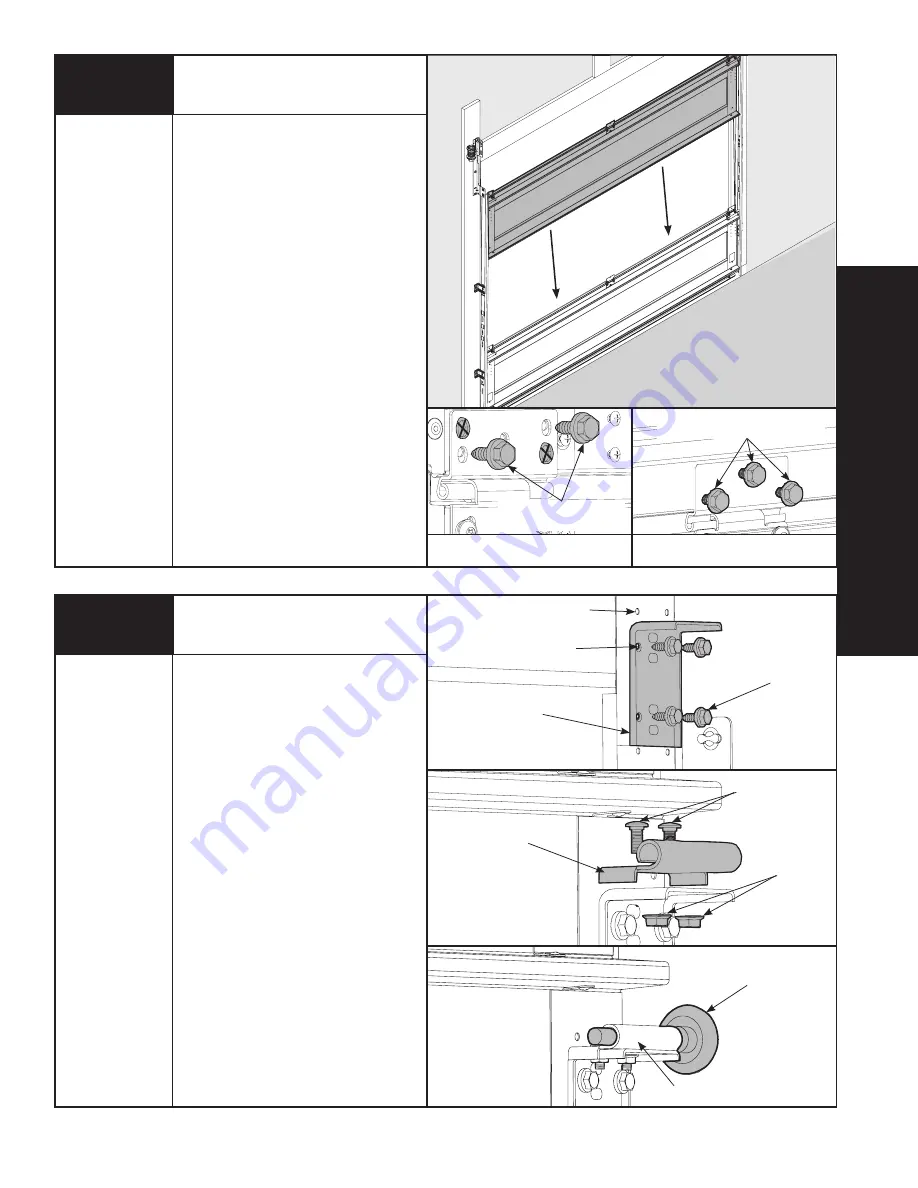
Stacking Sections

NOTE:

 For door section identification see 

page 4.

NOTE:

 Make sure hinges are flipped down, 

when stacking another section on top. 

Place rollers in hinge tubes of the second 
section (lock section). With assistance, 
lift second section and guide rollers into 
the vertical tracks. Keep sections aligned 
and fasten hinges to connect the sections 
using 1/4”-14 x 5/8” self tapping screws. 
Repeat for other section(s) except top 
section.

IMPORTANT: 

PUSH & HOLD THE HINGE 

LEAF AGAINST SECTION WHILE SECURING 
WITH 1/4”-14 X 5/8” SELF TAPPING 
SCREWS. END HINGES HAVE (2) SCREWS 
AND INTERMEDIATE HINGES HAVE (3) 
SCREWS.

NOTE:

 Install lock at this time (sold 

separately) see instructions in OPTIONAL 
SIDELOCK INSTALLATION on page 40.

LOCK SECTION

8

(2) 1/4”-14 X 5/8” 

SELF TAPPING SCREWS

END HINGES (LEFT HAND SHOWN, RIGHT 

HINGE SYMMETRICALLY OPPOSITE)

INTERMEDIATE HINGES

Top Brackets

(4) 1/4” - 14 x 5/8”

SELF TAPPING 

SCREWS

TOP BRACKET BASE

TOP BRACKET SLIDE

(2) 1/4” - 20

FLANGED HEX 

NUTS

(2) 1/4” - 20 x 5/8”

CARRIAGE BOLTS

ROLLER

TOP BRACKET SLIDE

Power Drill

7/16” Socket 

Driver

Power Drill

7/16” Socket 

Driver

1ST SET

2ND SET

To install the L-shaped top brackets, 
align the top holes in the top bracket 
base with the second set of holes in the 
endcap of the top section. 

Fasten using (4) 1/4” - 14 x 5/8” self 
tapping screws. Secure the top bracket 
slide to the bracket base loosely using 
(2) 1/4” - 20 x 5/8” carriage bolts and 
(2) 1/4” - 20 flanged hex nuts. The 
bracket will be tightened and adjusted 
in Step 16. Insert rollers into top bracket 
slide. Repeat for other side.

9

(3) 1/4”-14 X 5/8” SELF TAPPING 

SCREWS

TOP SECTION

TOP SECTION

TOP SECTION

Содержание Torquemaster Plus 9100

Страница 1: ...e attempting installation If in question about any of the proce dures do not perform the work Instead have a qualified door agency do the installation or repairs Copyright 2015 Wayne Dalton a Division...

Страница 2: ...when closing a door Use lift handles gripping points when operating door manually 10 DO NOT permit children to operate garage door or door controls Severe or fatal injury could result should the child...

Страница 3: ...00 9600 5120 5140 IMPORTANT NOTICE Read these instructions carefully before attempting installation If in question about any of the procedures do not perform the work Instead have a qualified door age...

Страница 4: ...3 and 4 4 only on five section doors See view below The stamp identifies the stacking sequence of the section The sequence is always determined by 1 being the bottom section to 3 or 4 being the highes...

Страница 5: ...OLD DOOR PREPARING THE OPENING CAREFULLY OTHERWISE SEVERE OR FATAL INJURY COULD RESULT If you have an existing door follow the instructions to identify which counterbalance removal is necessary The pr...

Страница 6: ...door from lifting as you unwind the springs Use only approved winding bars available from your dealer Do not use undersized steel rods screw drivers or anything else to unwind the springs Position th...

Страница 7: ...have a black counter cover Place a mark on the drive gear tooth and an adjacent mark on the right hand end bracket Fig 1 Loosen the lock nut 1 4 turn using a 7 16 wrench and continue with step 2 If y...

Страница 8: ...s to the upper portion of the end bracket and hold the housing steady while removing the lower 5 16 x 1 5 8 lag screw and 10 x 1 2 phillips head screw from the end bracket Fig 6 Step 6 Holding the rig...

Страница 9: ...he other side If safety cables are running through the extension springs remove them also Remove parts from work area Step 2 Holding door in the open position remove the vice clamps be prepared to sup...

Страница 10: ...irmly attached to the wall above the header at the center of the opening The mounting surface must be 2 x 6 lumber minimum Select southern yellow pine lumber Do not use lumber marked as spruce pine fu...

Страница 11: ...NOT NECESSARY WHEN INSTALLING PRODUCTS ON UN TREATED LUMBER NOTE It is recommended that 5 16 x 1 5 8 lag screws be pilot drilled using a 3 16 drill bit and 1 4 x 2 lag screws and 1 4 x 1 1 2 lag screw...

Страница 12: ...zontal angle is not welded the horizontal angle will be installed as shown NOTE If you have riveted track skip step 4 and proceed to step5 Horizontal Angle Hammer HORIZONTAL TRACK HORIZONTAL ANGLE HOR...

Страница 13: ...2007 mm QIJB 3 BOTTOM QIJB 5 BOTTOM QIJB 6 BOTTOM 7 6 82 TRACK 2083 mm QIJB 3 BOTTOM QIJB 5 BOTTOM QIJB 6 BOTTOM 7 9 85 TRACK 2159 mm QIJB 3 BOTTOM QIJB 5 BOTTOM QIJB 6 BOTTOM 8 0 4 SECTIONS 88 TRACK...

Страница 14: ...RAISED THE HEIGHT OF THE SHIM Position the left hand vertical track assembly over the rollers of the bottom section Make sure the counterbalance cable is located between the rollers and the door jamb...

Страница 15: ...AVE 2 SCREWS AND INTERMEDIATE HINGES HAVE 3 SCREWS NOTE Install lock at this time sold separately see instructions in OPTIONAL SIDELOCK INSTALLATION on page 40 LOCK SECTION 8 2 1 4 14 X 5 8 SELF TAPPI...

Страница 16: ...E Model 9405 9600 glazed top doors 13 0 wide or greater will be supplied with a 3 asymmetrical u bar for the top section Place the 3 asymmetrical u bar over the top rib Fasten each end of the u bar to...

Страница 17: ...erator bracket on male part of the top section For retro fit applications the operator bracket must be aligned with an existing operator and positioned on top section so it bridges the transition poin...

Страница 18: ...n 1 11 16 43 mm to 1 3 4 44 mm from the edge of the door tighten the bottom lag screw Flagangles must be parallel to the door sections Repeat for opposite side IMPORTANT THE DIMENSION BETWEEN THE FLAG...

Страница 19: ...TEP 30 OR DOOR COULD FALL FROM OVERHEAD POSI TION CAUSING SEVERE OR FATAL INJURY Level the horizontal track assembly and bolt the horizontal angle to the slot in the flagangle using 1 3 8 16 x 3 4 tru...

Страница 20: ...lange hex nuts DO NOT RAISE DOOR UNTIL HORIZONTAL TRACKS ARE SE CURED AT REAR AS OUTLINED IN STEP 30 OR DOOR COULD FALL FROM OVERHEAD POSI TION CAUSING SEVERE OR FATAL INJURY Level the horizontal trac...

Страница 21: ...ckets With horizontal tracks installed you can now adjust the top brackets Vertically align the top section of the door with the lower sections Once aligned position the top bracket slide out against...

Страница 22: ...Center Bracket Bushing NOTE If you are installing the idrive opener on your garage door skip this step and continue with Step 19 NOTE If you are not installing the idrive opener on your garage door yo...

Страница 23: ...pting to slide opener over the left end of the TorqueMaster spring tube can damage the internal electronics Once aligned slide the opener onto the right hand end of the TorqueMaster spring tube As the...

Страница 24: ...right and left Slide the left hand drum wrap over the left side of the TorqueMaster spring tube assembly with the tabs facing left Continue sliding the left hand drum wrap towards the center of the T...

Страница 25: ...stall the cable drum slide the correct cable drum over the winding shaft until the cable drum seats against the TorqueMaster spring tube assembly The winding shaft must extend past the cable drum far...

Страница 26: ...er Drill 7 16 Socket Driver 5 16 Wrench Cable Dru m No spa ce bet ween Ratch et Paw l and Cable Dru m indicates eng age me nt Cable Dru m Ratch et Paw l ENGA GED SID E VIE W No spa ce bet ween Ratch e...

Страница 27: ...lling the idrive opener on your garage door you must install the center bracket bushing assembly Follow these instructions for non idrive operated garage doors NOTE If you are installing a DoorMaster...

Страница 28: ...e to the top of the door section with the idrive resting on the support bracket Once TorqueMaster spring tube is level drill 1 8 pilot holes for the lag screws Then secure support bracket to the mount...

Страница 29: ...rs from ratchet bracket until spring s are fully wnwound To safely unwind spring s read and follow the directions in the installation instructions owners manual DO NOT REMOVE THIS TAG NOTE See idrive...

Страница 30: ...x 1 2 screw into the disconnect handle until snug and then tighten screw an additional 1 to 1 1 2 turns to secure disconnect cable to the disconnect handle Trim off excess cable from bottom of the dis...

Страница 31: ...engagement Cable Drum Ratchet Pawl ENGAGED SIDE VIEW No space between Ratchet Pawl and Cable Drum ENGAGED UNDERNEATH VIEW Space between Ratchet Pawl and Cable Drum non indicates engagement Cable Drum...

Страница 32: ...COMMENDED SPRING TURNS Door Height Spring Turns 6 0 14 6 3 14 1 2 6 5 15 6 6 15 6 8 15 1 2 6 9 15 1 2 7 0 16 7 3 16 1 2 7 6 17 7 9 17 1 2 8 0 18 END BRACKET RATCHET 3 EXTENSION 5 8 SOCKET MARKS None T...

Страница 33: ...UIRED NUMBER OF TURNS For single spring applications Return to the right hand and continue winding the spring to the required number of turns for your door Place pawl knob in lower position For double...

Страница 34: ...from raising or lowering while installing the rear support Using perforated angle 2 5 16 1 5 8 hex head lag screws and 5 16 bolts with nuts may not be supplied fabricate rear support for horizontal t...

Страница 35: ...ter clockwise on the right hand side and clockwise on the left hand side Place the ratchet with 5 8 socket onto the winding shaft pull down to add 3 10 of a turn Watch as three teeth of the ratchet wh...

Страница 36: ...ch provides a safety feature that prevents the door from rapidly descending in case of spring failure or forceful manual operation Typical sign of an activated system Door opens but will not close doo...

Страница 37: ...ift easy to pull down Anytime spring adjustments are made pawl knob must be in the upper position see illustration An unbalanced door such as this can cause idrive or Torquemaster opera tion problems...

Страница 38: ...d the ratchet wheel Push in on the pawl to allow the three ratchet wheel teeth to pass by the ratchet pawl as you carefully allow the wrench to be rotated upward by the spring tension Release the pawl...

Страница 39: ...SELF DRILLING SCREWS 1 8 Power Drill 7 16 Socket Driver NOTE When installing a DoorMasterTM operator use the center bracket and drive gear supplied with your operator located in DoorMasterTM package...

Страница 40: ...a 7 16 11 mm hole through the section at each mark and insert the outside step plate Loosely fasten step plate slide to base with 1 1 4 20 x 5 8 carriage bolt and nut Align inside step plate holes an...

Страница 41: ...NSTALL PULL ROPES ON DOORS WITH ELECTRIC OPERATORS CHILDREN MAY BECOME ENTANGLED IN THE ROPE CAUSING SEVERE OR FATAL INJURY Measure and mark the jamb approximately 48 to 50 1220 to 1270 mm from floor...

Страница 42: ...shown in FIG 2 4 through FIG 2 5 NOTE Depending on your setup you may or may not have to cut straight arm to accomplish trolley settings as shown in FIG 2 4 through FIG 2 5 Align hole in the appropria...

Страница 43: ...iate 1 2 1 room permitting above of the high arc line and centered on the vertical line as shown in FIG 3 2 Spot the wall brackets mounting holes on the header wall and then refer to your garage door...

Страница 44: ...T CLOSE AND A CLOSING DOOR OPENS IF PHOTOELECTRIC EYE SYSTEM IS OBSTRUCTED FAILURE TO PASS THIS TEST REQUIRES IMMEDIATE ADJUSTMENTS OR REPAIRS FAILURE TO MAKE ADJUSTMENTS IF NECESSARY CAN RESULT IN SE...

Страница 45: ...ay from any sources of sparks and or fire 3 DO NOT USE window cleaning fluids scouring compounds gritty cloths gasoline or solvents such as alcohol acetone carbon tetrachloride etc Wax on the surface...

Страница 46: ...ed painting with latex paint may cause accelerated rusting of the steel in the exposed area NOTES 1 Repainting of finish painted steel doors cannot be warranted as this condition is totally beyond the...

Страница 47: ...s Manufacturer s preparation and painting instructions are followed explicitly This Limited Warranty will be voided if any holes are drilled into the door other than those specified by the Manufacture...

Страница 48: ...ore Covered by one or more of the following Patents 5 408 724 5 409 051 5 419 010 5 495 640 5 522 446 5 562 141 5 566 740 5 568 672 5 718 533 6 019 269 6 089 304 6 644 378 6 374 567 6 561 256 6 527 03...

Страница 49: ...a instalaci n Si hubiera dudas sobre alguno delosprocedimientos noefectuareltrabajo Ensulu gar contrataraunaempresaespecializadaenpuertas para que efect e la instalaci n o reparaciones Copyright 2015...

Страница 50: ...es al cerrar una puerta Al accionar la puerta manualmente utilizar las manijas de levantar puntos de sujeci n 10 NO permitir que ni os accionen la puerta del garaje o los controles de la puerta Si un...

Страница 51: ...SI EST N INCLUIDOS BARRA U ASIM TRICA SI FUERA NECESARIA TorqueMaster Single and Double Spring Installation Instructions and Owner s Manual 9100 9600 5120 5140 IMPORTANT NOTICE Read these instruction...

Страница 52: ...pa de identificaci n 1 2 3 y 4 4 s lo en puertas de cinco secciones Ver la ilustraci n abajo La estampa identifica la secuencia de apilado de la secci n La secuencia siempre est determinada por la sec...

Страница 53: ...ERTA EXISTENTE PREPARACI N DE LA ABERTURA CUIDADOSAMENTE DE LO CONTRARIO PODR AN OCURRIR LESIONES GRAVES O FATALES Si se tiene una puerta existente seguir las instrucciones para identificar qu reducci...

Страница 54: ...lo para evitar que la puerta se levante a medida que se desarrollan los resortes Utilizar s lo barras de arrollamiento aprobadas disponibles mediante concesionarios No utilizar varillas de acero de di...

Страница 55: ...EL INTERIOR DEL EDIFICIO VIENDO HACIA AFUERA Paso 1 Si se tiene una cubierta de contador negra Colocarunamarcaeneldientedelengranaje impulsor y una marca adyacente en el soporte de extremo derecho Fi...

Страница 56: ...resi n a la porci n superior del soporte de extremo y sujetar la carcasa sin moverla mientras se retira el tirafondo inferior de 5 16 x 1 5 8 y el tornillo de cabeza Phillips nro 10 x 1 2 del soporte...

Страница 57: ...le la polea acanalada y el resorte de extensi n Repetir para el lado opuesto Si hay cables de seguridad tendidos a trav s de los resortes de extensi n retirar los tambi n Retirar las piezas del rea de...

Страница 58: ...montaje adecuada La superficie de montaje ha de ser madera de 2 x 6 como m nimo elegir madera de pino amarillo del sur No usar madera marcada picea pino abeto SPF por sus siglas en ingl s La superfici...

Страница 59: ...S NECESARIO USAR TIRAFONDOS DE ACERO INOXIDABLE AL INSTALARSE PRODUCTOS EN MADERA NO TRATADA NOTA Al utilizarse tirafondos de 5 16 x 1 5 8 se recomienda taladrar agujeros piloto con una broca de 3 16...

Страница 60: ...horizontal como se muestra NOTA Si usted ha remachado vestigio paso 4 de brinco y contin a a step5 Angular horizontal Martillo RIEL HORIZONTAL ANGULAR HORIZONTAL ANGULAR HORIZONTAL RIEL HORIZONTAL AG...

Страница 61: ...SJIR 3 INF SJIR 5 INF SJIR 6 INF RIEL DE 7 6 82 2083 mm SJIR 3 INF SJIR 5 INF SJIR 6 INF RIEL DE 7 9 85 2159 mm SJIR 3 INF SJIR 5 INF SJIR 6 INF RIEL DE 8 0 4 SECCIONES 88 2235 mm SJIR 3 MEDIO SJIR 6...

Страница 62: ...rse que el cable de compensaci n est ubicado entre los rodillos y la jamba de la puerta Taladrar agujeros piloto de 3 16 para los tirafondos Conectar los soportes para jambas y el soporte acartelado d...

Страница 63: ...EN TRES 3 TORNILLOS NOTA Instalar la cerradura vendida por separado ver instrucciones en INSTALACI N DE CERRADURA LATERAL OPCIONAL en la p gina 38 SECCI N DE CERRADURA 8 2 TORNILLOS AUTO TERRAJANTES D...

Страница 64: ...as modelo 9405 9600 con vidrio y anchura de 13 0 mayor vendr n provistas de una barra U asim trica de 3 para la secci n superior Colocar la barra U asim trica de 3 sobre la nervadura superior Fijar am...

Страница 65: ...superior ubicar el centrodelasecci nsuperioryasentarelsoporte delaccionadorsobrelapartemachodelasecci n superior Para aplicaciones de renovaci n el soporte del accionador ha de estar alineado con un...

Страница 66: ...r de 43 mm 1 11 16 a 44 mm 1 3 4 del borde de la puerta apretar el tirafondo inferior Es preciso que los soportes acartelados de angular est n paralelos a las secciones de la puerta Repetir para el la...

Страница 67: ...DESCRIBE EN EL PASO 30 DE LO CONTRARIO LA PUERTA PODR A CAER DESDE LA POSICI N SUPERIORY CAUSAR LESIONES GRAVES O FATALES Nivelarelconjuntodelrielhorizontalyempernar el angular horizontal a la ranura...

Страница 68: ...PUERTA SINO HASTA QUE LOS RIELES HORIZONTALES EST N ASEGURADOS EN LA PARTE POSTERIOR COMO SE DESCRIBEENEL PASO 30 DE LO CONTRARIO LA PUERTA PODR A CAER DESDE LA POSICI N SUPERIOR Y CAUSAR LESIONES GR...

Страница 69: ...Con los rieles horizontales instalados ahora se puede ajustar los soportes superiores Alinear verticalmente la secci n superior de la puerta con las secciones inferiores Una vez alineada ubicarelarras...

Страница 70: ...TORQUEMASTER Ninguna 17 18 Casquillo de soporte central NOTA Si se est instalando el accionador idrive en la puerta de garaje ignorar este paso y continuar con el Paso 19 NOTA Si no se est instalando...

Страница 71: ...sliza sobre la etiqueta del tubo de torsi n Si se intenta des lizar el accionador sobre el extremo iz quierdo del tubo de resorte s TorqueMaster se podr a da ar los componentes electr nicos internos U...

Страница 72: ...ho e izquierdo Deslizar el encastre del tambor izquierdo sobre el lado izquierdo del conjunto del tubo de resorte s TorqueMaster con las orejetas viendo hacia la izquierda Continuar deslizando el enca...

Страница 73: ...el tambor para cables deslizar el tambor para cables correcto sobre el eje de arrollamiento hasta que el tambor para cables est asentado contra el conjunto del tubo de resorte s TorqueMaster Es preci...

Страница 74: ...de extremo COSTILLAS EJE DE ARROLLAMIENTO RANURA AGUJERO GU A DE CABLE DE DESENGANCHE SOPORTE DE EXTREMO DERECHO ETIQUETA DE ADVERTENCIA 22 Soportes de extremo Taladro el ctrico V stago de cubo de 5 1...

Страница 75: ...ar con el Paso 23 NOTA Si no se est instalando el accionador idrive en la puerta del garaje se ha de instalar el conjunto del casquillo del soporte central Seguir estas instrucciones para puertas de g...

Страница 76: ...con el idrive descansando sobre el soporte de apoyo Una vez se ha nivelado el tubo de resorte s TorqueMaster taladrar agujeros piloto de 1 8 para los tirafondos A continuaci n asegurar el soporte de a...

Страница 77: ...ible severe or fatal injury DO NOT remove fasteners from ratchet bracket until spring s are fully wnwound To safely unwind spring s read and follow the directions in the installation instructions owne...

Страница 78: ...esenganche Apretar el tornillo nro 6 20 x 1 2 en la manija de desenganche hasta que est ajustado luego apretar el tornillo de 1 a 1 1 2 vueltas adicionales para asegurar el cable de desenganche a la m...

Страница 79: ...ho ajustar el conjunto de tambor para cable mediante la rotaci n del tambor hasta que el tornillo de fijaci n vea directamente en direcci n opuesta al travesa o Aflojar el tornillo de fijaci n no m s...

Страница 80: ...AR GUANTES DE CUEROALARROLLAR LOS RESORTES DEL TORQUEMASTER PLUS EL NO USAR GUANTES PUEDE CAUSAR LESIONES EN LAS MANOS Cerciorarse de que el cable de compensaci n est alineado en la primera ranura del...

Страница 81: ...extremo Colocar la llave de trinquete con un cubo de 5 8 en el extremo izquierdo del eje de arrollamiento Para arrollar el resorte rotar el eje de arrollamiento en sentido horario mientras se observa...

Страница 82: ...suba o baje mientras se instala el apoyo posterior Con perfil angular perforado tirafondos de cabeza hexagonal de 5 16 x 1 5 8 y pernos de 5 16 con tuercas podr an no ser suministrados fabricar el ap...

Страница 83: ...Y VERIFICAR NUEVAMENTE LO SIGUIENTE 1 Verificar el nivel de la puerta 2 Verificar el nivel y la verticalidad del tubo de resorte s TorqueMaster y de los soportes acartelados de angular 3 Verificar la...

Страница 84: ...e al t pica de un sistema activado la puerta abre pero no cierra la puerta hace un ruido de chasquido distintivo al abr rsela Si el sistema est activado seguir cuidadosamente las instrucciones de rest...

Страница 85: ...ar a una empresa especializada en puertas para que reemplace el los resorte s NOTA Tambi n se recomienda una extensi n de 3 para mayor espacio libre desde el angular horizontal COLOCAR LAS MORDAZAS DE...

Страница 86: ...de la rueda dentada pasan sobre el trinquete creando tres chasquidos Para reducir la tensi n de un resorte Para reducir la tensi n de un resorte verificar que la llave de cubos est configurada para a...

Страница 87: ...librada correctamente colocar las perillas de los trinquetes en la posici n activa posici n inferior Instalar la cerradura lateral en la segunda secci n de la puerta Asegurar la cerradura a la secci n...

Страница 88: ...eMaster de modo que el conjunto del engranaje impulsor soporte central est n en el centro del tubo de resorte s TorqueMaster NOTA Despu s de completar este paso continuar con el Paso 20 en la p gina 2...

Страница 89: ...e pulga da atrav sdelasecci nenambasmarcaseinsertar la placa escalonada exterior Fijar holgadamente la corredera de la placa escalonada a la base con un 1 perno de carruaje de 1 4 20 x 5 8 y tuerca Al...

Страница 90: ...w Wayne Dalton com Cuerda de tiro NO INSTALAR CUERDAS DE TIRO EN PUERTAS CON ACCIONADORES EL CTRICOS LOS NI OS PODR AN ENREDARSE EN LA CUERDAY SUFRIR LESIONES GRAVES O FATALES Medir y marcar la jamba...

Страница 91: ...4 y 2 5 NOTA Dependiendo de la configuraci n podr a ser necesario o no cortar el brazo recto para lograr los valores deseados del trole como se muestra en las figuras 2 4 y 2 5 Alinear el agujero del...

Страница 92: ...e la l nea del punto m s alto del arco y centrado en la l nea vertical como se muestra en la figura 3 2 Localizar los agujeros de montaje para los soportes de pared en la pared del travesa o y luego c...

Страница 93: ...UE UNA PUERTA QUE SE EST CERRANDO SE ABRA SI SE OBSTRUYE EL SISTEMA DEL OJO FOTOEL CTRICO EL HACER CASO OMISO DE LOS AJUSTES SI ESTOS FUERAN NECESARIOS PUEDE CONDUCIR A LESIONES GRAVES O FATALES 1 Ins...

Страница 94: ...n un rea bien ventilada alejada de toda fuente de chispas y o fuego 3 NO UTILIZAR l quidos para limpieza de ventanas compuestos abrasivos pa os con arenisca gasolina o solventes como alcohol acetona t...

Страница 95: ...rimado adecuadamente la pintura de l tex podr a acelerar la oxidaci n del acero en el rea expuesta NOTAS 1 No se puede garantizar el reacabado de la pintura de puertas de acero puesto que esta condici...

Страница 96: ...nos que las instrucciones de preparaci n y pintura del Fabricante se sigan al pie de la letra Esta Garant a quedar sin efecto si se perforan agujeros en la puerta que no sean aquellos especificados po...

Страница 97: ...oducto al establecimiento de compra Amparado por una o m s de las siguientes patentes 5 408 724 5 409 051 5 419 010 5 495 640 5 522 446 5 562 141 5 566 740 5 568 672 5 718 533 6 019 269 6 089 304 6 64...

Отзывы: