Page 6
AG-SS with Monitor Faucet Installation
Step 6
Step 7
Step 8
Gather and identify the M-500 faucet pieces.
Step 10
Note:
A dripping or gurgling sound may be heard coming from the air gap hole on the faucet or
the drain when the system is running. This is normal and in compliance with UPC
(Universal Plumbing Code) requirements.
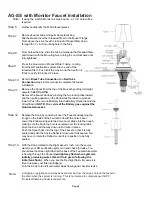
If using the AG-SS Monitor Air Gap Faucet , a 1 1/4" hole will be
required.
Remove Faucet and small parts from plastic bag.
Slip the Gasket over the threaded Stem to the Faucet Flange.
From above the sink, feed the tubing and Faucet Stem down
through the 1
¼
inch mounting hole in the Sink.
From below the sink, slide the Tubing Guide up the threaded Stem
and follow it with the Mounting Nut, turning the nut clockwise until
fully tightened.
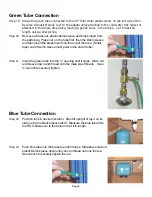
Press the blue colored Product Water Tubing, coming
from the RO purification system into the end of the
threaded Stem. Push it all the way in and then pull on it
firmly to verify it is locked in place.
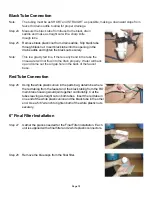
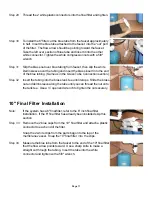
Refer to
Black Tube Connection
and
Red Tube
Connection
steps in this manual to complete the faucet
installation.
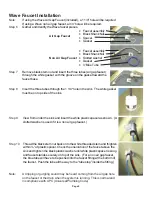
.Remove the Spout from the top of the Faucet by pulling it straight
upward. SEE DRAWING
Remove the Faucet Knob by pinching the two locking tabs inward
and then pulling upward on the Knob while the tabs are pinched
inward. Push the coin cell Battery into the Battery Holder behind the
Circuit Board.
NOTE: the + side of the Battery goes against the
Gold metal bracket.
Replace the Knob by centering it over the Faucet and aligning the
trough on the inside of the Faucet Knob with the Valve Lever.
Lower the Knob making sure the Valve Lever slides into the trough,
making sure the Knob top hole is centered over the locking tabs.
Push the Knob all the way down until it locks in place.
Push the Spout back into the top of the Faucet so that it is fully
seated and push the frosted Deflector down until fully seated. You
may have to rotate the Deflector until it is in position to be fully
seated.
With the Knob rotated to the Right about ½ inch, turn the source
water to your RO purification system on and check for leaks. You
should see the Green light flash at the base of the Faucet while water
is flowing through the Faucet
(red light may flash when system is
initially producing water, this will turn green following the
initial tank flush)
. When you see the Red light flash, it means it is
time to replace your filter cartridge(s).
Turn the Knob to the left until water stops flowing and check for leaks.
Step 9
Step 11
Step 12
Step 13
Note:
Содержание 5 SV DELUXE
Страница 19: ...Page 19 California Certification...
Страница 24: ...Page 24...


