


21
Fig. 25
Fig. 24
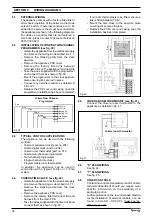
6.13
GAS VALVE (see fig. 25)
Carry out component removal procedure as
described in 6.4.
The gas valve must be changed as complete unit.
Disconnect the electrical plug and leads from the
gas valve. Slacken and unscrew gas valve inlet
and outlet connections (3). Please note, the
sealing washers (2) must be discarded and
replaced with new sealing washers (2). Locate
and remove gas valve retaining screws on the
underside of the boiler if required, the gas valve
can now be removed. Replace in the reverse
order. Check and adjust burner pressure settings.
WARNING: A GAS SOUNDNESS CHECK
MUST BE CARRIED OUT.
6.14
INTEGRAL TIME SWITCH (if fitted)
Carry out component removal procedure as
described in 6.4.
Locate and remove the terminal cover and
securing screws (2), locate and remove the time
clock retaining screws, remove time clock.
Disconnect wiring after carefully taking note of
all electrical connections.
Replace in the reverse order.
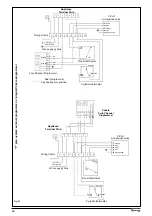
6.15
ELECTRODE, BURNER THERMOSTAT,
BURNER & INJECTORS
Fig. 26: carry out component removal procedure
as described in 6.4.
Unclip and remove the air chamber cover (2).
Locate and remove the 6 screws securing the
front combustion cover (3), pull the cover towards
you before lifting and disengaging. Disconnect
the electrode lead and burner thermostat from
their respective connectors. Ease the electrode
sealing grommet from its seating (4). Remove the
retaining screw (6) for the burner thermostat and
remove the thermostat (7).
Fig. 27: locate and remove the four screws which
secure the burner in position (1), gently ease the
burner out of its location. Once the burner has
been removed, the electrode retaining screw can
be can be removed. Locate the burner injectors
(2) and remove (if necessary). Replace in the
reverse order. Please note, the injector sealing
washers (3) must be replaced if the injectors have
been removed, ensure all seals are in good
condition, taking care to ensure they are replaced
correctly. Replace in the reverse order.
Fig. 26
1
1
3
2
1
1
Содержание Synergy 29
Страница 1: ...Installation Servicing Instructions THESE INSTRUCTIONS TO BE RETAINED BY USER ...
Страница 40: ...38 Fig 45 ...


