17
5.1
GAS SUPPLY INSTALLATION
Inspect the entire installation including the gas
meter, test for soundness and purge. Refer to BS
6891 for specific instruction.
5.2
THE HEATING SYSTEM
The appliance contains components that may
become damaged or rendered inoperable by oils
and/or debris that are residual from the
installation of the system, consequently it is
essential that the system be flushed in
accordance with the following instructions.
5.3
INITIAL FILLING OF THE SYSTEM
Ensure both flow and return service valves are
open, remove appliance casing as described in
4.7.1, identify the automatic air release valve and
loosen the dust cap by turning the cap anti-
clockwise one full turn. IMPORTANT, THERE
ARE NO MANUAL AIR RELEASE VALVES
LOCATED ON THE APPLIANCE. Ensure all
manual air release valves located on the heating
system are closed. Using the approved method
of filling (fig. 14), slowly proceed to fill the system,
as water enters the system the pressure gauge
will begin to rise. Once the gauge has reached 1
bar close both the inlet and service valves and
begin venting all manual air release valves,
starting at the lowest first. It may be necessary
to go back and top-up the pressure until the entire
system has been filled. Inspect the system for
water soundness, rectifying any leaks.
5.4
INITIAL FLUSHING
The whole of the heating system must be flushed
both cold and hot as detailed in 5.8. Open all
radiator or heating valves and the appliance flow
& return service valves. Drain the boiler and
system from the lowest points. Open the drain
valve full bore to remove any installation debris
from the boiler prior to lighting. Refill the boiler
and heating system as described in 5.3.
5.5
PRE-OPERATION CHECKS
Before attempting the initial lighting of the
appliance, the following checks must be carried
out:
●
ensure all gas service valves from the meter
to the appliance are open and the supply pipe
has been properly purged
●
ensure the proper electrical checks have been
carried out, (see 7.7) particularly continuity,
polarity and resistance to earth
●
ensure the 3 amp fuse - supplied with the
appliance - has been fitted
●
ensure the system has been filled, vented and
the pressure set to 1 bar
●
ensure the flue system has been fitted properly
and in accordance with the instructions
●
ensure all appliance service valves are open.
SECTION 5
COMMISSIONING
5.6
INITIAL LIGHTING
Ensure the electrical supply to the appliance is
switched on. Move the selector switch to the ON
position, ensure any time clock or programmer
is switched to an ‘ON’ position and ensure any
other external controls are also calling for heat.
The appliance will now operate in the heating
mode as described in 1.3. Should the appliance
fail to ignite, refer to 5.5 and/or section 7
(faultfinding).
5.7
CHECKING THE BURNER PRESSURE
Although the burner pressure is factory set, it is
necessary to check it during commissioning.
Isolate the appliance from the electrical supply
and attach a suitable manometer to the gas valve
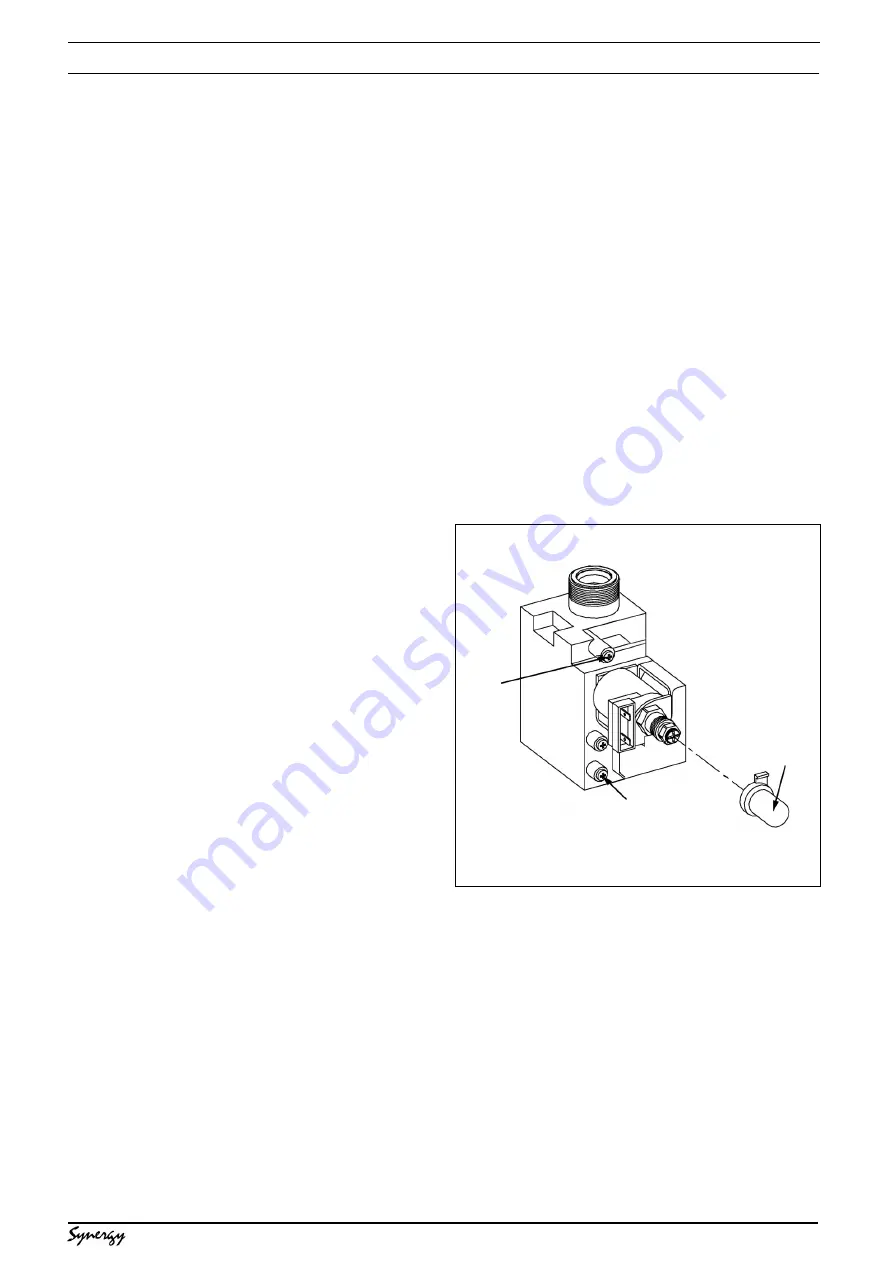
outlet test-point (see fig. 17). Light the boiler as
described in 5.6, allowing the appliance to
stabilise. Compare the reading on the manometer
with the value described in 2.3. If adjustment is
required, follow the detailed instructions in section
7 (7.3).
Once the burner pressure has been checked,
isolate the appliance from the electrical supply,
remove the manometer and tighten the gas valve
outlet test nipple.
5.8
FINAL FLUSHING OF THE HEATING SYSTEM
The system shall be flushed in accordance with
BS 7593. If a cleanser is to be used, it shall be
from a reputable manufacturer* and shall be
administered in strict accordance with the
manufacturers instructions.
*Both Sentinel and Fernox manufacture products
that have proved suitable for use with Vokera
appliances. Vokera Ltd. cannot comment on the
suitability of any other such product with our
appliances.
Fig. 17
Protective
cap
Outlet
test-point
Inlet
test-point
Содержание Synergy 29
Страница 1: ...Installation Servicing Instructions THESE INSTRUCTIONS TO BE RETAINED BY USER ...
Страница 40: ...38 Fig 45 ...


