background image

4 Data Logging 

Page 20 of 57 


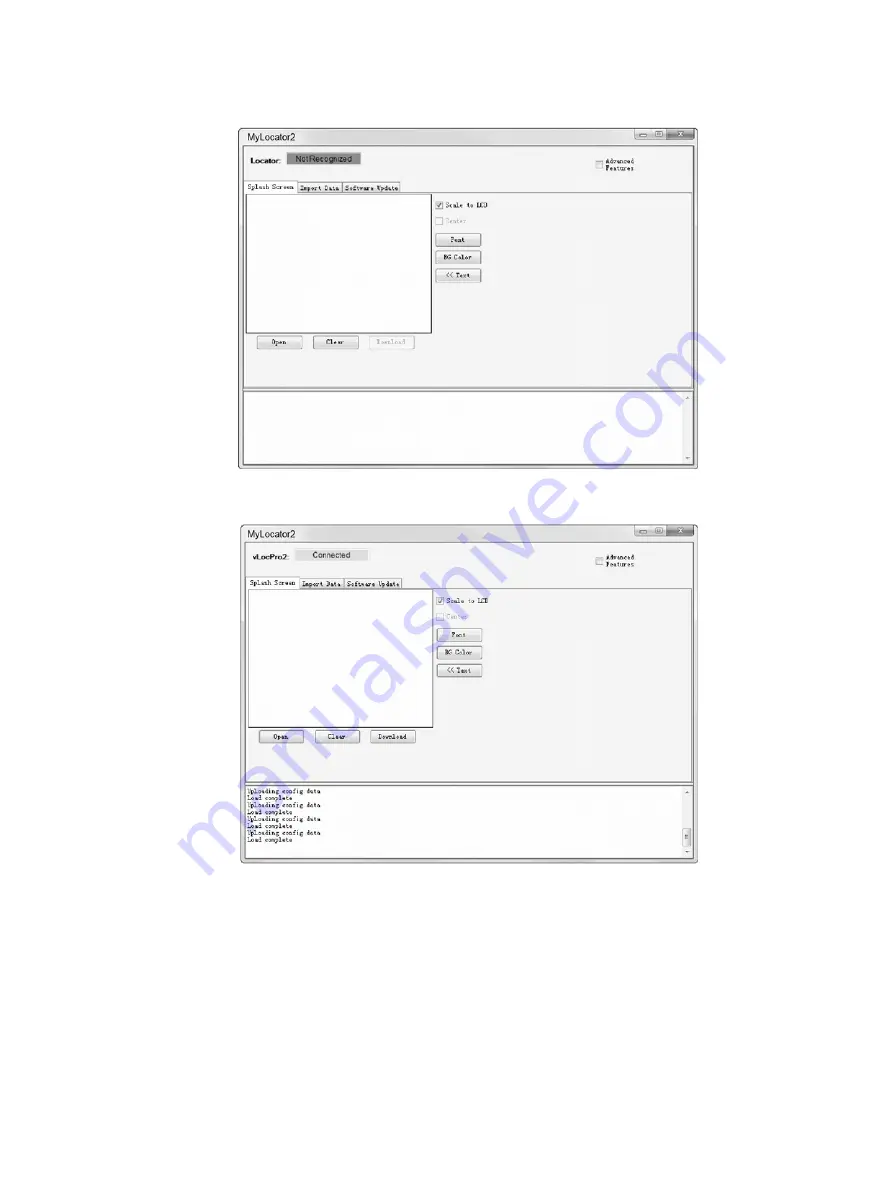
The basic operational screen is displayed below. This will change slightly depending on which tab is active. 


Connect the vLoc receiver to the PC using a USB to Mini USB cable. The PC should recognize the vLoc and 
the display will now change to the below or similar. 


It will now be possible to perform the three operations in the tabs shown. 


4.4.2 Splash 

Screen 

1.  Click the Splash Screen tab. Click on the “Open” button. Browse your computer to find the picture that is 

intended to be the splash screen. 

2.  The software will accept the following formats: JPEG, BMP, GIF, PNG, ICO. 

3.  Select the file and open. The screen below should now also contain a representation of the picture. 

4.  Press “Download” to transfer the file to the vLoc or “Clear” to remove the file. 

5.  Clicking on “Scale to LCD” will alter the aspect ratio of the picture to fully fill the screen. Leave this 

unchecked if no scaling is required. Check the “Centre” button to center the graphic on the screen. 

[email protected] |  13309 Beach Ave. Marina del Rey, CA 90292  | Phone: 800-WCT-PROD (800-928-7763)  |  Fax: 310-306-9343

Содержание vLoc-5000

Страница 1: ...Handbook English Edition Version V1 1 Toll Free 800 WCT PROD 928 7763 Local Phone 310 822 5212 Fax 310 306 9343 Email info wctproducts com Address 13309 Beach Ave Marina del Rey CA 90292 Website www w...

Страница 2: ...3 Service Support 4 2 1 Serial Number and Software Revision Number 4 2 2 Distributors and Service Centers Closest to You 5 vLoc 5000 Receiver 6 3 1 vLoc 5000 Receiver 6 3 2 Charging the Receiver Batt...

Страница 3: ...tion 24 4 4 9 Configuration Lock Dongle 24 4 4 10 Icon Summary 26 Loc 10TxSIS Transmitter 27 5 1 Loc 10TxSIS Transmitter Overview 27 5 2 Transmitter Battery 28 5 2 1 Removing the Battery Tray 28 5 2 2...

Страница 4: ...ion Precision Identification 45 6 4 Using the Accessories 47 6 4 1 Using the LPC Separation Filter 47 6 4 2 Using the A frame in Fault Finding 48 6 4 3 Using the Remote Antenna USB 50 Accessories Opti...

Страница 5: ...apter Optional 54 7 17 Loc 5Tx 10Tx Charger 55 7 18 Loc 10Tx Rechargeable Battery Tray 55 7 19 Loc 10Tx Alkaline Battery Tray 55 Glossary 56 info wctproducts com 13309 Beach Ave Marina del Rey CA 9029...

Страница 6: ...in the same battery pack do NOT mix old with new Never attempt to charge alkaline batteries 1 4 2 Nickel Metal Hydride Batteries Rechargeable When using rechargeable batteries use only the correct cha...

Страница 7: ...tteries responsibly 1 4 6 Transportation of Lithium ion and Lithium Metal Batteries The Lithium ion and Lithium metal batteries used in Vivax Metrotech products meet the required safety standards and...

Страница 8: ...tic field or pipe In the case of pipes this may be significantly deeper than the top of the pipe 1 7 American Canadian Safety Notices USA This transmitter and receiver comply with the general conditio...

Страница 9: ...Number NOTE The transmitter Model Serial Number can be found at the bottom of the transmitter and also inside the transmitter between the battery tray and the main module of transmitter Software Revis...

Страница 10: ...3 5597 Cromer NSW 2009 Australia Email applications vxmt com Tel 61 2 9972 9244 Service Repairs Fax 61 2 9972 9433 T Free 1 800 638 7682 Website www sebakmtaus com Tel 1 408 962 9990 Email sales sebak...

Страница 11: ...receiver 1 Optional Bluetooth Module 6 Charging Socket 2 Pushbutton Display 7 Mini USB Port Data Transfer and Software Upgrade 3 Carbon Fiber Reinforced Antenna Assembly 8 Accessories Port 4 Accessory...

Страница 12: ...ate red until the batteries are fully charged at which time the LED will change to green WARNING Rechargeable batteries are supplied with a mains or 12V DC charger These are specific to the batteries...

Страница 13: ...echargeable Battery Status 15 Gain Control reduce gain 5 Compass Line Direction Indicator 16 On Off Control 6 Distortion Indicator 17 Cable Position Indicator 7 db Gain Setting 18 Peak Signal Indicati...

Страница 14: ...efining the precise location of the target line The vertical green bar represents the underground utility and when shown on the left of centerline it indicates the target is also to the left Distance...

Страница 15: ...onses to the signals radiating from the buried pipes and cables The modes are 3 5 1 Peak Response Mode This uses the two horizontal antennas and provides a Peak or maximum signal response over the cen...

Страница 16: ...tive modes The color of the compass changed from clear to blue when the receiver is in line with the buried line Some users prefer the null response it works well in uncongested areas but is more pron...

Страница 17: ...lease refer to 9 1 3 3 7 Audio The visual display is also accompanied by an audio response The output level volume of this response is set by entering the Setup Menu Press and hold i pushbutton for 2s...

Страница 18: ...the i information pushbutton will display the depth to the center of the radiated signal and a measurement of the current press the pushbutton briefly remember if you press and hold you enter the set...

Страница 19: ...seconds to display the SETUP menu Use the to navigate through the various options and use the M pushbutton to select To exit the setup menu press the i pushbutton The setup menu allows the user to con...

Страница 20: ...ound at the back of the handle near the battery compartment 3 Remove the cover by sliding it away from the handle 4 Take the Bluetooth module and carefully slide it into the position the cover was occ...

Страница 21: ...before commencing a survey 4 2 1 Pairing with the vLoc 5000 Receiver 1 Switch on the M1200 and ensure it is within a couple of meters of the receiver 2 Pairing the M1200 with the receiver is achieved...

Страница 22: ...necessary to use the vLoc 5000 Configurator Tool This is a simple program that can be downloaded from the Vivax Metrotech web site at www vivax meterotech com The file can be found under the Support D...

Страница 23: ...Launch the application and switch on the GPS When connection is achieved a little satellite icon will appear in the middle of the top bar 1 From Skyplot select Setup 2 Now select GPS Settings 3 Selec...

Страница 24: ...ollowing is a guide to its operation but there may be subtle changes to screens etc However the guide should still give sufficient information for the user to navigate MyLocator2 4 4 1 Launch the Appl...

Страница 25: ...rowse your computer to find the picture that is intended to be the splash screen 2 The software will accept the following formats JPEG BMP GIF PNG ICO 3 Select the file and open The screen below shoul...

Страница 26: ...ete Should only take a second or two it will be possible to save the data 5 Press the Save As button 6 Browse your computer files to find the desired file location Name the file and use the Windows pu...

Страница 27: ...ow will start to activate showing the progress of the software installation When it is complete a message software upload complete will be shown both on the computer and locator screen 5 Note that the...

Страница 28: ...k the boxes that are required to be made available 4 Click on the pull down menu and select the settings required 5 Clicking on the Send Cfg icon will send the configuration to the locator 4 4 7 Switc...

Страница 29: ...ly with the settings from the configuration file 4 4 9 Configuration Lock Dongle A Configuration Lock dongle is available that allows lockout of features and functions so that operators are forced to...

Страница 30: ...he Locators configuration 3 Click on the Frequency tab 4 Uncheck all frequencies except 8 19 kHz 5 Check both boxes associated with 8 19 kHz as below 6 Double click on the Frequency tab to lock the pa...

Страница 31: ...iguration created by the operator to a file of your choice Either Send saves configuration to a locator or Get copy a configuration from a locator Clears a configuration created on the configuration t...

Страница 32: ...ched empty box indicates requested current level has not been achieved 2 Digital Read Out mA volts ohms 7 Low Power Indicator enabled automatically when battery becomes one bar 3 Loudspeaker Level 8 B...

Страница 33: ...n and give a short sharp tap of the battery tray on your hand Replace batteries with new batteries of the same type be sure not to mix old and new batteries Do NOT use rechargeable batteries in the al...

Страница 34: ...er Connect the mains charger to the charging socket on the side of the transmitter and connect the charger to a suitable mains socket The LED will show a red light indicating that the charge cycle is...

Страница 35: ...to a suitable ground a ground stake is provided with the transmitter An auxiliary ground lead is also supplied If the auxiliary ground lead is used the ground clip of the connection lead black clip i...

Страница 36: ...o cables that carry electricity be sure to follow your company s safety instructions and procedures Beware that if applied around a high voltage cable that cable may induce a current in the clamp caus...

Страница 37: ...ing used If the transmitter can supply the requested current the bar will turn black If the bar does not turn black improving the ground connections or wetting the ground where the earth stake in posi...

Страница 38: ...used when user wants to energize on user s target two frequencies at the same time Mainly it can be used when user is not sure which frequency can be impressed better into the target NOTE When using...

Страница 39: ...it is powered down this mode will be reset To activate it again after power up user has to follow the above procedures 5 4 Information When the i information pushbutton is pressed the display will sho...

Страница 40: ...te the line then switch to Peak mode to confirm the direction Pinpoint the line by carefully establishing the exact Peak position Then with the base of the receiver on the ground rotate the receiver t...

Страница 41: ...can transmit through some metallic pipes such as cast iron pipes which is why they are frequently used with sewer inspection cameras The procedure for Depth Measurement is the same as in line locatio...

Страница 42: ...walking in an arc the following method can be used Position the locator in the approximate vicinity of the Sonde as above Rotate the locator so that the compass is now pointing at 3 o clock Now step...

Страница 43: ...o transmissions These are generally in the range of 16 kHz to 22 kHz Passive location is used to search an area to see if buried metallic lines are present known as locating to AVOID It does not help...

Страница 44: ...nection leads are plugged into the transmitter WARNING Never make a direct connection to live cables carrying hazardous voltages Do NOT plug the connection leads into the transmitter before connecting...

Страница 45: ...Any dirt or corrosion on these ends will reduce the efficiency of the clamp WARNING ALWAYS follow the appropriate safety requirements mandated by safety legislation safety practice or your company s...

Страница 46: ...enerally but not exclusively done in the Peak mode using passive locating 6 3 5 Tracing a Buried Line Once a buried line is located it is generally necessary and a good practice to trace that line for...

Страница 47: ...do not the signal field is distorted and the depth measurement may be inaccurate Measure the depth of the buried line by pressing i pushbutton briefly to measure depth and current The depth should be...

Страница 48: ...this point and then slowly return to the peak position Continue past this position until the 50 mark is reached on the other side Mark this position Now measure the distance between these two points...

Страница 49: ...d or using a low frequency signal clamp SiS and SD cannot be applied using the Induction method Signal Select does not require phase setting to the transmitter but is generally better for short distan...

Страница 50: ...gnal Select modulation must be switched on for each frequency this is the default Even if multiple simultaneous outputs are on any or all can be selected to carry the modulated output For each transmi...

Страница 51: ...le results and to maximize the distance to the next synchronization point To synchronize the receiver to the transmitter at the beginning of a survey pinpoint the line very close to the transmitter be...

Страница 52: ...line will also appear as being in Sync with the target line When performing a reset take care to ensure that you have not strayed from the target line 6 4 Using the Accessories 6 4 1 Using the LPC Se...

Страница 53: ...or a dedicated resistance measuring device to confirm that there is a fault to ground The A frame will typically detect faults up to 2 mega ohm and above depending on the distance from transmitter so...

Страница 54: ...ode Eventually the A frame will detect the fault signal and the Fault Find arrow will point forwards Continue moving forwards it may be worth reducing the distance between measurements points as the f...

Страница 55: ...n using the signal clamp both ends of the target cable should be grounded Apply the clamp below the ground point Applying the clamp above the ground point will prevent the signal finding the return pa...

Страница 56: ...solated cables This process can be further enhanced if the cable is isolated and is of a twisted cable construction Method 1 Connect the transmitter to two of the cores of the cable At the far end sho...

Страница 57: ...d To power the transmitter from the 12V DC vehicle power lead connect the lead to the 12V DC input positioned on the side of the transmitter Plug the cigarette lighter plug into the vehicle cigarette...

Страница 58: ...ttery D23F 512 AA D23F 640 AA Sonde 1in 23mm x 18in 456mm long range 20ft 7m Flexible 3 section Sonde with optional 512Hz or 640Hz for use in cast iron pipes 1 x AA battery 7 8 Clamp Optional VX2 50 V...

Страница 59: ...an be considered as a backup battery pack It requires 6 x AA alkaline batteries 7 13 Ground Stake Standard Used to make an independent connection to the ground so as to complete the circuit when the t...

Страница 60: ...tery packs Supplied as standard with rechargeable battery option 7 18 Loc 10Tx Rechargeable Battery Tray NiMH rechargeable battery pack Only use the charger supplied 7 19 Loc 10Tx Alkaline Battery Tra...

Страница 61: ...a buried line Passive Locate A locate where the receiver searches for a wide range of signals that radiate from buried pipes or cables These signals come from a variety of sources in the environment a...

Страница 62: ...nual will inevitably show some resemblance to similar illustrations from other Manufacturers some manufacturers have given permission for the use of their graphics Vivax Metrotech Seba is given credit...

Страница 63: ..._____________________________________________________________ _________________________________________________________________ _________________________________________________________________ ______...

Отзывы: