SOLENOID VALVES
N O T F O R U S E O N H A Z A R D O U S O R C O R R O S I V E F L U I D S
August 2003 / BULLETIN 30-11
To insure peak performance, solenoid valves must be selected and
applied correctly; however, proper installation procedures are equally
important. The following instructions list the essential points for
correct installation.
An exploded view of a typical solenoid valve is illustrated in Figures
5, 5A and 6, page 4.
Position
— All standard solenoid valves may be mounted
horizontal, on its side or in a vertical line with the exception of the
following: A3 dated 6-86 or before, MA32, B33, OB33, MA42,
MA50, MA5A, MA17A, XWG, XUP, XRN, XRM and XPO series.
These valves
MUST
be installed in horizontal lines with the coil
housing no more than 45° from vertical, see table on page 2. The
direction of flow is indicated by an
arrow
or the word
IN
on the inlet
of the valve body. For heat pump applications, valve types C(M)E
and C(M)B are typically installed with the directional arrow pointing
toward the outdoor coil. Or, the
IN
connection toward the indoor coil.
NOTE:
Solenoid valves having a type number starting with the letter
"X" are Special Solenoid Valves (non-standard). Contact Sporlan
Valve Company, Washington, MO if valve mounting is in question.
SOLDER CONNECTIONS
Because of possible damage to valve components due to the high
temperatures of soldering and brazing, "B" Series Solenoid Valves
with brass connections are shipped handtight to facilitate
disassembly, with the exception of the (M)B33S2 & OB33S2. It is
necessary to completely disassemble these valves before any heat is
applied to the valve body. The following steps outline recommended
procedures when installing these valves.
Soldering Precautions
— Solder connections on Sporlan Solenoid
Valves are either copper or brass. Any of the commonly used types of
solder are satisfactory with these materials. Regardless of the type of
solder used, it is important to avoid overheating the valve.
The tip of the soldering torch should be large enough to avoid
prolonged heating of the connection during the soldering operation.
Overheating can also be minimized by directing the flame away from
the valve body.
Type A3S1, S4S1, S6S1, S7S1
1. Remove the coil assembly.
2. Locate the word
IN
or the directional
arrow
on the valve body.
3. Place the valve in the line, in the proper direction of flow, and
solder.
4. Replace the coil assembly and tighten coil hex screw.
Types B6, B9, B10, B14, B19, B25 Series (Brass Connections)
1. Remove the coil assembly, enclosing tube and nut, all internal
parts, and manual lift stem assembly.
2. Locate the word
IN
or the directional
arrow
on the valve body.
3. Place the valve in the line in the proper direction of flow and
solder.
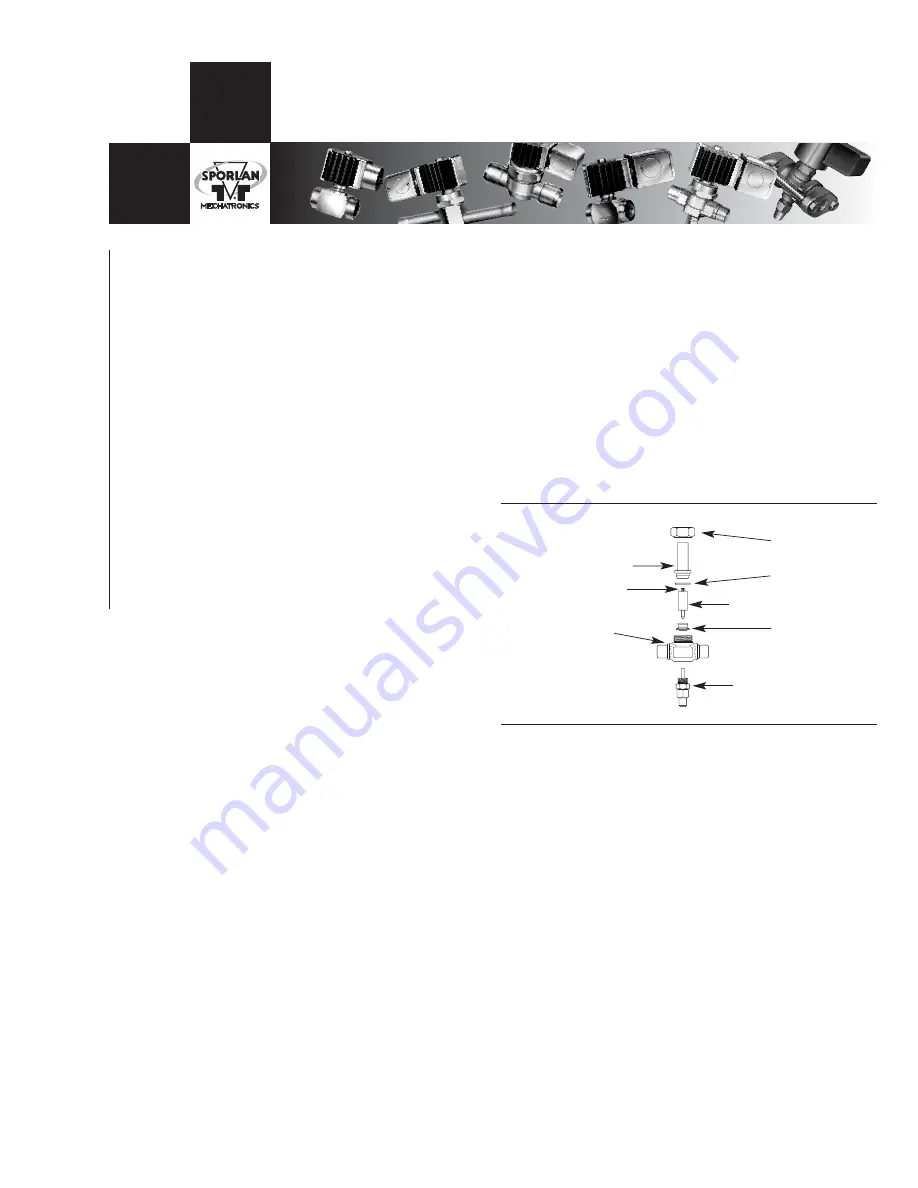
4. Re-assemble as follows, see Figures 1, 5, and 5A:
a. Place the seat disc into the valve body with the smaller
diameter end facing up.
b. Place the enclosing tube gasket onto the valve body above the
threads.
c. Hold the plunger with one hand so that the pointed end is
resting in the pilot port of the disk. Make sure the small spring
is in place on the top of the plunger.
(NOTE: Does not
apply to normally open and rapid cycle series.)
d. With the other hand, place the enclosing tube over the plunger,
making sure the enclosing tube gasket is in position.
e. Replace the enclosing tube locknut and tighten. (See
recommended torque in the table on page 2.)
Do not over
tighten.
f. Replace manual lift stem. Tighten lift stem assembly and seal cap.
g. Replace the coil assembly.
(NOTE: For normally open and
rapid cycle valves replace spacer and spacer cup
with coil assembly.)
NOTE:
Excessive tightening of the enclosing tube locknut can
damage the valve body bore. Please observe the torques listed on
page 2.
Types: All E Series (Extended Copper Connections)
Brazed into the line without disassembly because the valve contains
extended connections. Use caution by placing a wet cloth or chill
block on the extensions at the body to prevent excessive overheating.
Follow Type A3S1 installation instructions.
Enclosing Tube
Kickoff Spring
Valve Body
Enclosing
Tube Locknut
Enclosing
Tube Gasket
Stem and Plunger
Seat Disc
Manual Lift Stem
(if required)
■
Figure 1
I n s t a l l a t i o n a n d S e r v i c i n g I n s t r u c t i o n s
© C
OPYRIGHT
2003
BY
S
PORLAN
V
ALVE
C
OMPANY
, W
ASHINGTON
, M
ISSOURI
B
ULLETIN
30-11, A
UGUST
2003 S
UPERSEDES
B
ULLETIN
30-11, N
OVEMBER
2000
AND ALL PRIOR PUBLICATIONS
.
■
The molded MKC-1 coil fits the A3, E3, W3, S4, E5, B6, E6, S6,
W6, S7, R183, R184 and R246 series normally closed solenoid
valves.
■
The OMKC-1 coil fits the XWG, XUP and XXF series rapid
cycle solenoid valves.
■
The MKC-2 coil fits the B9, E9, B10, E10, B14, E14, W14, B19,
E19, W19, B25, E25, W25, B33, E33, E34, E42 series normally
closed solenoid valves and the 180 solenoid pilot control...
and all solenoid valves in the field that are equipped with
the old style KC-2 coil.
■
When changing from the old KC model coils to the current
MKC molded model coils, discard the coil housing, coil
housing bottom plate, two coil sleeves (not used with KC-1
coil) AND THE SPACER.
■
The OMKC-2 coil fits the OB9, OE9, OB10, OE10, OB14, OE14,
OB19, OE19, OB25, OE25, OB33, OE33, OE34, OE42 series
normally open solenoid valves and the XRN, XRM, XPO
series rapid cycle solenoid valves.
■
Other Sporlan Valve products using a molded coil are as
follows:
MKC-1 — OM-1, SORIT, 8D, 12D, 10G, SORIT-PI, 5D, SHGB(E)-8.
MKC-2 — 16D, DDR-20, SHGB(E)-15, OLDR-15 and OLDR-20.
OMKC-2 — LDR-15, LDR-20, XTM and XTO.
Содержание VSM 71-701
Страница 1: ...1 VPN 35391S February 2006 Rev 05 Price 60 00...
Страница 2: ...2...
Страница 20: ...20...
Страница 52: ...53 Pre Start Up Check List...
Страница 99: ...99 Recommended Spare Parts List...
Страница 104: ...104 Gate Rotor...
Страница 110: ...110 Main Rotor VSS...
Страница 112: ...112 Main Rotor VSR...
Страница 114: ...114 Slide Valve Cross Shafts and End Plate...
Страница 118: ...118 Capacity Slide Volume Slide Carriage Assembly Slide Valve Carriage Assembly...
Страница 134: ...134 Miscellaneous Frame Components VSS Screw Compressor VSR Mini Screw Compressor...
Страница 138: ...138 C FlangeAdapter Components 630 620 610 640 601 641 630 601 620 610 640 641 642 650 651...
Страница 140: ...140 Replacement Parts Tools...
Страница 144: ...144 GaterotorAssembly...
Страница 148: ...148 Main Rotor Slide Valve Cross Shafts and End Plate Models 71 401 Only Counter clockwise...
Страница 151: ...151 See Next Page for Models 501 701 Main Rotor Slide Valve Cross Shafts and End Plate V S M Parts List...
Страница 152: ...152 Main Rotor Slide Valve Cross Shafts and End Plate Model 501 701 Only Clockwise...
Страница 154: ...154 Volume Ratio Capacity Slide Carriage Assembly Slide Valve Carriage Assembly...
Страница 158: ...158 Miscellaneous Frame Components Model VSM 501 701 Model VSM 71 401...
Страница 160: ...160 Replacement Parts Accessories Housing Accessories C Flange Assembly...
Страница 166: ...166 Haight Pumps...
Страница 170: ...3 Refrigerating Specialties Division...
Страница 184: ...C A R T R I D G E H E A T E R S Hi Temp Cartridge heaters are designed for optimum performance above and beyond the norm...
Страница 236: ......
Страница 237: ......
Страница 238: ......
Страница 243: ......
Страница 244: ...168...


