background image

15 

 15 

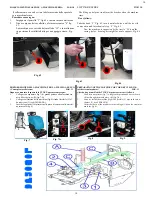
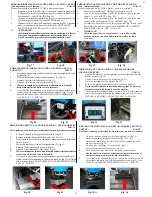
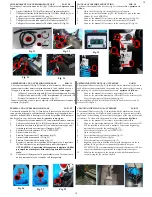
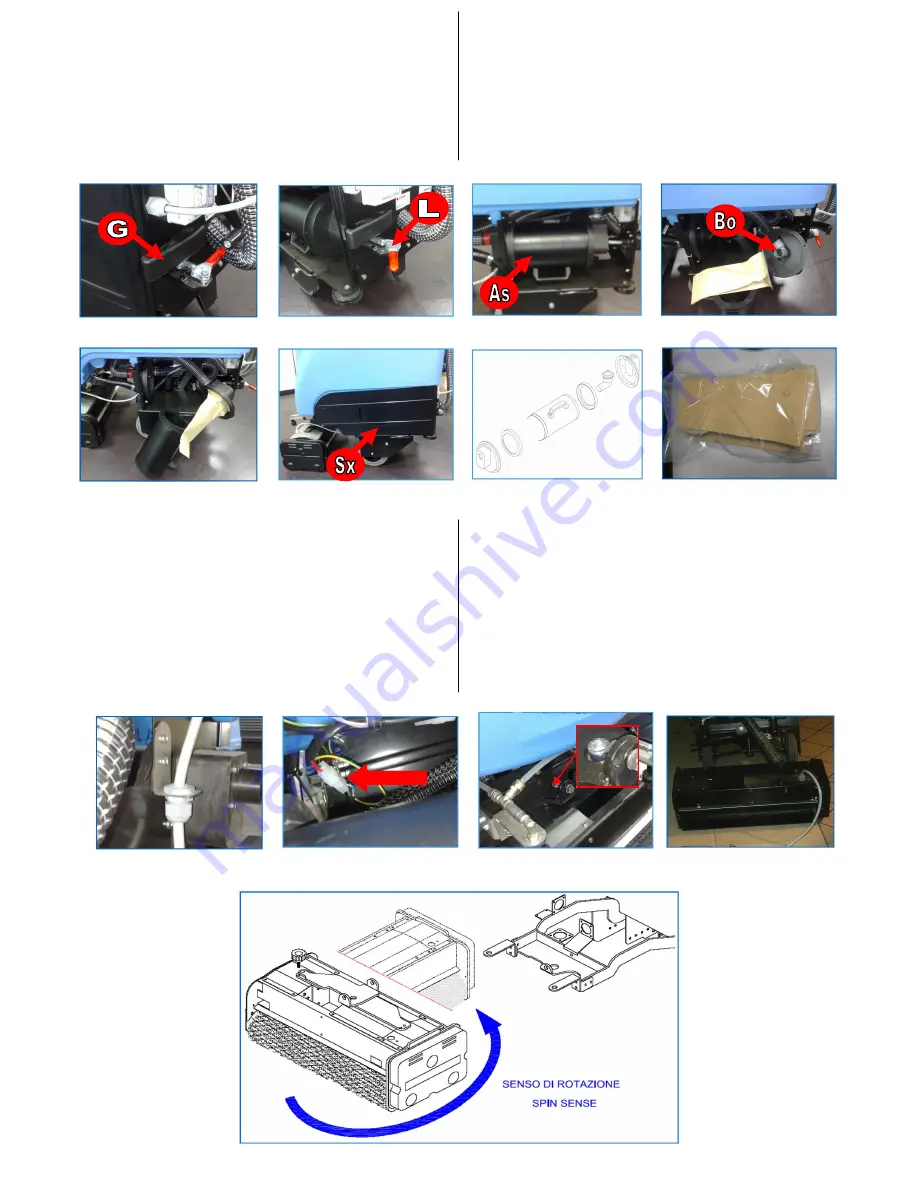
MONTAGGIO/SOSTITUZIONE FILTRO A SACCO              PAR. 23 

Per il primo montaggio o la sostituzione del filtro a sacco dell’aspiratore 
interno alla lavascale, 

operare come segue: 


1. 

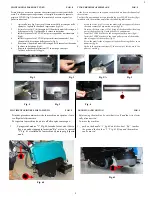
Rimuovere il fianchetto SX (fig.40) attraverso l’apposito gancio (G). 

2. 

Tirare la leva (L) (fig.36) per liberare l’aspiratore interno (As). 

3. 

Rimuovere il contenitore del filtro (fig.37). 

4. 

Inserire il filtro a sacco (fig.38) nell’apposito bocchettone (Bo). 

5. 

Rimontare il contenitore del filtro. 

6. 

Premere la leva (L) per bloccare l’aspiratore interno (As). 

7. 

Rimontare il fianchetto SX (fig.40) e bloccare il gancio (G). 

ASSEMBLAGE / SUBSTITUTION PAPER FILTER              PAR. 23 

For the first assemblage or the substitution of the paper filter of the inside 
aspirator of the machine, 

operate as it follows:  


1. 

Remove the SX side (fig.40) through the special hook (G). 

2. 

Throw (fig.36) the lever (L) to free the inside (As) aspirator. 

3. 

Remove the container of the filter (fig.37). 

4. 

Insert the paper filter (fig.38) in the special mouthpiece (Bo). 

5. 

Reassemble the container of the filter. 

6. 

Press the lever (L) to stop the inside (As) aspirator. 

7. 

Reassemble the SX side (fig.40) and stop the hook (G). 

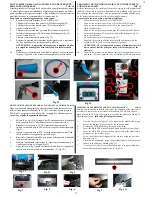
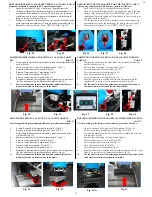
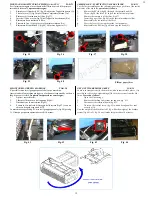
SMONTARE IL GRUPPO SPAZZOLE                          PAR. 24 

E' possibile smontare il gruppo spazzole dal corpo macchina.  
Questo renderà la macchina più leggera e facilmente trasportabile, anche nei 
luoghi poco accessibili. 

In questo caso procedere come segue: 


1. 

Aprire i carter laterali. 

2. 

Liberare il ferma cavo dal supporto (fig.41). 

3. 

Disconnettere la morsettiera (fig.42). 

4. 

Svitare la vite centrale di fissaggio della testata (fig.43 ) con una 
chiave a brugola esagonale di 10.  

La macchina ora peserà kg 65, mentre il gruppo spazzole (fig.44) pesa kg 

31. Il tempo per questa operazione sarà di 10 minuti.


GET OFF THE BRUSHES GROUP                                  PAR. 24 

In order to transport easily  the machine, also in inaccessible places, it is 
possible to relieve the weight taking off the brushes system from the Ma-
chine. 

Proceed as follows: 


1. 

Open the side casings. 

2. 

Remove the locking cable from the support (fig. 41). 

3. 

Disconnect the terminal board (fig.42). 

4. 

Unscrew the central screw (fig. 43) with an hexagonal key seat 
wrench of 10.  

Now the weight of the Machine is 65 Kg, while the weight of the brushes 
system (fig.44) is 31 Kg. You will make this procedure 10 minutes

.


Fig. 40 

Fig. 39 

Fig. 37 

Fig. 36 

Fig. 38 

Fig. 35 

Fig. 43 

Fig. 42 

Fig. 44 

Fig. 41 

Filtro - 

paper filter 


Содержание X51

Страница 1: ...la sua consultazione prima dell utilizzo della macchina USE AND MAINTENANCE USO E MANUTENZIONE This Manual should be considered as an integral part of the machine The User should consult the manual be...

Страница 2: ...WASHING SCALE 13 18 POSIZIONAMENTO PER LAVAGGIO LATO DX SCALA POSITIONING FOR WASHING RIGHT SIDE SCALE 13 19 ROTAZIONE TESTATA LAVANTE PER LAVAGGIO LATO SX ROTATING HEAD WASHING WASHING LEFT SIDE 13...

Страница 3: ...3 3 PAR 1 PAR 1...

Страница 4: ...4 4 PAR 2 PAR 2...

Страница 5: ...5 5 PAR 3...

Страница 6: ...6 6 PAR 4 PAR 4...

Страница 7: ...anutenzione il quale si impegna a leggerlo a custodirlo in luogo sicuro e a consultarlo pri ma di iniziare qualsiasi operazione sulla macchina stessa Le informazioni scritte in questo manuale sono fin...

Страница 8: ...e health For the maintenance and the recharge of the batteries you read with attention the specific instructions of this manual The reparations must be effected only by specialized person nel The oper...

Страница 9: ...le the grey TYNEX brushes fig 1 furnished with the machine and follow the following indications 1 Act on the lever fig 2 sets on the mobile side of support of the bru shes and remove the aspiration st...

Страница 10: ...e support Fig 64 Fig 62 Fig 63 Fig 64 PREPARAZIONE DELLA MACCHINA PER LA PULIZIA A SECCO Con aspiratore Esterno PAR 11 Dopo aver montato le spazzole in TYNEX operare come segue 1 Collegare un aspirato...

Страница 11: ...della scala stessa sia diretto verso la lavascale 8 Accertarsi che nei canali non vi sia pi polvere quindi aspirare tutti i residui rimasti sul piano tramite l accessorio manuale fig 13 collegato alla...

Страница 12: ...of disbursement is 0 8 bar to prevent that the detergent invade the inferior part of the staircase 10 Nebulize the product on the mobile staircase through the accessory gun spray P for a complete cycl...

Страница 13: ...fig 30 10 Mettere in funzione la scala mobile assicurandosi che il moto della scala stessa sia diretto verso la lavascale ROTATION WASHING HEAD AND ESCALATOR WASHING PART SX PAR 19 For the washing of...

Страница 14: ...piral pipe S fig 34 ASPIRAZIONE CON ACCESSORIO MANUALE PAR 21 L accessorio manuale H fig 31 fornito con la lavascale efficace per aspirare tutti i residui rimasti sul piano durante le fasi di pulizia...

Страница 15: ...pirator 7 Reassemble the SX side fig 40 and stop the hook G SMONTARE IL GRUPPO SPAZZOLE PAR 24 E possibile smontare il gruppo spazzole dal corpo macchina Questo render la macchina pi leggera e facilme...

Страница 16: ...one dell acqua pulita con il regolato re R fino ad ottenerne la giusta quantit fig 28 BRUSHES CLEANING PAR 25 With the accessory Tub inox fig 45 is possible to clean the brushes at fini shed work To p...

Страница 17: ...e spazzole e togliere la canalina di aspirazione fig 2 A 2 Aprire il fianchetto DX fig 49 attraverso l apposito sportello 3 Collegare all interno della macchina fig 51 il tubo flessibile A al bocchett...

Страница 18: ...ig 55 Fig 56 Fig 57 Fig 58 SVUOTAMENTO SERBATOIO SOLUZIONE LAVAGGIO PAR 30 La fig 58 raffigura il rubinetto per lo svuotamento Ap della soluzione di lavaggio dal serbatoio dell acqua pulita importante...

Страница 19: ...obstructions and clean the filter Clogged filter Clean or replace the filter The solution tank is empty Fill the solution tank The faucet of regulation is closed Open the faucet of regulation The mac...

Страница 20: ...u 1 mm Blue electric cable 1 mm TAS Tasto Motore Aspiraz Suction motor switch MSP Motore Spazzole Brush Motor R 1 Cavo Elett Rosso 1 mm Red electric cable 1 mm 230V 1 mm 110V 2 08 mm PWR Spia Luminosa...

Страница 21: ...21 21 IMPIANTO IDRICO PAR 36 WATER SYSTEM...

Страница 22: ...22 22 NOTE NOTES...

Страница 23: ...23 23...

Страница 24: ...24 24 VACLENSA PLC SERVICE HAUSE SHIELD DRIVE WARDLEY INDUSTRIAL ESTATE U K WORSLEY MANCHESTER M28 2QB TEL 0161 728 1800 FAX 0161 728 8310...

Отзывы: