


1-3-5
2DA/2DB-1
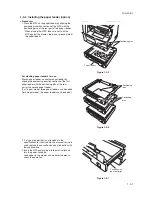
Install the original cover or optional DP.
1. Install the original cover or optional DP (see pages 1-3-9 to 1-3-12 when installing the DP).
Install the optional duplex unit.
1. Install the optional duplex unit as necessary (see pages 1-3-13 to 1-3-15).
Install the optional finisher or job separator.
1. Install the optional finisher or job separator as necessary (see pages 1-3-22 to 1-3-34).
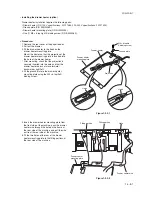
Install the toner container.
1. Open the front cover.
2. Tap the top of the toner container five to six
times.
3. Shake the toner container approximately 10 times
in the horizontal direction to stir toner.
4. Turn the toner container release lever and gently
push the toner container into the MFP.
* Push the container all the way into the MFP until
it locks in place.
5. Restore the toner container release lever.
6. Close the front cover.
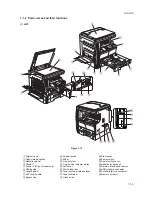
Toner container release lever
Toner container
Figure 1-3-4
Connect the power cord.
1. Connect the power cord to the connector on the MFP.
2. Insert the power plug into the wall outlet and turn the power switch on.
Installing the toner (maintenance item U130).
1. Enter the maintenance mode by entering “10871087” using the numeric keys.
2. Enter “130” using the numeric keys and press the start key.
3. Select the “EXECUTE” using the up/down cursor keys.
4. Press the start key to execute the maintenance item.
Installation of toner starts and time (minutes) is indicated until the installation ends.
5. When the installation is complete, “FINISHED” will be displayed if the installation is successful or “NG” will be
displayed if it has failed.
If “NG” is displayed, check to see if the toner container contains toner and to see if the toner container sensor
malfunctions and then try again.
6. Press the stop/clear key.
Load paper.
1. Load paper in the drawer.
Содержание cd 1116
Страница 1: ...Service Manual Copy CD 1116 CD 1120 Rev 1 ...
Страница 2: ...Service Manual Copy DC 2116 DC 2120 Rev 1 ...
Страница 4: ...This page is intentionally left blank ...
Страница 247: ...2DA 2DB 1 2 3 2 Figure 2 3 2 Power source PCB silk screen diagram 220 240 V AC 120 V AC ...
Страница 264: ...2DA 2DB 1 2 3 19 Figure 2 3 10 Operation unit PCB silk screen diagram ...


