


2DA/2DB-1
1-6-50
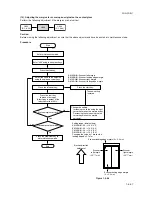
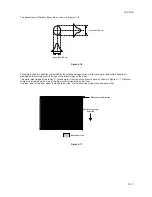
(8) Adjusting the fixing unit height (adjusting lateral squareness)
Follow the procedure below if the drum is not parallel to the fixing unit and therefore paper is not fed straight to the fixing
section and the trailing edge of image on either the front or rear side becomes longer.
Procedure
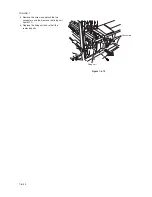
1. Remove the front left cover 1 and 2 (see
pages 1-6-43).
2. Remove the screw and then remove the
stopper.
3. Loosen the screw holding the fixing unit.
4. In the case of copy example 1 (the trailing
edge of image of the machine rear side
becomes longer): Place the fixing unit on the
third step from the bottom of the spacer to
adjust the spacer position (height adjustment
of +0.5 mm).
In the case of copy example 2 (the trailing
edge of image of the machine front side
becomes longer): Place the fixing unit on the
first step from the bottom of the spacer to
adjust the spacer position (height adjustment
of -0.5 mm).
5. Retighten the screw holding the fixing unit
and refit the stopper.
6. Refit all the removed parts.
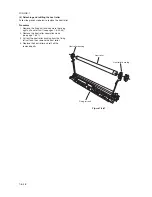
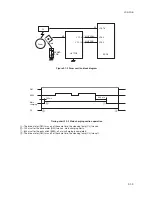
Spacer
Screw
Stopper
Original
Copy
example 1
Copy
example 2
Fixing unit
Spacer
Stopper
Height adjustment: 0 mm
(Second step from the bottom)
Height adjustment: -0.5 mm
(First step from the bottom)
Height adjustment: +0.5 mm
(Third step from the bottom)
[Cross section viewing from the right side of the machine]
Figure 1-6-90
Figure 1-6-91
Figure 1-6-92
Содержание cd 1116
Страница 1: ...Service Manual Copy CD 1116 CD 1120 Rev 1 ...
Страница 2: ...Service Manual Copy DC 2116 DC 2120 Rev 1 ...
Страница 4: ...This page is intentionally left blank ...
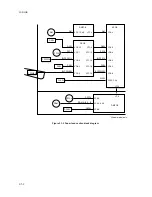
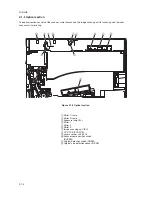
Страница 247: ...2DA 2DB 1 2 3 2 Figure 2 3 2 Power source PCB silk screen diagram 220 240 V AC 120 V AC ...
Страница 264: ...2DA 2DB 1 2 3 19 Figure 2 3 10 Operation unit PCB silk screen diagram ...


